Flying High With Electric Power!

The Ampeer ON-LINE!
August 2009
The Club Newsletter of the Electric Flyers Only, Inc
AMA Charter 2354
Walled Lake, MI, USA

Editor: Ken Myers

Fly the Future - Fly Electric!

What's On This Site:
Site Table of Contents

President:Vice-President:Secretary/Treasurer:
Ken MyersRichard UtkanRick Sawicki
1911 Bradshaw Ct.240 Cabinet5089 Ledgewood Ct. W.
Commerce Twp., MI 48390Milford, MI 48381Commerce Twp., MI 48382
(248) 669-8124(248) 685-1705248.685.7056
Board of Directors:Board of Directors:Ampeer Editor
David StacerJack LemonKen Myers
16575 Brookland Blvd.8908 Sandy Ridge Dr.1911 Bradshaw Ct.
Northville, MI 48167White Lake, MI 48386Walled Lake, MI 48390
248.924.2324248.698.4683248.669.8124
Mailed Ampeer subscriptions are $15 a year US & Canada and $20 a year world wide. FREE on-line!
The Next Flying Meeting: Date: August 1 Time: 10:00 a.m.
Place: Midwest RC Society 7 Mile Rd. Flying Field, Salem Twp., MI

What's In This Issue?
RC Advisor's ModiFly The Myers' ModiFly The June EFO Flying Meeting Own a Bob Aberle Review Plane
Upcoming E-vents
Send Ken email

Ampeer Paper Subscriber Reminder

     When subscribing to or renewing the paper version of the Ampeer, please make the check payable to Ken Myers. We do not have a DBA for the Ampeer or EFO. Thanks, Ken

     The 2009 Mid-Am Coverage will be in the September Issue

RC Advisor's ModiFly:
Design and Build From Scratch Your Own Flying Model Airplane In One Day For Just $5
A Review and More
By Ken Myers

     The creator of "Brainy Calculator" at www.rcadvisor.com, Carlos Reyes, has a new, follow-up book coming out on the heals of his successful RCadvisor's Model Airplane Design Made Easy.
     Carlos' new book allows you into the head of a model airplane designer. Carlos describes, in detail, the goal considerations of his design and how he met them or modified them as the design took final shape.
     By following the book's examples, you can create your own "new", successful RC flying model from scratch. Modify the ModiFly to your liking and be successful.
     The majority of the model's airframe is built with materials that are gathered from "common", everyday sources with no hobby shop required. When I created my version, the only item I purchased from a hobby shop was 0.039-inch Music/Piano wire.
     Of course the power system and onboard radio components were purchased from typical sources including the local hobby shop and online suppliers.
     Chapter 1 takes the reader step-by-step through the design process and goals for this type of flying model. Chapter 2 describes the prototypes that were rejected and reasons why and demonstrates why the winner is the Winner. Chapter 3 lists all of the materials needed and where to purchase them. Chapter 4 leads the reader through the building process with well-documented photos and how-to text, as well as great tips. Chapter 5 covers the flying of the model and includes where to fly, the preflight procedure, tips on hand launching, and repairs. Chapter 6 covers enhancements like painting and decorating, a removable wing option, adding landing gear, mounting a camera, and making it sort of scale, Chapter 7 discusses possible variations which might include; free flight glider, basic trainer, slow flyer, motor glider, slope soarer, 3D aerobatic, combat, and pylon racer. Chapter 8 includes Carlos' suggestions for making it your own. (Which you'll see I did!)
     As I read through various drafts of the book that Carlos was kind enough to send me, and exchanged emails with the author, my appetite was whetted for this type of model. I've never built anything like it in my modeling career, so I thought, "Why not? I just might learn something new."


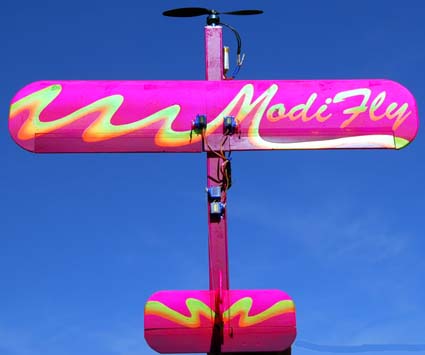
Photo from RC Advisor's ModiFly book

What I Learned from This Book

   1.) The wing uses a KFm1, bottom-stepped, flat-plate type airfoil. I was only aware of the KFm family of airfoils from Carlos' first book.

   2.) All 1/8" dowel is not really 1/8" in diameter. The book lists the actual diameters of various 1/8" dowel found at local sources.

   3.) Foamboard is a good source of foam sheets.

   4.) I learned the best, cheapest way to remove the "board" from the foam of Foamboard is to soak it in the bathtub for a few hours and then peel and "roll" the paper off finishing up by rubbing the foam with an old tee-shirt to remove the remaining paper. Carlos gives other tips and other ways of doing it in the book.

   5.) You can't count on one source having everything you need to complete any project, whether it is material for the airframe, or the onboard radio components, or the power system components. Plan ahead!

     Using Carlos guidelines, tips and ideas, the Myers ModiFly took shape in my mind and on "paper."

A Press Release from Carlos

     Here is some information from the author. KM

     How does an original model airplane design get created?
     I've always wanted to read a book that answered that question. A book that takes me by the hand and shows me how it's really done. One that tells me not just the what and the how, but also the all-important why. Since nobody had ever written such a book, I decided I had to do it myself. This is that book. Experience firsthand the joys of building and flying your very own model airplane design. Put into practice the lessons from my previous book, RCadvisor's Model Airplane Design Made Easy. Follow along as we design, build, and fly a modern radio-controlled model airplane.

DESIGN GOALS

     Incorporating the latest innovations and research results, the design is deceptively simple in appearance. However, 20 prototypes and 15 hours of flight-testing were required before a design finally met all the goals:
* Build it in just one day for less than $5.
* A joy to fly with no bad habits.
* Sturdy enough to survive hard landings.
* Build either a park flyer or an indoor slow flyer.
* New pilots can fly it without ailerons.
* Easy to build for new scratch builders.
* Kid-friendly free flight glider version.
* Use inexpensive electric power systems and radio gear.
* Great starting point for your own unique designs.

     You can easily find the construction materials for the airplane at local discount or craft stores. So what are you waiting for?

DESIGN PROCESS

     The book starts by describing the goals and the long prototyping process that led to the final design. Along the way you get to see firsthand the challenges that creating an innovative design presents. Learn the reasoning behind all the decisions that led to this unique design.
     While it is a stand-alone book, RCadvisor's online model airplane calculator and my first model airplane design book complement it nicely.
     Picking up where that book left off, it takes a very pragmatic approach to the entire design process.

ADVANCE PRAISE

"This is absolutely A MUST READ!" - Bob Aberle

"I am so excited about the design that I just have to build one to try it out." - Ken Myers

"Carlos kicks out another winner with this one." - Jamie Burke

"Even if you have some model airplane design experience, you are likely to learn something from this book. I know I did." - Paul Bradley

"Carlos Reyes has done it again!" - Richard Kline

"Lots of great info!" - Michael "Crash" Hancock

"Carlos' latest book is like a well written mystery novel." - Red Scholefield

SPECIAL OFFER

     The book is just $19.95. That is a lot less than the price of a new kit! As a bonus, I'm including a *free* six month subscription to the premium features of the calculator. That is a $12 value! This subscription unlocks the optimizer and all the other advanced calculator features. Current subscribers can extend their subscription for another six months with this offer.

FLIGHT PACK

     As a service to the RCadvisor community, I'm making available flight packs suitable for the model described in the book. These are the same high quality components I used in all my flight-testing:

* HXT 5 gram micro servos (4 each)
* Flightmax 500 mAh 2S1P 20C LiPo battery packs (2 each)
* Turnigy 10A speed controller
* Turnigy 24 gram brushless outrunner motor
* Slow flyer 8x3.8 propeller
* Prop saver and other connectors

     The price of the flight pack is just $74.95, a real bargain. Bonus: for a limited time, I'm adding an extra propeller for a total of two.

BONUS STICKERS

     While supplies last, I'm throwing in free high quality vinyl stickers with every order. They are three-inch high copies of the RCadvisor logo in full color. The vinyl is only 0.002 inches thick and is self-adhesive. They look great!
<www.rcadvisor.com/products>

Carlos Reyes
www.RCadvisor.com founder

Return to "What's In This Issue"

The Myers' ModiFly

     I MUST make it clear that the following was purely optional on my part. Everything you need to know and do is in the book! The following is just my way of having fun.
     As I read through the construction of the ModiFly, I worked with my CAD program to see just how the parts came together. Once I had Carlos' basic idea drawn, I started my modifications and then made the parts layout for the foamboard.


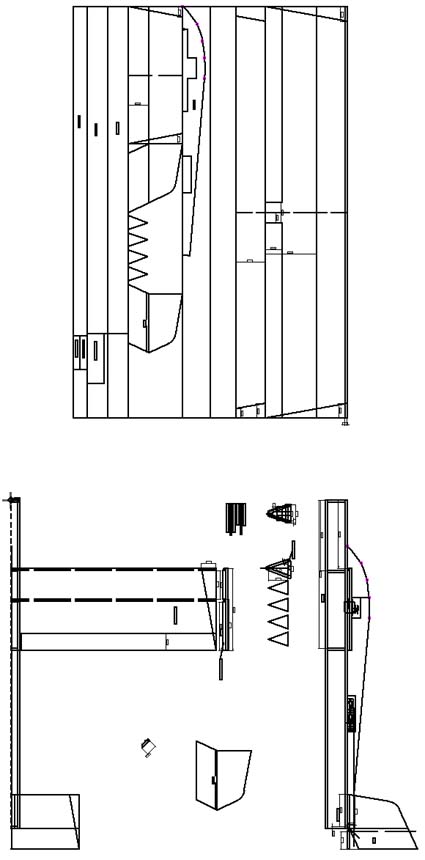
     Also, while I was drawing up the parts in CAD, I created a spreadsheet to see about how much the completed airframe might weigh.

     Once the airframe was completed and covered, I added the finished weights to the spreadsheet.
     Carlos recommends a specific power system in the book and is offering it as a part of his packaged deal. (See his press release above.)
     Carlos' power system, ESC and servo package was not available when I created my version of the ModiFly.
     Like all things in life, you have to make choices. I am having great success with Scorpion motors, so I looked at the smallest series they have. It is the S-2205 series that weighs 32g. I played with the numbers for the various winds in Drive Calculator (www.drivecalc.de) and decided on the S-2205-40 1550Kv motor (more on that later).
     I decided that I wanted to try and get all of my onboard radio system and power system components from one source, Todd's Models, since he appeared to have all the items that I wanted.
(www.toddsmodels.com)
     While I know that there are cheaper Li-Poly batteries available, Todd's carries the Thunder Power brand. I chose a TP Prolite V2 TP480-2SJPL2 Li-Poly Battery. Todd's Models gives the weight as 28g. I chose this pack because it has a balance node connector, which I feel is essential on all Li-Poly batteries, and it is also required by my FMAdirect CellPro 10S.
     I added to my order what I thought were the most appropriate props for the S-2205-40, 3 Hitec HS-50 servos (I wanted to use 3 servos instead of 4), a Spektrum AR6100 receiver and a Castle Creations Thunder Bird 9-amp ESC.
     Later that day I received a courtesy call from Todd letting me know that he did not have the motor that I wanted in stock. Thanks for that call Todd. That was very thoughtful!
     I played around with Drive Calculator once again and changed the goal or mission for my version to a "sports car" ModiFly. I decided to go with the S-2205-32 1980Kv.
     I ordered it, along with what I thought were the appropriate props from Dan at Go Brushless (www.gobrushless.com), another of my trusted suppliers.
     I completed the plane while the electronics were in route.
     It should be noted that I had great service from both suppliers and highly recommend them.
     The first thing I did when I received my new Scorpion S-2205-32 was the drill press test for the Kv. I found it to have a 2002Kv. That was a little higher than I had planned on.
     The motor was attached to the motor mount of the completed airframe with four wood screws and washers behind the top of the "+" mount on each side of the top for down thrust. The motor with its "+" mount, bullet connectors, four wood screws, four washers, Cox 6x4 prop and collet type prop adapter, not wobbly, weighed 48.45g/1.7 oz.
     Using my Emeter II, I gathered the following information about the motor and entered my data into Drive Calculator.

No Load

Partially charged 2S1P Li-Poly average -
7.56 volts 0.82 amps 14,828 RPM
Kv = 1961 (using no load volts & RPM)

Fully charge 3S1P "A123" 2300mAh average -
10.044 volts 0.88 amps 19734.4 RPM
Kv = 1965 (using no load volts & RPM)

     Scorpion states that the Kv is 1980 and Innov8tive Designs says 1979. It looks like we are all playing in the same corner of the sandbox.

Prop Data Averages

     Note that all of the prop data was gathered from the same charge on the battery and does not illustrate the maximums with any particular prop, except the APC 7x4E that was the first one to be tested.
     Just the raw data was required to input the numbers into Drive Calculator. Five data collections were made for each prop and then averaged. That is why you'll see a decimal point in the RPM and thousandths in the volts.

GWS 7x3.5 DD: 7.27 volts, 6.42 amps, 11413.2 RPM, pitch speed 37.8 mph, system eff. ~70.6%

Cox 6x4 Gray: 7.128 volts, 6.94 amps, 10857.6 RPM, pitch speed 41.1 mph, system eff. ~69.2%

APC 6x5.5E: 6.948 volts, 7.56 amps, 10172.2 RPM, pitch speed 53 mph, system eff. ~67.2%

APC 7x4E: 7.404 volts, 9.92, amps, 9825.8 RPM, pitch speed 37.2 mph, system eff. ~61.9%

Safety and Longevity Specing the Power System Using the 80% Rule

Motor: Max. Cont. Current 12 amps * 0.8 = 9.6 amps
ESC: Max. 9 amps * 0.8 = 7.2 amps
Battery: Max. C = 20 * 0.8 = 16C, 0.480Ah * 1.6 = 7.68 amps
Capacity to be used: 480mAh x 0.8 = 384mAh

     The numbers suggest that the GWS and Cox props can be used and should provide a good safety and longevity margin. The numbers for the APC 6x5.5E also suggest that I may want to give it a try for the "full sports car" version if I am willing to risk some of my investment. Obviously, the APC 7x4E should not be used.
     While doing the prop tests, I noticed that the Cox 6x4 had a great deal more pull than the GWS 7x3.5DD, so I decided to start with the Cox prop. I recharged the pack. To allow for the quick drop in voltage on a freshly charged pack, I gathered 6 data points at approximately 5-second intervals and averaged the results; 7.50 volts, 7.57 amps, 11,257 RPM. I then compared those actual numbers to what Drive Calculator predicted; 7.5 volts, 7.6 amps, 11,238 RPM. I'd call the DC model pretty good!
     With these numbers the pitch speed is 42.6 mph, Watts in 56.7, Watts out ~38.8 for a system efficiency of ~68%.
     A hole was "melted" into the wing and fuselage top for the aileron servo using a soldering iron. I measured and marked where the servo was to be placed, cut craft sticks to outline the hole and act as a guide for the soldering iron tip, used spray adhesive to hold the craft sticks in place and melted out a perfectly fitting hole for the aileron servo. I also "melted" out a small hole in the fuselage side for the aileron servo lead to pass through.
     I mounted the aileron servo into the snug hole with clear silicone adhesive holding the servo in place using the tabs on the servo that would normally have screws through them. The aileron push rods were fabricated using 0.039" music wire with "V" adjustments for fine-tuning and attached to the homemade control horns that are epoxied into the ailerons. The rudder and elevator push rods were fabricated in the same way and then the servos were attached to the top of the fuselage using double-sided tape. This allowed the rudder and elevator to be in neutral when attached to the top of the fuselage. The Hitec HS-50 servos, with the small "+" arms and screws weighed 7.1g each. I used 26-3/16" of music wire to create the push rods with a total weight of 3.93g. The completed canopy/turtle deck was then glued onto the top of the fuselage with Titebond.
     Velcro was added to the battery, and the battery pressed into position. With its two cutoff APP connectors and Velcro (both on the battery and what went on the fuselage as well), the battery weighed 33.45g/1.18 oz.
     Finally, the Spektrum AR6100 receiver (3.75g) and Thunderbird 9 ESC with 3 bullet connectors and two cutoff APP connectors (13.15g) were double side taped to the right fuselage side. Small cable ties were used to "neaten" up the wiring.

The Ready To Fly weights:
Completed Airframe: 110g/3.88 oz.
Power System w/ESC: 95.05g/3.35 oz.
Receiver, servos, push rods: 28.98g/1.02 oz.
Total: 234.03g/8.26 oz.
Actual Measured weight: 235.1g/8.29 oz.
Actual Measured weight w/lateral balance nails: 240.05g/8.47 oz.
Wing Area: ~174
Area Wing Loading: 7.00 oz./sq.ft.
CWL/wing cube loading: 6.38 oz./cu.ft.
(typically park flyer near heavy end of range)
Watts in (Cox 6x4) measured: 56.7
Watts in per lb.: 107
RPM (Cox 6x4) measured: 11,257
Pitch Speed: ~42.6 mph
Stall Speed: ~9.8 mph
Pitch Speed to Stall Speed Ratio: 4.35:1

My Modifications

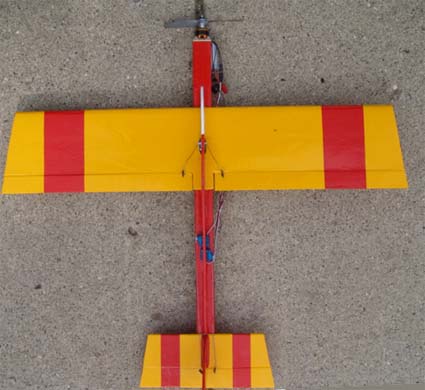
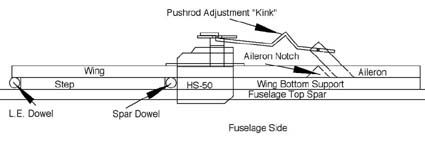
1. Top Flite Econokote was used to cover the airframe and make folded hinges for the ailerons, elevator and rudder.

2. The wing step width was reduced to 2-1/8" to allow for some setback of the leading edge dowel.

3. Water thinned Titebond Original Wood Glue was used for laminating, 30-minute Epoxy for attaching the wing, horizontal stab, vertical stab and motor mount to the fuselage and Titebond to attach the canopy/turtle deck.

4.) I chose a completely different "mission goal" for my version with a totally different power system.

5.) I chose a different brand of servos and ESC.

6.) I used 3 servos instead of 4.

7.) Push rods with "V" bends were used to allow for field adjustments of the trims. I prefer to adjust the flight control surfaces and keep the trims neutral on the transmitter.

8.) The wing tips, horizontal stab/elevator and vertical stab/rudder were angled instead of rounded.

9.) The aileron width was changed to 1-1/4" because they extend to the tips.

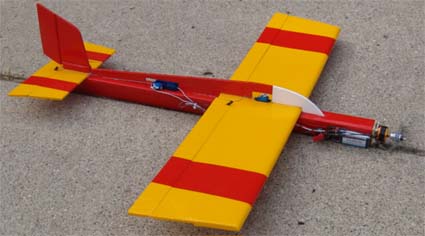
     If I were to do the plane over again today, I would use a Scorpion S-2205-36 1750Kv motor. Using the -36 would allow me to use a wider selection of 7- and 8-inch diameter props that are available today. The Cox 6x4 is no longer available. I would move the rudder and elevator servos back one inch.

Flying

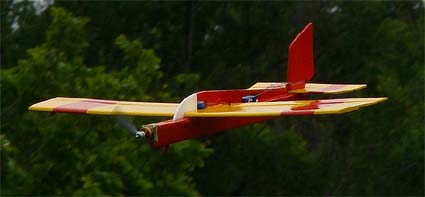
     The Myers' ModiFly was maidened on July 4th. It was a great day for a maiden. The slight breeze was variable, but it was usually right down the runway, and the temperature was in the low 70s. I had my flying buddy, Jim M., hand launch it for me. It headed pretty quickly towards the ground, but a yank on the stick brought it up and flying. Most of the first flight was spent trimming it out. It flew fine, but I wanted to get it trimmed well so that I could adjust the push rods when I landed. I set the timer for 3 minutes and the landing was easy and uneventful.
     I tweaked the control rods and removed the motor's down thrust for the second flight. My version flew much, much better with no down thrust.
     I flew 4 more flights, setting the timer for a minute longer for each flight and then checking the capacity returned to the pack by the CellPro 10S. The last flight was for 7 minutes. A recharge after that flight showed that 425mAh was returned to the pack. The average amp draw for that "typical" flight was 3.64 amps. Since I only want to remove about 380mAh from the pack, I am using 6 minutes and 30 seconds as my flying time.
     The plane flew well and I did most of my usual sport maneuvers; stall turns both directions, inside loops, outside loops, consecutive rolls in both directions, snap rolls in both directions, avalanche, inverted flight, Immelmann turns, split "S"s, slow flight figure 8Ős and Cuban 8's. I tried to spin it twice, but I don't think I got it fully stalled either time, as it never really "broke" into a spin, but it just did a downward spiral.
     One July 5, I put four more flights on the plane. I found the plane easier to hand launch at about 2/3 throttle. I also found out that flying with all surfaces on Low Rate on the Spektrum DX5e gave me a smoother flying plane.
     When I returned home, I decided to laterally balance the model, to see if I could get it to fly more precisely. I added one 8D 2-1/2" finishing nail and one cut to 2" to achieve the lateral balance. The 2.5" nail weighed 2.35g and the cutoff 2" nail 1.9g for an additional 4.25g to the RTF weight.

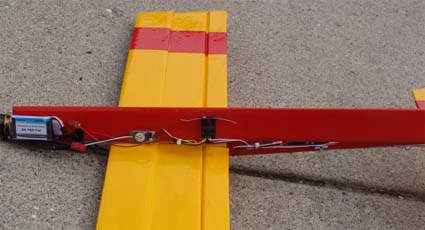
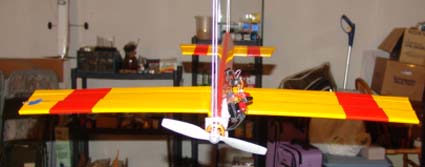
     The photo shows the whole nail already inserted into the foam of the left wing tip and the partial nail taped on to check the balance. Both nails were inserted just ahead of the spar dowel, very close to the CG.


Close up of inserted nail & partial nail

     I took the laterally balanced plane to the field on July 8 for five more flights. It is flying much better now and does not have a tendency to corkscrew out at the top of loops.
     All in all this little plane has been a very pleasant experience and well worth the build.

Return to "What's In This Issue"

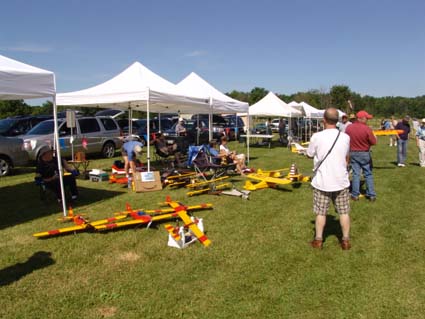
The June EFO Flying Meeting

     The June EFO flying meeting was scheduled for June 20, but it was a rainy, windy Saturday. The meeting was rescheduled to the June 27 and it could not have been a more perfect day!

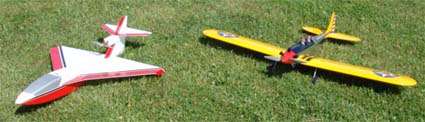
     Denny Sumner had out his new, all foam "North Star" for its maiden. It flew great! His Ryan's Daughter kept it company at the field.

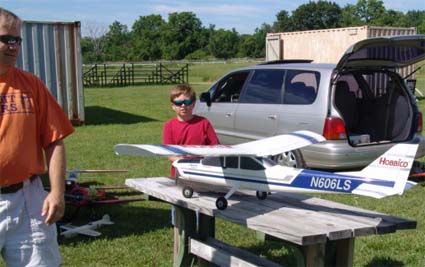
     Jim and Tim Young had a lot of fun flying Tim's trainer.

     Jim also had several of his fantastic flying planes with him on this perfect flying day.

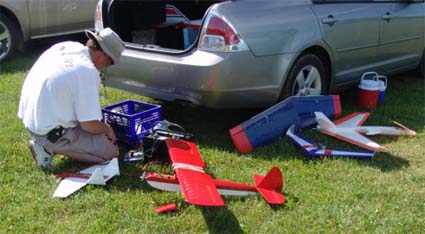
     Dave Stacer brought along quite a few planes as well. His SR Batteries AcroPro is in the front with several "foamie" wings. The ElectroFlying Fusion was about to be unloaded from his Ford Fusion.

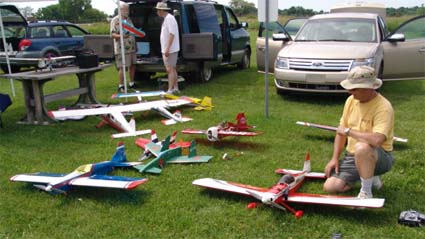
     Rick Sawicki had his fleet out as well.

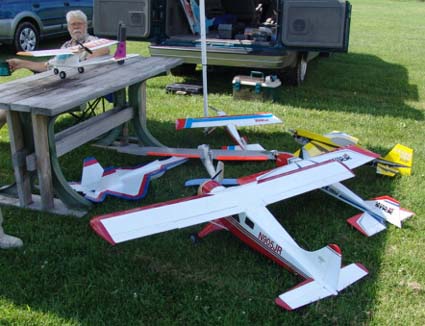
     It certainly was a day for fleets, as Paul Sockow looks over his.

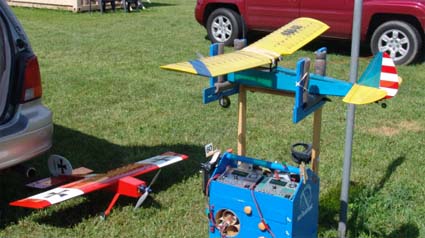
     Roger Wilfong flew the heck out of his SR Batteries Cutie and ElectroStick.

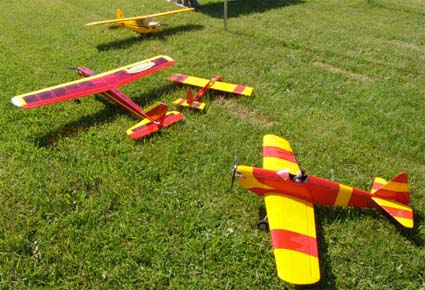
     Ken Myers had out his Fledgling trainer for use by student pilots. He also brought along the finished ModiFly airframe and his Son of Swallow.
     John Quisenberry flew his E-Flite J-3 Cub. It is a fine flying plane and fairly decent trainer.

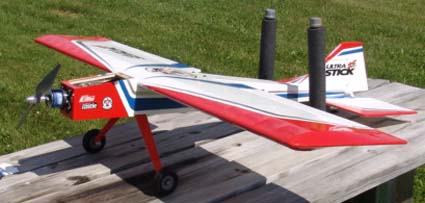
     Jesse had his Ultra Stick 25e up for several flights.

     Jim Lapham grilled us hot dogs for lunch and we washed them down with lemonade. What a nice and welcome surprise! Thanks Jim!
     Richard Utkan and Jim Maughan also brought out several planes and had a great time flying them. Jim really loves his Mountain Models Senior Switchback.
     No one wanted the day to end. It was absolutely wonderful. This is a great hobby and a fantastic way for a group of folks with a similar interest to get together.

Return to "What's In This Issue"

Own a Bob Aberle Review Plane
From Bob Aberle baberle@optonline.net
631-724-7517

     Bob Aberle needs to "clean out" his fleet and has five planes that he's reviewed for various publication for sale. He is willing to ship them, but it would be even better for you to pick them up at the N.E.A.T. Fair in is Downsville, NY on September 18 - 20, 2009. The prices are somewhat negotiable, within reason. Please contact Bob if you are interested.

     I've created an Acrobat .pdf file with a full description of each plane, where it is reviewed and what is included. Use the URL noted to "pull up" the .pdf file. NOTE, URLs no longer active for purchase of these planes.

Multiplex-USA BLIZZARD high-performance electric sailplane
blizzard.pdf
Complete ready to fly - with a Hitec OPTIC-6 Tx ($350) or without ($300).
Reviewed in the May 2009 MAN, pages 76 to 78.

HOBBY LOBBY BONNIE-20 -- trike gear as well as a set of Twin Floats and all mounting hardware
bonnie.pdf
Everything but a 72Mhz transmitter ($250)
www.masportaviator.com/ah.asp?CatID=1&ID=39

Horizon E-Flite DHC-2 BEAVER with full scale operating flaps and provision for adding twin floats
beaver.pdf
Needs only receiver and transmitter, all else included ($300)
Reviewed in Model Airplane News

GRAUPNER TAXI CUP-II
taxi.pdf
ARF aircraft, AXI motor, ESC, Battery TP 3S2P 4200 Li-Poly pack -- Hitec airborne RC system, TP battery balancer ($225) www.masportaviator.com/ah.asp?CatID=1&ID=103

Horizon E-Flite "MINI ULTRA STICK"
High performance Quad Flap aircraft with a total of 6 servos (4 in the wing).
mus.pdf
Only needs receiver, transmitter and 3S 2100mAh Li-Poly ($125) www.masportaviator.com/ah.asp?CatID=15&ID=129

     Please be sure to check the .pdf files for the exact details of what is included and pricing. I've tried not to make any errors while copying the information here, but the .pdf files have the correct pricing and details. KM

Return to "What's In This Issue"

To Reach Ken Myers, you can land mail to the address at the top of the page. My E-mail address is: KMyersEFO@theampeer.org
< href="http://www.theampeer.org" target=_blank>EFO WEBsite