Bugatti Flies - Take Two
From Keith Shaw, Ann Arbor, MI
Hello to all my aviation friends,
I am proud to report that I test flew my Bugatti racer last night (Oct. 12, 2004) with the new improved drive train. It was completely successful and handles beautifully. It has a very mild stall and is very light on the controls. It is quite aerobatic and much faster than with the original power system. It now flies at about 80 mph when at full bore.
To remind you, this is a 1/5th scale model of the 1939 Bugatti Model 100 that was built to capture the world's speed record. It incorporated many advanced features such as swept forward wings and a "tri-tail". It used twin, supercharged, straight-eight Bugatti racing engines (500hp each) driving coaxial contra-rotating props. It had a pneumatic computer that monitored the throttle settings and airspeed to automatically operate the retractable landing gear and the complex multi-purpose flaps. The power train and props were extensively tested on the bench, and the airframe was completed and in primer when Germany invaded France at the start of WWII. Unfortunately it was never completed after the war, so never flew.
The plane has been restored and is on display at the EAA museum in Oshkosh. Based on a computer-generated scan of the airframe with virtual wind tunnel analysis and using the original engine and prop data, the airplane could have reached or exceeded its design speed of 570mph. This would have been the record in 1939 and would still stand today! Rare Bear presently holds the piston record at a "mere" 530mph.
The model has a 65" span and is 60" long with retracts and contra-rotating props.
The first three flights last year were made with a single stock Astro brushed 40 driving both props through a homemade gearbox. That setup drew 45 amps on 24 NiCads. At slow speeds the coupled props were horribly inefficient, which made take-offs "interesting". The original drive train gave the model a top speed of barely 60mph. The model was also quite heavy, and the handling was less than perfect with hypersensitive pitch response. A high quality ball-bearing servo and greatly reduced elevator throw cured the pitch problems, but the airplane was still a handful to fly.
It was apparent that a diet was needed, but the easy fix of using Li-poly cells wouldn't work, as the 24-cell pack was as far to the rear as possible and I had to have FIVE OUNCES of lead in the stinger tailcone to get it to balance.
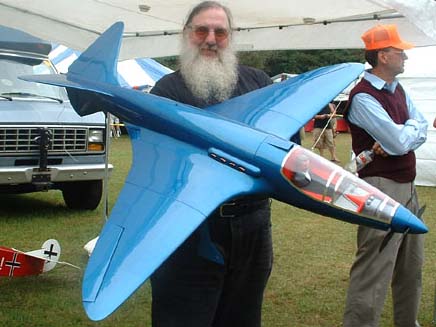
As you can see from the photo, it has an extraordinarily long nose. The only solution was to come up with a much lighter drive train so that the tail weight could be removed and Li-Polys used.
I spent a good deal of time last winter designing special motors and/or gearboxes. Several of them were really unique designs, but when I did a careful weight analysis, all of them were still too heavy.
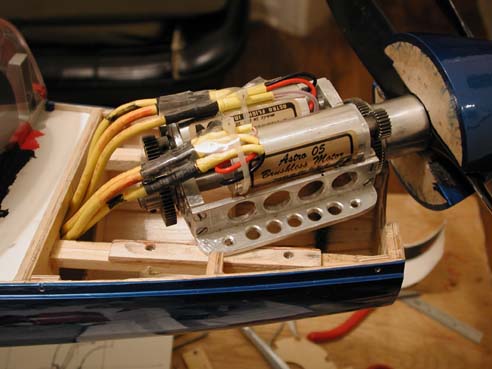
Two AF05 Brushless Motors on lightened gearbox
I finally decided on using two stock Astro brushless 05s, each driving a prop though my modified and lightened gearbox.
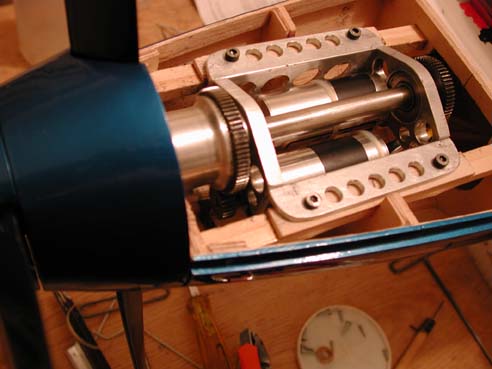
Another view of the gearbox
I have been pushing these wonderful little motors to 400 watts regularly on 3 Li-Polys, so I was confident that they would survive in this application.

Two Castle Creation 45-amp brushless controllers and a battery of Kokam 2Ah Li-Poly Cells in a 3S3P configuration
The good news is that I was able to remove the tail weight, and the airplane balanced with a 3S3P pack of Kokam 2 amp-hr (15C-20C) cells, for a total weight reduction of TWO POUNDS.
The two Castle Creations 45 amp controllers have worked out well even though they have 24" long leads to the motors!
As before, I put the new drive train in my old reliable test bed airplane for testing and tuning. A four-channel data logger was installed to monitor motor temperatures and the input battery current to each motor controller. The flights involved takeoff, a loop and stall turn, some cruise flying and some "swoops", when I would pull the airplane up very gradually into an ever steeping climb until vertical flight was achieved and the airplane quit flying. This gave me data on how hard the motors were working and a power consumed versus airspeed profile derived from the swoops.
Originally I had done some calculations for the coupled drive train that indicated that the rear prop would need to have significantly higher pitch. A Graupner 11x8R was chosen for the front prop and an 11x11 for the rear prop. Surprisingly, the recorded data on the test bed plane showed that even though each motor was pulling about 40 amps statically, very soon after takeoff the front prop current dropped to under 10 amp, while the rear motor stayed at 40 amps.
The plane's speed was disappointingly slow, and the rear prop motor was hot while the front prop motor was at ambient temperature. It was apparent that the rear prop had pushed the plane beyond the prop speed of the front prop. That meant that the need for a much higher pitched rear prop was not valid. Since I couldn't change propellers, several different pinions were tried for the front drive. Ultimately I settled on a 2.5:1 ratio for the front drive while the rear drive still used the original 3:1 gearing. The front drive now pulled 48 amps static, and in flight both currents settled down to 30 amps while the airspeed went up by about 20mph.
I haven't installed the data system in the Bugatti yet, but after a 4 minute flight of fast passes, slow speed handling tests and some aerobatics I only had used 2.8 amp-hours out of the 6 amp-hour pack.
This means that the average total current is about 42 amps, or only 21 amps per motor. That is a testimony to the very low drag characteristics of this amazing design! The motor and controllers were just slightly warm, while the Kokam pack was at ambient.
I'm looking forward to a few more flights this fall, if the weather permits, and flying it at air shows next summer. It does need pavement or very short grass though due to nose over tendencies.
I have appreciated all of your support and interest throughout this five-year-long project. I would particularly like to thank AstroBob for his wonderful motors, Patrick at Castle Creations for his reliable controllers, and Fred Marks and Kokam for their amazing batteries. This dream project would have not been possible without them.
Keith
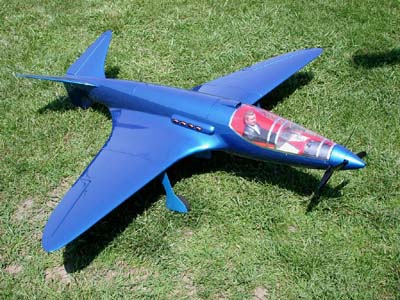
Another shot of Keith's plane
Return to "What's In This Issue?"
"FMAdirect Automatic Cell Detect, Low Voltage Cutoff Device
Part Number: AVC1AIR

Some of you are probably aware of this device, but I reprinted the following from the FMA Web site (www.fmadirect.com) for those of you who may have missed it. KM
FMA Direct is pleased to announce the release of an Automatic Cell Detect, Low Voltage Cutoff device (FMA part # AVC1AIR) for use with Electronic Speed Controls which do not provide proper cutoff voltage for Lithium Polymer, Ni-Cd and NiMH battery packs. The AVC1AIR will work with any ESC that provides motor cutoff on loss of signal. In particular it allows the use of ESC's that were designed before the emergence of Li-Po cells which are so popular today. It is imperative that Li-Po cells not be allowed to discharge to a voltage lower than 2.5 volts. To do so can permanently damage the cell. The AVC1AIR provides that protection.
Until recently there were not a lot of ESC's that were designed for use with Lithium Polymer batteries. Many are able to be programmed for a cutoff voltage. Change the number of cells though and the ESC had to be reprogrammed. The AVC1AIR does the programming automatically. It sense pack voltage and automatically determines the cutoff voltage. Optionally, a custom low voltage cutoff point can be easily programmed by using a voltmeter and flipping a tiny switch on the printed circuit board. It works with both brushed and brushless ESCs.
The AVC1AIR installs between the receiver's throttle connection and the ESC. Installation also requires connecting a single wire to the battery pack + connector terminal. When the pack reaches safe cutoff voltage, the AVC1AIR terminates the throttle signal to the ESC. The ESC then cuts off the motor while retaining adequate battery power to operate the receiver for safe landing. Unit includes multiple restart capability found in most ESC's by retarding and then advancing throttle.
Retail: $19.95
Size: 1.30x0.39x0.24
Weight: 4 grams - 0.14 oz.
Ratings: 4-12 Cells (Ni-Cd) 1-4 Cells (Li-Po)
Return to "What's In This Issue?"
May 15 - Rain Date: May 22 - KISHWAUKEE R/C FLYERS 2nd Annual Electric Fly-In
Registration: 8:00AM Fly: 9:00AM
Site: Kishwaukee R/C Flyers Club Field, Dekalb, IL
Restricted to electric powered aircraft.
Unobstructed fly over area.
AMA license required to fly.
$10 Landing Fee includes free lunch for pilots.
Due to parking arrangements, no RV's please.
Food and beverages available.
Contact: Brad Evenson eflyer201@atcyber.net, phone: 815-522-3344 (after 7pm) or Rocko McCombs nightz13@yahoo.com, phone: 815-756-9313 (after 7pm)
While this is a bit early, I wanted to remind all the Ampeer readers to get me notices of upcoming events ASAP so that they can be posted in the Ampeer and online. KM
Be sure to check out the AMA District 7 Web site at: www.amadistrictvii.org
Return to "What's In This Issue?"
Removal of Micafilm from a Water Soaked Airframe
From: Thomas Darragh - Marine City R.C. Club
Via Merle Davies
I believe the best way to remove "Micafilm" is to use a covering iron to soften the "Balsa-rite" glue as you lift the covering from an attachment area. Your iron needs to be a bit hotter than you would normally use for attaching the film.
You should let the frame "dry out" at room temperature for a couple of weeks before trying to remove any covering. If the wood were damp, it would be able to dry out while the covering helps retain its shape and it would not be subject to undue pressure while the covering is being removed from damp softened wood.
I see no reason to remove the covering to dry out the fuselage since it has adequate openings to allow air circulation during the drying process. As for the wings and stab, you may want to make some openings in the covering to allow air circulation during a dry out period if the wood structure is noticeably damp.
Finally, drying out the framework would not result in the frame being any lighter than it originally was. The wood was kiln dried to start with.
Tom
Return to "What's In This Issue?"
We Live in an Amazing Time
By Ken Myers
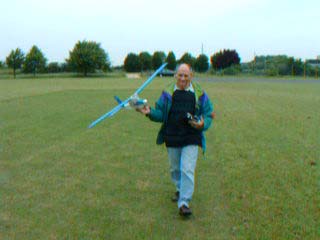
The slightly blurry photo shows Laurie Jones, of England, with his Ampeater. The Ampeater has been written up several times here in the Ampeer. The remarkable thing is that the photo was captured from the end of a video of a very successful flight.
Laurie was nice enough to send along a couple of videos of the Ampeater. The videos were captured on his digital camera and sent via email. It is amazing and wonderful to watch and listen to folks from "far away" enjoying this hobby.
We really do live in an amazing time. Thanks, Laurie, for sharing your Ampeater with the Ampeer readers and allowing me to visit you at your flying field!
George Jurasinski, of Vermont, sent along this photo of his Slow Stik on floats. He noted that it flies just fine on the stock motor when the floats are added. (george.jurasinski@adelphia.net)

George and his SS on Floats - Great flying site!
Return to "What's In This Issue?"
Thoughts from Bernard Cawley
bernard.e.cawley@boeing.com
Ken,
Just saw your post about the November Ampeer (you're early!) and took a quick look.
On the props: I've seen the very same thing in a bunch of static tests that I have run - the APC 11x4.7SF and the 10x7SF run almost identical RPM/current on a given motor/battery. I see similar things with the 9x6SF and 10x4.7.
On Axis: I don't know what it is about the 'Calc programs, but they never portray outrunners in general very favorably, but I sure love running them. They are smooth, silent, and certainly efficient enough. I have a three 2212/34s in use (including in the Dandy Sport as you know) and one 2826/10 (which replaced a 2820/10 in the same plane). The former swings a 13x8 at the same input power as the latter turns a 12x6 and the net effect on the performance of the plane is stronger climb and no downside except reduced ground clearance (this is the JK Aerotech Big T in my Ezone review).
On Robert Fishwick's LT-40: I have some personal knowledge of his first one - which was an LT-40 ARF. Robert bought the used Aveox motor/gearbox (and ESC) from me at one of the Chilliwack meets - it was the same motor that was in my Schneider Sport in the MAN article about brushless motors I did now some time ago. Robert has been flying that plane for quite some time and it certainly doesn't lack for power. Of course I've been flying an LT-25 for quite awhile with various power systems from Magnetic Mayhem to Hacker, and it will likely get an AXI itself this winter (unless I drop in the MEC brushless motor that Pete sent me to test - I should do that first).
Oh - one other thing not directly related to the November issue; I've been flying a couple of the all-in-one-box ready to fly in 15 minutes planes lately. I've focused on those that are three channel and have equipment that at least conceivably could be moved to another airplane when the original airframe becomes boring (or non-flyable). I'll have more to say on that subject in the future, but there are a couple that do work pretty well, especially for the price.
Take care,
Bernard
I'm looking forward to your report on all-in-the-box RTF's. Let us know when it is posted, and I'll put a notice in the Ampeer. KM
Return to "What's In This Issue?"
West Mountain Radio Crimping Tool
www.westmountainradio.com
West Mountain Radio has recently been in the modeling press for it computer battery analyzer (CBA), but they have a couple of other useful items.

The Crimping Tool is for Anderson Powerpoles. It is about 1/3 the price of the Anderson crimper, which I use. At $49.95, it seems to be a real bargain. If you hate soldering up Anderson connectors, this just might be the tool for you.

They also carry the Medusa Power Analyzer. It is sort of similar to the Astro Flight Whattmeter in function. I'd love a review of the Medusa from an Ampeer reader.
The photos of the crimper and Medusa are from the West Mountain Radio site.
Return to "What's In This Issue?"
Upcoming December Meeting &
November Meeting Notes
Remember that the December meeting of the EFO is actually going to be held on Saturday, Nov. 27, 9:00 p.m. at the Oakland Yard Athletic Dome on Highland Rd. (M-59) in Waterford, MI. There will be no actual December meeting. Flying is $15 for the evening, if you are not a member of the Oakland Yard's flying club. Admission to watch is $1. If you are a current EFO member, please see me at the meeting to receive a $1 refund.

The November flying meeting was held at the Midwest R/C Society 5 Mile Rd. flying field on Saturday, November 6. For a change, it was a beautiful fall day. The temperature was in the mid-50's with a beautiful fall sky as a backdrop. The winds were 12-15 MPH, but that didn't really stop anyone from flying. We brought out our most trusted planes and had a ball in the wind. It was a great day with no crashes and hardly any "hard" landings.
Thanks to James Maughan for the photos of Dave and Paul!
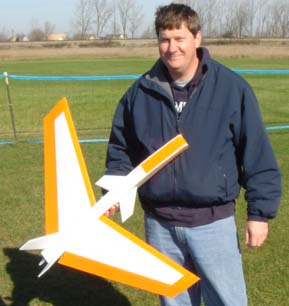
Dave Stacer at the field

Paul Sockow after a successful flight
Return to "What's In This Issue?"
MRC Reflex XTR Review
By Ken Myers
Recently, I had been looking for an RC flight simulator for my Macintosh computers. Unfortunately, I haven't been able to find one for airplanes. I had read about the great flight simulator "X-plane", which is designed for the Mac platform. I had read that it can be used as an RC flight simulator, but it is not really the same thing.
As luck would have it, the PC that I use blew a power supply. I was faced with the choice of getting a new case and power supply and rebuilding it or purchasing a new PC.
While I did not really need a Windows PC for the majority of my computing tasks, I thought I'd like one to run an RC simulator, MotoCalc or E-calc and my Castle Creations PHX-LINK.
I purchased an inexpensive PC (Insignia at Best Buy) with a Pentium 4 2.8 GHz processor, 256 MB Ram, 40 GB hard-drive, a floppy drive, and CD-RW/DVD-Rom combo drive. It has onboard graphics and sound and uses Windows XP Home for the operating system and has Microsoft Works software. This PC does not have an AGP slot, so I added an ATI Radeon 9200 PCI bus video card. Total price was just under $500 with the rebate and slightly over $500 with Michigan taxes. The monitor I was using was just fine.
Now that I had a new PC, I checked the RC simulator forum at (www.rcgroups.com) RC Groups and found that the Reflex XTR was getting some good comments. I also read about the latest Great Planes simulator, Real Flight G3. The one thing I found discouraging about the Reflex XTR was that the Hitec interface had a problem with the transmitter that I wanted to use, a Hitec Eclipse 7. I wasn't sure what to do, so I set it all on the side burner.
Since Real Flight G3 wasn't available yet, while I was at the Midwest R/C Society Swap Shop on November 7, I picked up a copy of the Reflex XTR program with the Hitec interface.
I checked the RC simulator forum on RC Groups to find the "fix" for the Eclipse 7 interface. A link in the forum lead me to the Reflex site where I found that I needed to eliminate four components from the interface circuit board. It was suggested that one end of each component be unsoldered and then the component removed with needle nose pliers. I didn't have much luck unsoldering them, so I just broke them off and cleaned the area where they were with a knife blade.
Next, I actually loaded the Reflex XTR program before the Radeon card was installed, just to see if the interface worked and to see whether the program could be used with the onboard graphics. To my surprise the modified interface worked just fine.
Setting up the channels proved to a bit time consuming, as I had no idea of the channel assignments since I didn't have my transmitter manual available. With a little trial and error I figured out the channel assignments and whether they needed reversing or not.
It was time to fly, but I still didn't have the new graphics card installed. I had to give it a try. It ran, sort of.
The flight simulation was okay, but there were huge chunks of white where the background and sky should have been. I continued to "play" with several different aircraft and then I found out that when the scenery choice called "REFLEX scenery..." (a non-photo realistic flying field) was used, the program would work with the onboard graphics card. I played with it for a while. Then I installed the ATI Radeon 9200 card and the program came to life.
I had only read a little about how the program functioned, but I was able to change the scenery and fly. It was almost as if I were at the flying field. While it was windy and 42 degrees F outside, I couldn't stop flying inside.
I pried myself away from the flying field and checked to see if there was a way to register the program. I couldn't find one. I also checked for updates. None were available at this time, but the next version is supposed to available by the end of November.
Larry Markey, Midwest club member, had given me a CD of planes that he had downloaded from the Internet for the Reflex XTR. I wanted to add them, so I had to figure out how to do that, as there was nothing in the help file about it. Copying and pasting the new files into the airplane (flugzeug) folder or helicopter (heli) folder of the program worked. If sounds files come with the airplane files, they need to be put into that same folder.
Larry had also warned me that the planes were very sensitive and needed exponential to fly well. While this may be true, I found all of the planes that I flew to feel almost "right." There were only a few those planes that seemed extremely sensitive on the ailerons and elevator. The newest, unreleased, version of the program allows the exponential to be set in the program, so that you don't need a transmitter with expo to feel comfortable with the aircraft.
The program comes with several planes; Modellbau Katana in four color schemes, Kyosho Ð AT-6, P-40, F-86, Flip 3D, GeeBee, Pitts Special (2 color schemes), Soarus 1600V (electric), Sonic Sports 1600, Spitfire, T-33 (electric ducted fan), Tiger Moth, Trainer 40 and Marutaka Bleriot. The F-15, Hawk (2 color schemes), SU-29 and Tucano are also available as free downloads at the Reflex XTR site. There are also several different photo realistic flying fields available.
I found an Internet site, via the RC simulation forum at RC Groups, with a lot of Reflex XTR models and scenery available. The Internet site is www.rc-sim.de .
Since this site is in Germany and the Reflex XTR program comes from Germany, much of the forum language is in German. I used Goggle's language tool, www.google.com/language_tools, to translate when I couldn't figure out what was being said. After reading the translated comments on the rc-sim.de site, I downloaded several planes and started "playing with them" and modifying their parameters to see what would happen.
One of the main reasons that I chose this particular RC simulator was that it has the ability for the user to recreate planes that they own and fly and place them into the simulation, as well as share them with others around the world. I looked at the RMK (Reflex Model Construction) program and learned that this was no easy task, but a possible one. One problem, for me, with using the RMK to create planes for use in the Reflex XTR program is that the tutorial is in German only. The RMK program can be in English, but not the tutorial. I did find a machine-translated version of the tutorial at www.ryanandkatrina.net/rmk.
Since then, I have spent a great deal of time translating and learning the RMK program so that I can recreate my electrics to let others fly them. If you would like a human translated version of the RMK tutorial so that you can recreate your own planes or helicopters, please contact me. I should have it done by the time you read this.
I was also unsure how to get the model parameters and physical parameters to use in the Reflex XTR program that tell the plane how to fly. A check of the Reflex XTR information at rcgroups (www.rcgroups.com/forums/showthread.php?t=294766&highlight=Reflex+XTR) revealed that there is an available spreadsheet program at Envision Design Products (members.cox.net/evdesign/pages/products.html). The package is called "Plane Geometry" and can supply most of the data needed. The electronic version is $19.95 via PayPal or a CD-Rom can be ordered for an extra $5 shipping. A review of that spreadsheet program is available at www.rc-soar.com/hardsoft/planegeo.htm. MotoCalc should also be helpful. I also downloaded Cliff Lawson's Blade, which was in the same thread as "Plane Geometry".
I continued to "play" with the Reflex XTR program and changed a few of the parameters for the EasyStar that I had downloaded from the rc-sim.de site. The original was too fast and just didn't fly the way a stock EasyStar RTF flies. I changed the weight to thrust ratio to about 1/2 what it was and increased the tail incidence. I saved the changes and then had a very good simulation of the stock EasyStar RTF actually flies.
The planes "feel" very real on the sticks and the visuals include niceties like the tail waggle when a stall turn is done perfectly. Very nice!
The program also crashes very realistically. The plane bounces, parts bend or break, the leaves on the trees shake if you hit them, and the model "skips" across the ground if you land wheels up. Don't ask!
, 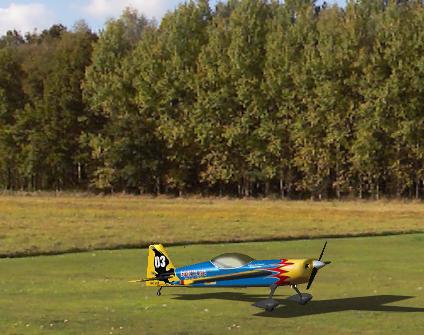
Part of a screen capture from the Reflex XTR RC Flight Simulation Program
The following are the file choices available and my notes in italics on things I've used.
File:
Open simulation...
Save simulation...
Select video card...(used after installing ATI card)
Select video driver...
Exit
Model:
Select model...
Save model... (save the changes you made to make it fly the way that you want)
Modify model params... (make changes in how the plane looks and sounds)
Modify physical params... (make changes to the physical model that change how it flies)
Scenery:
Select scenery...(several fields to choose from)
Panorama resolution (select the resolution to match you video card Ð my cheap card used the maximum resolution with no problem)
Modify scenery... (for use only with the non-photorealistic flying field)
Radio:
Read channel assignment...
Save channel assignment...
Assign channels... (used at set-up)
Channel display...
Calibrate center... (used at set-up)
Simulation:
Start
Stop
Autostart when RC power on
Display mode during simulation...
Torque training... (comments follow)
Hover training... (for the heli guys)
Promenade... (a virtual walk around the plane)
Modify simulation params... (wind, thermals, camera angle and other look and feel changes)
Recorder:
Record flight
Show flight...
Show all flights...
Language:
deutsch
english
francaise
? (Help)
Info about Reflex
Help
www.reflex-sim.de
This list should give you a fair idea of what can be changed. Options are the name of the game for this program.
Besides being a great looking and flying simulator, the torque training is a really nice touch. During torque training, you can learn to control a 3-D type plane one function and surface at a time. Start with working the throttle to maintain a hover, add in the elevator, and so on and so forth. Very neat.
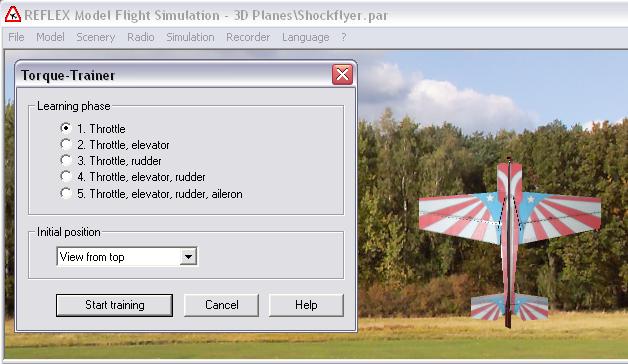
Screen capture of Torque trainer setup screen
I am very pleased with this RC flight simulator and feel that it will be an enjoyable tool and toy to expand my enjoyment of this hobby. I highly recommend it to anyone with a PC that can handle it. The only real problem with it is tearing yourself away from it! It is very addictive.
A note on using the RMK design program:
I have had no problem with the RC flight simulator program "crashing" through all of the hours that I''ve used it. That doesn't mean that it won't, as any program that uses up all the computer resources will stop running. I've not yet had a computer "crash" or "freeze" with this RC flight simulator.
On the other hand, the RMK design program has "crashed" several times when I've not followed the directions correctly and in the order called out for. Like all computer creation programs from word processors, spreadsheets and design type programs, save often!
Return to "What's In This Issue?"
| 


