 The first two articles this month from Robert Pike and Walt Grey come via
the Electric Model Flyer, the newsletter of the Electric Model Flyers of Southern Ontario.
The first two articles this month from Robert Pike and Walt Grey come via
the Electric Model Flyer, the newsletter of the Electric Model Flyers of Southern Ontario.
|
Flying High With Electric Power!
The Ampeer ON-LINE!
Fly the Future - Fly Electric! |
| President: | Vice-President: | Secretary/Treasurer: | Board of Directors: | Board of Directors: |
| Ken Myers | Richard Utkan | Debbie McNeely | Jim McNeely | Jeff Hauser |
| 1911 Bradshaw Ct. | 240 Cabinet | 4733 Crows Nest Ct. | 4733 Crows Nest Ct. | 18200 Rosetta |
| Walled Lake, MI 48390 | Milford, MI 48381 | Brighton, MI 48116 | Brighton, MI 48116 | Eastpointe, MI 48021 |
| (248) 669-8124 | (248) 685-1705 | (810) 220-2297 | (810) 220-2297 | (810) 772-2499 |
| Mailed Ampeer subscriptions are $10 a year U.S. & Canada and $17 a year world wide. FREE on-line! | The Next Meeting: Date: Thursday, February 5 Time: 7:00 at Ken's house --- wear airplane building clothes! | |||
From the EMFSO Electric Model Flyer
edited by: Al MacDonald
5-2881 Lawrence Ave. E.
Scarborough, Ont., Canada, L5E 1Z3
(416) 267-8504
almac@octonline.com
The first two articles this month from Robert Pike and Walt Grey come via
the Electric Model Flyer, the newsletter of the Electric Model Flyers of Southern Ontario.
The CL-215 is a purpose built flying boat used to fight forest fires in Canada, and around the world. It was developed by Canadair, in the mid '60's, and was designed to scoop up water as it planed along the surface of a lake. It then drops it's load of water on the fire as it skims the tree tops. It's a large aircraft with a wing span of almost 100 feet.
I've been fascinated with this plane for 18 years and have always wanted to build an
R/C model of it. It's a very unique subject in that it's a flying boat, it's a twin and it's one of those rare planes that was not built as a
killing machine or to simply carry passengers. Also, a model of it could be flown rather aggressively and still be flying in a
"scale" like manor.
During my early days of R/C, it could be nothing but a distant dream. I was a young
teenager and was enjoying flying gliders. I had a few "Glow" planes but nothing close to the complexity of a twin.
When I finished school and got a good job, I started to look more seriously at this
model. I was considering powering it with a couple of Surpass .21 four stokes. I then discovered Electrics and the project
suddenly seemed so much more feasible and enjoyable. This was in 1989.
I ordered the plans from RCM and started building. After several attempts at a light
but strong structure and thoughts of several different power plants, I finally had a model well underway.
 I met Marc Thomson in 1994 and discovered that he was building a very similar size
of the CL-415 - the newer turboprop version of the CL-215. Marc had his finished and flying in late 1995 and has dazzled all
spectators with his great building and flying skills ever since.
This Summer, I forced myself to finish off the Water Bomber for the Halton Hills Fun
Fly. My main objective was to have it flying; "Finishing" would come later.
The test flight was to be performed on Sunday morning, the week before the Fun Fly.
It was to be done from water as I didn't have any landing gear for the plane yet. This meant that the test flight was also the time
when the water performance would also be proven. I went to the local beach at 6:00 am to beat the crowds, and more importantly,
the wind and waves. The best place in my area was right from the open Lake Ontario! I had no retrieval boat, so failure was not
an option.
I placed the plane in the water and started taxiing. I found the air rudder was not very
effective for steering on the water, but I managed to get the plane into position for take-off. Acceleration was clean and fast. The
plane climbed up on step and was in the air in about 20 feet. The flight was great and was comfortable enough for a roll and some
playing with the flaps. I landed and taxied in. Good flight.
The plane has flown almost 20 flights since then. Most have been from the water.
I've taken it to the Halton Hills Fun Fly, the Christie Float Fly and the Toronto R/C Club Fun Fly. It's been flown from several
different water locations and in various weather conditions. It even had a collision with a swan on landing! I felt horrible for the
swan, but he's fine. Anyway, the plane got the worst of the deal. It's patched up now but still needs some attention to detail.
This plane is a combination of successes and failures for me. The successes are
obvious, but the failures may not be. I found later (Marc was the first to bring it to my attention) that the plans I started to build
from, were not very "scale". I modified the structure significantly to get it closer, but there are still some inaccuracies
lingering from before. Also, the plane came out A LOT heavier than I had hoped. I don't know why. I built it VERY light, even
building it MUCH lighter than most people would dare, but it still came out at 8 lbs !!. It still has plenty of power and flies very
well, but I would like better duration.
To remedy the steering problem on the water, Stefan Vorkoetter let me steal his great
idea of dropping a resistance across one motor to reduce the power to it and, as a result, increased the power to the other motor.
I do this by having the rudder servo hit micro switches at it's limits which then places
the resistor in the motor circuit. I do this with a 1 ohm, 30 watt resistor that sits in the fuselage. It's pretty neat. I can give more
details if you like and if you see me at the field, feel free to ask me to demonstrate. Apparently this has also been done by
someone in BC.
I'm running out of space here so I'll get to the important stuff. The specs are:
Even with all it's faults, I'm very happy with this plane. I'll like it even more as I fine
tune it over the winter. I'm now looking for another twin flying boat project for my two Astro 25's.
If you have access to the Internet, have a look at my Web Page. The URL is :
http://www.clo.com/~piker. There are more pictures there of this plane, as well as
MANY others.
I met Marc Thomson in 1994 and discovered that he was building a very similar size
of the CL-415 - the newer turboprop version of the CL-215. Marc had his finished and flying in late 1995 and has dazzled all
spectators with his great building and flying skills ever since.
This Summer, I forced myself to finish off the Water Bomber for the Halton Hills Fun
Fly. My main objective was to have it flying; "Finishing" would come later.
The test flight was to be performed on Sunday morning, the week before the Fun Fly.
It was to be done from water as I didn't have any landing gear for the plane yet. This meant that the test flight was also the time
when the water performance would also be proven. I went to the local beach at 6:00 am to beat the crowds, and more importantly,
the wind and waves. The best place in my area was right from the open Lake Ontario! I had no retrieval boat, so failure was not
an option.
I placed the plane in the water and started taxiing. I found the air rudder was not very
effective for steering on the water, but I managed to get the plane into position for take-off. Acceleration was clean and fast. The
plane climbed up on step and was in the air in about 20 feet. The flight was great and was comfortable enough for a roll and some
playing with the flaps. I landed and taxied in. Good flight.
The plane has flown almost 20 flights since then. Most have been from the water.
I've taken it to the Halton Hills Fun Fly, the Christie Float Fly and the Toronto R/C Club Fun Fly. It's been flown from several
different water locations and in various weather conditions. It even had a collision with a swan on landing! I felt horrible for the
swan, but he's fine. Anyway, the plane got the worst of the deal. It's patched up now but still needs some attention to detail.
This plane is a combination of successes and failures for me. The successes are
obvious, but the failures may not be. I found later (Marc was the first to bring it to my attention) that the plans I started to build
from, were not very "scale". I modified the structure significantly to get it closer, but there are still some inaccuracies
lingering from before. Also, the plane came out A LOT heavier than I had hoped. I don't know why. I built it VERY light, even
building it MUCH lighter than most people would dare, but it still came out at 8 lbs !!. It still has plenty of power and flies very
well, but I would like better duration.
To remedy the steering problem on the water, Stefan Vorkoetter let me steal his great
idea of dropping a resistance across one motor to reduce the power to it and, as a result, increased the power to the other motor.
I do this by having the rudder servo hit micro switches at it's limits which then places
the resistor in the motor circuit. I do this with a 1 ohm, 30 watt resistor that sits in the fuselage. It's pretty neat. I can give more
details if you like and if you see me at the field, feel free to ask me to demonstrate. Apparently this has also been done by
someone in BC.
I'm running out of space here so I'll get to the important stuff. The specs are:
Even with all it's faults, I'm very happy with this plane. I'll like it even more as I fine
tune it over the winter. I'm now looking for another twin flying boat project for my two Astro 25's.
If you have access to the Internet, have a look at my Web Page. The URL is :
http://www.clo.com/~piker. There are more pictures there of this plane, as well as
MANY others.
Return to "What's In This Issue?"
| MODIFYING THE ElectriCUB By Walt Gray (#411) |
My modifications to the Great Planes ElectriCUB began at the building stage where I
discarded virtually all the lite ply and, using old Sig Cub plans as a guide, substituted 1/4" stick balsa laid over the GP plans. I
modified the cabin bulkheads to allow the wing to be bolted to the fuse with two bolts and a 1/4" dowel. The modified bulkheads
were cut from a carbon fibre/foam sandwich material to further reduce weight.
Using the motor cradle supplied with the kit, I installed an AF 035G (3:1) motor with
an MA 9x8 e prop, a 7x1700 mAh pack, a Horak SPC35 ESC and a 250 mAh receiver battery. I used two standard JR servos
and a JR receiver. Flying weight was about 52 oz.
The first two or three flights in the fall of 1996 were not very impressive. The plane
would not ROG from our grass field, and the final hand launch was poorly executed resulting in a sudden stop from about 10'
which tore the cowl section, complete with motor, off the fuse.
Before rebuilding, I solicited advice from the E Zone discussion group
(www.ezonemag.com) which proved to be invaluable. An AF 05G (3:1) was installed
and the interior of the fuse modified to accept a 10 x 1700 mAh pack. The pack had to be broken up into two five-cell packs in
order to get it into the fuse because of structural obstructions. The revised flying weight was 57 oz.
www.ezonemag.comPropped once again with the MA9x8 e, the plane's performance this summer improved considerably. While
still not a world-beater, she at least behaved like a flying machine rather than a brick. Further experimentation with different props
indicate that an APC 10x7 appears to give the best combination of performance and duration with flight times in the 7-9 minute
range (with good throttle control). While not really aerobatic, respectable loops are possible and I might even be able to get it to do
a passable roll (because of the large rudder). The MA 10x8 e gave a truly impressive performance but duration dropped by about
25%. I'm going to try an APC 10x8 and see if it offers any advantage.
In summary, the above modifications turned a wimpy excuse for an airplane into a
very enjoyable one to fly. Now, if I can just get my heart out of my throat each time I try to land....!
Return to "What's In This Issue?"
Lazy Bee Special 50" Rating From: Grant Calkins - CasinoOp@aol.com
Stars: ** (2)
Equipment: Master Airscrew geared (3:1) 050 electric,11x7 APC prop JR Rx, 2 mini servos (R and E) and 1
Hitec micro servo (aileron), 600 mAh Rx battery, Hitec 217 ESC.
Weight about 49 oz
Comments: Fun to fly, although a little radical on the controls, but a nightmare to build. This plane has a severe
tendency to ground loop during the takeoff run. You have to use reduced-rate rudder to even keep it halfway straight, and even
then about 1/3 of the takeoffs have to be aborted.
Instructions: inadequate and sketches (there are no photos) don't necessarily match the particular version you are
building. Short of wood in several places, and whole plane seems to be built from you-laminate-them balsa sticks. Plane ends up
pretty strong except for a serious structural weakness at the front wing hold down point (top front of cabin) and tailwheel mount
(part of rudder, which is only hinged to fuse!). A kit in name only.
(Just a reminder for all of you Bee lovers out their. All of the plane ratings in the Ampeer are the OPINIONS of
the builders and fliers of that model. km)
Jim Ryan of Cincinnati, OH gave out some good information about where
to get a small mixer to install in the SR Batteries X440. I sure wish I knew this when Richard and I were trying to put our
X440 together.
As you know
Art Quillen, Quillen Engineering, 561 North 750 West, Hobart, IN 46342 --- (219) 759-5298
Radio Shack Digital Multimeter by EFO member - Don Skiff
I just bought a digital multimeter from Radio Shack, on sale for $99US that has a
computer serial connection and software for DOS and Windows to display, record, or graph everything that the meter measures.
You can use it for data logging, and save the data into files for manipulation (such as calculating pack capacity). I used it for peak
detection charging of a pack of six 600AE cells, which my AstroFlight 110XL would not handle, and for cycling packs, it is easy to
tell when the pack is exhausted.
It also measures frequency, capacity, and checks diodes and transistors.
It's a great new tool! Stock number 22-168A.
(I also found out that Ralph Weaver likes it too. Ralph has written a
Windows program that will start beeping when the pack has peaked, and another that beeps when the pack is down to
1.0V/cell. Both of his programs graph the voltage vs time. You can reach Ralph by visiting his Website
at http://members.iquest.net/~weaverr)
NOTE:: Don has written up a full report on this unit, which will appear in an upcoming Ampeer. He also did a
wonderful demonstartion of the unit at the January EFO meeting. Thanks Don!
Go Fast and Turn Left, With Speed 400's
Archie Adamisin of Adamisin Racing Concepts (email at:
ARCadam67@aol.com) is planning on running Speed 400 races here in the Garden
City, MI area this year.
As of this writing, there are still a lot of details to be worked out, but Archie his hoping
get as good a turn out as possible. He's planning on having the first contest sometime in May or June, then the last contest
sometime in August or September. He's also letting vendors know that they will be welcome to show off their products.
Heat Shrinkable, Paintable Covering
There is a material known as Doculam that is available for about 5 cents per foot. It
is 1.5 mil thick. It is applied at 275-300 degrees F with the final shrink taking place at 400F. It takes paint, and is puncture and
sag resistant. It weighs 1.1oz per sq.yd. It is available from:
Astro Flight Gearbox Ratios for the 035 - 15 info from Robert Boucher http://www.AstroFlight.com
Astro Flight has two pinions for its 035, 05 and 15 motors. They are an 11 tooth and
13 tooth. With these pinions these ratios are available:
We also have 13 tooth pinion bored to 3/16 for MaxCim motors and 5mm for Graupner
and Aveox motors.
Getting Up to Speed - 400 That Is --- Part 3: Building the Speedy
Chris Boultinghouse & Dale O'Donnell
from DEAF Notes, the Newsletter of the Dallas Electric Aircraft Fliers, edited by Frank Korman, 9354 Forest Hills Blvd.,
Dallas, TX 75218-3633
(Note: Part 1 was in the March '97 Ampeer and Part 2 was in the July Special Edition Ampeer. km)
In the last two issues we talked about motors, props, airframe theory and
construction methods. This time we have construction tips for "Speedy", designed, built, and written-up by my good
friend Dale O'Donnell. Speedy can be used as a racer, or just a fun little sport plane for general flying. The plans
reproduced here, (and the construction tips), reflect the use of a foam wing. Plans that are ordered from CAB Designs
(See below) will also include instructions and drawings for a built-up wing. At some point in the future we may offer kits, but for
now it is a plans only offering.
These construction tips are rather brief, and are meant to give you an idea of
what is involved should you choose to build a Speedy. More detailed instructions are included with the plan set, along with full-size
CAD drawn templates for all parts.
After the cores have been cut dehair them using a dry sponge. Lightly sand the
cores to remove any bumps. Spray glue the cores together using 3M 77. Cut the sheeting to 30 1/2" and join if necessary.
Sheet the wings using a good laminating resin such as West Systems or HobbyPoxy2. A good way to do this is to use a plastic
filler knife (Bondo knife) and cut "V" notches 1/16" deep every 1/2" along the bottom edge. Use an
un-notched knife to spread the epoxy until the wood is completely covered. Then come back and with the notched knife and
scrape off the excess resin until you are left with little ridges of resin, and the area between the ridges looks dry. Run a piece of
1.75 oz. fiberglass cloth 10" wide in the center of the wing between the core and skin. Place the skins and cores back in the
beds and either vacuum bag or place on a flat surface and stack about 100-200 pounds of weight on top.
After the resin is cured cut out the ailerons. Bevel the LE of the ailerons. Cut a
1/8" wide notch through the bottom wing sheeting from the inboard side of the aileron to the center of the wing. Remove
carefully and place aside. Then carefully cut through the foam to the sheeting on the other side and install the torque rods for the
ailerons then replace the piece that was cut out. Glue on the L.E. balsa stock and sand to shape. Drill four 3/8" holes
through the top sheeting for the bolt hard points. Remove the foam down to the bottom skin, but do not cut through the bottom
skin. Cut the 3/8" dowel rod to fit in the holes and glue in place.
Cut 8 pieces of 1/32" balsa 3" long and join 4 for each side of the
fuselage with the grain running vertical. These are to be used as doublers for the 1/16" balsa sides. Cut a piece of 1/32"
and a piece of 1/16" balsa 3" long to use as the formers. Laminate the 1/32" cross grain balsa to the 1/16"
sheets with a layer of 1.75 oz. glass cloth trapped between the sheets. Do the same for the 3" pieces. Run the grain of the
1/32" perpendicular to the 1/16". (See last month's article for tips on laminating fiberglass to balsa - CAB).
After the epoxy cures lightly spray glue the patterns to the balsa using 3M 77 contact adhesive (rubber cement will also work).
Then cut out using a bandsaw or a sharp knife.
On the other piece of 1/16" balsa draw a center-line the length of the piece and draw lines where the formers go
square to the centerline. Using CA, glue the B and C formers to the 1/16" with the center of the formers on the centerline. Make
sure the formers are square with the table. Glue the two fuse sides to the formers with the 1/32" cross grain facing in then
pull the sides together at the tail till they meet over the centerline and glue sides together. After the tail has been glued glue down
the sides from the B former all the way to the tail. Glue the firewall to the sides with it lined up on the centerline then glue to the
bottom sheeting. Then run 1/32" cross grain sheeting inside on the fuse bottom from the firewall to where the other cross
grain on the sides stop. (For extra strength run 1/8 x 1/8 square stock in the corners where the sides meet the bottom). Cut a strip
of 1.75 oz. cloth the width of the fuse and spray glue to the bottom of the fuse from the firewall to the T.E of the wing. Coat the
cloth with 5 minute epoxy and using a hair dryer warm the resin and wipe off the excess with a paper towel. (Again, see last
month's article - CAB).
Using 1/32" balsa, place cross-grain sheeting from the L.E. of the tail to 3" behind the C former (this leaves a space
that will be used to access the rear servo). Also run 1/16" cross grain sheeting from the firewall to the L.E. of the wing. Cut
out the wing hold down blocks and epoxy in place. Drill the wing for the bolt holes and then with the wing sitting square on the
fuse drill the hold down blocks and install the T-nuts. Nylon 4-40 bolts are quite sufficient to retain the wing. If you cannot find
these locally, we have them available here at CAB Designs.
Using 3/32" balsa cut out the tails and elevators. Then sand the roots to the correct angle and round the L.E. of the
tails and sand the T.E. to a good point. Join the tails at 110 degrees between the tails. Then glue to the fuse with the wing bolted
on to get the correct alignment. The slot indicated on the plans will give the correct incidence in relation to the wing.
Slightly round the corners of the fuse and cover with your choice of covering
material. Tissue and dope would work well, as does plastic film. Just remember to keep it light! Install the servos and cut out the
control horns from 1/16 ply. Glue the horns in and run the pull-pull cables. We've found that Berkley Gorilla Braid
(30-40 lb. test) works very well for control strings. Set up the control throws as follows. Ailerons... 3/8" both directions.
Elevator.... 1/4" in both directions. Install the motor and battery pack. CG the plane 1.5" back from the LE of the wing
for the first flight and gradually move back if desired.
So, there you have it. As you can see, there isn't much to building one of these
little guys! Full size plans and instructions are available for $12 (shipping included) from:
Getting up to Speed 400, That Is: Part 4: Let's Go Racing Chris Boultinghouse & Dale O'Donnell
Okay, so now you have your Speedy finished and you want to "go fast and
turn left." There are two separate schools of thought on the best way to race. I've only tried one, but both look like fun.
Both are presented for your consideration.
Motor(s) must be stock Mabuchi 380. This includes the
Graupner, Robbe, Johnson, Salt Creek Special, etc. It does not include the Kyosho AP-29, Graupner Speed
480 Race, or the new Astro 020 Brushless motor. The only modification allowed to the motor is the
advancement of the timing. Any prop is allowed as long as it meets AMA guidelines.
Battery is limited to 7 nickel cadmium cells (any size)
Airframe. No limits. The low power of the Speed 400 imposes its
own limits on maximum airframe size, and equipment and wing loading concerns sets a lower limit. Want to race a Canard or
flying wing? Have at it!
These are simple rules. This is intended to be a FUN event. Note the use of
plural on motor. Yes, you could fly a twin on 7 1000 cells and complete 10 laps. P-38 racing anyone?
The object is to fly 10 laps as quickly as possible without "cuts"
(flying inside the pylon instead of around it). Four planes are flown on the course at the same time. Each lap counter/timer and
#1 pylon judge is assigned to watch a specific plane before the race starts. The 4 people at the #1 pylon signal (via colored flag)
when their assigned plane passes the pylon. There is a single person at each of the other two pylons to assure no cuts. There are
also 4 lap counters/timers. Launches are "staggered". The four launchers/callers stand side-by-side about 10 ft apart.
When the timer drops the start flag, the inside and middle planes launch, and a split second later when the flag comes back up the
outside and remaining planes launch. This helps avoid mid-airs at the start. After the planes are on the way the callers go back to
their pilot and at about this time yell "TURN" as the plane passes the #1 pylon. The pilots and callers are standing near
turns 2 and 3 so they can judge the turn themselves. As each plane passes around turn 3 the timer for that plane flips the page on
the chart to the next number so the caller can keep track of what lap the plane is on. In the heat of competition it is not possible to
keep count of the laps. Trust me! You are so intent on flying a tight course and avoiding the other planes you don't think of
anything else. If a pilot "cuts" a turn he or she must fly an extra lap. This usually means last place (unless someone
else cuts). Two cuts and you zero the round. Scoring is strictly time. Fastest time around 10 laps wins.
The fact that speed is the emphasis raises concerns of "illegal"
motors or just abusing the stock motor to the point of destruction just to get the fastest times. It would be nice to think that no one
would cheat, but sadly it happens. Hence, the following rules (which I shamefully copied from Aveox's web site at
http://www.aveox.com. Thanks Matt Orme! FK)
Method 2 (By way of Matt Orme)
Here are my proposed l/2A electric ("Speed 400") pylon rules. They
use rules adopted from AMA Event 614 (Class A (7-cell) pylon racing) except:
Km is in inch ounces per root watt, and shall be calculated by dividing the
Torque constant (Kt) in Inch-Ounces per Amp by the square root of the motors resistance. Kt can be calculated from the
manufacturers published Speed Constant Kv (no load rpm per volt) which is divided into 1352 to calculate Kt. (Kt*Kv=1352).
Resistance shall be taken as the manufacturers published or stated values. Manufacturers are defined as in, and can qualify a
motor as in Q-15 supplemental 4.2 (page 97 of the 1996-1997 regulations), as they would apply to electric motors, either by
supplying the Km, or the other values to calculate it from. A list of compliant motors would then be made.
The alternative task shall be 4 minutes, and the maximum number of laps wins,
and in the event of a tie, the plane in the lead at the finish signal shall be the winner. An audible signal shall signal the start, and
finish of the event. Planes that come to rest before the 4 minute signal shall score DNF (zero points) for that round.
Note. A Graupner 6V Speed 400 (Mabuchi RS380PH) motor has a
Km of 1.02, the Robbe power 400/35 (their 6V equivalent, a Mabuchi RS380SH) has a Km of .947, while a Speed 480 race has a
Km of 1.23. The rules would be simple, and eliminate all the bigger motors.
The Km values were determined for the 400 motors from the Mabuchi
data, which differs from the Graupner/Robbe published data, while the 480 came from the Graupner catalog.
Mabuchi Numbering system: R-round; S-carbon brushes; 3-armature diameter;
8-magnet size, or case length; 0-poles. 0=3, 5=5, 3=12; and S-magnet type (S and P magnets are defined by Mabuchi as the same
type, but P are called high torque magnets, H-metal and plastic rear end housing.
As you can see, instead of 10 laps at maximum speed, the object of this race is to
fly the maximum number of laps in FOUR MINUTES. Note that if you do not fly for four minutes you get ZERO points! This
effectively eliminates pushing the motor for maximum power and forces careful design and prop choices.
I'm not going to get into a battle over which type of racing is best. Heck, fly both
types on the same day! This will really shake everybody up. They both look fun and challenging, and isn't that what this whole silly
hobby is about? FK
60 Amp Fuse Holder by Howard Chevalier from Deaf Notes - Edited by Frank Korman
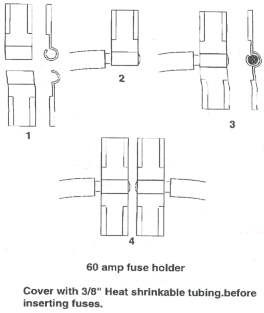
[I've grown lazy lately not installing fuses in my planes, and justifying this by
noting that 30 amps seems to be the largest auto type fuse available ... hardly enough for a competition motor. Ironically, it is
these high amp systems that pose the greatest hazard if not fused. Howard Chevalier to the rescue with the
following. Should be pretty self explanatory. FK]
(I get my spade lugs, like shown in Howard's drawing, at Radio Shack.
km)
Return to "What's In This Issue?"
San Diego Meet in February 1998!
TO ALL ELECTRIC FLYERS EVERYWHERE
The Silent Electric Flyers Of San Diego proudly announce THE SAN
DIEGO WINTER ELECTRICS -- February 13-14-15 1998.
A first ever fun-fly for snowbirds and escapees from winter's rigors. The meet
will be held on the shores of Mission Bay next to SEA WORLD and a mile from our famous San Diego ZOO and AEROSPACE
MUSEUM. We invite all builders and AMA flyers of electric aircraft to show us their best at a location just a mile from where
Charles Lindbergh first lifted the SPIRIT OF ST. LOUIS into sky.
Details on this exciting meet can be found at our website
http://www.sefsd.org A full schedule of activities is planned during daylights plus a tour of
the museum and a banquet featuring as speaker, "ASTROBOB" BOUCHER, will be held in the evening.
Equipment manufacturers and vendors are invited to display their latest
achievements. For details, e-address- info@sefsd.org
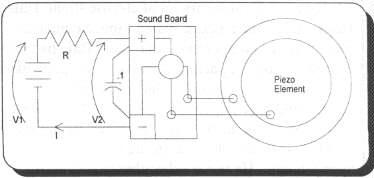
A Greeting Card Plane Finder --- via Watts Current edited by Doug Ward, R.D #1, Box 189, Irwin, PA DWard79207@aol.com
Just when you thought you knew everything...
Some months ago, Greg Lee presented the club with a neat little
gadget which he salvaged from instant banishment to the trash can. It was.. .well, let's let him tell it:
Cheap? I like to call it thrifty. When it comes to silicon I hate to
throw anything away. Even though my wife calls me a pack-rat, I know that someday I will find a use for it. This is a classic
example of such a project.
The sound generator of a musical greeting card has some specifications that
make it a good locator for lost aircraft, especially electric models. It has the following desirable characteristics:
Most sound boards of greeting cards are powered by 1.5 VDC, although some
might use three-volt batteries. By adding a resistor, you can step the voltage down for your receiver pack. You will also
need a .1 mf capacitor to smooth out the pulsation from the different tones. To calculate the value for the resistor, just follow the
simple formula below where V1 is the receiver pack voltage, V2 is the sound board voltage and I avg. is the average current in
amps:
Foam Wing Sheeting Tip
(This tip first appeared on the eflight-list in October last year. I asked
and received Archie's permission to reproduce it here in the Ampeer for you. km)
There is a simple, cheap solution to this problem. Go to your local hardware
store and buy some presswood, some straight 1 x 2's, (4) 1/4 20 treaded rod, (8) 1/4-20 nuts, (12) 1/4" washers, (4) wingnuts, and
a bit of time. Use these materials to build yourself a press. I have used this press when I didn't feel like using the vacuum bag
and this gives you great results as well. I cut the press to be able to accept wings for speed 400 racers up to Q-40 racers. The
outer dimensions are 14" wide x 32" long. I use the threaded rod in the four corners and jam nuts to adjust the space
in between the press. I set the jam nuts 1/32" thinner than the core with cradles & sheeting. The compression gives
you even pressure over the whole surface of the wing. As far as materials for sheeting, I would use hard 1/32 balsa and epoxy to
sheet the wing. This should give you a strong yet light wing. I have had a lot of success with my speed 400 racers with this
method.
Good Luck, Archie Adamisin
West Winds Fornier RF4 Rating from Grant Calkins, Muroc Model Masters (Edwards AFB), CasinoOp@aol.com
The model I've completed is the Fornier RF4 by West Winds models of the UK.
The motor used is a Graupner 480 BB Race (the recommended Speed 400 wasn't strong enough to ROG!), 7x3 prop, 7x600mAh
battery, AstroFlight #217 ESC, weight 32 oz ready to fly. On the first flight it was slightly tail heavy, and the recommended
control movements were too extreme, but it flew beautifully. There was plenty of power, and it glides beautifully, like the
motor-sailer it was modeled after. The first flight was contrasted to an actual SR71 Blackbird that flew by in the background!
Not the same planes!! I have to give this model a solid **** (4 stars).
Adding Ball Bearings to the Magnetic Mayhem from Mike Pfeiffer via the MARCEE Newsletter
The MM is a great motor for the price, but the bushings are really a weak point. I
wore out the front bushing after only a few fights in a direct-drive configuration. The bushings seem to last much longer in a
gear-drive configuration.
Making Spinners
(Some of this information came from a conversation on the eflight-list,
to which you can subscribe at http://www.ezonemag.com I'm always leery
about posting info from the list or other e-mails not sent directly to me, but this is such a great idea. I HIGHLY
recommend that you get the EFI issue with Steve's whole article in it, as this is very brief and sketchy, but the idea is
here. Please note that I have edited Steve's comments to make it clearer and hopefully more readable. km)
Take a lump (block) of balsa and impale it on a length of dowel. Chuck the dowel
up into an electric drill. Turn the block to shape and then stick the dowel in from the other end and hollow the spinner to suit your
prop nut. Cut notches on either side to clear the prop blades, and screw it to a ply backplate (essential!).
Like most other things, it gets easier as you make more of them. Since these are
made from scrap balsa that would be thrown out anyway , you have nothing to lose.
(I really like this next part. I'd never thought of it before, but it is so simple! I don't know who said the next
paragraph, but it's useful and Steve responds in the following paragraph. km)
"Apart from Steve's ideas, I have also seen a normal spinner as the front
half of the scale spinner with the rear half being made false and not rotating. This does result in the prop and motor being further
forward, but it looks OK in the air."
This is more durable than balsa spinners, it really depends on your subject. If
you want to make an exotic bird, say an Albatross D-III or Hawker Fury, you'll have to make your own spinner anyway.
(Please note that these ideas and thoughts are from: Steve Kerry,
Yorkshire, UK km)
Sprite-20 Update: From: pdelcast@idir.net (Patrick del Castillo)
Ken!!! Thanks for the spot in the Ampeer!
Unfortunately, the info you had was quite old, and is no longer accurate....
(Yikes! - even this little rag has problems with lead time! km!!)
I've shipped over 300 Sprite-20s in the last four months. They have been
VERY successful.
I took the Griffin-40 and Griffin-60 designs and rolled them into a single design,
the Griffin-50. It is a 50 amp continuous controller with BEC. It ended up only 0.7" x 1.2", so is smaller than I
originally had thought. It will be (IS) shipping by the time you read this. It retails for $95.00 and will be available at New Creations
and NE Sailplane Products.
The Pegasus is still in development as a 50 amp controller -- and the Dragon
data logger is in development, but will be an in-flight data logger only (logging voltage, current and G-loads) - so that it can be
used with brushless motors as well as brushed motors. It will also be able to log flights of over 2 hours (no longer limited to eight minutes)
Also, I have a phone number for Castle Creations: (913) 397-0813 - The phone number
you gave was my home number. :) (oops - km)
Again, thanks for the spot! And let me know if you want pictures!
Patrick del Castillo - Castle Creations
Upcoming Events:
February 13-14-15 1998 The Silent Electric Flyers Of San Diego proudly announce THE SAN DIEGO WINTER ELECTRICS A first ever fun-fly for snowbirds and escapees from winter's rigors. Will be held on the shores of Mission Bay next to SEA WORLD and a mile from our famous San Diego ZOO and AEROSPACE MUSEUM. We invite all builders and AMA flyers of electric aircraft to show us their best at a location just a mile from where Charles Lindbergh first lifted the SPIRIT OF ST.LOUIS into sky. Details on this exciting meet can be found at our website http://www.sefsd.org. A full schedule of activities is planned during daylights plus a tour of the museum and a banquet featuring as speaker, ASTROBOB BOUCHER, will be held in the evening. Equipment manufacturers and vendors are invited to display their latest achievements. For details, address - info@sefsd.net.
June 13 & 14, Knights of the Air 1998 Land of Lincoln E-Fly in Springfield, Illinois. For more information, contact Tim McDonough
June 13 & 14 the River Valley Flyers announce The River Valley Electric Only Fun Fly to be held in central Wisconsin (Wisconsin Rapids area). The CD is their club newsletter editor, Richard Ida. For more information, contact Richard Ida at Inspctr398@aol.com
June 13 & 14, DEAF/Ezone Electric Expo (in the works)
What: Sport/Fun Fly with User Friendly Competion - Anything Electric Goes!
When: June 13 & 14 (Tentative)
Where: Either Irving RC or Grand Prairie RC Field (Stay Tuned)
Events:
Speed: Fastest time between two pylons. Dive down, etc. and make “level” timed flight.
Aerobatics: Will be a simple short routine. Scoring method to be determined
Most flight: 2 minute minimum each flight. Honor system log in of # of flights
Smallest Airplane to make a 2 minute flight: "Small" = length of wing + length of fuselage
Biggest Airplane to make 2 minute flight: "Big" = lenght of wing + length of fuselage.
Stand-Off Scale: Pilot vote on best stand-off scale plane.
Speed 400 Pylon: 300’ leg x 50’ base. Man-on-man. 10 laps. Duel elimination.
Weirdest/Most Unusual: Pilot vote on "oddest" aircraft
Fun Fly: Shortest time to take off, do 3 loops, 3 rolls, land intact.
Youngest Pilot: Certificate to youngest person to fly a plane.
Oldest Pilot: Certificate to oldest person to fly a plane.
Greatest Distance Traveled: Certificate for person traveling longest distance to attend meet.
Ugliest Plane: Certificate awarded to ugliest flying plane. CD picks ugliest
This will be a low cost ($10 or less) meet. We’ve you to
decide on when the events will take place. Everyone is welcome to come out and just fly, gab,
etc. More to come in next DEAF Notes (and Ampeer km). Please contact
Frank Korman (214) 327-8411/email: FSKorman@aol.com or
Jim Bourke (972) 680-1220/email: jbourke@ezone.com
Also visit the Ezone web site: http://www.ezonemag.com/ (info from DEAF Notes, Jan. ‘98)
June 26th, 27th & 28th MARCEE98 At the 3M R/C flying field. More information to follow.
July 11 & 12 Mid-America Electric Flies to be held at the Midwest R/C Society flying field on 5 Mile Rd. near Napier Rd. in Northville Twp., MI, which is near Plymouth, MI. Hosted by the Ann Arbor Falcons, CD Keith Shaw, & the Electric Flyers Only, Inc., CD Ken Myers. Contact Ken Myers for more details.
July 18 and 19 Voltaires of Central New York Tenth Annual All Electric Fun Fly --- Grenadiers Field, Caughdenoy, NY. This is a medium (25 - 35 pilots) size event with the emphasis on FUN. We run about 10 to 12 events each day and give prizes for the events, door prizes and a drawing for really nice grand prizes. The site has a paved runway, clubhouse with power and plenty of room for camping but no hookups. The quality of this event has produced a very loyal following, or maybe it's because we feed the pilots lunch both days. Contact Garret Wikoff 315-695-4271, wikoff@ibm.net or Gordon Wheler, 5 Old Farms Ln., Cazenovia, NY 13035.
August 2, 3, & 4 AMA/NEAC Electric Nationals, Muncie, IN at AMA Headquarters. Old-timer, glider and S400 competition. Contact Doug Ward, president of NEAC
August 8 & 9 Fort Wayne ElectriFly The club is situated at a
park that also has camping sites just a stone's throw away. Saturday will be exclusively
electric flying, as well as into the evening. Sunday will be "open" flying to all
members of our club, but the field is usually vacant on Sunday mornings.
We're planning on having some night flying Saturday
evening. There will be food available most of the day, we'll probably try to hold
a dinner towards evening. More details will follow. For more information contact:
Pat Mattes Yoder, IN
FOR SALE: Airtronics Infinity 660 - Brand-new - 6ch., 4 102 servos, 600mAh Rx battery,
Channel 15 - $300
Contact:Doug Kursinsky, 37752 Jerome, Sterling Hts., MI 48312 --- (248)264-5014. Sorry,
he doesn't have an email address.
To Reach Ken Myers, you can land mail to the address at the top of the page. My E-mail address is: KMyersEFO@aol.com EFO WEBsite: http://members.aol.com/KMyersEFO/