|
Flying High With Electric Power!
The Ampeer ON-LINE!
Fly the Future - Fly Electric! |
|---|
Site Table of Contents
| President: | Vice-President: | Secretary-Treasurer: |
| Ken Myers | Richard Utkan | Rick Sawicki |
| 1911 Bradshaw Ct. | 240 Cabinet | 5089 Ledgewood Ct. W. |
| Commerce Twp., MI 48390 | Milford, MI 48381 | Commerce Twp., MI 48382 |
| (248) 669-8124 | (248) 685-1705 | (2480 685-7056 |
 | ||
| Board of Directors: | Board of Directors: | Ampeer Editor |
| David Stacer | Arthur Deane | Ken Myers |
| 16575 Brooklane Blvd. | 21690 Bedford Dr. | 1911 Bradshaw Ct. |
| Northville, MI 48168 | Northville, MI 48167 | Commerce Twp., MI 48390 |
| (248) 924-2324 | (248) 348-2058 | (248) 669-8124 |
| The Next EFO Flying Meeting: Date: Sat. & Sunday, July 8 & 9 Time: 10 a.m.
Place: Midwest RC Society 7 Mi. Rd. Flying field It's the Mid-Am!!! | ||
| Selecting An Electric Power System, Revisited Ken Myers updates his process for selecting a successful electric power system. | MODEL AERO SPORTSTER, a Review Joe Hass reviews and gives some building tips for this fun little sport plane. |
| Denny Sumner's Monocoupe 90A Maiden Flight report with photo. | Mark Rittinger's Trishula Flies! Flight report with photos. |
| Mark Rittinger's New P-51 Flight report with photo. | Upcoming Event - Cards of East Lansing, MI - 7th Annual Electric Fly In Marv Thomson, CD, gives details on this fun event at a great flying field. |
| More on the ESC Problem in the FMS SuperEZ Ken reports the results of his trouble shooting his student's power system problem in the FMS SuperEZ. | Upcoming Event - Skymasters' Electrics Over Lake Orion Pete Foss, CD, gives details on this fun event including a night fly and bonfire. |
| The 2017 33rd Annual Mid-America Electric Flies Links to this year's flyer and map | Upcoming E-vents Events noted on the Events page. |
By Ken Myers A friend of mine just finished up a kit, a Great Planes RV-4 .40-size Sport Scale Airplane, using an electric power system. Pertinent glow SPECIFICATIONS
The maiden was done using a 4S A123 2500mAh pack. The plane weighed 7 lb. 4 oz. on the maiden. The motor was an O.S. Motor OMA-5010-810. That motor was reviewed in the February 2013 Ampeer. It flew, but it was apparent that it needed a bit more oomph. In March of 2017, I did a presentation at the Midwest RC Society. The topic was "Selecting an Electric Outrunner Motor Power System". At that time, I updated my previous Web page on that topic on the Ampeer Web site, but I never included a writeup about it here in the Ampeer. The updated article and Excel workbook are found here. Another link is found on the homepage, and may have been overlooked by many, including myself when I was trying to find it again!!! The RV-4 is being used to illustrate how to select a power system based on that article. This is kind of a condensed, Cliff Notes, version. Full explanations are in the article. When doing a glow conversion, the only things that need to be known are; the sizes, in cu.in., of the LARGEST 2-stroke and 4-stroke motors (2-stroke .52 and 4-stroke .70), the maximum weight in pounds (6.25 lb.) the wing area (631.6 sq.in.) and the largest diameter prop to allow for ground clearance (13" according to an email from the pilot). 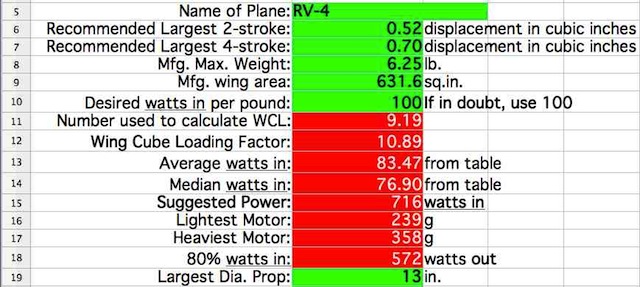 (The article also describes what data to use, and how to use it, for an airplane designed for electric power. That is not covered here.) The next required input is the prop pitch. There is a table on the spreadsheet that recommends pitches based on the Wing Cube Loading (WCL) level. Wing Cube Loading and Typical "Type"
More information on the WCL can be found on the Ampeer Web site, Table of Contents page. There are five articles relating to this comparative number under the heading "Wing Cube Loading (WCL)". Unlike the value for wing area loading, with its units given in ounces per square foot, the WCL value has no units. A quick calculation of the WCL for the RV-4.
The spreadsheet does the math. This is only presented for those who are curious about how it is derived. The spreadsheet indicates that with a WCL of 10.89, it is a WCL level 5 plane.  A 10-inch pitch was chosen for this example. After the prop pitch has been entered, the completed data looks like this. 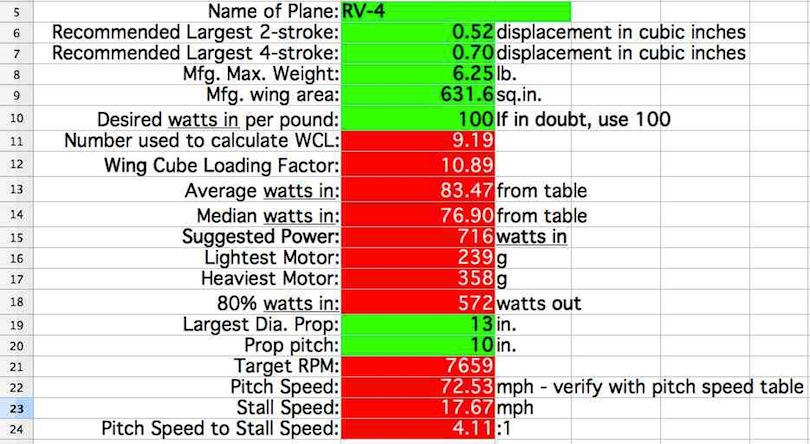 If the Target RPM of 7659 can be achieved, the theoretical pitch speed would be 72.53 mph and the pitch speed to stall speed ratio would be an excellent 4:11:1.  The review section has one more input, desired flight time. This input determines the suggested battery capacity. The review section shows that we are looking for an outrunner motor that can turn an APC 13x10E while requiring about 700ish static watts in. The motor should weigh between 239g and 358g. The complete article explains why Cobra motors are used during the motor selection process, how to select them by weight, and how to substitute other brands of motors.  The Work Area is where possible usable motor data is recorded from the Innov8tive Designs Web site. There are more rows than shown here, but these were the only three Cobra motors weighing between 239g and 358g that might possibly turn an APC 13x10E at somewhere near 700 watts in.  The Results area shows that the Cobra C3525/18 would be a good choice. It has a good system efficiency and a good ratio of volts out at the motor to volts in at the ESC. A 6S 2000mAh LiPo battery should yield the 6 minutes of desired flying time. An ESC rated for a 6S LiPo packs at 40 amps should be just fine. 2000mAh LiPo cells are not common at this time. A typical pack might be a Glacier 6S 2200mAh 30C. My friend wants to use A123 2500mAh cells instead of LiPo cells. I recommend using A123 2500mAh cells at about a maximum of 35ish static amps. That yields about 100 watts in per cell at the ESC and a flight time of 6 to 7 minutes, depending on throttle management and the pilot's mission. There is a second spreadsheet in the Excel workbook for A123 2500mAh cells. 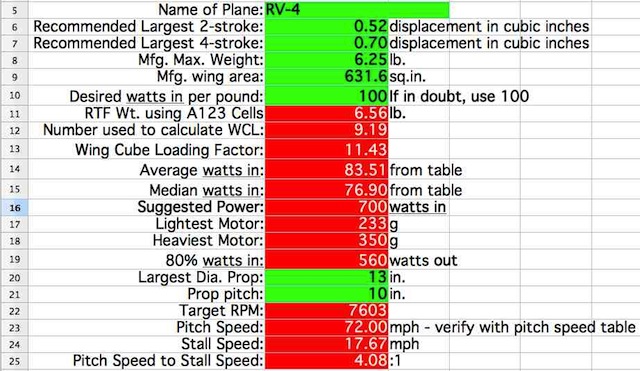 The same data was input into the A123 spreadsheet.  A123 2500mAh Results are presented a bit differently. Only the Kv range and motor weights are shown for selecting a motor.  Either of the two selected motors should be just fine. As noted in the complete article, motors in the same weight and Kv range can be substituted. An alternate motor might be a Great Planes Rimfire .80 50-55-500 Outrunner Brushless 298g, Kv 500. For any of the motors selected, the prop may have to be adjusted to fine tune the maximum static amp draw of about 35ish for a flight of 6 to 7 minutes. The whole article goes into a lot more detail, with a lot more explanations. The RV-4 workbook can be downloaded and used as a template for other projects as well. MODEL AERO SPORTSTER, a Review
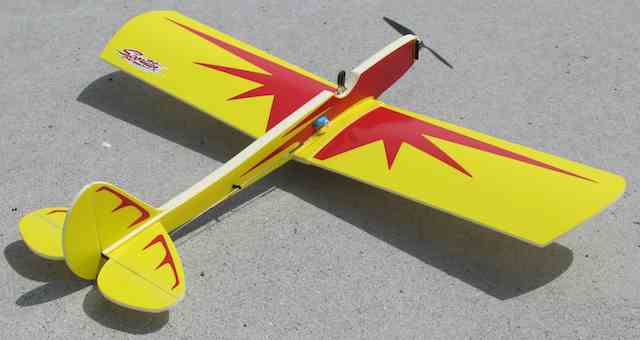
Specifications (from website)
This is my third Sportster. The first appeared in the fall 2015 issue of Park Pilot as a review. I had purchased a kit from Scott DeTray, of Model Aero, at the Weak Signals RC Expo in Toledo. I fell in love with the "Spacewalker" look; long "full" fuselage (made up of laminated foam), included decorations and preformed airfoil wing. The instructions come on a disk that includes all the Model Aero kits. Take a look at their new SPIRIT for something that is fun off grass, water or snow. The instructions call for a typical build and equipment installation. The airframe is completed before the installation of hardware. After looking at everything, I quickly departed from the norm. Let's start with adhesives. Obviously, foam safe CA has its place, but most of the build can be completed with spray on contact cement, Foam Tac or epoxy. On the third build I used 30 minute epoxy (thinned with 70% isopropyl alcohol) to laminate the fuselage, wing doublers and wheel pants. Foam Tac, if allowed to migrate to the edges, becomes hard to sand. Contact cement gives you one chance to get it straight. I liked the ability to adjust things. I used the thinned epoxy very sparingly, immediately cleaning up anything that migrated to the edges. While I can't explain it, the thinned 30 minute epoxy sets up in about 10 minutes, so the work went quickly. The wings are joined with 3 plywood stiffeners. After the adhesive (epoxy) sets, apply the wing decorations. These are made of self adhesive vinyl. Clean the wing with a tac rag or tape to remove all contaminates. Position the vinyl and let it set for about 10 minutes. S L O W L Y remove the carrier tape. You may have to use a blade to keep the edges of the vinyl down as you remove the tape. Set the wing aside to let the vinyl grab unto the foam. I try to allow the vinyl 24 hours of undisturbed time on the foam. You will see how it attaches itself over time. Sand the edges of the top and bottom of the foam fuselage square using some 80 grit paper on a block. Do not round anything yet. Apply the fuselage vinyl using the cockpit area as the primary alignment tool. Make sure you haven�t put a twist in the fuselage and set it aside like the wing. Repeat the process for the wheel pants. I had to trim the wheel pant vinyl to get it to fit correctly on the foam. I preferred to paint the plywood parts black. Mask the areas that need to be glued. I used quick drying spay black. Move on to the horizontal stab and elevators, joining the elevators halves with the carbon fiber joiner and then hinge the surfaces with 3M Blenderm tape. Apply the vinyl decoration to the horizontal stab and let it set. The instructions call for an exposed radio installation. I wanted to hide as much as I could. Open up a slot in the middle fuselage piece to allow the servo wires to pass through the fuselage and wing. 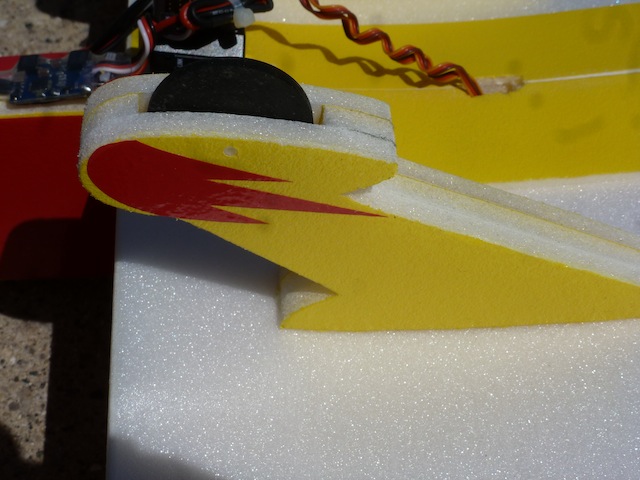
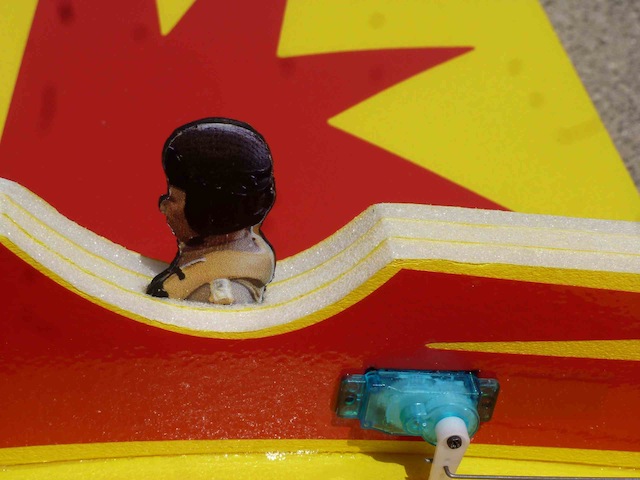 Cut the vinyl at the servo locations and fold it in. Only cut one side for each servo. Epoxy the servos in place with the servo wires passing out the bottom of the fuselage in the wing cradle area. Remember the wing hasn't been attached yet. Attach the horizontal stab and elevator making sure it is centered and square. I used foam safe CA. Attach the rudder to the vertical stab. This gets tricky as the vertical stab is part of the center of the fuselage. An extra set of hands help or simply prop up the fuselage to allow easy access to the joint. It will take 2 pieces of Blenderm on the rudder, one for above the elevator and one below. Next create the pushrods and guides and set up all of the control throws. Again, the wing is still not attached. Not much elevator throw is needed. I used the second hole. I used 5 minute epoxy for the control horns. 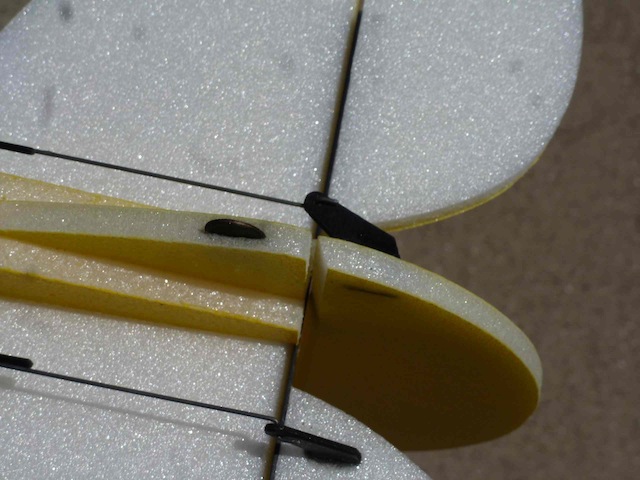 Pre-drill the holes for motor mount before attaching the mount to the fuselage with epoxy. A little right and down thrust can be can be added before the epoxy sets. 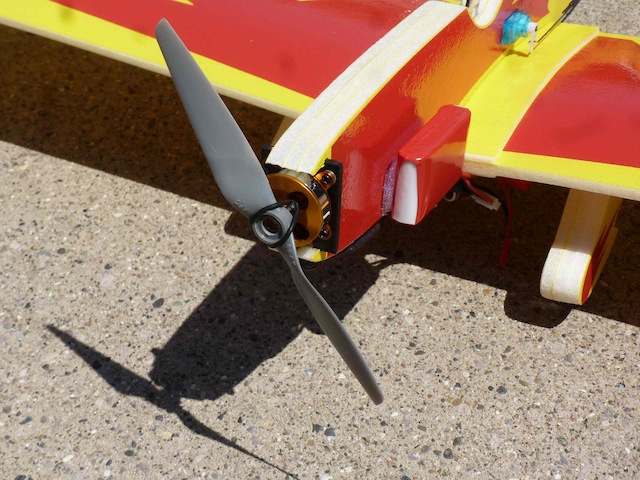 With the motor mounted, the ESC can be double sided foam taped to the bottom of the fuselage. Test fit the wing to the cradle. Sand as needed. I have used both foam safe CA and epoxy to hold the wing on. Cut a slot for the servo wires and attach the wing, making sure everything is square. While that is setting, attach the wheels to the wheel pants. Trim off the top of the alignment tabs on the wheel pants so that they just protrude into the wing (otherwise they will protrude up to the vinyl). Attach the wheel pants to the wing. I have used either Foam Tac, 5 minute epoxy or foam safe CA for the wheel pants. If you have the version of the Sportster with the painted wings, now is a good time to go over the edges with some 120 sandpaper on a flat block. You don't want to sand too much. Just take the edge off the foam creating a small radius on all the edges. I changed the covering on the 3 cell 450mAh Li Po to red heat shrink that is close to the red on the fuselage. It helps hide the battery. Self adhesive Velcro holds the battery to the side of the fuselage. I added a small carbon fiber strip to help support the battery (see picture). 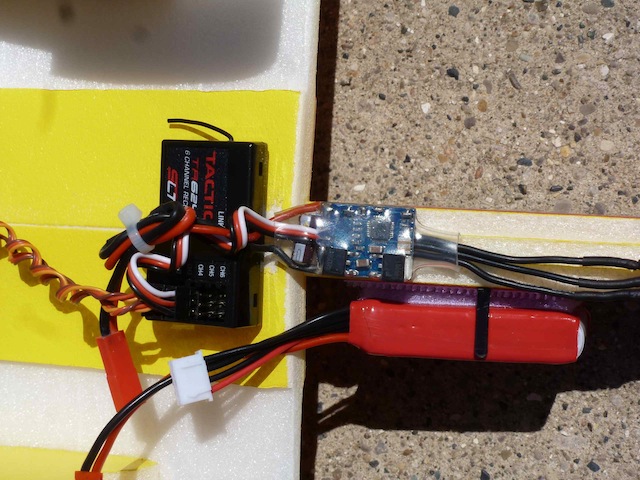 The receiver is held to the bottom of the wing with double sided tape. On occasion I fly off of concrete, so I added a skid or wheel to the tail. The kit includes a "foam" pilot with stickers. I found it better to attach the stickers to some 1/16 plywood. The pilot sticks out a bit and becomes an easy target for hanger rash. Set the control throws and center of gravity (CG) per the instructions. Moving the battery should get you close. I did the first flights indoors. Slowly advance the throttle. It should be off at about 1/3 throttle. Cruising around is fun. Lazy Eights are easy. Loops are nothing more than advancing the throttle and gently pulling up elevator. You will need to fly it through the loop, working the throttle a bit. Touch and goes are a breeze. It is so neat to see the wheels on the ground and the tail hanging in the air for what seems like forever on landings. I have done flying circles with one wheel on the ground. Play with the throws and exponential to suit your style of flying. I programmed the rudder stick to the ailerons in case I forget what I am flying. I get tired before I run out of battery because so much of the flight is at 1/4 throttle. One local flyer added ailerons to make his 'full house'. It is just as easy to fly outdoors. Just watch the wind conditions. Resist pulling a lot of up elevator with full power. I have really flexed the wing at times. This is a fast, easy foam build that gives you the illusion of a home built or vintage era aircraft. It doesn't take a lot of room to fly or store. It is perfect for some schoolyard flying at lunch time. Joe Hass
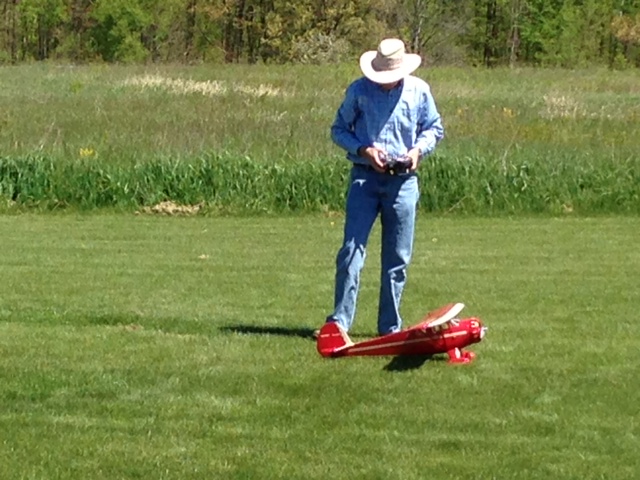
Denny Sumner's Monocoupe 90A Maiden
On Monday, May 15, Denny Sumner maidened his new Jim Young designed Monocoupe 90A. The model was built from the third prototype kit by Jim. The kit is now available through Manzano Laser Works. The specifications from the Manzano site:
With 0.7 oz. of lead in the cowl, Denny's weighs in at 54 ounces. The maiden flight was very successful. The photo shows Denny getting ready for its second flight of the day. There is a lot more information on his build and maiden flights in his build thread on RC Groups. There is also a short video of part of the second flight. Mark Rittinger's Trishula Flies!
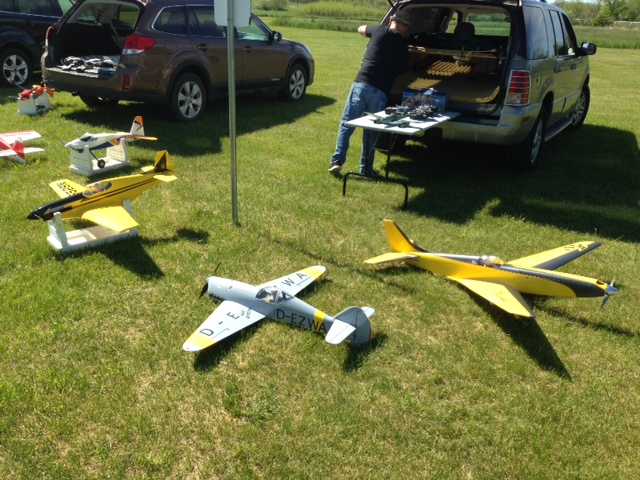
Mark Rittinger's Trishula, far right in the photo, awaits its first flight at the Midwest RC Society 7 Mile Rd. flying on Monday, May 15. 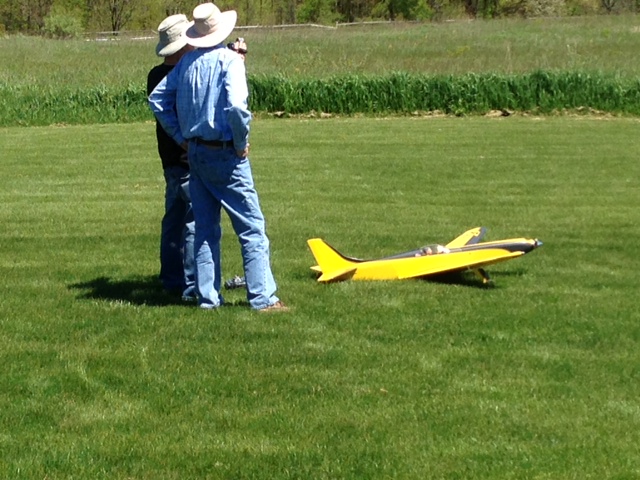 Denny Sumner and Mark discuss the preflight and flight plan for the maiden flight. The wind was quite gentle and down the runway from the east. Due to the spring rains, Midwest's grass was a bit 'plush' and longer than it should have been. It turned out that the grass did not hamper the Trishula at all. 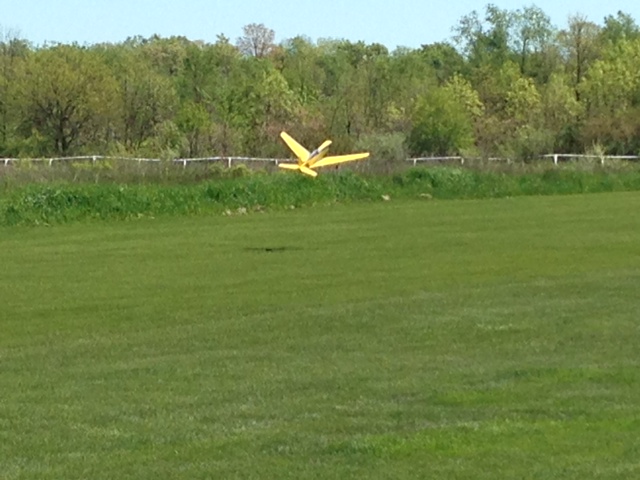 The photo shows 'lift off' on the maiden flight. A lot more information and video of the flight can be found in Mark's build thread on RC Groups. The Trishula has a wing area of 576 sq.in. and weighs 87 ounces. The WCL is 10.88. Mark Rittinger's New P-51
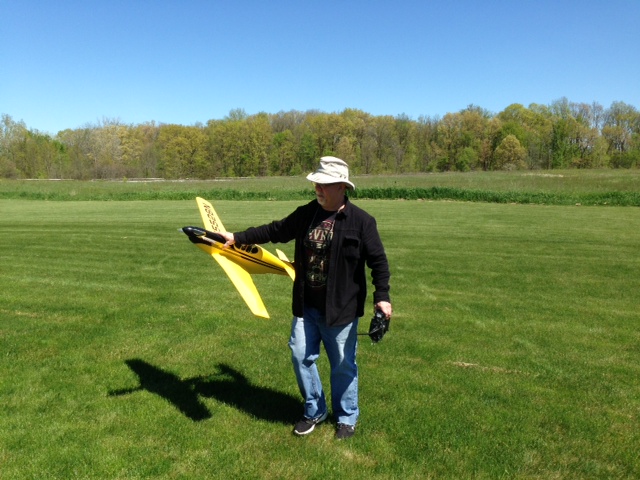
On the same day that Mark maidened his Trishula, he also did a maiden on his new P-51. Denny Sumner did the hand launch, and flew perfectly from the launch. This is one of those, "It only took a couple of clicks of aileron trim.", fly it off the building board, planes. Mark was all smiles, and rightly so. This is one great looking, great flying plane. Details on this version can be found in the RC Groups thread titled "Mike's 48" P-51B Mustang Build - Vlog". Details of Mark's version can be found on page 6 of the thread. Mark has designed several variants of the P-51 over the years, and this is one of his best looking and best flying. This version uses and E-flite Power 32 770Kv, APC 14x10E or 14x12E prop and a 3S 2700mAh LiPo pack. The wing area is 350 sq.in. and flying weight is 52 oz. That yields a WCL of 13.5. Congratulations on another great design Mark! Upcoming Event
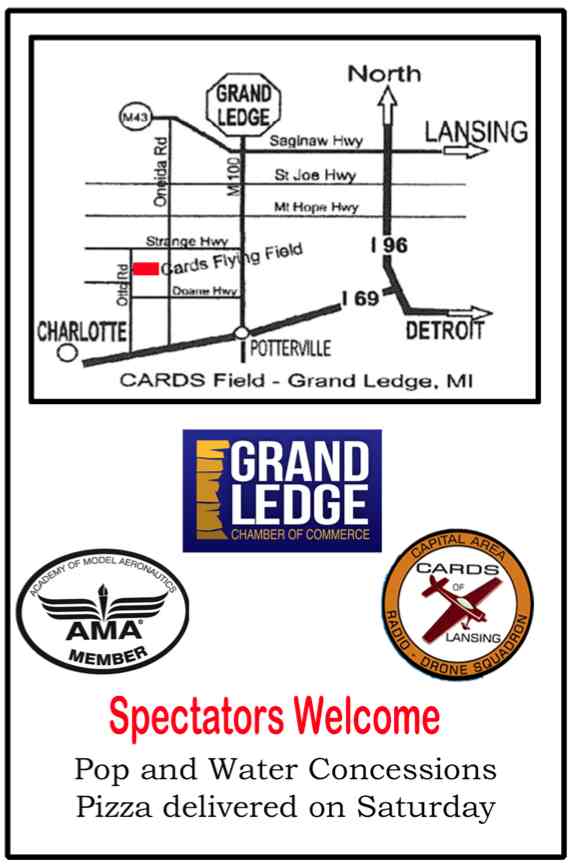
When: Friday August 25 4:00 pm - 9:00pm and Saturday August 26 from 9:00 am to 9:00 pm
Landing Fees: $15 (includes Pilot Pizza & Soda ) CD Marv Thomson 517-8027675 or mthomson@wowway.com Website: www.cardsrc.com Address: 8328 Otto Rd, Grand Ledge, Mi 48837 More on the ESC Problem in the FMS SuperEZ
I reported in the June 2017 Ampeer that the power system in one of my student pilot's FMS SuperEZ trainers was having a problem. He was told by someone over the phone at Motion RC that the ESC or motor would be replaced, once he knew which one was causing the problem. Since a new pilot does not have the equipment to determine what the problem might be, he removed the ESC and motor from the plane. I took the motor, ESC and one of his LiPo batteries home to trouble shoot and locate the problem. I had a 'spare' ESC from a Freewing Pandora that had the correct size bullet connectors on it. The motor from the SuperEZ ran perfectly with Freewing ESC. I tried the Freewing motor with the SuperEZ ESC and the motor only 'jumped back and forth', like it was doing with the SuperEZ motor. Obviously, the ESC was the problem. I removed the shrink tube from the three motor leads on the ESC and resoldered the connections. The problem persisted. I removed the original bullet connectors, cut the three ESC wires back a little and soldered on new 3.5mm bullet connectors. The 'jumping' problem still existed with both motors. There was definitely something wrong in the ESC itself. My student called Motion RC and reported that it was the ESC. They would not replace the basically new, faulty ESC. I gave him the Freewing ESC, and he installed it in his SuperEZ. Problem fixed, no thanks to Motion RC. Upcoming Event
June 24, Saturday, 8 p.m. - 12 a.m., June 25, Sunday, 8 a.m. - 2 p.m.
No Landing Fee! Refreshments available at event
Flying open to all AMA members. Flying field is located within the Bald Mountain Recreation Area, about 5 miles north of the Palace of Auburn Hills All vehicles require a Recreation Passport available from Secretary of State or DNR. For more information email electricfly@skymasters.org
The 2017 33rd Annual Mid-America Electric Flies This year's event takes place on July 8 & 9. The flyer has all the information about the event, and the map and hotel list contains information of the location of the event an area hotels. To Reach Ken Myers, you can land mail to the address at the top of the page. My E-mail address is: KMyersEFO@theampeer.org |