| |
The February EFO Meeting

Richard Utkan shared information on his GWS 8-channel Dual conversion
receiver. It weighs 0.8 oz. and has a switch to change between positive and negative shift, making it easily usable with all
brands of transmitters.
It was also noted by other club members that one of the FMA receivers and the Hitec Supreme have automatic shift for use with all brands of transmitters.
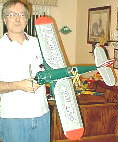
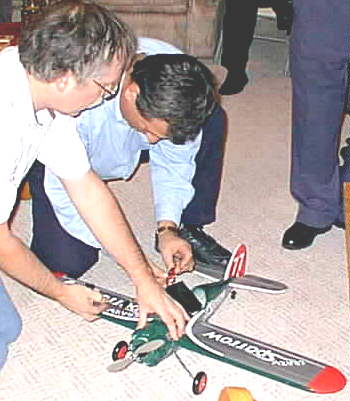
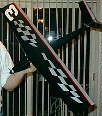
Richard also shared his Crazy Sparrow. Power is a Graupner Speed 300 with an
MPI 5:1 ratio ball-bearing gearbox. He‘ll probably use a 7-cell 350 mAh NiCad pack, but a 7-cell 600EA pack is not out of the
question. (Flight Level 4 with either 350 or 600AE pack KM)
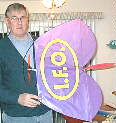
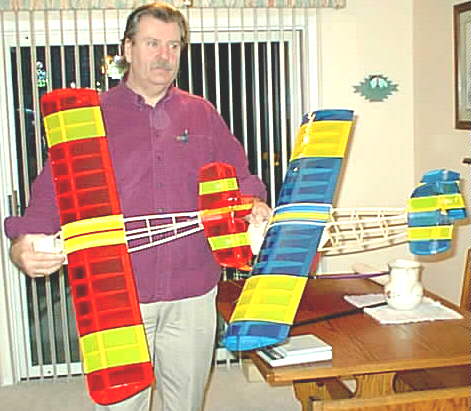
Norm Dmuchowski showed off his IFO Trainer. It features
throttle/elevator/rudder control and has 2 wheels. It uses a GWS A motor. It weighs in at 7.2 oz. and uses a 7-cell 300 mAh
NiMH pack with a GWS receiver.
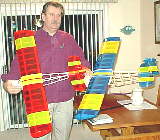
Ron Lalinsky shared some interesting pushrods that he’d found at a swap
shop. The appear to be Kevlar and used in building kites. They are $8 a piece.
He’s built up two Robin Hood 10’s from plans that he’d also found at a swap shop.
As seen, they weigh 7.6 and 7.8 ounces. Ron noted that he really likes the fast building of smaller models.

We tested out the motor on the Crazy Sparrow to see how many amps are being drawn. Rich is using a “servo tester” in place of a speed control. Measurements are being taken with the Astro Flight Whattmeter.
Ken presented some preliminary data on a math formula for finding a “good running amperage” for cells. He also presented a lot of plane data and attempted to explain his Flight Levels and how he derived them.
Return to "What's In This Issue?"
Create Your Own Decals
By Lionel Bernstein
Via the AMA National Newsletter
From Wing Tips
Lionel Bernstein, editor
6 Norman Drive
Bohemia, NY 11716-1322
To accomplish this task you must have a computer ink jet printer, scanner, and a
desktop publishing program or a friend who owns these items.
I like to try new ways to use my computer system, so when I ran across the
INVENT IT! brand ready-to--print Clear Decals by HammerMill Paper at CompUSA, I purchased it. I was determined to
find a way to use what looked like an interesting idea.
It was my intention to use the Clear Decals film to make decals for my car
side windows, but never got around doing it.
Recently, I was completing a scratch-built model, The Stikota, which was a
Tom Hunt redesign of an old Free Flight model called The Dakota, circa 1950s. I decided to use the decal material, which
was gathering dust, to make up some graphics for the finished model.
Since the material is a clear film and you can print any color with your ink jet
printer except for white, I made it a point to cover my model in some areas with white Monokote This meant my homemade
decal would stand out on the white background.
If you are going to just make up an AMA number or a name decal like my
"Stikota" that will appear on your model’s wing panel, you should be able to do this with very little effort.
First, you must scale the graphic so it fits on the wing panel. Once you have
the size selected, you can play around with the various fonts to find that which best suits your model. You will find them in
your computer’s bank of fonts located in the desktop publishing program.
Before you print it on your clear decal stock, make some test prints on bright
white stock paper. See how it fits on the wing panel where the final decal will be attached. It is here that you will adjust the
size of the font so it will fit your model.
Some computer programs let you design a graphic logo that you use on the
engine cowl or rudder of your model. Let your imagination guide your efforts. Make sure you save what you design in your
computer, as you can waste hours of work if you are not careful.
Now to the scanner. If you are building a scale WW I model and need some
authentic markings, obtain the largest color pictures of’ these markings from a set of scale three-views and scan the items
you need for the model into your computer.
Once you have these saved in your computer’s clipart file you will be able to
crop out the unwanted portions. Edit out any lines that might be distracting and scale them to the size you need.
It is very simple to now copy it to your work sheet with the numbers and
names you designed before. This will allow you to print the most you can fit on the 8˝ x 11 sheet of clear decal material.
The decal sheets run about $1.00 each, so get the most for your money. Plan to make up a sheet with every space utilized
with some kind of graphic.
The actual printing is simple. Set your ink jet printer for highest quality printing
to get the densest print image on the film. Allow extra time for the final printed sheet to dry before touching the inked area.
Failure to wait for it to dry will smear and ruin your work.
Now cut out your decal, peel off the backing, and stick it to your model,
smoothing out any trapped air bubbles.
If you should decide to make a decal for your home or car window, just set the
printer for flip horizontal printing and your final work will now be able to be attached to the inside of a window and will read
in the proper way. Remember, put these reverse printing items on a separate sheet of decal film as everything on the sheet
will print reversed.
To use with glow or gas powered motors, over-spray the decal with a clear
fuel proof paint or iron over the decal with clear Monokote to protect the image from fuel exhaust.
Have fun with this easy to use, ready to print, clear decal material.
Return to "What's In This Issue?"
LINKS REMOVABLE TAIL-WHEEL ASSEMBLY
Via Loops & Lies October 2001
River Valley Flyers Newsletter
Edited by: Rich Ida, P.O. Box 1013, Wisconsin Rapids, WI 54495
A lot of the kits out these days either have you mount the tailwheel right on the
rudder (ugh!) or have the tiller sunk into the rudder.
There are some problems here - if the tailwheel is mounted on the rudder, all the
shocks from that wheel are taken up by the rudder hinges! Not recommended for long life.
The better system is to use a tailwheel bracket to take all the loads - but if the tiller
is embedded in the rudder, there are still potential problems.
- There is little turning shock absorption; most of those shocks will be transmitted back to your servo.
- After a bunch of landings, the tiller tends to turn the inside of the rudder to mush.
- If the tiller breaks through the rudder, or if the wire strut breaks, there is no way to remove and replace it without ripping up
half the rudder.
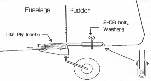
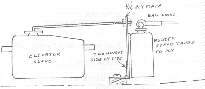
A removable assembly, as shown in the diagram, circumvents those problems. Use a wheel collar on the bottom to transmit the loads to the bracket. On the tiller, put on a piece of inner Nyrod, then some fuel tube - this will help dampen turning shock loads, easing the loads on the rudder servo. The yoke that goes around the tiller and is bolted to the rudder can easily be bent from clevis rod wire. And the bracket does NOT have to be lined up with the rudder hinge line.
Return to "What's In This Issue?"
To Fly or Not to Fly OR Lightning Never Strikes Twice
By Frank Korman
Via September 2001 Deaf Notes
Editor: Greg Judy, 212 Freedom La., Arlington, TX 76002
The reasons and causes for not actually flying one’s models while at the field are
too numerous to enumerate, but over the years I’ve managed to realize quite a few. Even so a new one popped up recently.
There I was ready to toss the Dallaire to its doom when, upon wiggling the sticks
for the second time, I noticed a speed controller burp. Oh great, I thought the little black box is not happy all of a sudden. Then I
noticed the tail feathers were not moving as they had a moment ago.
Finally, I noticed the battery/signal strength meter on my transmitter was falling
rapidly into the dead zone. Odd I thought as the transmitter battery is almost brand new and I had it on charge overnight. Trudge,
trudge back to the pits.
The battery was removed and checked. Sure enough it was in a coma.
Fortunately, Bobby Dixon had the right connections and we quick charged the battery so that I was able to fly out the session
with no problems. I felt very lucky that the battery had failed while the plane was still on the ground.
Now to the cause: I use the wall charger that came with the transmitter and have
been doing so with success for more years than I care to admit to, but had recently noticed that the little LED’s came on
intermittently. In fact they ceased coming on altogether right after a (rare summer) lightening and thunderstorm. Even so I still
used the charger (how’s that for brains?).
When I mentioned this to Bobby he suggested I unplug the charger and check the
prongs with an ohmmeter. If all is OK, I should see some resistance displayed. Well, I did check two wall chargers used for my
JR transmitters and guess what, they both registered zero resistance. Just for fun I checked an Airtronics wall charger and it
showed about 375 ohms resistance.
So I learned two things, and was reminded of another. One, it’s a good idea to
unplug wall chargers when they are not in use, or at least plug them into a device which protects against electrical spikes. Two, if
in doubt you can us an ohm meter to check the “life force” of a wall charger. And always check radio function thoroughly before
every flight.
Return to "What's In This Issue?"
Oh, Those Park Flyers
by Russ Cleversley
from The Flight-Log
Radio Control Aircrafters of Western New York
Ross Cleversley, editor
Cheektowaga, NY
Via AMA National Newsletter
Recently I was driving by the West Seneca Soccer field off Last and West
Road, I noticed a family out on the field flying to fly a park flyer airplane.
After observing from the sidelines for a short period it became obvious that the
father did not know how to fly the airplane. I strolled over to him and identified myself as a member of the RC Aircrafters
and described what we are all about. He then asked the anticipated question, "Can you fly this thing for us?"
Never having flown with rudder and stab before I told him that it may take me
a whack or two to get it right. Fortunately, the airplane had a nice hand-launched glide to it and after having him slowly toss
the airplane a few times I was ready to power up the tiny electric motor.
As the mini craft left his hand it climbed nicely and the slow speed allowed me
to quickly gain some in-flight feel. The most significant part of the flight was the look of awe written on their faces when the
airplane was, indeed, flying. Gazing back at the boy was the most enjoyable. His expression was carved from sheer
amazement and fascination.
I gauged him, Robert, to be around 11 years old, distinctly discovering that he
was nine and a half. The flight only lasted for a few minutes, and I kept the airplane in close anticipating the depletion of
power.
The landing brought a round of jumping, clapping, and cheering from the now
delighted family. I now know how Lindbergh felt when he dropped his craft onto the shores of France.
After a quick charge we were set to go again. The father, Bob Sr., not
wanting to look inept again, declined the first offer to try it out. Robert got so excited when he realized that he could try it that
he stumbled while charging over to me and fell face first into the soggy turf. Unfazed and never stopping his forward
progress, he bounded up and was at my side in a flash. Not having a buddy box did not pose any problems-the airplane
literally floated at a maximum speed of three to five miles per hour into a barely perceptible breeze. Flying upwind and
hands-off it hung nearly motionless in the sky. When Robert took the radio his excitement ignited the calm air. With minimal
coaching he began his first Radio Control (RC) flight. He did amazingly well, a tribute to youth, I suppose.
Aware that his father was feeling a little left out and with his pride somewhat
compromised, I convinced him to try it on the next flight. I sensed an uneasiness that froze his expression and trembled his
hands. Before we took off, I went through the things that he, as a new RCer, would need to be responsible for, giving him an
informational edge that would set him a level up from his son.
We toggled the controls and then it was launch time. Steadying the airplane at
a safe altitude I handed the radio to him and began giving quiet, almost inaudible instructions. Each second brought a new
level of confidence until the pure joy of flying overflowed into a pool of exhilaration. As the power seeped away he tried to
hand the radio to me. Instead, I continued to give him reassurance as the airplane began a graceful, feathery descent. As it
touched down, Robert Jr., acknowledging a true modern day hero, ran to his father’s side and they embraced while reveling
in their accomplishment.
After humbly accepting their gratitude, it was time to leave them in their
pristine moment of splendor. A treasured memory was born and shared between strangers. One that I will never forget.
The controversy over park flyers will intensify in the coming years. Yes, they
can be a hazard to established RC fields such as ours. To me it simply means that we need to be keenly aware of what is
going on around us while at the field. With our experience and knowledge the burden falls squarely on our shoulders. I
noticed on the Great Planes Web site that they include a warning about flying their park flyers near RC fields. It will take
some prodding by all the RC clubs to get every supplier to place these warnings on the packaging, instructions, and Web
sites. But the adventuresome side of human nature has often precluded good judgement.
The vast majority of the park flyer crowd will fly a few times and then move
on to something else. Attrition will help to keep the threat of interference at a manageable level. Those who realize that there
is much more to RCing will eventually get involved with a club. That is another great reason for all clubs to stay involved with
the public. Not only is it a great opportunity to enlist newcomers, it is also a superb venue through which we can educate
them and ourselves.
The experience at that West Seneca field hopefully is repeated and cherished
by many seasoned RCers worldwide.
It is uncharacteristic of me to be so open with a stranger unless it is an
emergency situation. RCing seems to bring out some great human qualities There is a lot of that quality in our club and others
throughout the world.
Let’s go flying!
Return to "What's In This Issue?"
Flight Log
by Edward Russell
from Talespins
Aeromasters MAC
David Hoe, editor
Fredericksburg, VA
via AMA National Newsletter, July 2001
I recommend that everyone should try to maintain a log each of your planes,
especially a new airplane. This will add greater interest to your flying. Entries in the log should contain; date, time, weather,
and a short summary, number of flights, failures, success, etc. I consider a flight as a takeoff and landing. I have maintained a
log on my Seniorita, and it now has reached 533 flights without incident or engine failure.
Remember, a well-maintained airplane will look better, fly better, fly longer,
and provide more joy.
Bob Kopski has done this forever. I’ve done it "on occasion."
I’ve kept both paper and electronic logs. I have a Psion Series 5mx PIM/PDA. It has a built in keyboard, and is
very easy to use at the field. To learn about the Psion: members.aol.com/kmyerspsion
I highly recommend it over the much better known PDAs.
I also have a Palm III with an attachable keyboard. I tried to find the RC
Flight Log mentioned on the eflight list, but it seems to have disappeared.. I did find the Modeler‘s Logbook at:
www.computassistomaha.com/ml/ .
It is Free to try, $8 shareware. KM
Return to "What's In This Issue?"
Building Tip
from Radio Flyer
Pikes Peak Radio Control Club
Bill Sanderman, editor
Colorado Springs, CO
via AMA National Newsletter, July 2001
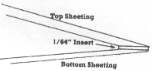
If you have a wing or tail surface that has overlapping sheets which form the
training edge, put a strip of 1/64-inch ply between the sheeting to provide a harder edge for sanding or finishing.
Return to "What's In This Issue?"
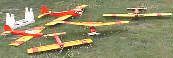
Five of Ken’s planes seen at the Fort Wayne fly last summer. (left to right) Lightening E-250, SR Batteries X-250, SR Batteries Cutie, Spickler Q-500, (rear left) TigerShark.
Return to "What's In This Issue?"
Tracer E-Conversion
From: Clarke "Tex" Gehman eliztex@shaw.ca
Winnipeg (Sabrejock)
Ken, I thought I might tell you about one of my more recent conversions: the
TopFlite (GP) "Tracer". It's my understanding that this kit is the replacement for their "Astra Sport"
aerobatic success of years gone by.
I saw the Tracer fly with glow power and was impressed by its lines and tracking
in maneuvers. I had test flown mine with my AF15SB and 12xRC2000's. I was not terribly impressed. Then Greg Gallego's
admonitions kicked in and I started stuffing in more cells.
For weight purposes I decided on Sanyo CP-1700SCR. On the bench added cells
and added cells until I got to 16. I was changing props as I advanced the volts and ended up with an APCe 12x10. I'm getting
about 450+W (still at 25A) off charge settling to about 430W. I know people are going to chide me about that, but hey, it's my
motor, and the plane really performs. Big round loops and really tall up lines, which I like. It weighs just a tad under 5 lbs.
(box says 5 1/2 lb. with a glow engine, so read 6 ish). So the only thing TF are the stickers!
I fly big gasoline powered aerobats too, and am kinda' hard to please when I opt to
do aeros with E-power. I think this one is going to satisfy me.
(I asked for more details on the power system. KM)
I just checked the RPM on the Astro 15 with Super Gears (3.69:1). 16 x CP1700
and an APC 12x10E
Off charge: 6750 @ 24A measuring 18.5v (about 450W)
Stable: 6400 @ 22.5A measuring about 400W
The readings were taken with a SuperWhatt meter.
These cells are new, having been "massaged" only a couple of times.
I expect them to improve in delivery with a bit of use. I also see that if I'm careful with the throttle just off charge, I could likely
prop it a bit more. It's a very clean airframe, so I know that the amps will drop considerably in flight with the low RPM. I'll fly it
a bit and perhaps go to 12x12. Greg G. informs me he's using up to 500W static with the 16 cell setup with no apparent detriment
to the motor. Amazing, these little gems!
Return to "What's In This Issue?"
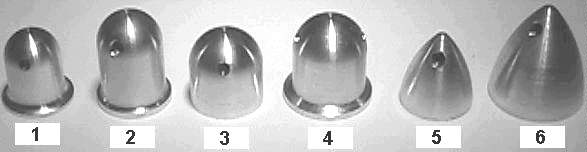
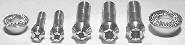
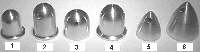
Bullet Spinners
8233 Indy La.
Indianapolis, IN 46214
Phone: 317.271.1010
bulletspinners.com
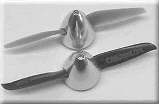
These are High Performance Spinners that have been Competition proven. They
are 2024 and 7075 Billet Aircraft Aluminum, 100% CNC Machined- Ultra-Light weight, heat sinked, for High Performance
electric motors.
There are also scale spinners as well as:
Collet Prop Adapters
(All Photos from Bullet Spinner’s Web site)
Please call or visit the Web site, sizes and most recent additions.
And Bullet Nuts
Return to "What's In This Issue?"
Upcoming CHIEFS Electric International Fun Fly
June 15 , Canandaigua, N.Y., Contact: Todd Sheehan email:
tms@pt.com
There are a few fun events like, speed run, spot landing, and timed flight.
There will also be two speed 400 Zagi/FMA Razor races! These are great fun.
Stock planes and equipment please. Up to an 8 cell pack, and any prop you like. What makes this fun, is it's flown in a figure 8
pattern. All turns are made away from the flight line which also makes it safer for everyone.
Everyone who comes up is encourage to stay the weekend and have fun on
Friday, and Sunday as well (although the field will be open to all types of flying). Camping is encouraged at the field (sorry, no
hook-ups).
Hope to see you there. For more details go to:
www.geocities.com/chiefsusa
Return to "What's In This Issue?"
Simple V-Tail Mixer
By Eric Leadley
Via Electric Flight U.K.
Issue #50, Spring 1997
Details are given here of a very simple mechanical mixer for V-tails which I have
fitted to my latest model. It has no slides to jam up and weighs but a few grammes. It requires only a small piece of 1/16"
ply to mount the rocking servo, two ailerons hinges and a thicker piece of ply to which the hinges are screwed. The elevator
servo can be mounted across the fuselage, or in-line as shown.
Return to "What's In This Issue?"
Propstoppers Fun Fly
From: Dave Harding davejean1@comcast.net
The Propstoppers Electric Fun Fly will be held on Saturday, August 24th 2002 in
Delaware County, Pennsylvania, just south of Philadelphia. We fly from a small, pretty, secluded field which is easily accessed
from I-95.
In addition to fun flying we will hold three fun contests; Scale, Elexaco and Zagi
Combat.
Scale will be judged with a simplified stand-off standard and flight judged on flight
realism. Elexaco will be to Joe Beshar rules and just bring your Zagi and fly, it’s a hoot.
Vendors are welcome.
Details will be posted as they develop at www.propstoppers.org
Dave Harding, 610-872-1457 davejean1@comcast.net
 Return to "What's In This Issue?"
March EFO Meeting
Ken said that the deal for the area where the Midwest R/C Society is located fell
through. We are still planning on holding the Mid-Am there. Ken also discussed his very strange email request on how to
construct an "auto-piloted" R/C plane. He also noted that he turned the information over to the FBI. New versions
of Ken’s flight evaluation information were passed to all members attending.
Gus Nuerenberg showed us his "auto-pilot".
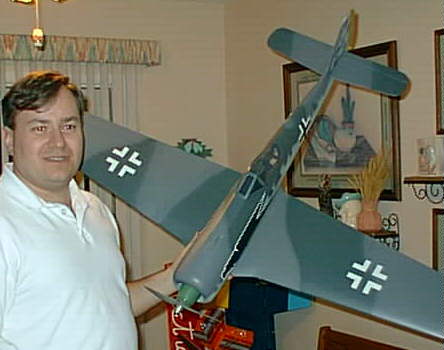
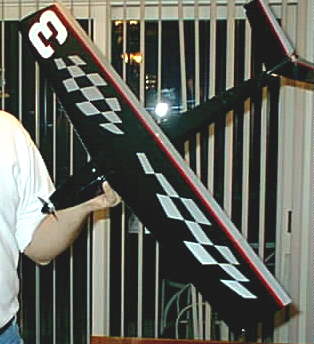
Jim Young shared is super-dooper field box and Balsacraft FW-190, which is
powered by a brushless motor on ten cells. Jim also had "his" version of an ACE Simple 400 club racer with the
S400 6v and 7 600AE cells.
Mike Holroyde has his Blue Max ARF ready to go.
Norm Dmuchowski shared the following information on Li-ion batteries.
Qualcomm Battery Packs and Chargers: Ordering Info
Batteries and Charger Packages:
5 7.2v packs and one charger - $36.00
10 7.2v packs and one charger - $46.00
10 7.2v packs and two chargers - $60.00
Prices include priority mail shipping.
Batteries only:
10 packs $28.00 + $6.00 shipping
20 packs $52.00 + $8.00 shipping
40 packs $92.00 + $8.00 shipping
50 packs $100.00 + $10.00 shipping
Checks or Money Orders to:
Mark Levitt
613 Plymouth La.
Foster City, CA 94404
Or: PAYPAL, user ID: mark@hackettelec.com
www.hackettelec.com/~hackelec/qc.html

Jim's Nifty Field Box
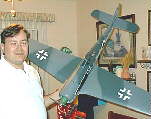
Jim & Balsacraft FW-190
Jim's Simple 400
Mike & Blue Max ARF
Return to "What's In This Issue?"
Upcoming 3rd annual Bluegrass Electric Fly In
From: Keith Hollifield email: keith6566@qx.net
July 20, 2002 - 3rd annual Bluegrass Electric Fly In Lexington, KY
This will again be a single day event and will emphasize open flying and fun with
electric airplanes. The site features a 600' x 50' asphalt paved runway along side a 600' x 60' grass runway, a covered
pavilion, and over 100 acres of overfly area. The Lexington Model Airplane Field is conveniently located about 5 minutes east of
the I-75 / I-64 intersection in Lexington, KY. We hope to see all those that attended over the past two years and meet some
new "E-flyers" looking for a laid back flying event. Check out Don Belfort's column in the February 2002Flying
Models magazine for a brief synopsis of the BGEF 2001. See the events section at our club web page at
www.lmacky.org for directions and updated information.
Return to "What's In This Issue?"
Upcoming Third Annual Ottawa Electric Fun Fly
Again this year again the Ottawa region is uniting under the Ottawa Regional
Electric Organization (OREO) and the Ottawa Radio Control Club (ORCC) on June 8th, 9 a.m. to 5 p.m., for the now regular
Electric Fun Fly which brings flyers from Kingston, Toronto, Montreal and visitors or curious from all around. Activities planned,
besides people showing off their latest acquisitions or creations, are pylon racing, streamer combat and F5J. We'll also have the
usual lunch and great chat and plenty of cool new models to show off (EDFs, Scale birds, racers, new e-gliders, etc)
The event will be held on OREO's superb sod farm, about 30 km north of the 401
and 60 km south of the 417.
Contact Mike Anderson (mikea@magma.ca)
(Ph 613 258 5817) for additional details.
OREO website: www3.sympatico.ca/rwoolley/oreo.htm
ORCC Website: www.ottawarcclub.com
F5J Event web site: http://www.aei.ca/~ouroboros/f5jrules.html
Pylon Racing Web site: members.rogers.com/ldionne5531/rc/e_racing.htm
Directions to the field: www3.sympatico.ca/rwoolley/field1.htm
Return to "What's In This Issue?"
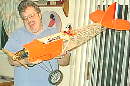
The Fenix 400
Bob Hatmaker - EFO Member
email: Planecrazyman@aol.com

I chose to make it according to the plans, including painting the plane. I changed
very little on the plane. I did add an extra vent for motor cooling. Also, a push rod guide was added for the rudder.
Building this plane was pretty much straight forward. The wood in the kit was of
good quality and light.
The wings did warp after construction, but after adding some weights, and a giving
it a couple of days, the warps were eliminated.
I would recommend this plane highly for anyone who wants a neat, simple
construction, fun flying plane.
About the only thing that I would recommend is some extra bracing (ribs) for the
wings. It might eliminate the tendency for the wing to warp.
It is a fun flyer that should be in everyone’s hangar.
Return to "What's In This Issue?"
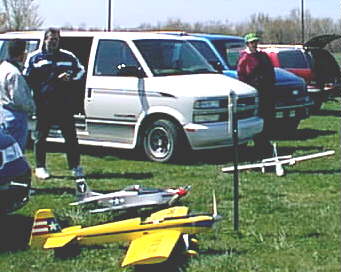
April Meeting Photo
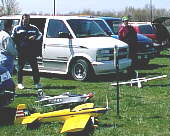
A few of the planes that showed up for the cool and windy April EFO meeting.
Return to "What's In This Issue?"
To Reach Ken Myers, you can land mail to the address at the top of the page. My E-mail
address is:
KMyersEFO@aol.com
EFO WEBsite: http://members.aol.com/KMyersEFO/
|
|