Ken Myers Change of ADDERESS!
Ken Myers
1911 Bradshaw Ct.
Commerce Townshop, MI 48390
Phone: 248-669-8124
Ampeer Paper Subscriber Reminder
When subscribing to or renewing the paper version of the Ampeer, please make the check payable to Ken Myers. We do not have a DBA for the Ampeer or EFO. Thanks, Ken

Can you name this plane? ;-)
Lithium Face Off: A Head-to-Head Comparison
of Li-Po, M1/A123 & Emoli
By Ken Myers
Last summer I was pulled kicking and screaming into the "Li-Po" age. After physically damaging a 4S1P 4000mAh Skyshark RC pack in a crash, I really felt that they were a bit too fragile. I don't usually crash, but sometimes stuff just happens. All of the warnings and reports appearing about Li-Po fires are also rather unnerving.
I read as much as I could about the "lithium chemistry in a can" cells that are commonly called the M1/A123/DeWalt 36V cells and Emoli/E-moli/Milwaukee V28 cells. They have been reported to better withstand a physical "oops" and not to be flammable during charge, physical damage and storage situations.
I speculated, in the Ampeer, about them as well, based on published data. All of the published data that I could find on the Web or print magazines was about one or the other of these cell types, but never a direct comparison of the three cell types in the same application.
I finally bit the bullet and purchased an Emoli pack and a M1/A123 pack to run a head-to-head comparison with one of the Li-Po packs I used last year. For this comparison, I chose to use 5S Li-Po and Emoli packs and a 6S M1/A123 pack, as I expected them to be very similar in voltage.
March 27, 2007 was supposed to be a prefect flying day. That morning I put Anderson Power Poles/APP (A.K.A. Sermos connectors) onto my new 6S1P 2300mah M1/A123 pack and the 5S1P 3000mAh Emoli pack and charged them, and my True RC 5S1P 4000mAh Li-Po, which had been in a "resting" state (3.84v per cell) since last fall.
My new packs "lithium in a can" packs were purchased from Mike at www.bigerc.com and came fitted with the appropriate taps for my Astro Flight (AF) Blinky. I had Mike use the optional 12-gauge wire for the battery cables when he custom made the packs.
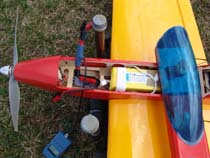
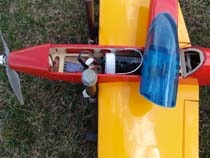
My ElectroFlying Models Fusion sport plane was chosen as the test bed, www.electroflying.com. This model was chosen because it is such an excellent flier, no matter whether Ni-xx or Li-xx chemistry cells are used.
The Plane stats:
The ElectroFlying Fusion is a 4-function, low-wing sport plane with 569 sq.in. of wing area. It has a measured ready to fly weight of 58 oz./1644g without a battery. The motor is an AXI 4120/18 being fed through a Hyperion 50-amp opto ESC and spinning an APC 12x10E thin-electric prop.
LiPo Pack
A123 Systems 2300mAh pack
The Batteries:
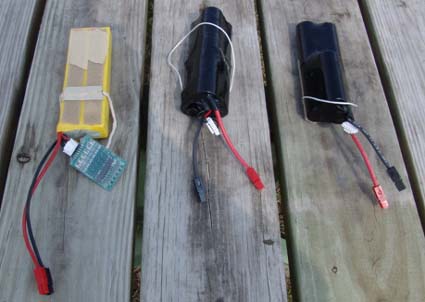
Left to right: 5S LiPo, 6S A123, 6S Emoli
All the following given measured weights for the batteries include the power cables, power connectors, balancing taps, Velcro and a pull string.
Battery 1: Custom True RC 5S1P 4000mAh Li-Po. (home.comcast.net/~truerc/custompack.htm) The pack is rated at a continuous 10C (40 amps) discharge by the supplier. The dormant pack was charged at 1C (4 amps) using an Astro Flight 109 charger to bring the voltage up and then the pack was Blinky balanced.
The measured weight is 474g or 16.7 oz. It is 5.9" (150mm) long including the wire hump at the front, 2.03" (52mm) wide and 1.4" (36mm) thick including the Velcro on the bottom of the pack. It was flown for 28 flights and charged 15 times during the 2006 flying season. Last year, its cost, including shipping, was $95.
Battery 2: The new BigERC 5S1P 3000mAh Emoli pack was charged at 1C (3 amps) with the AF 109. (www.bigerc.com) The supplier rates the pack at a continuous 12C (36 amps) discharge. The individual cell voltages as received were, 3.90, 3.90, 3.90, 3.91, and 3.90. After the initial charge, a Blinky was used to balance the pack.
The pack's measured weight is 535.9g or 18.9 oz., which is 2.2 oz. heavier than the True RC 5S1P 4000mAh Li-Po pack. It measures 5.7" (145mm) long including the "bulge" where the wires exit, 2.12" (54mm) wide at the widest point where there is a slight bulge near the center of the pack and 2.09" (53mm) high where the 5th cell is "humped" on top at the "front" of the pack and includes the Velcro on the bottom of the pack. It should be noted that many folks have given the capacity of the cells used in this pack as 2800mAh. This pack's cost, including 1/2 the shipping cost and the optional 12-gauge wire, was $94.65.
Battery 3: The new BigERC 6S1P 2300mAh A123 pack showed all six of its cells reading 3.30 volts upon arrival. It is rated as a continuous 30C (69 amps) discharge by the supplier. It was charged at a 1C (2.3 amp) rate using the AF 109, which "saw" the pack as a 5S. After charging, the open voltages were all over the place. The cells were each charged separately to bring them all close to a resting voltage of 3.6v as measured with my voltmeter.
The pack weighs 17 oz. (482.3g), which is 0.3 oz. heavier than the True RC Li-Po. It measures 5.53" (140mm) long including the "bulge" where the wires exit, 2.25" (58mm) wide at the widest point where there is a slight bulge near the center of the pack and 2.11" (54mm) high including the Velcro on the bottom of the pack. This pack's cost, including 1/2 the shipping cost and the optional 12-gauge wire, was $111.65.
At the Field
It was a sunny day at the Midwest RC Society 5 Mile Rd. flying field in Northville Twp., in southeastern MI. The air temperature was between 75 F and 80 F (23.9C - 26.7C)[very weird for March in Michigan!] during the flight tests with a 10 mph - 15 mph wind directly down the runway from the west.
Before each flight, the Hyperion Emeter was used to take and record 5 full-throttle static readings. After logging the static readings a timed 6-minute flight was made with each pack with no recharge after the data gathering.
I tried to fly each flight in a similar fashion so that a direct comparison could be made. The static values given are the AVERAGE for the 5 static readings taken prior to each flight.
These were the first flights of 2007 for me, so I was hoping not to "bump" a landing and break the prop, since I didn't have another APC 12x10E.
The preflight True RC 5S1P Li-Po cell resting voltages were measured at 4.08, 4.09, 4.09, 4.09 and 4.08. I noted from my battery log that this was lower than last fall.
The AVEARGE of the static readings were: 18.23v, 31.76 amps, 579 watts in, 7,988 RPM
The resting voltages for each cell several hours after the 6-minute flight were 3.84, 3.85, 3.85, 3.85, and 3.84. (Note that each cell dropped exactly 0.24v. The two lower voltage cells are still the two lower voltage cells by exactly the same amount of difference.)
The pack was recharged at 1C (4 amps) on the morning of March 28. The AF 109 recorded 1,767mAh returned to the pack.
Preflight resting voltages for the 5S1P BigERC Emoli were 4.13, 4.13, 4.13, 4.14 and 4.13 after being balanced with the AF Blinky.
The AVERAGE static readings were; 17.23v, 28.34 amps, 488 watts in, 7,638 RPM
The resting voltages for each cell several hours after the 6-minute flight were all 3.89 volts.
The pack was recharged at 1C (3 amps) on the morning of March 28. The AF 109 recorded 1,722mAh returned to the pack.
Preflight cell resting voltages for the 6S1P BigERC M1/A123 were all approximately 3.6v, really "all over the place" with some being higher and some being lower.
The AVERAGE static readings were; 17.89v, 29.96 amps, 536 watts in, and 7,878 RPM
The resting voltages for each cell several hours after the 6-minute flight were 3.275, 3.28, 3.27, 3.28, 3.28, and 3.28.
This pack was recharged at a 1C (2.3 amps) rate the evening after that first flying session. The AF 109 recorded 1,695mAh returned to the pack. It should be noted that the charger cannot completely recharge these cells and that I had forced them to approximately 3.6v per cell before using them, which most likely explains the slight mAh discrepancy between this pack and the other two packs.
When I measured the cell voltage shortly after the charge, the individual cell voltages were "all over the place" again. There were differences of up to 0.2 volts between some of the cells. When I measured the resting voltage of each cell the next morning they were 3.40, 3.40, 3.38, 3.40, 3.40, and 3.40. This indicates that all the fiddling I did to try and get the pack balanced on the day of the first test flights was really not all that helpful.
Flight Test Impressions
The flight-testing proved out to be exactly what the static testing had indicated. The Li-Po was just ever so slightly better than the M1/A123 pack and the Emoli was noticeably a little less powerful in the air. The differences could be perceived in the horizontal "top end speed" and in the verticals and loops. Vertical climbs were pretty much identical with the Li-Po and M1/A123 packs and not quite as "high" with the Emoli, but still good. Actually, all of the flights had excellent power for this plane.
A Warming Trend?
It was a cool 50-degreeish F (10C), non-flying day, with the winds 15 mph to 25 mph on March 28 so I decided to repeat the static testing with the recharged packs. I did the testing in my dining room where there was plenty of ambient light available.
The Fusion fuselage was restrained in a cradle while EFO V.P. Richard Utkan assisted in holding the fuselage in place while I took the Emeter readings.
After taking individual cell readings of the Emoli pack of 4.14, 4.14, 4.15, 4.14, 4.14 it was placed in the plane and the Emeter hooked up. When we recorded the results we were a bit surprised. The averages for the five captures were down slightly from those I had taken at the field the previous day; 16.8v (down 0.43v from the day before), 28.4 amps (about the same), 477 watts in (down 11 watts) and an RPM of 7476 (down 162 RPM). Since this was the second use of this pack, we were expecting the numbers to be "up".
What changed?
Elevation: There is only a slight difference in elevation between my house and the field's.
Air Pressure: I didn't check either day but it might have been slightly higher on the 28th, as a storm erupted at the end of flying on the 27th indicating low pressure.
Temperature: The temperature in my basement was measured at 63-degrees F (17.2C). That is where the pack was charged and kept until the test. The temperature in the dining room was ~67 degrees F (19.4C).
We decided to warm the pack without recharging it using a rice bag that I have mentioned before. The measured temperature of the rice bag was 150-degrees F (65.6C) and the battery was wrapped in it for about six minutes. The resting voltage was measured at 4.08, 4.07, 4.08, 4.08, and 4.08. Five more readings were captured yielding an average of 17.51v, 30.9 amps, 541 watts in and an RPM of 7704. These numbers were well above the earlier test and even the data collected at the field before the first flight.
Warming certainly appeared to help the output of this pack!
With that in mind, we heated the Li-Po and M1/A123 packs for 5 to 6 minutes in the rice bag before testing.
The Li-Po pack resting voltages after being Blinky balanced and before the data collection were 4.15, 4.16, 4.15, 4.16, and 4.14. The average data recorded for the 5 runs were; 18.55v, 33.2 amps, 616 Watts in, and 8078 RPM. Again, these numbers were slightly higher than collected at the field the previous day.
The M1/A123 pack was the most interesting. Since I do not have a balancer, the pack was not balanced and the resting voltages were; 3.49, 3.49, 3.43, 3.46, 3.50, 3.48. The data was gathered and yielded; 18.0v, 31.4 amps, 566 watts in and 7,902 RPM. Again, this data is better than the data gathered at the field on the previous day.
The resting cell voltage was measured after the test and found to be 3.35, 3.36, 3.35, 3.35, 3.36 and 3.35. The pack appears to pretty much have balanced itself. This was very similar to what happened on the 27th when the pack, after the flight, had a resting voltage of about 3.28v per cell when the initial resting voltages had been "all over the place" before the flight.
I checked the Emoli pack and found it too had balanced itself to a perfect 4.05v per cell for all five cells. On the other hand, the Li-Po pack exactly maintained its slight imbalance after the testing with a 0.04v drop in each cell after the test was run. Therefore the high cells in the pack that had read 4.16 before the test now read 4.12 after the test and the low cell at 4.14 was at 4.10 after the test. Every single cell showed exactly the same 0.04v drop. The Li-Po seemed to be maintaining its slight imbalance.
The Warming Trend Continued
I was curious to see how much the rice bag may have warmed the packs. I have no way to measure the internal temperature of the packs, but I have an IR thermometer that can read the external temperatures. It really isn't the best tool to use for this test as it changes temperature as it is pointed at different colors in the same ambient air. The black shrink on the M1/A123 pack sitting on my workbench in the basement read 62.3 F (16.8C) while a white piece of paper, in the same ambient air read 61.3 F (16.3C).
I heated the rice bag and then folded the 62.3-degree F pack into it on the kitchen counter and set the timer for 6 minutes. A kitchen meat thermometer was also folded into the rice bag, but not touching the pack. At the end of the six minutes the meat thermometer read 150 F (65.6C) and the IR thermometer showed 85.4 F (29.7C) on the black shrink of the pack when it was removed from the fold of the rice bag and placed on the counter.
Flight Test #2
I returned to the field on March 30 for three more flight tests. I charged the batteries at home and then placed them in heated rice bags inside my ammo can to take to the field. The air temperature was 63 F (17.2C) when I arrived at the field and 65 F (18.3C) when I finished the three flights with the Fusion. It was sunny and there was a 10 mph � 15 mph wind out of the east.
I used the same procedure as the original flights except the flight time was extended to 7 minutes.
The Emoli pack was flown first. The cells' resting voltages after using the AF Blinky were; 4.14, 4.14, 4.14, 4.15, and 4.135. The averages gathered using the Emeter were; 17.56v, 31.08 amps, 547 watts in, and 7,716 RPM. The resting voltages the following morning were all 3.84v per cell. On the morning of the 31st 2,154mAh were returned to the pack in 34 min. 15 sec. I wanted to charge at 3C, but the AF 109 topped out at 7.45 amps or about 2.5C. The Blinky was "happy" with the pack balance and the individual cell voltages read; 4.14, 4.14, 4.14, 4.15, 4.14.
The M1/A123 pack was flown next. The cells' resting voltages at the field, after force overcharging each cell at home on the AF 109, were; 3.74, 3.76, 3.76, 3.63, 3.66, and 3.75. The averages gathered using the Emeter were; 18.07v, 32.62 amps, 590 watts in, and 7878 RPM. Again, the resting voltages the following morning were very interesting, especially when the starting voltages were once again "all over the place." The resting voltages on the 31st were; 3.24, 3.25, 3.24, 3.245, 3.25, and 3.25. The AF 109 put 1,907mAh back into the pack raising the cell voltages to 3.39, 3.40, 3.39, 3.39, 3.39, and 3.39. Each cell was then charge at 1C using the AF 109 until it faulted in phase 3 of the charger. On average, the charger then added 127mAh to each cell bringing the total to 2,034mAh or about the same as the other two chemistries.
Finally the True RC 4000mAh 10C Li-Po was flown. The cells' resting voltages after using the AF Blinky were; 4.16, 4.17, 4.16, 4.17, and 4.16. The averages gathered using the Emeter were; 18.64v, 34.76 amps, 648 watts in, and 8,052 RPM. The resting voltages the following morning were all 3.82v per cell. On the morning of the 31st 2,096mAh were returned to the pack in 49 min. 51 sec. The resting voltages several hours after the charge were 4.16, 4.16, 4.16, 4.17, and 4.15. The AF Blinky started balancing and stopped when the individual cell voltages were at 4.13, 4.13, 4.13, 4.13 and 4.12.
Flight Test Impressions 2
With the batteries pre-warmed, all three packs flew the plane equally well. The Emoli pack had pretty much the same "feel" as the other two and the performance difference was hardly noticeable at all. The only real difference I noted was that it felt like the throttle stick was a little further forward when flying the Emoli equipped Fusion at the "same" horizontal speed, not wide open throttle, as the other two packs.
Below is a comparison chart:
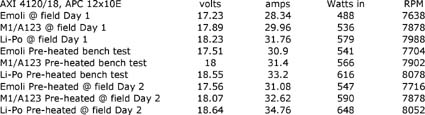
Looking at the chart, it seems that the Emoli cells, with less overall performance are clearly not the way to go. Unfortunately, life is not that simple.
I originally had this plane set up with 16 CBP 3300mAh NiMH cells. At that time, the plane's ready to fly (RTF) weight was 93.4 oz. (2,659g), as the battery pack weighed 35.8 oz. (1015g). That gave the plane a cubic wing loading (CWL) of 11.89 oz./cu.ft. Checking my motor data for this motor and prop combination, I found that for three motor tests, using the same procedure outlined here the average numbers were 17.33v, 29.3 amps, 508 watts in and 7700 RPM. That meant that the original watts in per pound were 87. The plane flew well and I was pleased with its performance. If I had then switched to the Emoli pack, and knew that preheating helped so much, using the Day 2 data would have given me a CWL of 9.79 oz./cu.ft and watts in of 113.8 per pound. I would have been (am) thrilled with the performance in both the power increase and weight reduction. The cost of the Emoli pack was only about $15 more than the 16-cell 3300mAh pack I made, so it would have been worth it and I already had an AF 109 just sitting around waiting to be used.
I actually bought the True RC 5S1P 4000mAh pack next and I was wowed. Even without preheating the pack it changed the CWL to 9.51 oz./cu.ft. and watts in per pound to 124. Ever since then I have been touting this pack as the one to use in this combination.
Fortunately, I have so far managed not to physically damage this pack through an oops at the field or charging mishap, but storing it and the other 4 Li-Po packs I have, still continues to make me apprehensive.
At first I was concerned that the M1/A123 cells would not have a "pgood enough" capacity for the way I like to fly. I didn't realize that I was only using about 2000mAh doing a 7 minute flight, the way I fly. Now I realize that these cells do have the capacity to do exactly what I want to do.
Using these cells in the Fusion yields almost the same CWL, 9.55 oz./cu.ft. as the Li-Po pack and still, when preheated, a very respectable 125.9 watts in per pound.
What I am Going To Do With This Information
"I am going to start using the M1/A123 cells in all of my new sport and sport scale plane setups." At least that is what I said in an earlier draft of this article, but there is a new fly in the ointment! Here is what I originally said when I thought for SURE that the M1/A123 were absolutely the way to go: They provide the energy and duration I most often use at a very reasonable weight. They are the most expensive and will require a new or updated charger but offer a peace of mind that is an intangible benefit. I know that I can scavenge the cells out DeWalt 36V packs and lower the cost per cell, and I am capable of making up the packs myself. From my brief exposure to these cells, and the anecdotal evidence I've read in the magazines and on the Internet, they do not seem to need balancing taps, which simplifies pack construction, and they appear to be self-balancing. I can also charge them quickly and in the plane.
"I will continue to fly my True RC and Skyshark RC Li-Po packs until they are "worn out" but I will continue to be extremely cautious when storing and charging them.
"I will most likely replace my "physically injured" Skyshark 4S1P 4000mAh Li-Po with a 4S1P Emoli pack. That would allow me to not change the motor prop combination on the two planes I use that pack in. A 4S1P M1/A123 pack wouldn't provide enough power and a 5S1P M1/A123 would be too much for my intended use.
"I will not be purchasing any more Lithium Polymer packs for the majority of my projects.
The Fly in the Ointment
A123 Systems has made Horizon Hobby the only distributor for the M1 cell to the hobby sector in the US. Horizon Hobby is charging $19.95 per cell for single M1 cells. That means that the only reasonable way to purchase M1 cells is to purchase DeWalt 36V packs and scavenge the cells from them. A search of Ebay shows these DeWalt packs for about $120 including shipping. The DeWalt pack contains 10 cells. The really disturbing thing about all of this is what D.B. Mathews stated in his "Flying for Fun" column in the April 2007 issue of Model Aviation, p. 82, about these cells "The cells' distributor currently charges the toolmakers approximately $4 per cell�"
Pros and Cons
True RC 5S1P 4000mAh pack:
Pros:
Relatively inexpensive
Capacity allows two 6-minute flights per charge
Highest output of the three types of cells compared
Lightest of the packs tested
Uses standard Li-Po charger and balancer
Cons:
Requires special care when charging
Can only be charged at a 1C rate (1 hour)
Requires removal from the plane for charging
Requires special care during layover storage
Requires balancing
Requires special container for storage, transport and charging
Actual "useful life cycles" unknown
M1/A123/DeWalt 36V 6S1P 2300mAh pack:
Pros:
Second highest output of the three types of cells compared
Almost as light as the Li-Po pack tested
Metal can for better physical protection than a "poly" bag.
Balancing doesn't seem to be an issue at this time
Can be charged in the plane
Can be charged at 4C (15 minutes)
No reported charging fires
Appears that no special storage, charging or transport container is required, just the normal precautions for any battery.
Cons:
Relatively most expensive
Capacity allows only one 7-minute flight per charge
Requires special charger for this type of cell
Layover storage requirements unknown at this time
Actual "useful life cycles" unknown
Emoli/Milwaukee V28
Pros
Relatively inexpensive
Uses standard Li-Po charger and balancer
Appears that no special storage, charging or transport container is required, just the normal precautions for any battery.
Can be charged at at least 3C (20 minutes)
Can be charged in the plane
At this time it appears to be self-balancing but can be balanced with a standard AF Blinky
Cons:
Is "over" capacity for a 7-minute flight but can't get two 6-minute flights
Lowest output of the three types of cells compared, but still better than a 16-cell NiMH
Heaviest of the packs tested and compared
Care during layover storage unknown
Actual "useful life cycles" unknown
Return to "What's In This Issue"
WEST WINGS HAWKER HUNTER
by Mike Southwood HHMFC michael.southwood@ntlworld.com
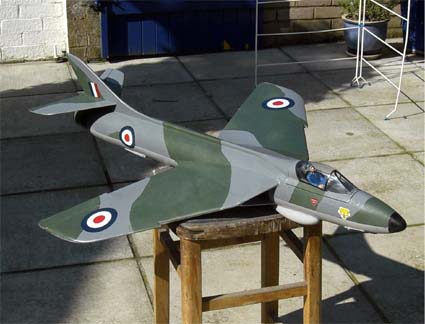
Having just completed the building of Ducted Fan DH Vampire from scratch, using plans of the real thing found on the net, I decided to build the second plane I had worked on while in the RAF, way back in 1955, the Hawker Hunter.
A look on the net found that West Wings make a kit for a 27.8" span version, designed to use a Wemotec 480 mini fan unit. This just happens to be almost identical to a Chinese import from RCM Direct (in UK)
The model is almost scale, only the tail size being enlarged for extra stability. The original was like most fighters designed to be unstable so that the pilot had full control.
The kit from West Wings arrived as promised and was soon opened and checked out. All the formers, ribs and tail parts were CNC cut from either ply or balsa. Plenty of good quality balsa sheet was supplied and all the tricky difficult shapes are light plastic vacuum moulded. This includes the air passages from the wing intakes to the fan unit, which is a very important part of any ducted fan. Early versions of this kit were designed for cobalt motors and heavy NiCad power packs. With the availability of brushless motors and Li-Poly packs, the fan unit is moved forward two bays to give correct balance. The latest kits have these modifications on the drawing and ducting is correctly designed to fit. A well detailed plan, instruction sheets and manual, plus scale decals are included.
DETAILS:
Wingspan: 27.8 inches
Scale: 1/19.8
Deviations from scale: Intake and jet nozzle area (for ducted fan)
Tail: Tail increased 10% to improve pitch stability.
The model is intended for experienced builders and flyers and the original was designed to be bungee launched, although using a powerful brushless motor, hand launching is possible.
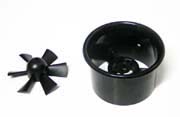
EQUIPMENT:
HiModel Ducted Fan: Almost identical to the Wemotec 480 mini fan except that mounting lugs are facing forward and require minor changes to the fuselage mountings.
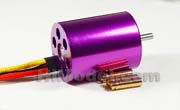
Motor: HiModel B2040-6T
Voltage Range: 11.1
Kv (Rpm/Volt): 5100
Shaft Dia: 3.175
Maximum Load Current: 40A
Speed Controller: Melody / Fly Series 40 Amps Plus.
Servos: 3 X Futaba
Receiver: Jeti 4 channel mini
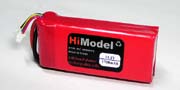
LiPoly: HiModel 2200 X 11.1 volt.
BUILDING
As a start, the fuselage formers were all cut out from the CNC routered sheets. Before cutting out they were all marked with their identification, which is shown on one of the separate plan sheets. This is important, as many are nearly identical, but do need to go in the right place.
The instructions suggest building the front fuselage first. This is a good idea as it teaches the general method used. The fuselage is built in halves, split down the centre line. Each being built flat on a board then joined up later to form the shell. It is recommended that one builds over the plan, using cling film protection and pinning down. In my case the cling film did not work as using ZAP super-glue, it sticks to the cling film. Also pinning down did not work as the pins broke the keel sections where the grain was across the brittle balsa part. I eventually built the half section up without pinning, using the formers to set the shape. The only difficult part is the setting of the last former, which has to match the rear fuselage section and is at an angle. The second side was built on the first. The rear former was joined up by spanning the halves with scrap balsa, which was then positioned square and at the planned angle to both half fuselage frames before gluing. After drying the rear former and the stringers were sanded off flat, ready to join to the rear fuselage. The plastic nose mouldings have to be trimmed to fit over the frame. It is worth taking some time to get these a perfect fit with good centre join and a square rear edge just lapping over the former. Glue this on with Modeller's silicon glue and leave it to dry before starting to sheet cover with 1.5mm (1/16") balsa sheet.
The battery hatch is made up after sheeting. It also carries the canopy and can be fitted out with any cockpit detail and a pilot if required.
A good tip is to find an image of the Hunter Cockpit on Google and print off a suitably sized dashboard etc. Any pilot has to be 20th scale and only the top bit can be used. I found an old one from an EFlight Jug models and repainted him to RAF uniform colours.
The rear fuselage is again built as a skeleton structure, in two halves split down the vertical centre line. In my case I built both halves as skeletons. Then test fitted the plastic air ducts and tubes. I also fitted an extra former through which the HiModels EDF unit located and the fixing lugs could be screwed to. This former was supplied as a spare part. Once all the internals had been made and trial fitted, the outside was sheeted (only one side) I sheeted the entire length in two sheets, ending up with a straight smooth job.
After sheeting and sanding the mating edge, all the internal tubes and mouldings were fitted and glued in place. The EDF was fitted and tubes slid up to it with no gaps then the front one was glued to the air ducting. The rear tube was slid in to position then glued. It has to be movable to allow removal of the EDF, although I made the decision not to have a hatch unless it proved necessary later, when I will cut it out. It is worth taking time to fit all the tubes correctly each joint going inside the one behind to improve airflow. Where the tube enters the EDF, I made it a good fit and then put a ring around to prevent it moving back in to the fan.
After sheeting the first side, I fitted all the internals and after making sure that the second side would fit over them, I glued them all in place.
The motor leads need to be brought back to the ESC. This has to be done before sheeting the second half fuselage so that the heavy wires can be routed between the skin and the ducting. As the motor can take a peak of 50 amps, the extension wires have to be heavy or they will restrict amps and get hot.
With the fuselage sheeted and the wiring nicely routed to the front it can be left to dry while the wings are made.
TAIL UNIT:
This was assembled square and glued with super-glue after sanding to shape. The whole assembly was glued to the top of the fuselage with epoxy, making sure it was in line and square to the wing locations.
WINGS:
There is nothing wrong with the West Wings design, but I like to do my own thing. In place of the separate leading and trailing edge sheeting with open structure in between, I made up four complete wing skins from 1/16 balsa. Joined using masking tape and aliphatic adhesive, the skins were sanded to a smooth finish when dry. The bottom skins were marked out to show rib positions. A new set of 1/16" balsa ribs replaced the ply ones from the kit. In place of the inserted dummy leading edge strip, I used a vertical 1/16" leading edge to which all the fronts of ribs glued and which finally will be sanded straight and the solid balsa leading edge glued on before shaping.
Wing ribs were glued on to the bottom sheet. Aileron cut out edges were glued in place and the skin marked to allow cutting out the ailerons later. Tops of ribs, dummy leading edge and trailing edge skin were sanded to allow the top skin to be glued on smoothly.
At this stage the skin where the aileron servos fit was strengthened by coating it with thin super-glue. This makes it almost as strong as ply. The two Futaba S3110 Mini servos were fitted with long arms and glued in the wing with modeller's glue. This has to be done before the top skin goes on. The wires can be run out through the first rib, ready to connect to the "Y" lead. As an extra precaution I filled the space above the servo with servo tape.
After making sure that the servos worked and the arms were correctly centred, the wings were placed on a flat board, with a hole cut out to clear the servo arm and the washout strip placed at the trailing edge. Aliphatic glue was beaded on top of all ribs and the trailing edge. The top sheet was then positioned, trailing edge in line and using nails in the board edges, elastic bands were stretched over the top skin, A piece of hardwood strip was placed over the trailing edge to keep it straight. It was left to dry, before removing the skinned wing. Super job. Each panel weighed about 1 oz. Next, after trimming spare skin and squaring up, the leading edge was fitted and shaped, then the wing tips. After shaping and final sanding, the wings looked superb. The washout was identical and the weight for both panels less than 3 oz.
The ailerons were carefully cut out, using the lines drawn on before fitting the top skin. Edges were sanded straight and angled to allow movement.
ASSEMBLY:
Fitting the wings to the fuselage was not a simple job. The fuselage rib had bowed slightly so that the joint was not perfect. I solved this by epoxy gluing an extra hard balsa rib over it and sanding this flat and at the correct angle to give the anhederal. To hold the wing panels in position, I made a jig to locate the fuselage and hold both wings at the correct angle while the glue dried overnight. The result was good.
Now all that was left was to add the air intake edges and the last bit of bottom sheeting from fuselage to wing. It is worth getting the joints perfect as a lot of the wing's strength against clapping hands is from these joints.
FINISHING:
Finishing before covering was just a case of wiping a little light filler into any gaps and corners. Then the air intake edges were carefully shaped using little sanding files made from scrap and with sandpaper glued on with "spray mount". The whole plane was lightly sanded and filled where necessary until it was smooth. Weak edges such as the air intakes were painted with thin ZAP to strengthen them and prime them for the ProFilm covering.
Covering with silver ProFilm was tricky around the compound curves. I also made the mistake of trying to cover the canopy moulding behind the cockpit. The temperature needed to iron on the covering melted the clear moulding. I had to be very careful. The same applied to covering the plastic bits such as the exhaust cone. This would soften at ironing temperature. If I did it again I would not cover these parts, but would paint them.
After covering the underside was sprayed with Ford Light Grey, aerosol. It gave a very good finish. The topside is camouflaged using Humbrol hand applied. It was left to dry before applying the transfers. The use of silver Pro-Film was good; as the paint gets scratched the silver metal shows through.
There was a problem with the transfers. They looked superb, but my set had no varnish coat and proved impossible to apply. I managed to get the roundels on, but the lettering proved impossible. That was a great pity at this stage but an email to West Wings produced a new set by return.
Finished weight with battery: 1Kg. - 2 lb. 3 oz.
Without Battery: 818g - 1 lb. 12.5 oz.
FLYING REPORT LATER
Return to "What's In This Issue"
More on the Bill Evans' Designs
From Reuben Schneider, Phoenix, AZ
Last month a couple of photos and information on Bill Evan's flying wings was presented in the Ampeer. Reuben has some more info to pass on about them. KM
I hope to offer some helpful info to Claude Vest with his Bill Evans' flying wings.
I met Bill Evans many years ago in the late 70's or early 80's. I visited him in Bishop, CA on the eastern slope of the Sierras.
I watched him fly the Future Shock and others at over 200mph with Astro electric motors.
I purchased many extra cores each time I visited. I gave some of them to my friends and flew mine in the 80's with Astro 035, 05 and 15's. Some were geared.
The most important things:
1. Add 1/8" reflex to the elevons
2. The C.G. should be located at 10% of the root chord
3. It is very important the rib nose should look like this:
If you make the rib nose look like a normal cambered rib, it won't fly well.
4. Inverted flight requires twice as much down because of the reflex.
Bill wrote an excellent article "The Mystique of the Flying Wing" in the March 1985 Model Aviation magazine.
Please excuse my scribble (it was a handwritten note KM). I am only 91 and still going strong.
Reuben
Return to "What's In This Issue"
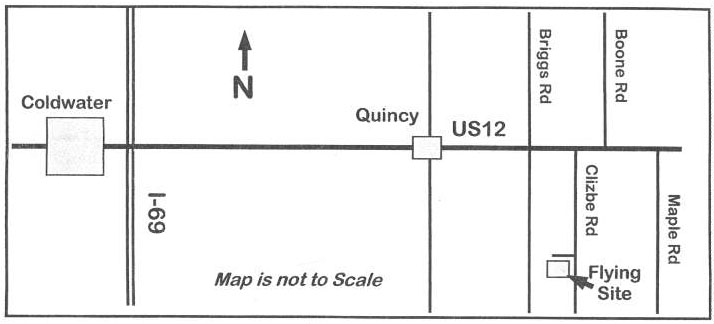
Upcoming Keith Shaw Birthday Fly-in
On June 9 and 10 The Keith Shaw Birthday Electric Fly-in will take place in Quincy, MI near Coldwater, MI, see the map. Dave Grife is the CD and can be reached at 517-279-8445. This is always a fun time.
 Return to "What's In This Issue"
To Reach Ken Myers, you can land mail to the address at the top of the page. My E-mail
address is:
KMyersEFO@theampeer.org
EFO WEB Site
|

