 |
Flying High With Electric Power!
The Ampeer ON-LINE!
Fly the Future - Fly Electric! |
|---|
Site Table of Contents
| President: | Vice-President: | Secretary-Treasurer: |
| Ken Myers | Richard Utkan | Rick Sawicki |
| 1911 Bradshaw Ct. | 240 Cabinet | 5089 Ledgewood Ct. W. |
| Commerce Twp., MI 48390 | Milford, MI 48381 | Commerce Twp., MI 48382 |
| (248) 669-8124 | (248) 685-1705 | (2480 685-7056 |
 | ||
| Board of Directors: | Board of Directors: | Ampeer Editor |
| David Stacer | Arthur Deane | Ken Myers |
| 16575 Brooklane Blvd. | 21690 Bedford Dr. | 1911 Bradshaw Ct. |
| Northville, MI 48168 | Northville, MI 48167 | Commerce Twp., MI 48390 |
| (248) 924-2324 | (248) 348-2058 | (248) 669-8124 |
| EFO Flying Meeting: Tentative Date: Saturday, May 5 Time: 10:00 a.m.
Place: Midwest RC Society 7 Mi. Rd. Flying Field | ||
| Tentative Date for 1st EFO Flying Meeting Upcoming Event | Additions to: "Advice for Getting Into Flying Radio Controlled (RC) Airplanes" Additional Beginner Recommendations |
| "Wing-It Judging" Event announcement | A Comment on "The Power of Two" Article Paul Witko adds his observations and comments |
| A Comment on "Advice for Getting into Flying R/C Airplanes" Burkhard Erdlenbruch of Augsburg, Germany comments on the article and adds some very interesting information about using a simulator for flight training. | Upcoming Keith Shaw Birthday Party Electric Fly-in 2018 Event announcement |
| Skymasters' Electric Night Fly and Fly-in Event announcement | Upcoming 34th Annual Mid-America Electric Flies 2018 Great Event Announcement |
| How Do You Pronounce FrSky? Ken points to a document that clears this up. | |
Saturday, May 5 is the TENTATIVE date for the first EFO flying meeting of the year. Please check the EFO Web site for a possible date change due to flying field conditions. Suggested by Owen Morgan Implemented by Ken Myers Only two Radio Systems were used to calculate the pricing on the "Ken's Recommended Top 5 Trainers; Spring 2018" and the "30+ RC Trainers; Spring 2018" listings. The Horizon Hobby Spektrum DXe transmitter, and any required accessories, was paired with the Horizon Hobby BNF planes. The Tower Hobbies 424 4-Channel SLT System was used for the recommended radio system for airframes that require both a transmitter and receiver. They were chosen because they are the least expensive, reliable options from major US suppliers. The transmitters are both known as Mode 2 transmitters with yaw (Rudder) and thrust (throttle) control on the left stick and roll (aileron) and pitch (elevator) control on the right stick. 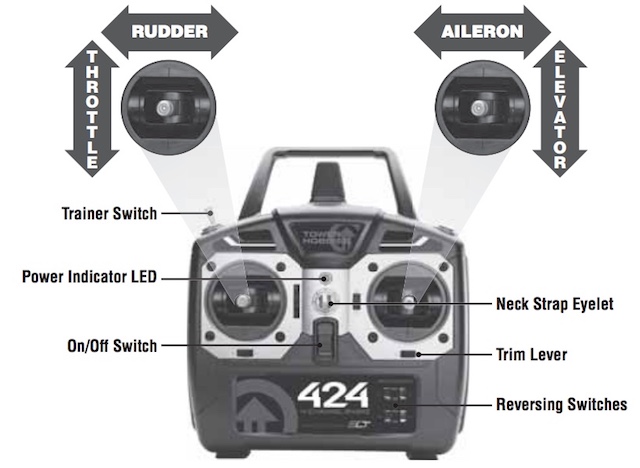
Tower Hobbies Photo/Diagram Mode 2 is the most used mode in the US. There are also Mode 1, Mode 3 and Mode 4 transmitters with the yaw, thrust, roll and pitch functions assigned to different sticks and stick movements. The manuals for each of the trainer aircraft show the stick movement in relationship to the moveable surface movement on the airplane. 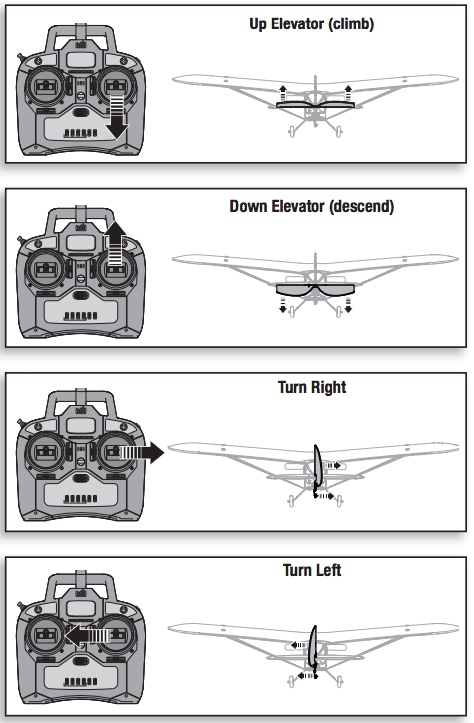
Diagram from the Horizon Hobby Super Cub S The diagram shows a typical 3-channel setup from the rear. If a transmitter is used that has an 'LCD screen' on it, and it provides a means for the mixing of the channels, typically called a computer radio, the rudder channel can be mixed 100% to the aileron channel. The result is that either the left or right stick can move the rudder equally. Be sure that the rudder moves in the same direction with both sticks. Using the left stick, by moving it left and right, on the ground provides for steering in a similar manner to a typical 4-channel set up and moving the right stick, right and left in the air, provides turning in the air in a similar manner to a typical 4-channel set up. The particular radio brand used will determine which channel to plug the rudder servo into. Some trial and error is required with each system. 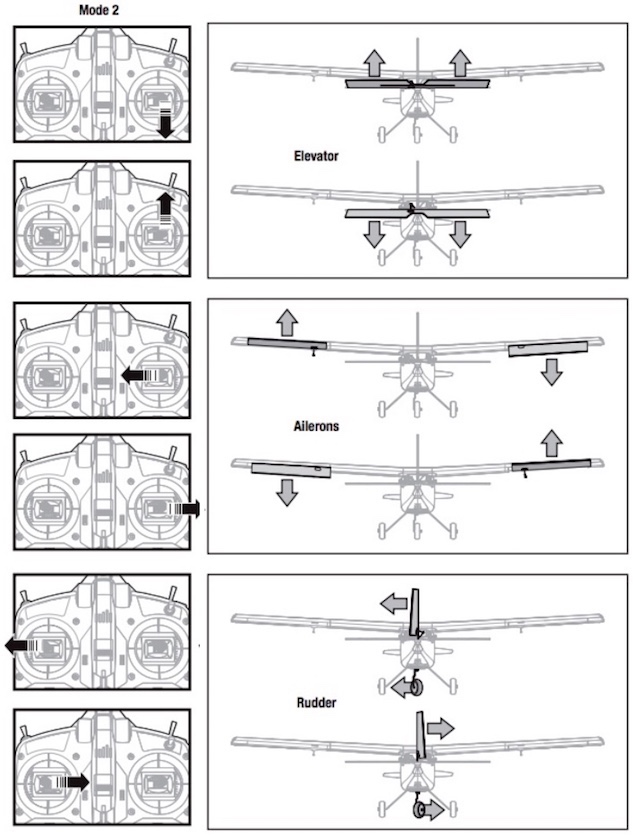
Diagram is Modified from the Horizon Hobby Apprentice for a 4-channel Apprentice The diagram shows the movable surface movements, from the rear of the airplane, in relationship to the stick movements on the transmitter. The view of the plane is from the rear. If you choose to use an RC instructor or mentor, the best way to start, he or she may have specific recommendations for a radio brand based on personal experience and the ability to 'buddy box' the plane to their personal transmitter. Selecting a Radio System is a difficult decision for a person new to RC airplanes. Ready to fly (RTF) packages include an installed radio system and transmitter. Other types of airframes require some choices to be made. Today's 2.4GHz radio systems, provided by US suppliers, Horizon Hobby (Spektrum), Hobbico (Futaba, Hitec, Tactic, and Tower Hobbies), and Aloft Hobbies (FrSky), are all pretty reliable. It is important to keep in mind that while all of the transmitters are transmitting across the 2.4GHz band, using spread spectrum frequency hopping, the way that they communicate with the 'receiver', their protocol, is different for each brand. A transmitter of one brand cannot usually communicate with another brand's 'receiver'. The user is then somewhat 'locked into' that brand. Many, if not most, of the modelers, who've been in the hobby for awhile, will have more than one transmitter and may even have different brands of transmitters for different purposes. Trainer planes only require the simplest of radio systems. The suggested, and recommend, Tower Hobbies radio system is for all of the airframes noted that are not sold by Horizon Hobby. It is relatively inexpensive and comes with its companion receiver. Tower Hobbies is an extremely reputable supplier in the US and backs up what they sell. The Tactic radio system uses a protocol known as SLT. It is also the same protocol as used by Tactic radio systems. The SLT protocol can also be selected, as one of two protocols, on the newest Hitec radio systems. When using only 3-channels of a 4-channel (4 function) system, or more, the roll/yaw control needs to be on the right stick. That means that the rudder servo needs to be plugged into what the supplier calls the 'aileron' channel. On a Tower Hobbies or Tactic radio system that is Channel 1 on the receiver. The receiver channel position will vary with other brands of receivers. Channel 3, the throttle channel, on the transmitter needs to be reversed to operate with electronic speed controls (ESCs). This also applies to Futaba systems. Other systems will vary. Purchasing a radio system from overseas can, for some people, be a problem. The transmitter should be configured to Mode 2 when delivered or at least note that it can be configured to Mode 2 by the user. The radio system SHOULD NOT NOTE that it is for use in the EU. The European Union (EU) and other countries in Europe require less power output of the transmitter to meet their specific radio frequency transmission regulations for these types of transmitters. Less power out equates to less range. As with most types/brands of radio systems they require that specific brand's receivers. Since the radio system and its components are coming from overseas, deliver times can be quite long at times. The reliability of the overseas' company to deliver as promised sometimes comes into question. There is a lot of information in the manual that comes with the plane regarding having a successful first flight. Read it and then reread it. If at all possible, have an instructor/mentor fly the first flight, which is called the maiden flight. The FliteTest video is very good. It clearly demonstrates what to do when arriving at the flying site. The very first skills to be acquired are takeoff/launching and landing as demonstrated in the video. All of the demonstrations in the video have the pilot standing behind the plane for takeoff. This is the perfect place to start, but the pilot cannot stand behind the plane when it is landing. To prepare for landing, the flight path should be a rectangular pattern with 90 degree turns where the 'long' sides of the rectangle parallel the center line of the runway. This is demonstrated in Flite Test's next video. The plane is always kept in front of the pilot. The pilot's shoulders should parallel the center line of the runway. The pilot's head needs to turn to look at the plane when landing. Practicing takeoffs/launches and landings with the plane starting parallel to the pilot's shoulders are required before actually starting to fly.  In the example diagram, the wind is blowing from the west, the pilot is facing north, away from the sun. The plane's takeoff position always remains the same; the far east end of the runway in the example. It doesn't matter whether the plane is taking off on wheels or being hand launched by a buddy. The pilot starts the takeoff in Position 1 and does a landing straight down the center line of the runway. After several takeoffs and landings down the center line of the runway, the pilot moves to Position 2 and repeats several takeoffs and landings. The process is repeated until the landing space is too short to safely land on the runway. Position 5 in the diagram hints at an ending position. If the plane is moving parallel to the pilot's shoulders from the pilot's right side, moving the stick to the right moves the plane away from the pilot. If the plane is moving parallel to the pilot's shoulders from the pilot's left side, moving the stick to the left moves the plane away from the pilot. Once the parallel takeoffs and landing have been mastered, it is time to fly. The Flite Test video on How to Fly does a good job of describing how to control the plane in the air by moving the transmitter sticks only a little bit and then releasing them. They are not held in any position for too long. Practice flying the rectangular pattern in both directions, using 90 degree turns, along with horizontal figure 8s are demonstrated, as stressed, in the video. Be sure to follow all of the preflight checks noted in the Takeoffs and Landings Video. Also take ALL of the manuals and instructions received with the plane, radio system and battery charger to the flying site. 1. Pick the calmest day possible
After performing all of the preflight check list checks and practicing Takeoffs/Launches and Landings, and following the advice in the flying video, the first flight, or maiden flight, has a high degree of success. For an even higher degree of success, an instructor/mentor is recommended. Keep in mind that the area to fly in must be appropriate to the size, weight and speed of the finished plane. There should be no obstacles present. The flyover area MUST be clear of people, animals or moving vehicles. You should never fly the plane toward yourself. If the plane is coming at you, turn the plane to resume a rectangular pattern. By Ken Myers LiPo batteries should not be discharged to lower than 80% of their stated capacity. A flight must be timed to keep this from happening. A timer on a smart phone or inexpensive kitchen timer can be used. Some computer-style radios have built-in timers. The use of a timer is essential for electric flight. LiPo batteries should not be discharged too deeply, or they become permanently damaged, lose capacity and wear out quickly. Running a LiPo battery down to the low voltage cutoff (LVC), which is set in the electronic speed control (ESC), is too low! Don't do that. Use the 80% 'rule'. That means do not discharge a LiPo battery lower than 80% of the stated capacity as noted on the label. The best option is to have a transmitter that has a timer than can be set to trigger on the throttle channel to count down every time the throttle is "on". Unfortunately, that kind of timer is only available on some of the computer type transmitters. When a transmitter does not have a timer, a stand alone timer can be used. Before the age of smart phones, with a built in timer app, kitchen timers were used. I still use the Taylor Digital Compact Timer, sold at Meijer for less than $5, as I find it more convenient than a smart phone. When a battery is charged, on a decent charger with a screen display, the display indicates the milliamp hours (mAh) returned to the pack. Sometimes the display may indicate amp hours (Ah) for larger capacity batteries. To change Ah to mAh, multiply the Ah by 1000. If a label notes the LiPo battery's capacity as 2100mAh, it should NOT be discharged lower than 2100mAh * 0.8 = 1680mAh or 1.68Ah. At home: Determine the maximum capacity to be returned to the pack or packs.
Take that number with you to the flying site. At the flying site: 1. Set the timer for 3 minutes, but don�t start it yet.
If you have a 2nd fully charged battery, a second flight can be taken using the same 3 minute procedure to verify the first flight capacity used. After the first flight battery has charged, note the mAh, or Ah, returned to the pack by the charger. It is displayed on the charger screen. Using the 2100mAh battery as an example.
1150mAh divided by 3 minutes gives the average capacity used per minute.
With 530mAh still available, setting the timer for 4 minutes and repeating the procedure should be safe. The process is continued until the mAh consistently returned to the pack is close to the number calculated as 80% of the pack's capacity. The useable capacity, calculated for the 2100mAh pack, was 1680mAh, therefore whatever flight time consistently gets the pack to around 1700mAh should be just fine for the example battery. From Owen Morgan, EFO member, via email Hi, I see you mentioned a timer in your article (in the April 2018 Ampeer KM). I never fly without a small LiPo checker plugged into the balance port of the battery in the plane, except for the UMX planes where it doesn't fit. It will show individual cell voltage as well as total voltage and starts beeping as soon as any cell gets below a user settable voltage. I can hear it well when it starts beeping in the plane while I'm flying and that means it's time to land. I don't know if I'd hear it if someone else is flying something with an internal combustion engine, but I don't like to fly if I can't hear my motor anyway. The voltages seem to be accurate. The only plane where this doesn't work is my EDF U2 as I can't hear it over the fan. An EDF is probably not going to be an issue for a beginner... Here's a link to the type I use, but I bought them cheaper from banggood.com. I bought five several years ago, but they are small and tend to go missing, so I only have one left now. I also have a timer on my transmitter that is proportional to the throttle. i.e. at half throttle it will run slower than at full throttle and it starts when you engage the throttle the first time. It seems to work OK and I use it on the UMX planes. Owen Thanks Owen. I never heard of a proportional timer on a transmitter. I'm not sure how they would get that to work because the stick placement is not proportional to the power or the power being consumed over time. Sounds interesting. I did find the LiPo voltage checkers you mentioned on Amazon. A search shows them 1 for $5.59, 2 for $8.99, 3 for $6.99 and 4 for $8.39, 5 for $10.50. KM "Wing-It Judging"
In the January 2018 Ampeer, I announced the "Wing-It" contest hosted by John Hoover of Flightline Hobby. This is the announcement of the static judging on April 29. The flying judging will be at a later date. KM A few short weeks ago John Hoover, at Flightline Hobby, introduced a contest based on building an airplane, any airplane, from a single wing design. The project was called "WING-IT". The aircraft in the works have been nothing short of astounding. Please join John, and these creative modelers, for the first phase of judging, the Static Judging. Here are the details: Sunday April 29, 2018
No Charge to attend.
See you there,
A Comment on "The Power of Two" Article
In the April 2018 issue of the Ampeer, I noted an observation that I called The Power of Two. It seems that I am not the only one that ever noted it. KM Ken, I loved the power of two concept - so true. About 15 years ago I cartwheeled my Sig 1/6th Piper Cub and stripped the gears in one of the Hitec HS-60 aileron servos.�I ordered two replacement sets for a couple of bucks from Dave at Radical RC.� He pointed out that by buying these backups I would never strip the gears again - he was right! Be well and thanks for your newsletter, Paul A Comment on "Advice for Getting into Flying R/C Airplanes"
Hi Ken, When looking up something in your article about LiPo batteries I came across your beginners article in the April issue of Ampeer. This is most intriguing to me! First point is that you mention simulators (of course :-) ). I'm still so proud of my simulator models that I find you could mention them, especially since I have beginner models like a RET glider, parkflyers, the famous Slow Stick, and even a special beginner model from back when download page.
I even wrote an essay about learning to fly with a simulator as PDF. It's here. The Reflex XTR simulator is still available, now as a convenient download from a web shop for "only" $99 (less than half as much as back then). Unfortunately, I don't know of any official website, so there is only my review page. That doesn't detract from the simulator's quality, though. By the way, today there are wireless transmitter adapters, effectively a receiver in a USB stick (mentioned in my Reflex review, second paragraph). (And needless to say that I'm not connected with Reflex or any other supplier.) Second point is your consideration of beginner models. How we best learn to fly and with what kind of models, has become kind of an obsession for me. Ten years ago, I built my old beginner model (mentioned above) for the simulator and started to research this topic. Reading your article, I see that technology has advanced a lot, but the basic problems are still the same (no wonder, people have not changed). And even though you may not share my historical (nostalgic) interest (obsession) it might be interesting for you to see 50 years old ideas and how they compare to your just as long experiences. Anyway, just for what it's worth, here's what I found out: Exactly 50 years ago, one of the best-known German model designers worked for one of the smaller German manufacturers. They agonized over the question how the perfect beginner model should look like because they felt the need to bring out a new trend-setting model. As a first step, they inserted a very exceptional page in their 1967 catalog. It described how to choose a kit and bash it to get a well suited beginner model. By the way, one remark there is "the more controls the more harm", similar to your advice. Back then I built my beginner model (mentioned above) following this page and later called it VEBF when I wrote a comprehensive description of the simulator model (PDF here). In the section "VEBF/The Original Sketch", the catalog page is discussed� as well as the underlying idea of the usual learning process. In the end the designer came up with new ideas of the learning process which actually caught on much later, when technology was more advanced. However, the new model he came up with became famous in short order: the Telemaster (the 6 ft version, later called Telemaster 40). In my Telemaster document, the new ideas are discussed in the short section "History/Sketch". The Telemaster's famous slow-motion behavior, stemming from its size, design, and lightweight construction, is not emphasized in this section but should be well known. Even though the trend-setting in new learning processes did not work back then (the new ideas were not promoted, either), the Telemaster has several proponents among flight instructors. Not to keep you busy, but just because you might find it interesting. And again thanks a lot for your articles! Burkhard Hi Burkhard Wow, that is some pretty interesting information you have there. I really enjoyed the 1967 Learn to Fly RC article. Seems like we haven't moved all that far in the last 40 years. Your simulator beginner�s model is so very much like my newest designed trainer, I can't believe it! I call my 'new' trainer the RUA 2-4-10. That is Really Ugly Airplane two for ten dollars (US). That is the cost for two airframes, no wheels, radio or power system. It is based on the concept of the Power of Two. The reason it is so 'ugly' is so that a student will feel no love loss upon banging it up. It is easily built and can be easily flown by a beginner. I fondly remember working on an English translation of how to create planes for XTR, although not speaking or reading German was a bit of a hindrance. Thanks to you, I managed to do it and the translation is still �out there� on the Internet. Thanks,
Upcoming Keith Shaw Birthday Party Electric Fly-in 2018
The Balsa Butchers are hosting the "Keith Shaw Birthday Party Electric Fly-In", for the 17th year, at their field near Coldwater, MI. The event takes place on Saturday, June 2, 2018. It is a one day event again this year. The event consists of Open Electric Flying with a "Special Guest of Honor Theme", Happy Birthday Keith Shaw. Enjoy a day with the "Pioneering Master of Electric R/C Flight". 8 am - 5 pm, Saturday. New this year, NO LANDING FEE! Donations for field maintenance and lunch appreciated. For additional information contact;
The field will be open for guests to fly on Sunday as well. 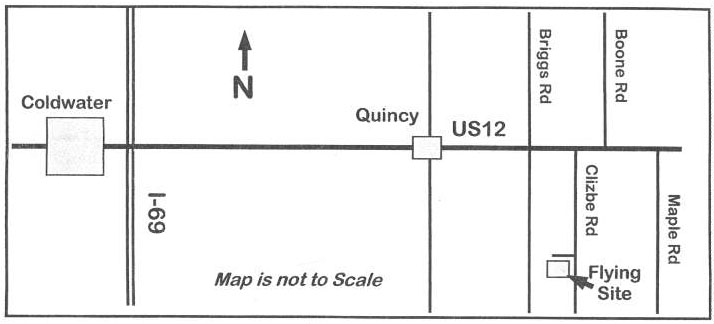 Directions: Quincy is approximately 4.5 miles east of I-69. Clizbe Road is approximately 1.6 miles east of Quincy. The Flying site is approximately 1.5 miles south of US-12 on the west side of Clizbe Road. Skymasters' Electric Night Fly and Fly-in
The Skymasters' Annual Electric Night fly will be held on Saturday, June 9 and the electric fly-in is on Sunday, June 10. More details will follow when they become available. Fore and Aft Balance: Initial Safe Center of Gravity (ISCG) Article Updated The article was updated on January 12, 2018. The updates include; electronic device cross-platform formatting, URL link updates, video link updates, and some corrections and clarifications. Upcoming 34th Annual Mid-America Electric Flies 2018
The 7 Mile Rd. Flying Site, Salem Twp., MI, is Provided by the:
Contest Directors are:
Flying both days at the Midwest R/C Society Flying Field - 7 Mile Rd., Salem Twp., MI Registration: 9 A.M. both days
Pilot Entry Fee: 18 and over, $15 Sat. - $10, Sunday, (ask about the family rate),
Saturday's Awards
Sunday's Awards
Planes Must Fly To Be Considered for Any Award
Open Flying Possible on Friday
Potluck picnic at the field on Saturday evening. Come and join us for two days of fun and relaxed electric flying. Come, Look, Listen, Learn - Fly Electric - Fly the Future!
Special Events again for this year for NCM (Not Conventional Materials) aircraft. Traditionally, model aircraft airframes have been mostly constructed from balsa wood, plywood, spruce, and fiberglass. For the purposes of this meet, NCM airframes are mostly constructed from not conventional materials i.e.; sheet foam, foam board, cardboard, block foam, foam insulation material, etc. Foam Flurry for NCM aircraft: This is a true event. It is based upon the all up/last down event of early electric meets. Any NCM aircraft may be used (no ARF types). Power systems are limited to a maximum of 3S (no paralleling) LiPo batteries or 4S maximum, no paralleling, for A123 packs. All planes qualifying for this event will launch at the same time, and the last one to land will be declared the winner. Most Unique NCM Aircraft Award: An award will be given on Sunday to an aircraft in the NCM category that is judged as 'most unique' by the Mid-Am panel of judges. The field entrance is on the north side of Seven Mile Road about 1.6 Miles west of Currie Rd.
Because of their convenient location and the easy drive to the flying field, the Comfort Suites and Holiday Inn Express in Wixom, MI have been added to the hotels' listing. They are only 10 miles northeast of the field and located near I-96 and Wixom Road. See the map-hotel .pdf for more details. The Midwest Priceless Sale at the flying field. No prices on any items. Make a reasonable offer and its yours. Money goes directly to the Midwest RC Society. No charge for space. The $5 requested donation for non-participant entry parking would be appreciated. How Do You Pronounce FrSky? FrSky is the company that makes the popular Taranis X9D Plus and the Taranis Q X7 radios. There is another company that makes much lesser quality radios named FlySky. Do not confuse the two. FrSky is pronounced Free Sky. That information is directly from the FrSky Quickstart Guide for FrSky Taranis with Open Tx. To Reach Ken Myers, you can land mail to the address at the top of the page. My E-mail address is: KMyersEFO@theampeer.org |