The 10x7 vs the 11x4.7 Props
By Ken Myers kmyersefo@aol.com
In the last issue of the Ampeer, I noted that I was surprised that the numbers reported in Rob Smith's October 2004 Quiet Flyer Column were so similar. Unfortunately, I'd not done the math, or I would have understood.
(10/12)4 * (7/12) * 5.663 = 51
(11/12)4 * (4.7/12) * 5.883 = 56
That's pretty close. Both were reported to pull 128 watts through the Whattmeter. Obviously the 11x4.7 was pulling less amps and had a higher voltage, thus the higher RPM of 5,880 versus the 10x7's 5,660. I just expected the 11-inch prop to have "significantly" more power out.
Another way to look at is that the 10x7 might fly a given model at 40 mph, while the 11x4.7, in the same model, might only be moving along at full throttle at about 28 mph. Obviously, you must match the prop to the airframe and task. This was also pointed out in some of the responses I received to my question. Here are some of the responses:
From: Paulo "Chispas" Fastino chispas@sapo.pt
Here is my opinion.
This is the part I like more and is to me the more challenging of our job. For me the answer of your question lies on the equation of Power on the prop that you have presented:
Power out = 10/124 * 7/12 * 5.663 * Prop factor
If you change the diameter of the prop by an inch you are changing it by a factor of the 4th power on the equation. On the other hand, if you change the pitch by an inch you only change by a factor of the 1st power. You need more amps to rotate the larger prop than to rotate the prop with more pitch.
If Motocalc is correct you get 19.5oz of thrust with the 10x3.8 prop, 18.9oz with the 10x7 and 23oz with the 11x4.7prop. On the other hand you have a speed of 20mph with the 10x3.8, 32mph with the 10x7 and 23mph with the 11x4.7prop.
So, unless you are flying an extremely slow plane, you will need both thrust and speed. The actual trend on electric flight is to go for the "squarish" prop.
I use an 11x8 instead of a 12x6, I loose some thrust but gain the speed, very useful when wind appears and the amps are the same. If I try to get the same speed with the 12x6 prop the amps will tend to go up by 25% more.
Try it and see what suites you more.
I tried to emulate your results on the 11X4.7 and 10X7 props and I found what I have known for long time: that a prop with low pitch draws less amps than a prop with a diameter smaller by an inch, but with a pitch slightly the double.
What seems an advantage on the larger prop, less amps and more thrust, is paid at the expense of a minor speed loss to the smaller prop, that gives a thrust slightly minor.
I tend to go with the smaller and "squarish" prop. As I fly at a region that has a windy climate, it seems to me an advantage.
Thanks for your input Chispas, much appreciated. I, too, tend to go for speed over thrust with the type of models I fly and weather conditions in my area. KM
From Ed Carter ehcarter@adelphia.net
Re the prop power enigma --- one would suspect a significant error in some part of the data, information or assumptions as prop hp has, for a long time, been assumed to vary (directly) with the fourth power of the diameter and the first power of pitch. I am sure that some variations have occurred, over the years, with experimental data but nothing of this order of magnitude!
Ah, but just as you, thinking about it, without the math didn't make sense. Now it does. Thanks Ed. KM
From Dick Corby sales@altacom.us
In the October issue (of the Ampeer) there was a question about props and their effect on the current draw. The way Props were explained to me years ago, "Pitch controls Speed, Length controls thrust - increase either and you increase the load on the motor". In the example he gave he went from a pitch of 4.7 inches of pitch to 7 inches, which of course will increase current draw. As would going from a 9x6 to an 11x6 prop.
Yes, it was that "gross" comparison of a 9x6 to 11x6 that got me into trouble. As explained here, closer iterations present less variation in prop output. KM
Return to "What's In This Issue?"
"Outrunner" Responses
By Ken Myers
It seems that everyone loves their "outrunner" brushless motors! Remember, in my article last month, I was not "putting down" outrunners, just noting that on the "brushless" side of things, they are less efficient than a non-outrunner type with a gearbox, nothing more, nothing less.
I've also noticed an "unexplained" loss happening with outrunner data when using both the power formulas presented by Bob Boucher and Ed Westbrook and the Abbot prop formula. This needs some follow up. If anyone knows what this loss is, and how to put it into the formulas, I'd love to be enlightened!
I received several responses from happy "outrunner" users.
From David Hipperson, Melbourne, Australia ritzi@corplink.com.au
I just read your item regarding the "Bonnie" and thought I'd pass on this info on my experience with an AXI 2820/10. I installed mine into a test vehicle, which was an elderly Davey kit of Bill Winter's "Le Crate". I'd obtained it in the closing down sale of a local model shop. The performance in this aircraft with 7 CP1300 cells and a 10 X 6 prop is quite simply stunning. OK, I know the model is light (30 oz), but climb outs are spectacular and take-off is within five yards if you wish, yet the handling is totally docile. Similarly I cannot recommend too highly the HET Micro 6 outrunner from Holland (sold in the USA under various names I believe). I use the 23-turn version, which comfortably turns a 9x4 APC prop on eight 1100KAN cells. The little Tsunami 10amp ESC from the same source is simply beautiful too with ultra smooth throttle control from a low, low tick over to flat out. I'd point out that I have absolutely NO connection to the model trade. When I buy motors or controllers outright performance holds no charm for me. I go for quality, construction and how does it perform for me in the air.
Regards to you and all your readers as always.
From Dick Corby sales@altacom.us
As usual I have been poring over the EFO for this month, and noticed there was a deep analysis of the AXI motors.
I'm not one to do a lot of analysis, so I just learned the basics and jumped in. The AXI on my Jr. Falcon (images in the October Ampeer) pulls the plane along very well, and it is more aerobatic than the pilot can handle. It stays in the air for 12-15 minutes, and the batteries still have about 25% of their charge left. ItŐs the AXI 2208/26 using a 3S1P 1500 mAh hour pack. And it came in at 15 oz. flying weight - 2 oz less than the plans call for.
I built a Great Planes RV-4 Park flyer a few months ago. I put the recommended geared motor on it and it would barely get off the ground and definitely had no aerobatic capabilities to speak of.
I converted it to a Wattage Super 400 T with inline gearbox, 10x6 Electric prop, and it flew much better, but weighed in at 31 ounces and still had little aerobatic capability. It took 2S3P 1500 mAh Li-Polys to carry the current which was in the range of 31 Amps full power. It had to be flown full power most of the time to get any performance. On landing the batteries were pretty warm, and the motor was too hot to touch. Plus it was noisy to say the least. So I hung it on the ceiling and left it there.
Last week I got an AXI 2212/20 swinging a 9x5 Electric prop, on 2S2P 1500 Li-Poly batteries into the plane. It now weighs 22 oz ready to fly, and last night I flew it for the first time. It's now an Awesome plane. It will do vertical rolls, Snap rolls, and probably some maneuvers that I haven't the ability or inclination to do and mostly at 3/4 throttle. I flew it for 14 minutes, and still had power to spare in the pack.
I think the AXI motors are what I have been looking for. The ease of installing them is especially pleasing to me. I have now converted 3 planes to AXI motors and they seem to fly longer, come down cool to the touch, don't overheat batteries, and overall make for a good flying experience.
My next project is a 40-sized Extra 300 Scale plane. I expect 3.5 pounds with an AXI 2814-10 swinging an 11x6 prop on 2S4P Li-Poly Batteries.
From John Rossetti jyuma@axxent.ca
Last year I built a Great Planes Ryan ST and powered it with an AXI 2820-10 and ten cells, but it was too powerful for the plane. So, I scaled up the plans 20% and built a larger plane and used the same motor and battery pack.
I am amazed at the power put out by this combination and am sold on outrunner brushless motors. I am drawing 28.5 amps with ten 1700 NiCads.
I asked John for more details and he replied: KM
My scaled up Ryan has 584 sq.in. wing area, weighs 65.5 oz. and I am using a 10x6 Graupner folding prop on the AXI 2820-10 (this is the recommended prop from AXI). The battery pack is a 10-cell Sanyo CP-1700SCR Ni-Cad solderless pack from Model Electronics Corp.
Return to "What's In This Issue?"
Needs Help in Finding 18ga Wire
From Ed Carter ehcarter@adelphia.net
Hi Ken:
Jim Oddino wrote, in his regular column --- "Airplane Stuff", for the October '03 issue of RCModeler, re the 18-gauge wire being used by Skyborn Electronics of Garland, TX in some of their power systems. One of the attractive features of this special, very flexible, wire is that it is compatible with standard R/C connectors. The copper wire is tinned, with a 7-strand, 161- filament construction, and thin silicone insulation.
While this wire would have been of little interest to e-flyers a couple of years ago, major advances in motor technology and the Li-Po cell have attracted many new converts and many with large-scale experience. Servo requirements for these larger control surfaces may be over-taxing the present day 22-gauge power and return wires and this new wire offers a significant reduction of i2r loss although there is a calculable weight penalty. Since many of us assemble these connectors from pin and housing kits --- it would be quite simple to use the 18-gauge wire for power and return and the 22-gauge wire for signal.
The major problem with this strategy is that I have not been able to find a source for the wire other than Skyborn. They have no (expressed) interest in supplying the wire except with end connectors, for which I have no use, and their pricing of these units does not encourage one to buy a cable and cut-off and discard the connectors. Understandably, they also had no interest in providing the name of their source. I have not seen any mention of this wire in Ampeer, nor was it expected, since at best --- it would be of extremely limited interest but I was hoping that with your many years of association with these types of materials and suppliers that your might have a lead that I could explore. (My wife may be right and the only reason that I'm pushing this item is because it does not appear to be readily available --- I hope she's wrong!)
Now that I've swept up all the kitty litter --- I want to thank you for the excellent publication you continue to provide. Your analysis of Rob Smith's article was perceptive and thoroughly appreciated. Such features augment Ampeer's contributions to the interest area.
Please continue your endeavors and if you have a (wire) lead for me (just had to get that in)--- an e-mail would be appreciated.
TNX and Regards Ed Carter
If anyone can help out Ed, please drop him an email. Thanks, KM
Be sure to check out the AMA District 7 Web site at: www.amadistrictvii.org
Return to "What's In This Issue?"
Another LT-40
From Robert Fishwick rmfish@shaw.ca
Hello Ken,
I read with interest the item about the E Powered LT40. I too converted one to E Power and loved it from the first flight. I started E-flight, flying E-powered gliders and built and flew several, until I decided that I would like to try my hand at sport plane flying. At the time I had a lot on my plate and opted for the ARF LT40 to save some time. As you can imagine, it is quite heavy. All up flying weight is just over 6.5 Lbs. I used MotoCalc to look at a few "What Iff's" and settled on an Aviox 1409/3Y brushless motor, 13x10 APC-E prop, and a 3:1 MEC gearbox. I used 16 cells of various types, from 1700 NiCads to 3000 NiMH.
To give you an idea of the efficiency of this set up, the first flight, which consisted of slow circuits whilst I learned the ropes under the close eye of my instructor, was a stunning 13 Minutes, this could be stretched to over twenty using NiMH 3000s. I learned to fly on this aircraft and loved it and flew it for several years.
On about the second or third flight, once I had gone solo, I landed a little hard at a slight nose down attitude and damaged the firewall. I made repairs and flew the LT40 for another 4-5 years with no mishaps until about two months ago when the nose wheel found a deep footprint left by a soccer player's boot. The firewall was completely destroyed.
Since I am retired, I purchased an LT40 kit. I will be able to build this kit much lighter than the ARF and with the same power plant and Li-Poly cells it should fly even better than the original.
I highly recommend this aircraft to any person wishing to find a worthwhile E-conversion.
Very best regards,
Robert Fishwick,
Vancouver, Canada
Return to "What's In This Issue?"
2004 Cedar Rapids Sky Hawks Electric Fun Fly Report
From Plenny Bates plennyb@mchsi.com
Our August Cedar Rapids Sky Hawks Electric Fun Fly was a great success. Of 24 entrants, 13 were guests and 11 local club members. There is no question electric is entering the mainstream. I had no idea we had 11 locals flying electrics. Guests came from MO, IL and IA.

Randy Cady brought his 96" Monocoupe powered by 24 Sanyo CP2400's, Astro 40 with Superbox. Randy has two packs for this model. One is assembled with cells side by side with Deans connector bars and the other is four sticks of six cells soldered end to end. The end-to-end pack is six ounces lighter. The electric Monocoupe is lighter than one with a large gas engine. Randy was able to build for the loads imposed by the motor and battery. He did not need to build to tolerate 40 G vibration from a single cylinder engine.
Here is some added info from Plenny about Randy's plane: KM
Here is the added information on Randy Cady's Monocoupe as sent to me by Randy today.
Wing span: 96 inch
Wing area: 1350 sq. in.
Weight ready to fly: 10lbs and some change (It is lighter than the same sized plane built for a big ignition gas engine)
Battery (cell type and # of cells): 24 CP 2400s
Motor: Astro 40 brushed with super box, modified for cooling
Prop: 18x12
Speed control: Astro 60 amp
Covering: Solartex and Monokote
Other details: Proven technology and help from friends made it a very successful project.

Bob Livin had his 1/4 (?) scale Aeronca that is a good flyer.
Here is some added info from Plenny about Bob's plane: KM
Wingspan: 94"
Wing area: 1224 sq. in. (8.5 sq. ft.)
Weight ready to fly: 10# 4 oz. (10.26#)
Battery (cell type and no. of cells): 20 x 2000's NiCads
Motor: Aveox geared
Prop: 13x8 Master Air Screw
ESC: Aveox
Covering: Solartex
Thanks again for the notice in the "coming events" section of your web site and in Ampeer.
Keep up the good work.
Plenny Bates
Return to "What's In This Issue?"
Upcoming 2005 Southeast Electric Flight Festival Info
From Jeff Meyers jsmeyers@earthlink.net
Hi Ken,
I thought I would drop you an early note about our event in 2005. We would appreciate it if you could include us in your Ampeer and event listing.
We have moved the event earlier in the spring so that we can get some cooler weather! Average high is 79 degrees :-)
DATE: April 21-24, 2005
WHERE: Americus, GA - Hodges Hobbies
EVENTS: LMR Sailplane competition on Thursday, Open flying the rest of the weekend.
WEBSITE: www.koolflightsystems.com/seff.htm
We expect to have another huge raffle, about 40 or so vendors, BBQ, awards, demo flights at noon, etc....
Pilot and vendor registration will begin no later than November.
Thanks in advance for helping us spread the word!
Best Regards,
Jeff Meyers
Return to "What's In This Issue?"
Lee B-29 Kit Conversion
From Daniel R Tracey dantra@fishinternet.com.au
Albion Park, NSW, Australia
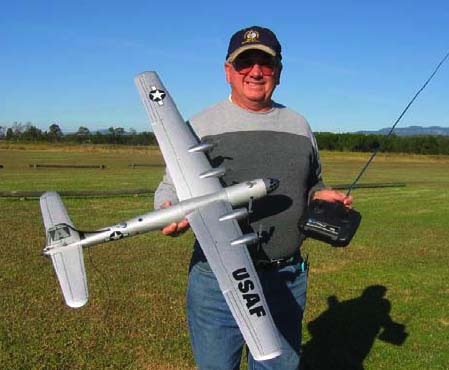
Hi Ken,
First, thanks for all your information over the years. It has been very helpful to us in Australia that fly electric.
I thought that you and your readers would be interested in my conversion of the Lee B-29 model to full RC control - rudder, elevator and throttle.
Why did I purchase such a model, let alone try to fly it with the standard set up? I don't know.
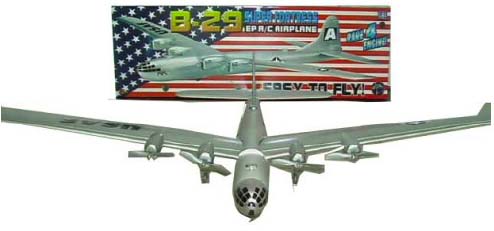
In its standard form there is no control over climbing except for power on, and turning is controlled by motor differential speed. To fly it can only be described as "Very Different".
The model did show signs that if converted to rudder, elevator and motor speed control it would be a nice model to have a little fun with. With this in mind, I started to find out if anyone had done a conversion. The only one that I found on the Web was in Japan. It was complete with photos, so this was a start.
I decided that to maintain performance I would have to use very light servos, speed controller and receiver while retaining the 650mAh battery that comes with the model.
The hunt was on for equipment. What I settled on is listed below.
Servos - 2 Waypoint W-060, weight 6g each
Speed Controller - Novatech SDC-10AB, which is a 10 amp with Brake, weight 7.5g
Receiver - Feigao 6-Channel, weight 11g
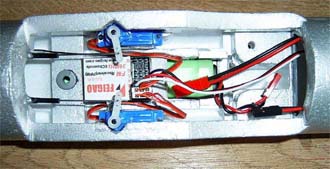
The first thing I did was to remove the stock electronic controller, which is positioned in the wing bay area of the fuselage. Then I fitted the rudder and elevator servos. All that was required was to scallop out the inner side of the fuselage to accept the servos, which are then held in place with double-sided tape. I made sure that the servos were placed as low as they could go in the fuselage.
At this stage I made a new tailplane and modified the fin to produce the rudder.
Using the original foam tailplane as a template, I marked out on a piece of light but firm 2mm balsa the shape of the original tailplane, but then shortened it by 40mm on each end to assist weight saving at the rear end of the model and also to have a more scale like model.
This task completed, I trial fitted the new tailplane to the model working out where I had to cut out a section of the fuselage and fin/rudder mount. All fitted correctly.
The next step was to make a light wire elevator connector to have both elevators halves work at the same time and then make and fit a 0.5mm ply control horn.
With this done, I then fitted the elevator pushrod, which is .5mm spring steel inside a plastic tube. It is epoxied to the fuselage at the wing trailing edge as per picture.
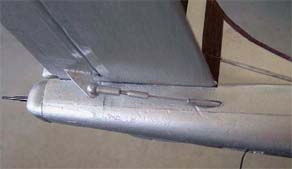
The original fin was cut to produce a rudder using the pre marked detail lines as a guide. Again this was trial fitted to the model to work out where the control rod would best be fitted. Once determined, the plastic outer control tubing was epoxied to the fuselage. The picture shows the modifications mentioned above.
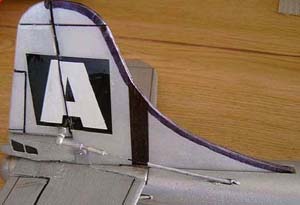
After the entire trial fitting was completed, it was time to permanently fit all parts. The tailplane is held onto the fuselage with double-sided tape, as is the front of the fin to stop it pivoting on the aft screw connection. The receiver is held in with double-sided tape.
I connected up the radio system electronics to test that the rudder and elevator operated correctly. Then it was time to think about the motor wiring modifications to suit the speed controller.
First I unsoldered the eight wires from the original centre block situated in the wing motor assembly. Then I removed the four-pin connector.
Next I soldered all the negative motor leads together, doing the same with the positive motor leads. I then soldered a short motor lead complete with appropriate plug to suit the speed controller to the motor harness making it easier to remove the wing when required.
I checked to make sure that all worked. It was OK and all was well.
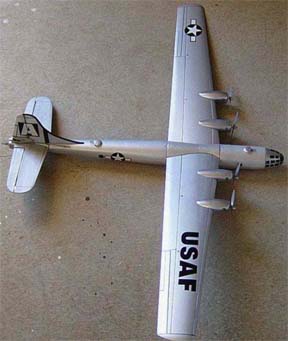
It was so now onto the wing modifications. After the first flight, it was apparent that the wing required some type of spar. I used two lengths of 2mm carbon fibre rod Zapped together and set at the original dihedral angle. The spar was epoxied to the underside of the wing being supported by the plastic engine pod assembly. With this modification I don't have the wings trying to shake hands when I loop the B-29.
At the completion of the conversion I was very happy that the model had only grown in weight by 18g.
Using the original 6-cell 650mAh NiMH pack, but moved to the front of the model to obtain a correct C of G, it produced a climb out very scale like with more than ample rudder and elevator control. With motors off the B-29 has a very good glide. As yet I have not been able to thermal the B-29, but given the right conditions this would be easily achieved. Flight time is well into 10 minutes.
All in all it was very satisfying to do the modifications, and it's a joy to fly.
Those low passes about 2m out from the flight line are most realistic.
Cheers - Daniel Tracey - IMAC
Return to "What's In This Issue?"
Bantam Bipe Landing Gear Mod
From Tom Steinhoff (STEINHT1@Nationwide.com)
Columbus, OH
I put a thicker landing gear and bigger wheels on my Bantam Bipe. It has made my touch-and-goes much more consistent! I'm not aware of any degradation in performance from the extra weight of the landing gear. If I fly with NiCads, I have to push them further back in the fuselage to get the CG right.
I've also been flying with some 2-cell 730mAh Thunder Power Li-Poly packs and a Pixie 7P programmable speed control. The packs fit nicely through the hole in the Bantam firewall, and they provide more flying time than I need. They compensate for the weight gain of the landing gear. The 9x4.7 prop works fine, but I think a 10x4.7 is more efficient with a 7.4 volt Li-Poly pack.
Return to "What's In This Issue?"
New E-kits from Australia
From Benny Laird James.Laird@defence.gov.au
Gudday Ken,
I'm finally up and going downunder kitting Peter Rake's designs. My Web site is www.laird-electrics.com
You and your site were greatly appreciated as I ventured into Electrics.
I am working with Tim at www.Skunkworx.com.au and he has set up an Aussie forum, which I am helping with.
Please drop in and have a look. You may have to register to see attachments as we are having some problems with the set up but it's early days.
www.skunkworx.rchomepage.com/tarmac/index.php
Cheers
Benny Laird
Here are some photos, from his Web site, of what Benny is offering. KM


Return to "What's In This Issue?"
Upcoming EFO Meetings
The October Flying Meeting was a bust with rain and wind starting in the morning, and high winds all day long.
The November flying meeting will be on Saturday, Nov. 6 at the Midwest R/C Society 5 Mi. Rd. flying field. Hope we can meet then!
The December meeting is being moved to Saturday, November 27 at 9 P.M. at the Oakland Yard. As usual, I'll have a $1 for EFO members attending to pay for their spectator entry. If you are planning to fly, the fee is now $18 a night, if you are not a member of the Oakland Yard Flying Club.
The reason the December meeting is being held in November is that there is no early December flying date at the Oakland Yard this year. The Oakland Yard athletic dome is located on the north side of M-59 between Crescent Lake and Airport roads. The address is 5328 Highland Rd. (Highland Rd. is M-59).
Visit the Oakland Yard Web site at www.oaklandyard.com and click on the Model Aviation Link to learn more about the indoor flying season at the their facility.
Return to "What's In This Issue?"
MIDWEST R/C SOCIETY
17th annual R/C SWAP MEET
Sunday, November 7th, 2004
9:00am to 1:00pm
Location: Northville Senior Community Center, Main Street, Northville, Michigan
Admission charge $4.00 per person
Vendor table cost $20.00 per table in advance or $25.00 per table at the door
The vendor table cost includes two admissions. If you have more than two people per table, the additional charge is $4.00 for each extra person. Vendor set up time is 8:00am.
Advance reservations are recommended, last year all tables were sold in advance!
For table reservations, call Rudi Reinhard at 248.643.4509 or wwtbi@aol.com
Directions:
Take the 8 Mile Road exit off of I-275 and go west for 3.2 miles to Center Street.
Turn south on Center Street and then go west on Main Street.
The Northville Senior Community Center is located at 303 Main Street in downtown Northville.
There is free parking in the back of the building.
Return to "What's In This Issue?"
More On the Zare Jr. Falcon
From Dick Corby sales@altacom.us
Hi Ken:
Here is a follow-up on the Jr. Falcon that I built from a Jim Zare Short Kit. I've been flying it for about two months now and it's a dream to fly. It gets about 12 minutes on 2/3 of the pack, which is about my attention span nowadays.
It loops from level flight, rolls beautifully, takes off at about a 60 degree climb, lands like a feather. In all a great flyer. I can't tell you about all of the great comments I get at the field after people see it fly for the first time.
I have a limited Video of it on my website for those that are interested.
www.altacom.us/video/JrFalconEPSuperstar.wmv
I'm firmly convinced that the AXI motor is the biggest contributor to the success of this project. I would suggest them for anybody with a project in the works. They are awesome in the power to weight category, then add the advantages of Li-Poly batteries, and you have a really fun flyer.
Bye the way, if you get a chance, can you add a link to your links page for http://lasvegassoaring.org We are the new kids in town so to speak, but growing and doing our best to promote Electric in the Las Vegas Area.
Dick Corby
Las Vegas Soaring Club
Return to "What's In This Issue?"
Improved Super Whattmeter from Astro Flight
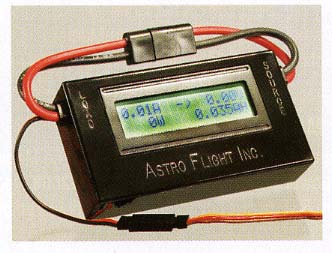
One of my favorite tools is the Astro Flight Whattmeter. It has been updated recently and now features an increase in resolution. It measures to 0.01 amps and volts and 0.001 amp-hours. The maximum current and input power capacities have been increased. It will now accept up to 100 amps and 6000 watts! There is an auxiliary receiver battery pigtail to power the meter when the primary battery voltage is below four volts.
Yep, I'm gonna get one ASAP!
Astro Flight Brushless 05 Powerhouse
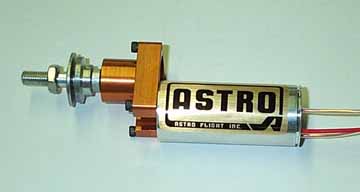
Mated to AF gearbox 3.3:1 ratio
Motor Specifications
Motor p/n 806SP
Stator Winding 3 Turns #18
Motor kv 2666 rpm/ volt
Winding Resistance 0.040 ohms
No Load Current 1 amp
Maximum current 45 amps
Maximum Power 500 watts
Maximum Motor Rpm 40,000 rpm
Motor Weight 4.0 ounces
Motor Length 2.25 inches
Motor Shaft Diameter 1/8 inch
Prop Adaptor Diameter 3/16 inch
Voltage Range 6 to 16 Volts
The above photo and data are from the Astro Flight Web site - www.astroflight.com. You'll want to use this data when you see what can be done with these motors next month in the Ampeer!
Return to "What's In This Issue?"
| 


