Ken Myers Change of ADDERESS!
Ken Myers
1911 Bradshaw Ct.
Walled Lake, MI 48390
Phone: 248-669-8124
Ampeer Paper Subscriber Reminder
When subscribing to or renewing the paper version of the Ampeer, please make the check payable to Ken Myers. We do not have a DBA for the Ampeer or EFO. Thanks, Ken
Exploring New Power Sources
By Ken Myers
In the October 2006 Ampeer I noted that there are other cells currently available for powering our electric motors.
As I stated at that time, I am very satisfied with the performance of the Skyshark RC and True RC Li-Po batteries that I am currently using. The "rest" period over the winter will truly show how well they hold up over time.
My only "disappointment" is with the fragility of Li-Po batteries in general. For some reason, I have had a very rough year with crashes. Unfortunately, my two Skyshark RC 4S1P 4000mAh batteries are the real victims.
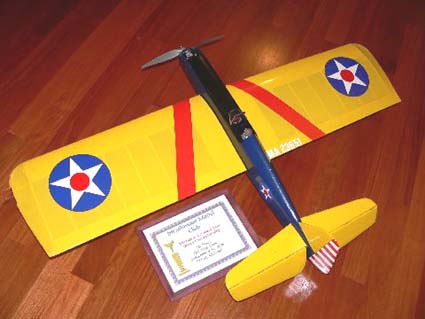
Besides being fragile, Li-Po batteries should NEVER be charged in the plane. Not wanting to spoil the looks of the fuselage on the Ryan STA, the wing must be removed to extricate the Li-Po pack for charging. It would be a lot more convenient, for planes like this, to be able to charge the battery while it is in the plane.
For my purposes, sport and sport scale flying of "medium-size1" planes, I might not be purchasing anymore Li-Po batteries, but to help me with this decision I decided to do a more analytical analysis of the potential of the A123 and E-moli cells for my purposes.
Last month I noted that Sid Kaufman has an interesting article on his site that compares NiMH, Li-Po, E-moli and A123 cells. It is available at slkelectronics.com/DeWalt/index.htm.
I wanted to do an apple to apples comparison. It must be remembered that all apples are not the same, but at least an apple is not an orange!
For my comparison, I tried to choose data points that were similar; therefore, my comparison is quite different from Sid's.
I did have to make some assumptions and adjustments to the data that I gathered, but I feel confident that it is mostly correct. It also assumes that the folks supplying the data made and recorded accurate measurements.
When the cells are discussed in the article, I have provided the links and references to the data that I used so that you may verify the information yourself.
First, I had to select a point where all four chemistries could be compared as directly as possible. I chose 12 NiMH cells, 5 A123 cells, 4 E-moli cells and 4S Li-Po for making up the comparison packs.
As I stated in the August 2006 Ampeer, for the type of flying I have described, I am recommending a static amp draw, near the beginning of the pack, in a range of 31 - 38 amps. Since I wanted to get a single data point for the comparisons, I chose 1Ah into the pack usage as the point to compare the voltage of the various cells and arbitrarily selected 33 amps. It must be remembered that both the pack voltage and amp draw will be higher with the fully charged cells, but I wanted a point that would be the same for all of the cells being "studied."
Table 1
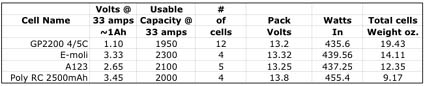
The Pack Volts are the volts in the first column of Table 1 multiplied by the number of cells. Watts In is the pack voltage multiplied by 33 amps.
Where did the usable capacity come from?
Gold Peak GP2200 4/5C: www.cheapbatterypacks.com/cellinfo.asp?invid=GP2200
Note: The graph doesn't show an amp draw over 30 amps so I made an educated guess. The capacity is based on where the "knee" is on the graph.
Milwaukee V28 E-moli: www.wattflyer.com/forums/attachment.php?attachmentid=11910&d=1148246211
Note: The guess is based on where 33 amps would be between 27 and 36 amps on the graph. Capacity is based on where the "knee" is.
DeWalt 36V A123: www.rcgroups.com/forums/attachment.php?attachmentid=883612 and FlyRC, Oct. 2006, p.56
Note: Based on where 33 amps would be between 27.6 and 36.8 amps. The amps shown on the right of the graph need to be multiplied by 10 as the CBA amplifier was used. Capacity based on "knee."
Poly RC 2500mAh: cheapbatterypacks.com/tplipocellinfo.asp?invid=PX2S-2500
Note: 80% of the capacity is 2000mAh and the graph also shows this is a good place to stop.
Price:
GP2000 4/5C $61.80 @ CBP (12 cells at $5.15 ea. plus shipping - no taps required, needs to be made into a pack)
4S E-moli $72.95 @ www.bigerc.com (completed pack includes taps but not shipping)
5 A123 ~$80 (found 10 cell pack online at several places for $160 - could be lower - shipping needs to be added, needs to be made into a pack and taps added)
Poly RC 2500 4S1P for $125.15 @ CBP (plus shipping, completed pack includes taps)
And Now For an Orange
My Skyshark RC 4S1P 4000mAh pack weighs 12.4 oz. and costs $84.95 and that included taps and shipping.
I do not have a nice graph to refer to, but I had taken a reading "pfurther down on the pack", according to my notes, and the average volts were 3.3 per cell, which is about the same as the E-moli. With wire, taps and connectors the E-moli pack will weigh closer to 15 ounces, giving the Skyshark RC Li-Po about a two and a half ounce weight advantage. The E-moli pack has only about 2/3 of the usable capacity of the Skyshark RC 4S 4000mAh Li-Po pack based on my data log showing approximately 3000mAh returned to the pack during my normal flying and charging routine. The cost for both packs would be close when shipping is added on to the cost of the E-moli pack.
The 5S A123 would weigh just slightly more than the Skyshark 4S with the added weight of the wire and a tap connector. I would have to purchase 10 cells, so the initial outlay would be greater than one Skyshark RC 4S 4000mAh pack. Once shipping is added to the original 10-cell A123 tool pack, the cost would be about the same as the Skyshark pack. I would have to get a SLK Electronics Li-PoDapter to charge the A123 cells.
This thinking out loud has made me realize why I chose the Skyshark RC and True RC packs in the first place. With basically no difference in price, weight or performance for the Skyshark RC, E-moli and A123 packs, is it worth the loss of capacity to have a more robust and safe pack?
While the Li-Po batteries seem to be a better choice, I have to keep in mind:
1.) Li-Po batteries are extremely dangerous to have around the house, and the utmost care must be taken when charging and storing them. Visit this site to learn more: www.purehobby.com/LipoSack.htm
2.) Li-Po cells are extremely fragile and can be easily destroyed in a crash or even by just "dropping" them off a workbench. Any pressure on the outside of the cells can start irreversible cell damage by the forming of crystals in the electrolyte.
3.) Li-Po packs, because of their lower weight, can cause problems with getting the CG correct on some planes.
4.) Li-Po cells start losing their ability to put out watts starting at about 50 degrees F (10 degrees C). They must be kept warm until use below these temperatures.
5.) If Li-Po cells need a layover because they are not going to be used for several months, they need to be monitored to keep them at about 3.80v to 3.85v per cell.
Decisions!
1. "medium size", generally 3.5 lb (56 oz., 1.6kg) to 7 lb (112 oz., 3.2kg) and wing areas between 450 sq.in. (29dm^2) and 720 sq.in. (46.5dm^2)
Return to "What's In This Issue"
Jim Young's New Web Site
Jim Young is a prolific electric RC writer and designer of electric powered model airplanes. He lives in Brighton, MI. We feel very fortunate to have him as an EFO member.
He has recently started a new Web site where you can purchase kits of his Hughes H-1 Racer (featured recently in the Model Aviation), Electric B-29, de Havilland D.H.-88 Comet (Coming Soon), and also coming soon, his Savoia Marchetti S.65.
I've been privileged to watch the Hughes, B-29 and Comet "grow up" and they are great fliers and very easy to hand launch! Personal experience there!
Check out Jim's site at: www.tnjmodels.rchomepage.com/tnjnewproj.php

Jim's Comet photo from his site
Return to "What's In This Issue"
News From Rick Sawicki
Rick Sawicki, EFO Treasurer, has been busy this summer. Rick has been one of the people pioneering electric control line here in Michigan. Recently his electric Viking WON first place in Old Time Stunt at the Michigan Stunt Championships. Rick has been on the handle for a long, long time, and now he is showing them how it is done electrically. Congratulations Rick!
Rick's Viking Classic Stunt Control Liner
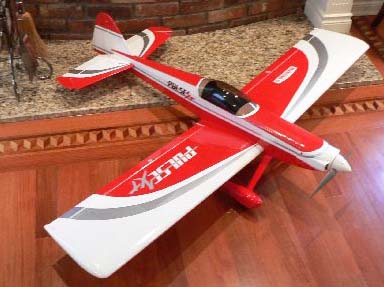
Rick has also been busy with a new RC project. He has assembled a Hangar 9 Pulse XT. It is a sport/pattern type plane with a wing span of 61", wing area of 670 sq.in., weight of 5 lb. 6 oz. and is powered by an E-Flite Power 46 BL outrunner. The E-Flite motor is paired with a Castle Creations Phoenix 45 and a Poly-Quest "Twenty" 4S1P 3700mAh Lithium Polymer battery. It is turning an APC 13x8e and pulling 43 amps static on the ground. Rick notes that the plane flies great. The plane is capable of going straight up at full power but his normal flying is using about 3/4 of the power available.
One curious thing was that I had mentioned to Rick that the same plane and power system were reviewed in the September 2006 Quiet Flyer magazine. I said that I was having a problem with the figures that Rob Smith, the QF author, gave. Rob said that he measured 49 amps, 737 watts and 9,000 RPM while using a Thunder Power 4S2P 4200mAh pack and an APC 13x6.5E. After checking the Drive Calculator (www.drivecalc.de) program and not coming up with anything close to that, I was wondering if Drive Calculator was way off. I checked the Horizon site where they give measured numbers for that motor, and their numbers were very close to what Drive Calculator predicted.
I had no idea that Rick was doing the same thing and he wrote back, "I was curious what the Drive Calculator program would have to say. My info is 43 amps and Drive Calculator suggests 44.4 amp. My outside temperature was 77 degrees F and very humid which could account for the very slight difference."
A few minutes after receiving the above message, I got this from Rick, "This is just UNBELIEVABLE. I just changed the temp on the Drive Calculator to 25 C and the altitude to 250 meters and guess what, it now says 43.2 for the amp draw! It looks like my 43 amp draw (I can't remember the number following the decimal point) and Drive Calculator ARE RIGHT ON!"
In the end, Rick reached the same conclusion I did. Rick said, "I was curious about the magazine article so I hunted it up. The error jumped right out. There is no way an APC 13x6.5E should be pulling 49 amps! I think his test equipment is OFF."
The other problem, that I saw, with the magazine article data was that the reported 737 watts divided by 49 amps = 15.04 volts, which is 3.76v per cell at a nearly 50-amp load. That would be incredible, in my opinion.
It is always fun to share models and thoughts with others, especially club members. Thanks for sharing Rick.
Return to "What's In This Issue"
Update to "Using Relatively Inexpensive Li-Po Batteries with Typical Mid-size Sport and Sport Scale Planes"
By Ken Myers
When I wrote this article I was not happy at all with the way that I was reading the individual cell voltages on the Skyshark RC and True RC Li-Po batteries because it was not safe.
I actually had a better way of doing it on hand. All I needed as a new lead for my " digital voltmeter". I had been using an old Futaba "G" series male plug to charge the cells individually. Now that plug can be used and there is no chance of shorting the cell when reading the voltage.
In the meantime, I had wanted a plug with heavier gauge wire so I had ordered a male JST plug from Hobby Lobby. Unfortunately, when it arrived, it was not the male JST that I had anticipated, but they do make one. I know that the male JST with exposed pins would have worked, but this is not what I got.
On a trip to Joe;s Hobby Shop in Farmington Hills, Mi, I told them what I wanted and went to get the Futaba "G" series plug to show Dave Shavlin what I was looking for. By the time I got back into the shop he had thrown a MPI MAXX Quality Gold-Pin R/C Connector, Order No. 3122, Fits Futaba J Female, w/AWG 22 Heavy Wires onto the counter. "Dave," I said incredulously, "I need a male!" The words "Fits Futaba J Female" had thrown me. With a quick flick of the X-acto knife, he flicked off the outer shell to reveal, are you ready for this, the male connector I was looking for.
Dave Stacer, EFO member, prompted me also. He sent me a photo of an adapter he had made up, along with this note, "I soldered up a jumper wire to help test the voltage easier. I had a two-pin 0.1-inch centers plug from some old electronics. I soldered on two old banana plugs from a old set of test leads."

During my conversation with Keith Clark, mentioned last month, he noted that the Deans two-pin connector used with radio systems would also work if the ends of the pins are carefully rounded and dressed with a file. He also suggested that for those using Thunder Power packs the Thunder Power adapter from Astro Flight allows the use of these types of pins for reading individual cell voltage.
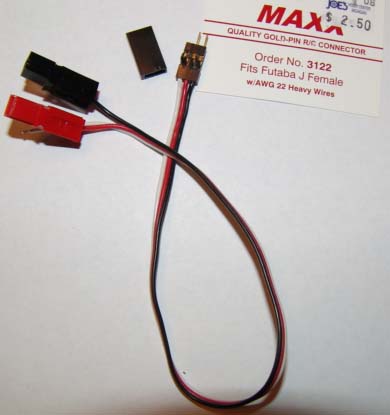
My adapter. Black piece near center top is the plastic housing removed from the plug.
The bottom line is, DO NOT measure the individual cell voltage with EXPOSED pins of any type that could short the cell!
Keith Clark also pointed out that if you have an Astro Flight powered Super Whattmeter; you do not need a digital voltmeter. By connecting a receiver battery to the Super Whattmeter, it can be used as a reasonably accurate digital voltmeter. Why hadn't I thought of that? Well, my AF Whattmeter is older than dirt and is still work very well so that is the only excuse I can think of.
He also suggested that I try using my Hyperion Emeter as a digital voltmeter, since it has an internal battery. Thanks Keith, it works!
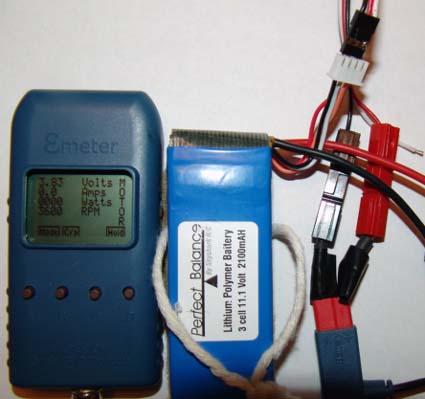
The photo shows the Hyperion Emeter being used as a digital voltmeter and my new adapter being safely used to measure the volts of the most negative cell.
Now I can use any of any of my 4 digital voltmeters or my Emeter to monitor individual cell voltage on my Li-Po batteries.
Bottom line here is that newcomers need to purchase an Astro Flight Super Whattmeter or an Emeter and then you won't need an extra digital voltmeter.
Return to "What's In This Issue"
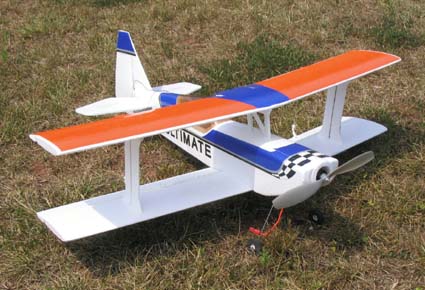
Ultrafly Models Ultimate Bipe
From Roy Day rday125@att.net
Dear Ken,
Here's some information on the Ultimate Bipe by Ultrafly Models. Don Grey took the photo.
Kit: Ultrafly Models
Wingspan: 35" wingspan
Wing Area: 458 sq.in.
Wing Loading: 7.86 oz./sq.ft.
Cubic wing loading: 4.4 oz./cu.ft.
Motor: Hacker A20-20L Outrunner
Prop: APC 10x4.7 (cut down from an APC 11x4.7SF)
ESC: 25 amp brushless from Dymond Modelsports
Battery: 3-cell 2100 mAh Li-Po from Dymond Modelsports
Servos: 4 Micro Tower Pro ($7 each from Toledo swap shop)
Receiver: FMA M-5
Performance:
Flying wt.: 25 oz.
Power max: 19 amps x ~10 volts = 190 watts in (approx.)
Watts/lb: 190 x 16 divided by 25 oz = 122 watts/lb
Max. RPM: ~6500
This is my first experience with one of the "foamies." I won this kit at one of our club raffles last winter. The Ultrafly Ultimate has a symmetrical airfoil and a 3-dimensional fuselage. Only the tail feathers are sheet foam. The kit was very complete and the instruction manual clear with illustrations. It comes with stick-on decals, which are not entirely satisfactory. The kit comes with a tube of gel glue, which is enough for assembly and even a few repairs. I had a chance to find out that repairs are easy after I snagged one of the tables at the field. The little Hacker A20 provides plenty of performance for acrobatics, more than I can use.
I found the white and blue colors difficult to see on a hazy morning so I stripped off the blue decals on the top wing and the horizontal stabilizer and replaced them with some orange Ultracote. The Ultracote goes on OK at a temperature of 250 degrees. Now, visibility is greatly improved. Overall, I'd say the kit is well-designed and fun to fly.
I like the performance. It's plenty zippy in the air and slows to a walk on landing. Just the thing for an 81 year old!
Roy Day
Return to "What's In This Issue"
News from John Zook
From John Zook johnzook@voyager.net
Greetings to Ken and all EFO members!
I am a little behind, as I tried to find the time to make a report for last month's Ampeer, but it seems that the "after Labor day slowdowns" has not happened.... too much overtime at work and caught up in other matters just seem to whittle away the time...doesn't it?
My flying buddy up in Ellsworth, Jim Maine, has been flying his now famous and large "Mother Ship" from FlyingFoam.com, with good success after a few glitches in the electronics and prop setup.
The wing as shown on the website is 84" and normally designed as a slope soaring glider.

Jim powered this beastie with a Kontronics Fun 500-27 with a planetary gearbox at 3.7:1 ratio, swinging a 12x8 Aeronaut folder from Hobby Lobby. The volts are supplied by either 12 GP 3300's cells or Elite 4300's from Cheap Battery Packs using a Castle Creations Phoenix 60 set up for soft brake. The static current draw is 43 amps and input watts are over 550. AUW is 6.5 lbs. Jim estimates a good 30-degree climb out and at least 10 minutes of powered flight.
"It likes the wind," as Jim related to me. "It's a windy day flyer."
I can easily attest to that fact as I have launched this monster several times and was amazed and awed by the flight performance of this wing. Did I mention it is made of EPP foam, which makes for a damage resistant plane? Overall Jim is very happy with the Mother Ship and really enjoys flying it.
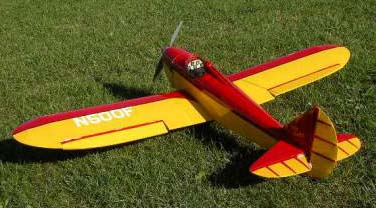
As for my own feeble flight forays, I converted an Aerodrome Models kit of a Fly Baby. Some of you may remember these planes were kitted by Dick Watz up in Saginaw for a few years and as I've been informed, produced very good kits.
I purchased the built airframe from a fellow club member and it sat in storage for a year or so. After cleaning and sanding the airframe, I inspected and repaired or made changes as necessary to the plane before covering.
The plane is covered in true red and Cub yellow Ultracote. I decided to add a little trim from another model to the rear control surfaces...guess which one?
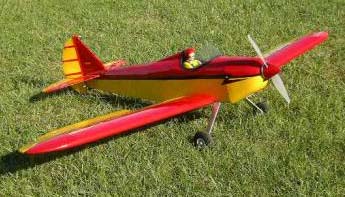
For power, I'm using a Jeti Phasor 30/3 brushless with an APC 9x6E prop. The Speed control is also a Jeti Advance Plus 40 amp with brake off and set to high rate. Volts are supplied via a 3S1P 3700mAh 20C PolyQuest pack.
For some reason unknown even to me, I do not have the performance specs written down. However I remember current draw at around 39 Amps static with an input power at over 400 watts plus. The AUW is 67 oz. so it has more than enough power.
First flights proved to be a handful as I had misread the CG location and was experiencing problems with premature ESC cut out. After replacing the faulty ESC and resetting the CG to its proper place, the plane flew much better and had no problem flying at below half throttle It does take some time getting used to a plane like this one as it is a scale model needs to be flown much as the "real" Fly Baby does.
However it does make for a very nice flyer once I got used to its characteristics. It also has a good "cool factor" in the air as well.
It's too bad these kits are no longer available as from what I've seen of the kits still being held by club members, they are very well designed and cut with exceptional care.
Having just finished a Mini Bee with a brushless motor from JustGo Fly a 300DF and 1320 TP 3S pack, I'm waiting for the weather to stabilize on a weekend to test fly it.
Cheers to all and keep up the volts!
John Zook
AMA 563510
Charlevoix Area BUFFS
Return to "What's In This Issue"
Hidden Servo/Receiver Battery Plug Danger
By Ken Myers
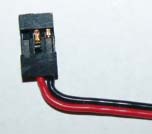
Near the end of this summer I had an unexplained crash of my Hobby People Low-Stik. At first I blamed the crash on a faulty receiver battery plug (shown above). It seems that the plug was NOT the cause of the crash, but a victim of the crash! I discovered that when I read this thread on RC Groups: www.rcgroups.com/forums/showthread.php?t=576920
feathermerchant had this same thing happen to a servo connector in a crash. You can see a photo of it in the thread. It looks basically the same as the one in my photo, except the damage is on an outside wire instead of the middle wire. When the two connectors are joined, these broken connections cannot be seen. The only reason I found mine was that whenever I moved the receiver pack while it was charging, after removing it from the crashed airframe, the charger LED would blink. Repeating the move and noticing the blinking several times caused me to pull the receiver plug out of the harness and thus discover the faulty connection, thank goodness!
In all my years of flying RC, I had never seen this. Now, my after crash inspection will include pulling apart all "servo/receiver battery connections" for a visual inspection. I highly recommend it!
Return to "What's In This Issue"
AMPERE HOUR DETERMINATION
By Bob Kopski, 25 W. End Dr.
Lansdale, PA 19446
The September 2006 Ampeer included a photo and some description of an experimental Amp Hour Detect Circuit. This Li-Po accessory is used in-flight and monitors the amount of actual battery discharge - in ampere-hours that is taking place in the air. The device connects in-line with the Rx-to-ESC cable, and to a shunt in the motor battery lead. The circuit has a pre-set AH value so that when a pack is depleted by that amount the circuit introduces some motor RPM wobble - an "alert" of sorts.
The idea behind this is to not discharge a pack below some chosen percentage of capacity value, since there is growing advisory to "only use 80% of capacity" for best pack life. Note that this is quite different, and possibly much better than, the pack protection afforded by LCDC-like devices. I cannot quantitatively say how well this all works and compares, since I don't yet have enough life data, but I sure do have the mechanism in place to get that data!
This discharge limit recommendation sounds simple, but how does one know, when the plane is in flight when a specific discharge level is reached? I have some planes that I fly "all kinds of ways" and I know for sure I cannot judge the value by time in the air, so what to do? That�s where this Amp Hour Detect circuit idea came from.
Since that earlier presentation, I have continued to refine this DIY (do it yourself) circuit and am now on my fifth version. The photo this month shows the original (larger) unit from September and units 3 and 5 as well. The "big thing" with units 2 and 3 was getting the size down, and the major advance in units 4 and 5 was getting on-field programmability on-board. At the same time all assemblies have other more minor variations so that no two are completely alike. It is called "continuing refinement"!
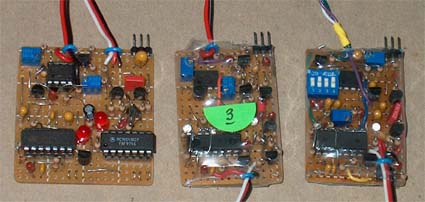
Evolution of the BDM
Whereas the earlier units had fixed 2 AH "detect" levels set during construction, units 4 and 5 have DIP-switch-settable AH values ranging from 0.33 AH to 3.3AH in 0.33 AH steps. So, for example, in one favorite flyer I have, wherein I routinely change packs over quite a large AH range, I can merely switch-in the "detect" AH value consistent with a particular pack.
The other thing that's "improved" is the name - I'm now calling the device Battery Discharge Monitor or "BDM". Now both the circuit and the circuit name work much better!
Just how well does the BDM work? I have accumulated a large amount of "recharge" data following many flying sessions with a wide variety of packs, and what I'm consistently seeing is charger-reported amp hour levels of less than +/- 2% of the circuit setting! Personally, I find this attainment level well past necessary accuracy, but at the same time it's nice to know how well this device can work. Please note there is some portion of that 4% total window associated with just "setting up" and then landing after getting the in-flight "alert" - part of the total variation for sure.
Of course, the BDM is a DIY device, and so is not for everyone. In addition, since I am only able to build with classic "thru-hole" components on pc hole board (aging eyesight and less-steady hands!), my versions are much larger than what could actually be realized in today's SMT (surface mount technology) world. Even better would be rendering (part of) the circuit function with a microprocessor - more size reduction. There is much that could be done to better yield for everyone what for me has been a proof-of-concept design and assembly effort. Meanwhile, I'm having lots of fun with this pursuit - and that's what the hobby is for. (I read that somewhere in times past!)
BUT THERE IS MORE! The hugely successful BDM electronics gave me another idea - herein referred to as the Amp-Gate (AG). As with in-flight discharge level recommendations, there is growing advisory to not store Li-Po batteries fully charged. What does that mean?
There appears to be variance of opinion on all parameters here including "how long" is storage, what would "partial charge" be, and how would one attain that value if it were known in the first place? Here again I personally do not yet have enough data to answer these questions, but I now have the accessory device needed to get that job done to - the Amp Gate!
The AG is a derivative of the BDM concept. It's a circuit that monitors discharge. In this case, the operation takes place on the bench instead of in the air, and the "output" of the circuit is a "shutdown" instead of RPM wobble. Thus, in use, one fully charges the storage-bound pack and then discharges a specific amount of charge prior to stashing the pack for the winter (or whatever).

Amp Gate
For example, lets say one has a 2 AH pack and decides to store it at 50% charge level. One would fully charge the pack, and then use the AG to discharge 1 AH from it. Presto! Fifty percent! The AG is programmable with an array of switches that allow discharge values ranging from 0.1 to 1.6 AH in steps of 0.1 Ah - which covers my range of packs nicely. This range is easily extended to cover larger capacities. Since the ultimate intention is "storage", some wide variation in how long it takes (discharge current) to partially deplete a pack is not very important.
In operation, the pack is connected to the AG, and a suitable LOAD is also connected to the AG. The load can be an appropriately chosen resistor, an auto lamp bulb, a Dump'r, a CBA - most anything that can suitably drain current from the pack. The present AG is designed for currents up to 2 amps and packs of 2 to 5 cells, and the pack being discharged also powers the AG itself. When discharge is complete, the AG electronically disconnects the pack from everything else. One graphic shows the outcome when a pack was discharged at 2 amps using a CBA as the load. The AG switches were set to 1-Ampere Hour. The CBA screen output tells the story!

AmpGate data
I might add here that many folks promote using pack voltage to gage the state of charge. For example, some suggest storing packs at a terminal voltage of 3.6 - 3.8 volts (among other recommended ranges). I tried this approach prior to designing the AG but kept experiencing somewhat unreliable results with many variables participating in that end result. I just didn't like it, hence the Amp Gate. To me, "total charge in" minus "total charge out" is "charge remaining". Period.
For the detail oriented, both the BDM and the AG monitor current flow with a shunt resistor in the battery path. The BDM uses a 5-milliohm shunt (not easy to find/make), and the AG a 100-milliohm shunt. Voltage drop across these shunts due battery current flow produces a precisely related much smaller current in internal circuitry. This latter current in turn linearly charges the timing capacitor on an IC timer. The more current in the battery circuit, the higher the timer charge current and the faster the timer / clock runs.
The timer / clock drives a counter IC which outputs a level change when 32768 counts have occurred. This level change is used to gate another several-cycle-per-second clock into a PW modulator circuit in the BDM. This in turn results in motor RPM "wobble".
In the AG, the counter level output change turns off a MOSFET in the battery circuit thus stopping the discharge. The adjustable clock frequency-per-ampere parameter is set with switched capacitors in the BDM and with switched resistors in the AG. Thus both the BDM and the AG actually tally "how many amps" for "how long" - or more simply: Ampere Hours. Actual current values (including all the wide in-flight variation that takes place) and cell counts (within design limits) do not matter.
Both the BDM and the AG work remarkably well and are candidates for construction articles for the DIY reader. However, both are somewhat "advanced" devices requiring more than a simple DMM to test and tune up, and I am working to simplify this aspect should such presentation be warranted in the future.
This latter point is up to you. Several Ampeer readers reacted very favorably to the September issue by expressing interest in the early BDM presented there. What's needed is more reader input in-kind - because, simply put, a construction article for either the BDM or the AG is a major undertaking. I'm certainly willing, as is Ken, to share the needed detail info with everyone via Ampeer, but first there needs to be sufficient real interest to encourage this sizeable effort.
That's the story of the Battery Discharge Monitor and the Amp Gate to date. I expect to continue playing with these aero-hobby related electronics - for the fun (and value) of it. It's up to you if you'd like to play too! Just let Ken and I know how you feel about this, and we'll see what the future holds. OK?
Return to "What's In This Issue"
|

