|
Flying High With Electric Power!
The Ampeer ON-LINE!
Fly the Future - Fly Electric! |
|---|
Site Table of Contents
| President: | Vice-President: | Secretary-Treasurer: |
| Ken Myers | Keith Shaw | Rick Sawicki |
| 1911 Bradshaw Ct. | 2756 Elmwood | 5089 Ledgewood Ct. W. |
| Commerce Twp., MI 48390 | Ann Arbor, MI 48104 | Commerce Twp., MI 48382 |
| (248) 669-8124 | (734) 973-6309 | (248) 685-7056 |
 | ||
| Board of Directors: | Board of Directors: | Ampeer Editor |
| David Stacer | Arthur Deane | Ken Myers |
| PO Box 75313 | 21690 Bedford Dr. | 1911 Bradshaw Ct. |
| Salem, MI 48175 | Northville, MI 48167 | Commerce Twp., MI 48390 |
| (313) 318-3288 | (248) 348-2058 | (248) 669-8124 |
| Upcoming EFO Flying Meeting: Saturday, October 1, 2022 Time: 10 a.m.
Place: Midwest RC Society 7 Mile Rd. flying | ||
| EFO Flying Meeting Reminder Remember that the posted dates are tentative for the summer EFO flying meetings. | The September 2022 EFO Flying Meeting A brief note because Ken had COVID and couldn't attend! |
| The Upcoming Midwest RC Society Annual Swap Shop Info on this November Swap Shop in Northville, MI. | Winter Indoor Flying at the Legacy Center Info on Winter indoor flying in Brighton, MI. |
| Skymasters' Winter Indoor Flying in Pontiac, MI Announcement of Winter Indoor Flying in Pontiac, MI. | SkyRC MC3000 Universal Battery Charger & Analyzer A Brief Review and Long Tutorial Using Lithium-based Cylindrical Batteries. |
Please keep in mind that all summer monthly EFO flying meeting dates are tentative and quite fluid depending on the predicted weather. The meetings are usually on Saturdays, but may change to the following Sunday or even possibly a week or more later. Everyone is welcome and proof of AMA membership is required to fly. The September 2022 EFO Flying Meeting The monthly EFO flying meeting was held on Saturday, September 3. The skies were bright and the wind was low. During the morning flying session, the temperatures remained moderate, but went quite high in the afternoon. From all reports the turnout was good and so was the flying. Unfortunately, I could not attend. I had COVID!!! This was one of the very few flying meetings that I'd missed in the over 35 years of EFO flying meetings. Actually, it might have been the only one. Thanks for carrying on guys. Nicely done. Midwest RC Society Annual Swap Meet Sunday, November 6, 2022
Location
Latitude 42 43 04 North
Admission Charge
Vendor Table Cost
For Information and Table Reservations
Directions
As always, this is the LARGEST and BEST swap meet in SE Michigan! Return to "What's In This Issue"
Winter Indoor Flying at the Legacy Center in Brighton, MI Indoor flying takes place from November 2rd, 2022 until April 26th, 2023 at the Legacy Center Sports Complex, 9299 Goble Dr., Brighton, MI, 48116 phone: 810-231-9288 Wednesdays from 12:30 PM until 2:30 PM. The cost is $10 per drop-in session. Skymasters' Winter Indoor Flying in Pontiac, MI
Hi All, I'm very happy to announce that we have secured a spot at the UWMSC (UWM Sports Complex), 867 S Blvd E Pontiac, MI 48341, calendar for indoor flying. WE ARE GOING BACK TO TUESDAYS FROM 9AM-12PM! Expected start date is 10/18. More details to follow soon when we open up online sign-in for Gold Cards, etc. Similar to last year we will be offering Gold Card season passes for $150 and single sessions for $10. Thanks,
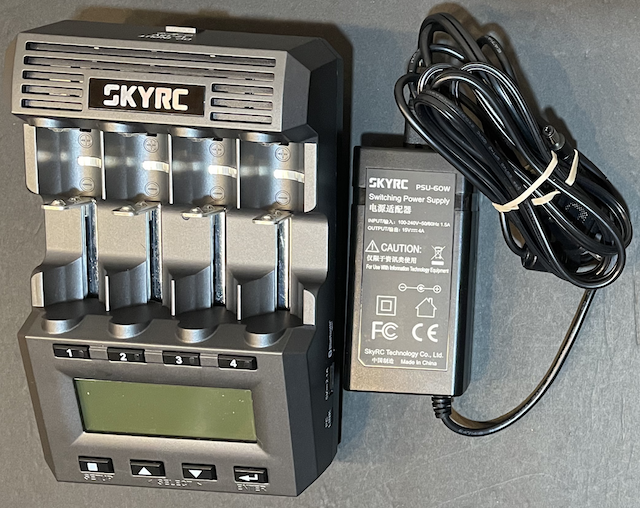
The SkyRC MC3000 Universal Battery Charger & Analyzer for Rechargeable Cylindrical Batteries
I recently had the need to charge 3 individual 10440 size Lithium Manganese Oxide (IMR) and 4 individual 10440 size Lithium Iron Phosphate (IFR) cylindrical batteries at a time. I thought that if I had a need to charge single cylindrical batteries, so might some others who read this newsletter. This charger can handle all rechargeable chemistry types, Lithium and Nickel, and all of the common, and even uncommon, sizes of cylindrical batteries. 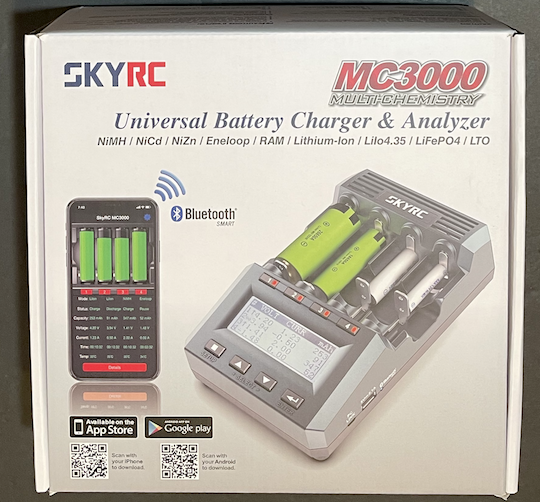
10440 size? Think the same size as AAA batteries, but Lithium based instead of Nickel, although it will charge Nickel-based AAA rechargeable batteries. After watching several videos on YouTube, like "SkyRC MC3000 - The most intelligent round battery charger!", I decided to purchase the SkyRC MC3000 from Progressive RC. That is my "go to" supplier for these types of purchases. It is a true multi-chemistry charger. It can charge, discharge, refresh, cycle, store1, break-in, trickle and has a resting routine, for NiMH, NiCd, NiZn, Eneloop, RAM, Lithium-Ion, LiIo4.35, LiFePO4, and LTO in sizes from 10340 through 32700.
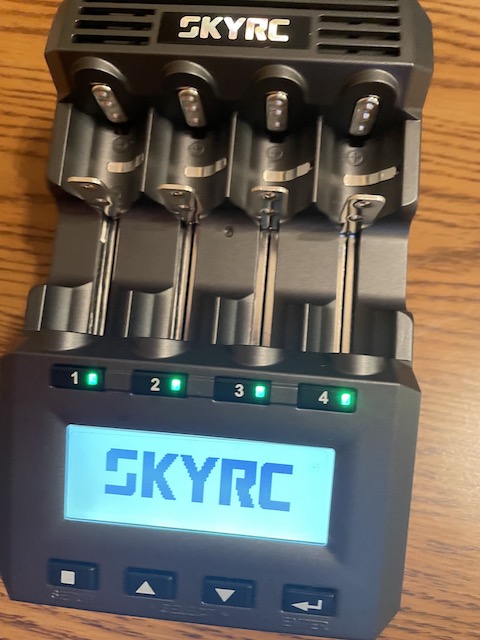
Not all of its functions are applicable to all chemistries. It has 4 battery slots. therefore it can hold from 1 up to 4 batteries at a time. It can perform the same, or different functions, in each slot at the same time with the same or different chemistries and the same or different sizes. It can hold up to 30 different user created programs. I was mainly interested in charging 10440 size Lithium-Ion batteries with what SkyRC calls a TARGET VOLT1 (a target voltage) of 4.2V and 10440 size Lithium Iron Phosphate batteries with a TARGET VOLT1 (a target voltage) of 3.60V or 3.65V, depending on the manufacture's specifications for their LiFe battery.
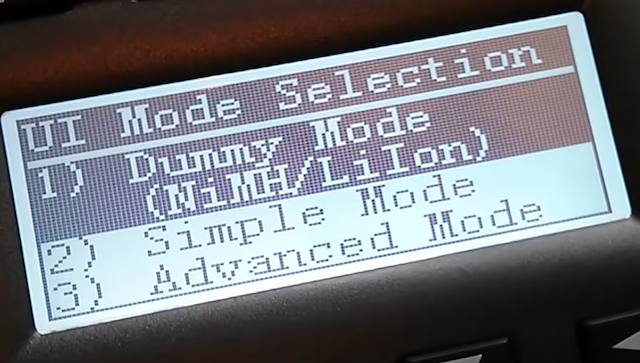
Before ordering the MC3000, I downloaded the PDF version of the Instruction Manual and read through it. The extremely comprehensive Instruction Manual, in English, is well written with very few typos. It is so comprehensive, that, at first, it may appear overwhelming to those without prior knowledge of battery charging and care for the various chemistries. It is a good idea to view the "SkyRC MC3000 - The most intelligent round battery charger!" video on YouTube to gain a bit of knowledge before turning on the charger for the first time. SkyRC delivers the unit, which includes the charger and power brick/power supply for it, set up in what they call "Dummy" mode. "Dummy" mode supports NiMH and LiIon only. SkyRC uses LiIon to refer to Lithium-Ion batteries with a TARGET VOLT: (a target voltage) of 4.2V. In "Dummy" mode, only the charging current can be adjusted. The Quick Start Guide, near the beginning of the Instruction Manual, covers how to use "Dummy" mode. The Instruction Manual notes that there are Video Tutorials. There is a QR code for the link, but the link to the videos is not written out. The link is here. SkyRC calls a second mode "Simple". They state, "In the Simple and Advanced UI (user interface) modes the device will NOT determine battery chemistry automatically..." and "The Simple menu mode assumes reasonable fixed parameters...". I chose to start in the third mode, with what SkyRC calls the "Advanced" mode. According to SkyRC, "The advanced menu lets the user control every single technical parameter of the operation...". Before receiving the MC3000, I put the FREE companion Bluetooth App on my iPhone. A Bluetooth App is also available for Android phones. I did not download the FREE companion Windows program. That Windows program can be used to set up the programs and run the charger from a Windows PC. The QR codes for getting the Bluetooth Apps for the iOS or Android operating systems are found here and so is the download for the Windows program. Upon receiving the MC3000, I first set up the Global Variables. There does not need to be any batteries in the unit to set up the Global Variables or later, even to do the Programming.
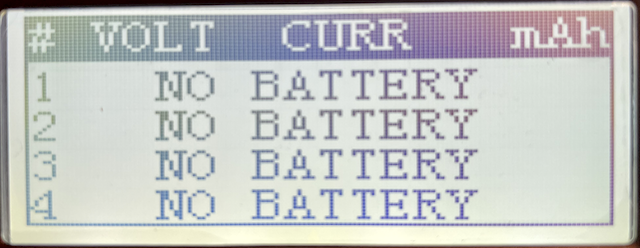 The Total Overview (TOV) screen appears. The Total Overview (TOV) screen shows the # (slot number), VOLT (volts), CURR (current) and mAh (milliamp hours) columns. This photo is noting that there are no batteries in any of the four slots. IMPORTANT NOTE: No batteries need to be in the charger to completely program it.
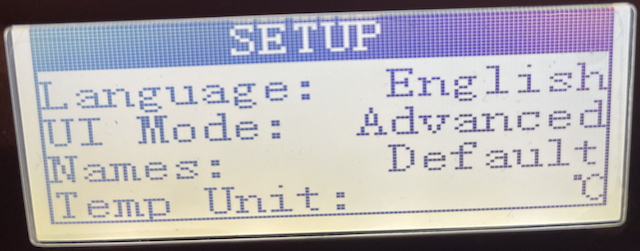 and the Global Setup View (GSV) SETUP screen is displayed. Release the button. Four lines of any menu appear at a time on the screen. For MY setup, no values were changed in the first four lines of the menu. The Temp Unit: in Celsius, is fine, even it you don't "think" in metric. 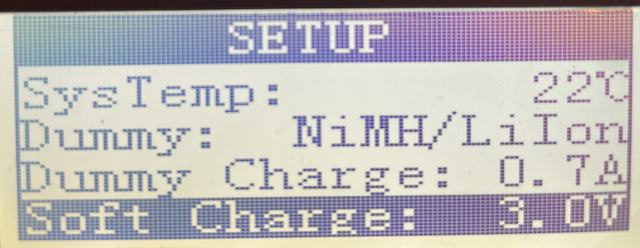 All of the defaults were left alone on the next four lines. This screen is displaying the SysTemp: (system temperature, but... 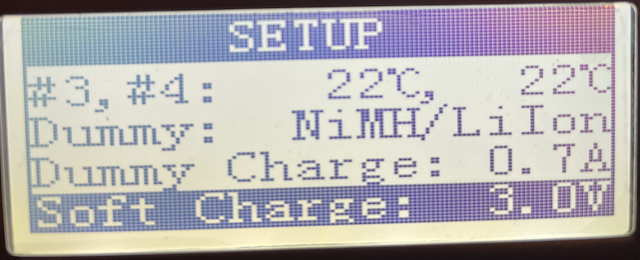 when stopped on this screen the temperature alternates between the SysTemp and the temperature of each slot, rotating between SysTemp, slots #1 and #2, and slots #3 and #4. The line with the name Dummy: cannot be changed by the user. The line that says Dummy Charge: is at its default of 0.7A, which is okay for larger batteries using the Dummy mode, but it can be changed, if Dummy mode is used for smaller batteries as well. Soft Charge: 3.0V was left at its default. The next 8 choices were not photographed, and not changed from the default.
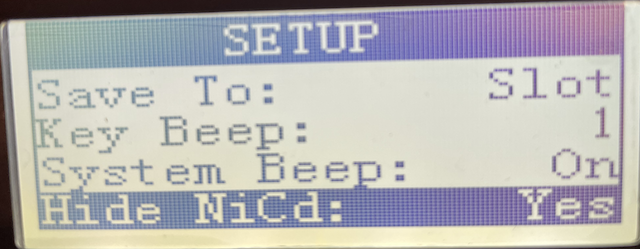 The defaults were accepted for Save To:, Key Beep: and System Beep by doing nothing with those lines of the menu. For MY convenience, ALL of the chemistries, except LiFe, were changed to Hide by changing the default from No to Yes. LiIon and NiMH cannot be hidden.
The Down Arrow key was pressed to highlight Hide NiCd.
That is kind of a problem, because if the change is made near the top of the menu selections and another change needs to be made for items further down the menu, each saved change requires reentering the Global Setup View (GSV) Setup Menu, using the SETUP button, and then scrolling through the whole menu to get to the next item to be changed. 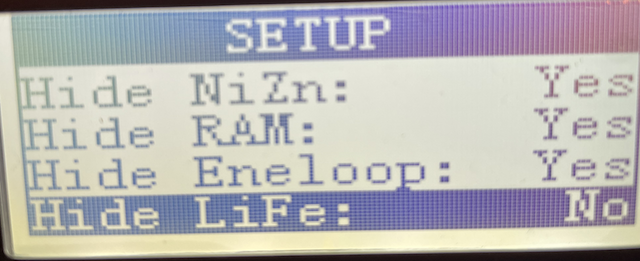 The same process was used to Hide NiZn, RAM and Eneloop. Note that Hide LiFe: was left at the default No. Yes, each time a change is made and the Enter key is held down, the display returns to the Total Overview display and the SETUP button needs to be held down to enter the Global SETUP View (GSV) menu again to continue changes to the Global Setup.  The same process was used to Hide LiIo435 (not pictured) and LTO. The defaults for Info Message:, Display:, and LCD Contrast: were left unchanged. There is no way to hide NiMH. It will still be in the chemistry selection menu when programming. 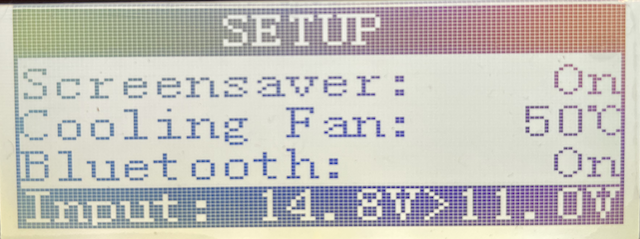 All of the defaults for these four lines were left unchanged.  All of the defaults were left unchanged in these lines. This is the bottom of the menu.
Where do the values come from for setting up a program? Page 10 of the MC3000 Instruction Manual offers some guidance regarding this topic in the section titled "Choosing The Right Charging Rate...". "Rechargeable Li-batteries. Battery manufacturers define the so-called 'standard charge' most often as a 0.5C charge at room temperature. The user is advised to look up the confirmed details in the battery specification sheet." The letter C stands for the nominal capacity, usually in the unit of milliamp hours (mAh), which is the current stated in milliamps (mA) that will drain a new, fully charged battery to its minimum acceptable, don't go below this, voltage in one hour. That mAh value is printed on a specification sheet for a given battery and on the battery label itself. There are problems when using the printed label mAh nominal capacity. The word nominal means "in name or thought but not in fact or not as things really are". This also applies to the term nominal voltage. An Efest 10440 size Lithium Manganese Oxide (LMO/IMR) battery, that I have, has a nominal capacity of 350mAh on the label. A two hour charge, that is a 0.5C rate as previously noted, is 350mAh / 2 hr = 175mA or 0.175A as the charge current to its TARGET VOLT: of 4.2V. To achieve its stated nominal capacity value it must only be discharged at a constant -0.2C rate, which equates to 5 hours, to reach its minimum acceptable, don't go below this, voltage of 3.00V. Therefore 350mAh / 5 hr = 70mA or 0.07A as the discharge current. That is a tiny current draw but it remains proportional through all battery sizes. A much physically larger, but very common size, is the 18650 size. 18650 size batteries come with various nominal capacity ratings. If it has a noted nominal capacity of 2500mAh, then its 0.5C charge rate would be 1250mAh or 1.25A for two hours. Its 5 hour, -0.2C, discharge rate would only be 500mA or 0.5A for 5 hours. It is obvious that discharging at a higher current decreases the time that the battery can be discharged. Also, using a higher current draw decreases the "usable" capacity from the nominal capacity. Another problem is that some Chinese manufactures, as well as Chinese battery re-wrappers that produce "house" or "special" brands, overstate the nominal capacity, as a marketing ploy, to try and sell more batteries over competing batteries that may actually use "industry standard practices" to note their battery capacities. 18650 batteries can be found with fake mAh labeling, which can skew the calculated charge rate. Stay away from them.
This type of misrepresentation happens in all sizes and chemistries of cylindrical Lithium-based batteries. There are real, physical fakes as well. I watched 30 videos on YouTube about FAKE 18650s. I found this one first.
Because the poster, C'sB Channel, seems to sell stuff, I thought this video might be a fake itself. My search then turned up the following videos. FAKE 18650 cells from fake sources (Part2) Ultrafire 18650 You Mean Ultra Fake.... Lets open one It is important to remember that all of the Lithium-based battery specifications are based on constant current/constant voltage (CC/CV) charges and constant current discharges. With my background in electrically powered radio control (RC) fixed wing aircraft, I have generally charged my Lithium Polymer (Lithium Cobalt Oxide) and Lithium Iron Phosphate battery packs, with their individual batteries physically connected, at the one hour rate of 1C, or the capacity in mAh divided by 1 hour. ie. a 2200mAh battery at 2200mAh / 1 hr = 2200mA or 2.2A. When I want to fly that battery again that day, I have, on occasion, charged it at the half hour rate of 2C at the flying field. ie. 2200mAh / 0.5 hr (1/2 hour) = 4400mA or 4.4A. I have no idea if there would be any useful capacity increase or battery longevity to be gained by using a 2 hour or 0.5C charge rate, as I have never done that. For my use of these 10440 size batteries, it doesn't matter to me whether it takes one hour or two hours to charge, which it actually wouldn't, as they will never be completely discharged to their minimum voltage, and most of the time they will be at a storage voltage before charging. A battery does not have to be in a slot to create a program and a program can be created in any of the four slots. Once a program is saved, it can be loaded to any slot or even to all of the slots. For this tutorial PROGRAM [01] is set up for the stated battery, and it was created in slot number 4 to demonstrate that it does not matter which slot is used for programming. This is a much easier menu to use compared to the Global Variables menu. During programming, it does not return to the Total Overview (TOV) screen until the last menu item is confirmed and saved.
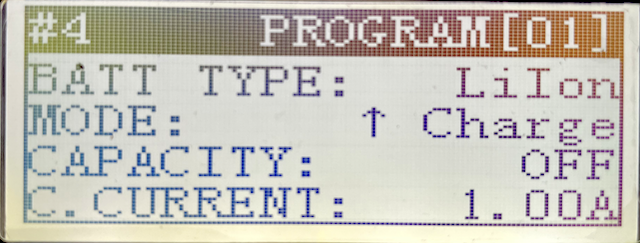 The Slot Programming View (SPV) menu opens. Any slot can be used to program. In this instance, slot #4 is being used to set up PROGRAM [01] for this battery. 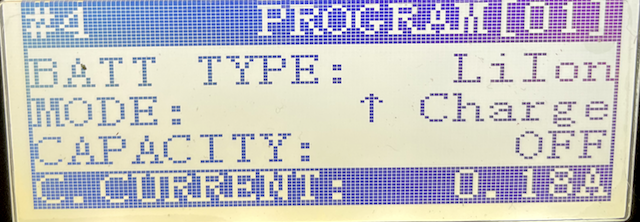 The defaults for the first four lines of the menu are shown here. To enter a value, press the Enter button and use the Down Arrow button to highlight line 4, C. CURRENT:. (charge current) Press the Enter button. Use the Down Arrow button to change the value in line 4 from 1.00A to 0.18A. Once the 0.18A value is set, press the Enter button to accept it. 0.18A is just slightly above the 0.175A, the 1/2C charge rate, or a 0.5C charge. Note that line 3, CAPACITY: is OFF. Page 20 of the Instruction Manual describes its function. Setting a value for CAPACITY: enters some defaults that will have to be changed. As described on page 20 of the Instruction Manual, CAPACITY: is NOT the Lithium-based nominal capacity as might be expected. Leave it set to OFF. No other changes needed to be made, as the TARGET VOLT: default was already set to 4.2V and the TERMINATION1 default current was set to 0.02A, which is as close to 0.175A as possible.
I created a Program [02] for the same battery, using the same method and the only change was to set the C. CURRENT: (charge current) to 0.35A, the 1C rating for the 350mAh battery. It is a good idea to write down what each program is used for, because it cannot be saved with a descriptive name.
LiFe batteries can have, what SkyRC calls, two TARGET VOLT (target voltages) of 3.60V or 3.65V. The MC3000 uses the 3.60V as the default TARGET VOLT. I found the specification sheet for the Soshine 10440 size, 280mAh LiFe battery that I am using. It notes: Standard Charge: Constant Current 0.2C or 0.056A for 5 hours, Constant Voltage 3.65V, 0.01C cut-off or 0.0028A (The MC3000 can't do that.) SkyRC uses the term TERMINATION, p. 22, for what is noted as the cut-off current on the Soshine specification sheet. Fast Charge: Constant Current 0.5C or 0.14A for 2 hours, Constant Voltage 3.65V, 0.01C cut-off Maximum Continuous Charge Current 1.0C or 0.28A for 1 hour It is a bit murky here as to what values to choose. The MC3000 can't do less than 0.01A as the TERMINATION current, but it does have the choices of zero and OFF. 0.0028A is closer to zero than 0.01A. "'Zero' means an ever decreasing charging current: not good for your patience or battery but allows to produce quasi-constant 4.20V battery voltage if that's what you're after. OFF means no CV-phase once the target voltage has been reached." page 22. Neither Zero or OFF seemed to be "good" choices to me. Both the MC3000 and my Revolectrix GT500 use 1/10C (C/10 or 0.10C) as the default. I checked the LithiumWerks 18650 specification sheet, as I use A123 18650 batteries wired in series to fly some of my planes. That specification sheet only notes: "Terminate Charge @ 3.6 V < 50 mA" <50 mA means less than 50mA or 0.05A, which is not very helpful. With a "Recommended Charge Current" of 1.5A, 0.10C would be 0.15A or 15mA, which is less than 50mA. Since I have found this chemistry to be not too persnickety when charging, I decided to set up a program, PROGRAM [03], for the Soshine LiFe 280mAh battery with a 0.5C C. CURRENT (charge rate) of 0.14A to a TARGET VOLT: 3.65V (from the Soshine specification sheet - the default of 3.60V was changed to 3.65V) with a TERMINATION: current of 0.1C (the default of the MC3000 and Revolectrix GT500), which is 0.014A (The MC3000 defaulted to 0.02A, which I accepted). I also set up a second program, PROGRAM [04], for this battery using a 1C CURRENT: (charge rate) of 280mA, actually 0.28A on the MC3000, to a TARGET VOLT: 3.65V (from the Soshine specification sheet - the default of 3.60V was changed to 3.65V) with a TERMINATION current of 0.1C or 0.028A (The MC3000 defaulted to 0.03A, which I accepted). Again, it is a good idea to write down what each program is used for, because it cannot be saved with a descriptive name. For example:
What SkyRC calls LiIon batteries, with a fully charged TARGET VOLT: of 4.2V. should not be left for extended periods of time fully charged. The MC3000 has a Storage Mode. In Storage Mode the charger will either charge or discharge, as necessary, to a storage TARGET VOLT:, typically 3.80V, for long term storage of LiIon batteries having a fully charged TARGET VOLT: of 4.2V. The storage charge, or discharge, depending on the state of charge (SOS) of the battery, only needs to be in the general area of 3.80V to be considered ready for long term storage. The default Storage Mode for LiIon was tried using only a CAPACITY: value input. That did not work for me, as it took too long. I then programmed the LiIon Storage; CAPACITY: OFF, C. CURRENT: 0.18A (about 0.5C) and the D. CURRENT: -0.18A (about 0.5C), TARGET VOLT: 3.80V, TERMINATION: 0.02A, and D. REDUCE: -0.02A. To verify the setting, an Efest LiIon 10440 battery was used in two states of charge, one below 3.80V and one above 3.80V, to allow the charger to both charge to the storage voltage of 3.80V and discharge to 3.80V. This method seemed to be working okay. When I used my programmed Storage Mode with a fully charged Efest battery, I confirmed that the D. REDUCE: of -0.02A had worked. The fully charged Efest LiIon took 1 hour 44 minutes and 47 seconds for the Storage Mode to stop at the TARGET VOLT: or 3.80V. I found that okay, time wise, as there is really no hurry to put this type of battery into a long term storage condition. While I have found NO PROBLEM with leaving my A123/LithiumWerks LiFe batteries fully charged over extended periods of time, Soshine, the manufacturer of the batteries that I am using, notes on their specification sheet;
I found it quite problematic trying to get a LiFe battery to around 3.30V and 50% of its capacity using the MC3000's Storage Mode. One problem was caused by the LiFe battery spending so much of its discharging time, in this case, between 3.30V and 3.20V. Trying to get to 3.30V and 50% capacity is difficult for this charger! Later, I also learned that the LiFe Storage Mode does not end when a D. REDUCE: of -0.02A is detected. I finally gave up on using the Storage Mode because it was just taking too long and not extracting many mAh from the battery. I created a "special" storage discharge for this type of battery using the Discharge Mode. Two different LiFe batteries, with different capacities and different TARGET VOLT(s) of 3.60V and 3.65V, were used for this test. Each battery used its own program to discharge the capacity by about 50% without using TARGET VOLT as in the Storage Mode. This is the Basic LiFe Discharge Mode I used for the fully charged batteries to drop them down to about 50% of their capacity:
Both were discharged at the same time using their own programs in separate slots. At the end of 1 hour, the TIME CUT: of 60 minutes sounded the time cut warning. The 280mAh 10440 showed just over 140mAh removed and the 1100mAh 18650 showed just under 550mAh removed, as expected. After resting for three hours, the open circuit voltage, using a Fluke multimeter, for the 10440 was 3.287V and for the 18650 it was 3.287V. Those voltages are just fine. They are very close to the desired 3.30V and the capacity removed was about one half the total, or maybe just a bit more than half. I am happy to use this method, should I ever want, or need to use it. Now my program cheat sheet looks like this. My New Cheat Sheet: LiIon Charge
LiFe Charge
LiIon Long Term Storage (more than a couple of days)
LiFe Long Term Storage From Fully Charged (LithiumWerks 18650 are noted as being shipped at 30% SOC)
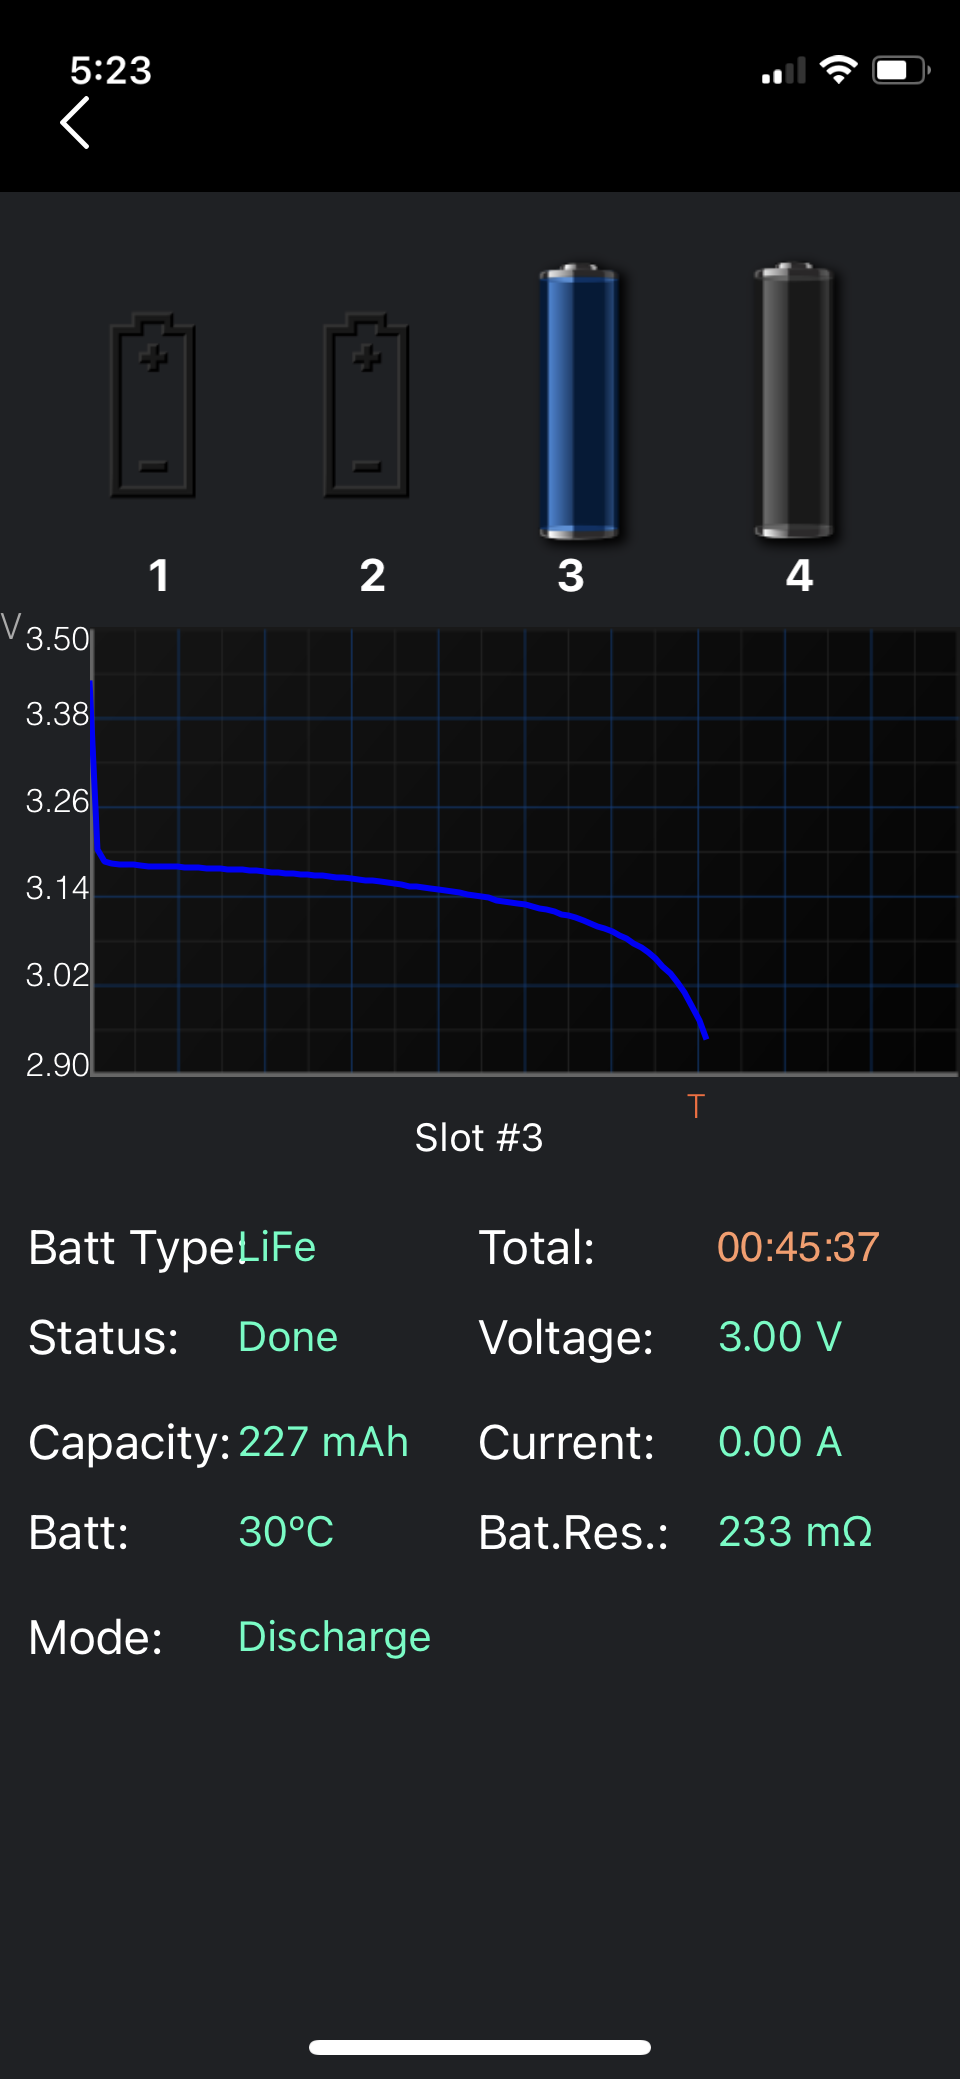
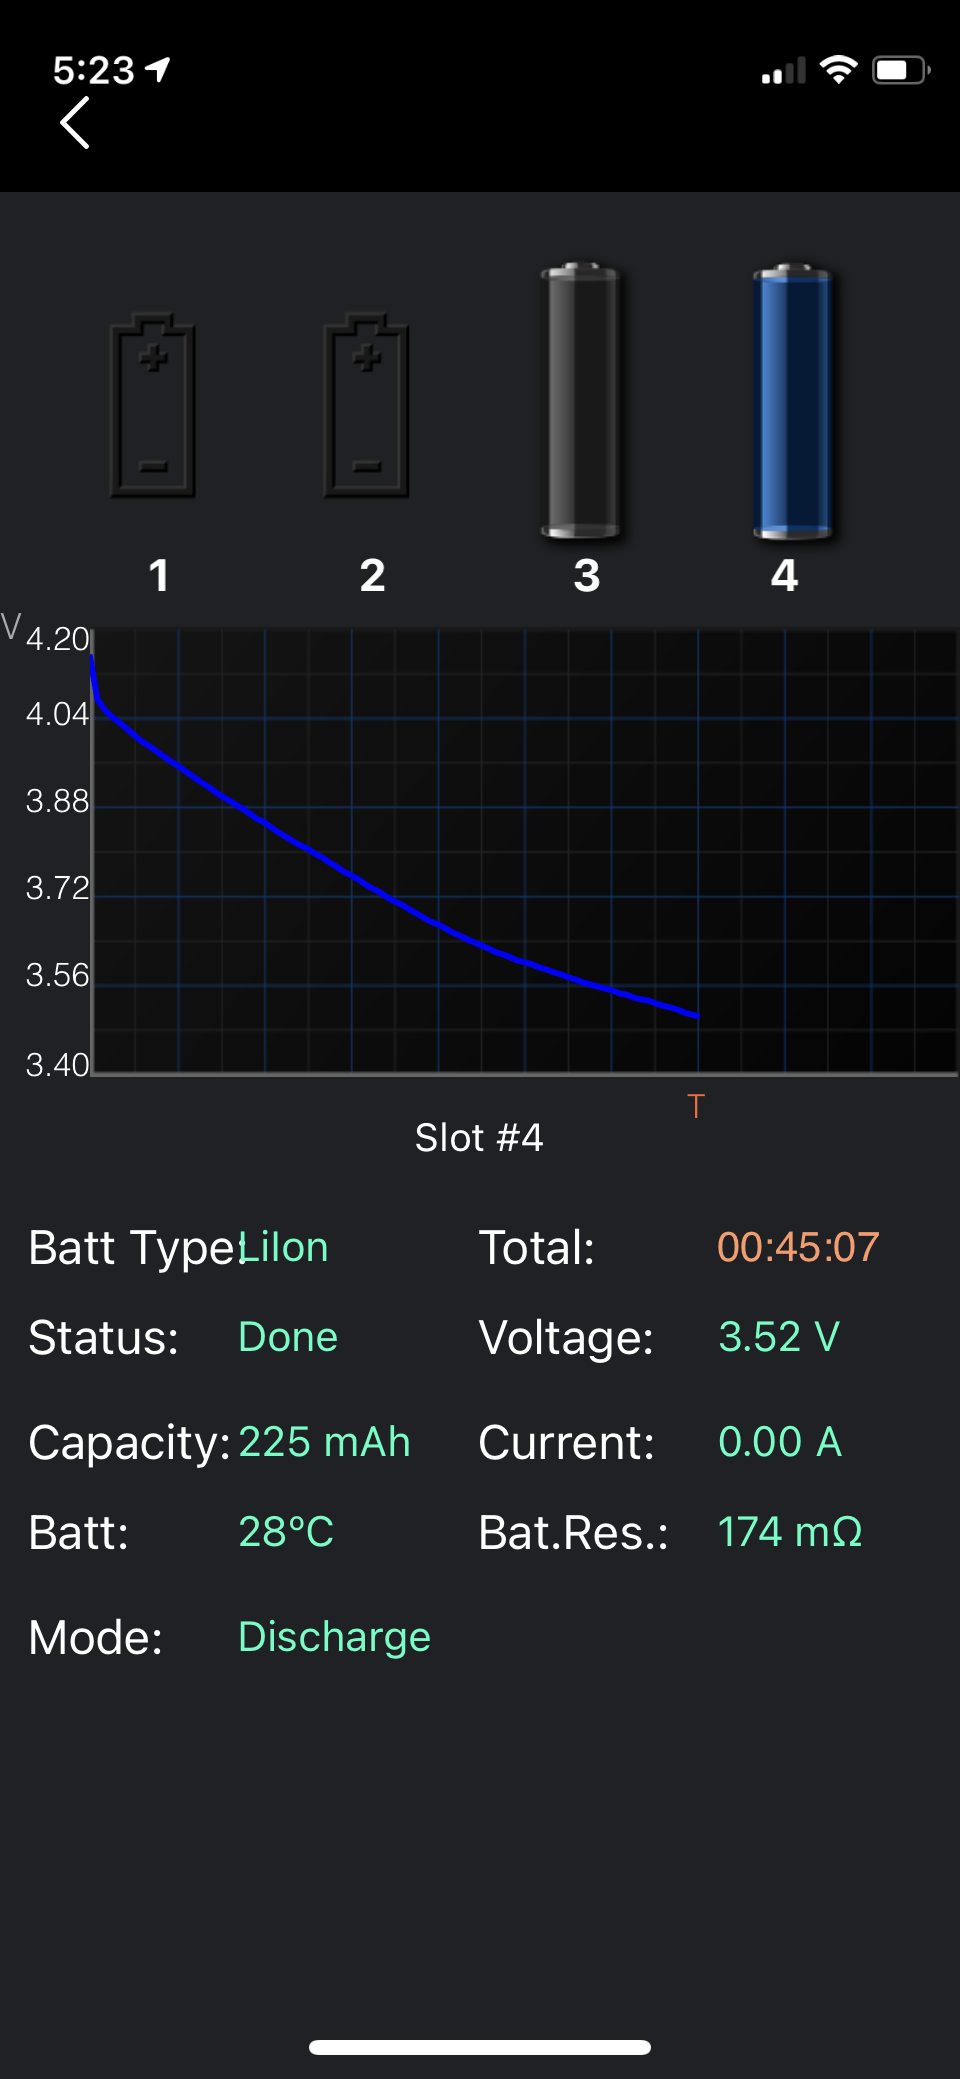
It is unknown whether this is really necessary or not. PROGRAM [29] Special LiFe, Discharge, D. CURRENT: -0.30A, CUT VOLT: 2.9V PROGRAM [30] Special LiIon, Discharge, D. CURRENT: -0.30, CUT VOLT: 3.50V Using PROGRAM [29] and PROGRAM [30], I set up a "race" between the Efest IMR 350mAh, 10440 size battery and the Soshine IFR 280mAh, 10440 size battery. Both batteries were fully charged before the race began. The Efest IMR 10440 350mAh was set up to discharge to 3.5V, which is where its discharge knee begins. The Soshine IFR 10440 280mAh was set up to discharge to 2.9V, which is just slightly after the discharge knee starts and before the discharge really starts to fall steeply. Both batteries were set to discharge at a constant -0.30A. -0.30A was chosen as that is the average amp draw for the motor they are powering. Their discharges were started at the same time with the LiFe in slot 3 and LiIon in slot 4 The images were captured using the companion App on my iPhone.
They both took a bit more than 45 minutes to reach their target stopping voltages so as not to become too deeply discharged. They both discharged approximately 225 mAh hours. Personally, I'd call it a dead heat, but I like the flat discharge curve of the LiFe for running a motor and maintaining voltage through the run. The batteries were recharged using their 0.5C rate. The Soshine LiFe was in slot 2 and the Efest LiIon was in slot 3. The returned mAh was approximately the same. The discharged mAh was approximately 97% of the charged mAh. The total charge times were also similar.
I have not set up any Nickel based rechargeable batteries, because I don't have any. I like it a lot. It does exactly what I purchased it for. It got quite a good workout as I did a lot of testing in the month that I've had it, and it is still working well. It appears to be quite rugged and well built. It does have two "interesting" little quirks though. One quirk is the LiFe Storage Mode. That quirk is really not caused by the charger itself, but by the properties of the LiFe battery. I expect other chargers, with this feature, to have the same type of problem with LiFe batteries, so it is not really a negative. It is just what it is. When using 10440 size batteries, the battery needs some physical "adjustment" to get it to work. The "adjustment" is shown in this part of this video. This is only a small negative for me, as the physical "adjustment" is simple and quick. I do recommend the SkyRC MC3000 for those who need to charge Lithium or Nickel based cylindrical batteries. To Reach Ken Myers, you can land mail to the address at the top of the page. My E-mail address is: KMyersEFO@theampeer.org |