|
Learning to Fly in New Zealand
From Bruce Pearson escapenz@hotmail.com
Dear Ken,
Firstly, thank you for a great newsletter and archive of articles regarding Electric flight.
As a "previous life" diesel burner (and control liner) my re-entry to the hobby using clean, silent power has been helped greatly by your e-newsletter and its contributors.
Thank you for your time in producing the newsletter. It is appreciated by a Newbie such as I am.
I have taken under my wing, so to speak, 2 "off the rails" teenage kids who are keen to build, and try to fly R/C airplanes.
We first built a GWS PT17, with a 3 channel Neon system with very poor results!
The motor as supplied barely let the thing ROG and a subsequent hand launch resulted in tip stall/spin into the ground.
While we were gluing the smashed wings and elevator/tailplane back together we asked around for help.
The Model Shop supplier could not explain the reason for the low power, but a net surf revealed that the motor as supplied is forward timed and needed to be re timed for use as fitted to the GWS gearbox!!!!
3 VERY Disappointed Learner R/C Fliers!!!
Retiming resulted in a lot more thrust from the set up but we hung the plane up in the workshop, and decided to make a more robust trainer for us all to learn to fly/crash with.
We asked at a local model-flying club for advice but as we were not members, and they only fly glow motors, they had no suggestions, apart from "GET A GLOW TRAINER!!!"
SORRY, not an option, we thought.
Membership of another local club which flies electric (as well as glow) is $120 per person (Total $360), as the 2 kids are not classed as "Family" as they are my partners niece and nephew!!
We have a safe "off the main road" flying site on a relative's farm, so we sat down and searched the net for a plane we could build, and learn to fly for ourselves.
No kits suitable for "crash test learners" are available locally; postage/shipping from the US is about the cost of most cheaper kits added on top!!
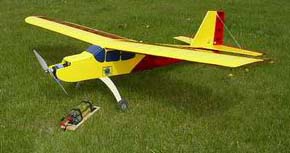
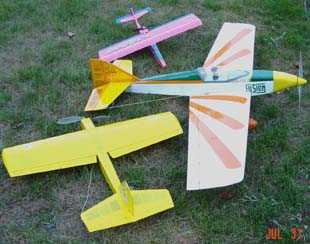
We came across an old Model Airplane News plan of a Cessna Bird Dog.
Construction was standard Balsa with shrink film covering, with Speed 400 electric power. We used this plan as a basis to build "Our trainer".
Using EPP Foam and similar techniques to the T52 from JK Aerotech. It is covered with fibreglass parcel tape and color tape. We now have a great rudder/elevator trainer with provision for ailerons later.
Wingspan is 52 in.
Length 36 in
Wing area 405 sq.in.
Dihedral 6 degrees
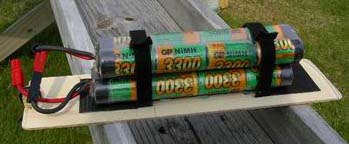
Total weight ready to fly with 7 x SC2400 cells 44 oz
Wing loading 9.2 oz per sq.ft.
We used a 480 motor (reverse timed this time) onto a Hobbico 2.55:1 gearbox, and after much experimentation and searching the net arrived at a 13x6 prop which draws its amps from 7 x 2400 Ni-MH cells.
The plane flies very well. It will ROG and is very forgiving to "learners antics"!
Hands off the controls usually restores everything to normal when things get out of hand. However, one "unexpected arrival" dislodged the rubber bands that held the wings, which was due to a 7-wire fence being in the way after control was recovered!
We are now well on the way to being proficient and will hook up the ailerons when we have bought a 4-channel radio, and carry on the exciting learning process.
The 12-year-old girl is very keen on design and building and has a sport scale 24" span Spitfire, from UK Quiet Flight magazine plans, on the building board.
The boy is thinking of a P-51. We saw a nice plan in May 2005 RCME magazine and eagerly looked carefully at the design and construction notes.
WHAT A SURPRISE!!!!
Good looking plan, Good photos of building, some construction notes, a lot of detail about making dummy exhausts, no overview plan to make a cockpit canopy plug, wings skinned with 1/16 PLY in one paragraph, the plan says 1/16 BALSA!
Electric Speed 500 motor, no details of prop (apart from a Folder?) and another prop mentioned at the end of the article, said that the designer fitted a prop "OF A LITTLE MORE SPAN"?
What do you think that size prop is? AND (he says) THE MOTOR BURNT OUT AFTER FITTING IT! One prop size to avoid there??!!
NO total as built weights, wing loading or other details in the article!!!
I notice your correspondents are similar to us and like to see real, understandable figures in test reports. This is a classic example of such an article!!
Again thanks for the tips, articles and other information from the web site. It is much appreciated in the "shaky isles of the South Seas".
Regards,
Bruce Pearson
Kumeu
Auckland, New Zealand
Return to "What's In This Issue?"
Building a Vacuum Press System
From "Jim" who requested that his name and email not be published
The following is just my opinion on how to make a vacuum press. There are a lot of ways to make this system. This is just my way. Things should be a simple as possible but no simpler. Kiss. That's a very good philosophy for all things great and small.
If you don't have the skills or time to build this press, I have listed some sites where vacuum presses can be purchased.
This article doesn't cover how to cut foam or the how to of bagging wings. There are a lot of sites that cover this. This is a real fun project if you're a builder, so go for it. An Obechi covered foam wing is light and super strong and a delight to behold, in the air or stuck in a tree.
A vacuum press is a must for making wings and other parts for model airplanes including plastic canopies. If you are a builder and wish to advance your skills it's the way to go. A vacuum press forces the two parts together, and achieves strength unobtainable by other methods.
You might even be able to practice cataract surgery or Licat-suction on your fat old cat, but I don't recommend this.
I have built several vacuum presses, starting with my usual way of using the absolute cheapest parts and working my way out of the mess I created. The learning curve in life is brutal. But maybe I can save you some pain here if you listen. Our conception of what is a fair price seems to depend on rather strange parameters stored in our brains. I'll pay $100 for a 3 oz brushless motor without blinking, but I try to save a few lousy $ in the strangest ways on most of my projects. Sometimes I win, sometimes I lose. This time I won, but it took me 4 tries.
I started with a hand vacuum pump, progressed to a venturi/air compressor system, then to a compressor out of a defunct refrigerator and finally to this system.
The hand pump can't move enough air unless you are part gorilla, the venturi method was wearing out my big air compressor, pleasing the utility company and making a lot of noise, and the refrigerator compressor only moved .5 CFM and spewed oil out the exhaust into the air. This will make the pulmonary Doc happy and the wife unhappy. There are a lot better ways to polish furniture.
My final vacuum press described here is patterned off industrial type systems. It works, as it should, without the problems the others had and it's a real pleasure to use.
Commercial systems like the ones Vacupress or CST make, www.vacupress.com, start out at $300 + and go to several thousand. So the $150 or less you may spend here is a very good deal. I also use this press in my hobby cabinet shop for veneering furniture and cabinets. The pump moves 4.5 CFM @ 0 PSI and 3.6 CFM @ 10 PSI. That is a lot of air and sets the bag almost instantly. I have found this is the secret to success. 3- 4 CFM or better is needed to seal the bags and keep up with leaks. Smaller pumps make it very difficult to seal the bag.
The Basics
Air is sucked out of a plastic bag and the resulting atmospheric pressure squeezes the parts together with tremendous and uniform pressure.
This pressure is adjustable from 3" to over 25" Hg. Foam will be flattened at anything over 8". I set my system for 6" for this application and for woodworking about 20-21" Hg. This system can produce over 1800 lbs per square foot of pressure and is a lot cheaper then feeding an elephant.
Components
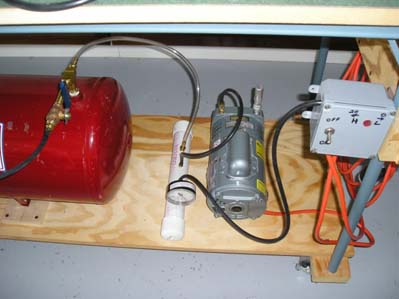
A good pump is the heart of this system. I found a 1/4 HP surplus pump at Surplus Center. It pumps about 3-4 CFM. These surplus pumps came out of Storage Technology and appear to be in good shape. Surplus Center has a good guarantee and will pay for shipping both ways if you get a defective one.
The down side is the pump uses a 240V motor. If you don�t have 240V in your shop you may have to use your clothes dryer outlet our find another pump.
There are a lot of used vacuum pumps on E-bay at good prices. But�I'm afraid of them. Vacuum pumps are used a lot for biological experiments and with toxic chemicals. Do I need to explain where the Hulk came from?
There is a way to get 240V from a 120V line to drive this pump. I have not tried this but it should work. Surplus Center sells a small transformer that converts 120V to 240V or vice versa. Just plug the 120V transformer side into a 120 V line and wire the 240V transformer output to the pump. If you have no experience wiring electrical items pass on this. You can be seriously hurt or killed doing this incorrectly.
My pump made noise like a small air compressor so I screwed a muffler on the exhaust. It runs very little while working so the noise is not really a problem for most people. I just don't like noise and that's why I fly electric. Some pumps are totally silent like, a refrigerator compressor, but I found they don't pump much air.
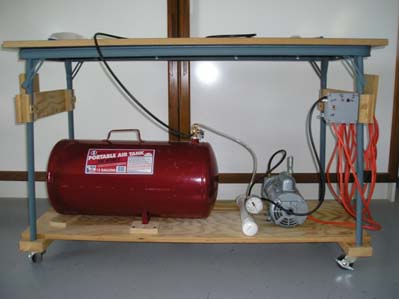
I have a very large shop, 2400 sq ft, so I needed a portable system on wheels. I bought a small folding table from Wal-Mart, installed wheels and a shelf and added the vacuum components. The top of the table functions as a worktable. I wanted a perfectly flat surface so I covered thick MDF with Formica on both sides. I used the vacuum press, of course, to install the Formica. Trust me on this- it�s there to stay forever! If you don�t have the room for a roll around you can simply make a small wood tray to carry the press around. It�s not very heavy, 40 lb maybe without the reservoir. None of the layout or plumbing is critical so do what ever looks good to you.
Reservoir Storage Tank
The idea behind this is to provide a large vacuum supply so the pump doesn't cycle on and off rapidly. It also is used to help evacuate the bag. The air is pumped out of the large reservoir and then closed off with a valve. When the wing is installed in the bag the valve is opened with the pump running and this evacuates the bag quickly. A bigger reservoir is better in this case. A small capacity reservoir like "Joe Woodworker" uses doesn�t provide enough spare vacuum to work very well for big bags. The wings we make however don't require much pump down. The large bags I use on furniture require a huge pump down.
I used a 12-gallon portable air tank for a reservoir. You really don't need a reservoir with the pump I called out but it looks so cool. The tank does take out a lot of surges and slows down pump cycling and can be added latter if you decide you need it.
Vacuum Switch
This regulates the pressure. It turns the pump on and off as needed. A small screw setting allows you a wide range of pressure. Air Logic model V-5100 is the one I use. They sell through their factory reps and other sources. The price is about $25 but they may have a minimum charge. You can locate their sales rep by going to their web site. You can get two for almost the same price.
The pressure swing is about 2" with the single switch. If you want less swing then this you will have to use two switches. One switch is used to control the high pressure and the other one to control the low pressure. This particular model is very popular and seems to be the one every one else uses. I use only one switch and haven't found the wide swing to be a problem.
The switch is rated 15A by the company. The pump only pulls 1.6A so there is no need to rig a control relay. Break one side of the 240V line and wire to the switch contacts with push on connectors. I mounted the switch inside a plastic electric box from Lowe's.
Vacuum Gage
This shows you how much vacuum you have in the bag. Without it you cannot set the vacuum. It can be ordered from the same people who carry the vacuum pump. 0-30".
Miscellaneous Parts
I got the rubber vacuum hose and a few other parts at the local auto supply store. Most of the rest is standard plumbing hardware available from Lowe's, HD etc. When plumbing use Teflon tape, not caulk.
Bags
There are a lot of articles on vinyl bags and valves. You can buy or make them but I don't think something this heavy is needed.
I use 2 mil sheet poly that I simply cut to fit around the part and make it about 8" oversize. I seal the edges of the poly sheet together with plumbers caulk. A 1/8" brass tube is laid on top the caulk and more caulk added on top. The plastic is then pressed into the caulk. When you pull a vacuum the bag self seals. I had a lot of trouble using small pumps to get a good seal. The big pump yanks the whole mess tight really quickly. When I'm finished I save the caulk and toss the bag.
Someday I plan to build a frame type thingy that lifts up for access. That would be cool and save time. I could also fit Fluffy into it for test runs.
Mechanical assembly
I made up a PVC manifold with a built in vacuum gage to manage all the hoses.
1- manifold line to vacuum switch
2-manifold line to pump
3-manifold line to storage tank "T". VERY IMPORTANT!!! Use a large enough line here to prevent rapid cycling
4- "T" mounted to storage tank with shut off valve. Line from the valve goes to bag.
Parts List
Vacuum pump
Surplus Center, item # 4-1540 $90.00
Remember this pump is for 240V only!
Vacuum Gauge, 0-30" HG
Surplus Center, item #2141, $5.95
Vacuum switch
Air Logic V-5100, Joe Woodworker or factory direct dealer.
Filter
Surplus Center, item # 4-926, $ 10.99
Check Valve (Goes between pump and manifold.)
Surplus Center, item # 4-945-A NPT $16.95
Ball valve
Surplus Center, item # 20-1201 NPT $5.99 or Lowe�s/ HD.
Misc.
a. 1/8" rubber vacuum hose, auto parts, 5-7' long, and vacuum hose from manifold to storage tank. I used 1/8" hose to the bag to slow down evacuation and allow the bag to flow around the part. Bigger hose could be used of course.
b. Line cord for pump and 240V plug.
c. on/off switch for pump, 240V and electrical housing box.
d. 1/8" and hose barbs and T's as needed 1/8" pipe as needed.
e. Teflon tape
f. Muffler for pump
Reservoir
12-gallon compressed air tank Wal-Mart or Auto supply.
Sites
CST: www.cstsales.com, sells pumps, vacuum switches and carbon
Joe Woodworker: www.joewoodworker.com, sells pumps parts and has his own version of a press. He sells the Air-Logic V-5100 vacuum switch at a very good price.
Surplus Center: www.surpluscenter.com, item # 4-1540 sells the vacuum pump, $90 and other stuff at a very good price.
Air Logic: www.air-logic.com, source for vacuum switch, Minimum order, so you can get two switches for about the same price as one.
Disclaimer
I have no connection to any of the suppliers mentioned. You are on your own as far as any additional advice. Check out the "Joe Woodworker" site for his version of a press. I like my version better of course, but then I might be the only one who does. He sells parts and stuff also. I don't. CST is also a good supplier for carbon fiber, pumps and more stuff.
Permission is hereby given to republish all or parts of this article. You can even take my name off and use your name if you want. Have fun!
Return to "What's In This Issue?"
Two Nice Flying Conversions
From John Zook johnzook@voyager.net
Greetings Ken to all in the EFO club from up North.
I don't know how you folks have fared down state but up here it's been very warm and humid and today seems no different.
Here are a couple conversions, one an old favorite and a new twist on a Tiger.
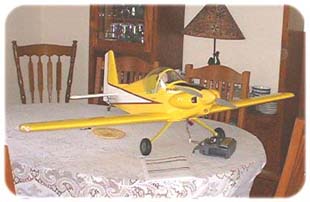
First is my conversion of a Sig LT-40. The fuse was replaced with a balsa structure of the same design and the original formers were used. I enlarged the front hatch to accept a battery tray, which holds up to 18 cells.
I left the wing stock except to ad dual aileron servos for better control authority. I also added a pull-pull system for the tail wheel, which I feel works better than just connecting it to the rudder. The plane is finished in Ultra Cote transparent red and opaque yellow. I replaced the wire landing gear with a Dubro Fiberglass unit for added ground clearance. For wheels I used Dave Brown Light Flight 3", which works very well on grass runways.
The battery tray is made to slide through the front hatch and into the fuselage, which has internal wood guide rails, which holds the tray in place. I also made up a latch from carbon tube and rod for the tray.
Now for a few stats:
Motor: Mega 22-30-3
Gearing: MAT belt drive 3:1
Prop: APC 14X10 E
Batteries: 18 GP 3300 in one 8-cell pack and one 10-cell pack.
Controller: Castle Creations Phoenix 80. Set up using PHX link.
Also used is the UBEC for receiver and servo power. I also added a switch between the UBEC and the receiver.
Whattmeter readings: Using APC 14X10 E and 18 cells:
Amps: 42, Watts 880, RPM is 7260.
Weight: 5 lb. 8 oz. w/out batteries and 8 lb. with batteries.
Power is more than adequate for the plane, and I get at least 10 -12 minutes flying with throttle management.
It flies like an LT-40 and the weight from the 2 1/2 lbs of batteries seem to make no difference, although I would like to try it with a Li-Po pack. The radio is a Hitec Eclipse 7 programmed for flaperons and a landing setup as the plane seems to glide forever in ground effect. I love to bring it in on the deck at full throttle and then pull back on the elevator to climb up several hundred feet.
Haven't tried any aerobatics yet, but hey, it's a trainer!
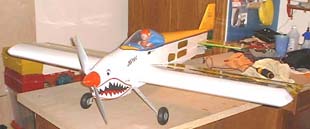
MY next plane is a Goldberg Tiger 2. I acquired this plane unfinished, from a friend in the club. The airframe was built, so all that was needed was a light sanding and covering.
I made no modifications to the airframe except to again use dual aileron servos. I also installed the rudder and elevator servos at the aft of the fuselage under the stab. I covered the plane in UltraCote transparent violet and opaque yellow. Servos are Hitec HS-85 MG and receiver is a Hitec 8 channel set for negative pulse. Transmitter is Hitec Eclipse 7 as well.
OK, now for some tech information:
Motor: Mega 2230-3
Gearing: MEC 2.41: 1
Prop: MAS Electric 13X8.5
Cells: 16 GP 3300 in two 8-cell stick packs
Controller: Castle Creations Phoenix 60 programmed with PHX link
Also used is a UBEC for receiver and servo power.
Weight: 71 oz. w/out batteries
Cells add another 37 oz.
Total AUW is 108 oz. or 6.75 Lbs. Typical glow weight is 4 1/2 to 5 1/4 lb. so the extra 1 1/2 lb. is due to the motor/ gearbox and the batteries, but the plane doesn't seem to notice as far as I can tell. Again if Li-Po cells were used the AUW would be considerably less, but I don't know if the balance would come out. I will have to work with it and see what happens.
Measured performance using Astro Whattmeter and Glo Bee tachometer.
16 GP 3300 cells, 13X8.5 prop, 2.41:1 ratio.:
Amps: 42, Watts: 770, RPM 7460
Output is at 114 watts /lb.
I had originally flown the plane with an Astro 25G and 16 cells but the ESC would not tolerate the number of cells. After switching to a brushless system I realized better performance and longer flight times. The plane will ROG easily even with the added weight after a little trimming it flew smoothly and tracked very well. I have not attempted any aerobatics yet as I need to modify the battery hold-down better.
All in all it is a very nice flying plane with this set up although other power plants such as an AXI would no doubt, work very well indeed. I believe that if I were to actually build this kit for electric I would replace the lite-ply fuselage with balsa and would probably use an AXI and Li-Pos for additional weight savings.
Thanks to all for taking the time to read about my conversions. Keeps the electrons flowing!
John Zook
Return to "What's In This Issue?"
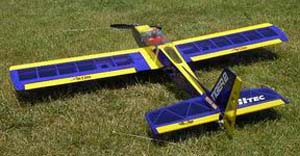
Fusion Review
From John R. Houvener jhouve@diamondcs.net
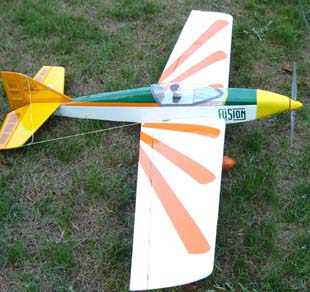
The Fusion is an electrically powered sport aerobatic airplane.
Specs:
Wing span; 57.5 inches
Wing area: 569 sq.in.
Length, rudder to prop: 44 inches
Weight without power battery: 59 oz
Weight w/Polyquest 3s3p 5400 mAh (narrow style): 74.5 oz. (4.66 lb.)
Total battery weight w/ wires, connectors, etc.: 15.5 oz.
Wing loading: 18.86 oz./sq.ft.
Cubic Wing Loading: 9.48 oz./cu.ft.
Power system: Aveox 27/39/1 with Maxon 4.4;1 planetary gear.
Motor specs.: Kv- 3124, Rm - .007, Io 2.30 amps, APC 12x8 "E": 7100-7200 rpm in first 10 seconds of motor run.
ESC: SL-48 rated up to 16 cells.
Takeoff power: 34 amps and 350 watts for 75 watts in per lb. The motor efficiency is 90.8%, therefore watts out is 318 or 68 watts out per lb.. Top efficiency for this motor is 92% plus, but this is at 50 amps or so.
I use about 300 mAh per minute of flying. I have flown about 12-13 minutes at times with some aerobatics, usually 10 minutes is plenty for me. On recharging I find that I have 1500 or so of mAh left. I am using a separate 600-mAh-receiver battery and also one of the Li-Poly savers for 9 volt cut off. I am using Hitec 85 mg servos, two for the ailerons.
The Aveox chart for this set up shows 44 oz. of flying thrust, but I do not pay much attention to thrust figures. Using the K.I.S.S principle, I hang on to the airplane, and if it feels like it wants to go to beat hell, that�s good enough for me. Of course I use the Astro Whattmeter before setting up. I also use the Astro Flight 109 charger for charging the Li-Po cells. It works perfectly, always.
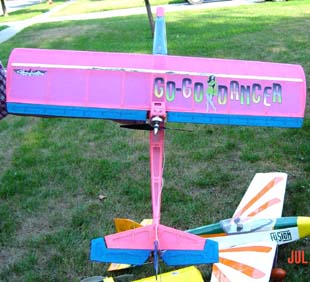
This is an all laser-cut kit by electroflying.com. Steve Pauly, from Minnesota, is the owner of electroflying.com. Steve has three kits out to date. He does his own laser cutting.
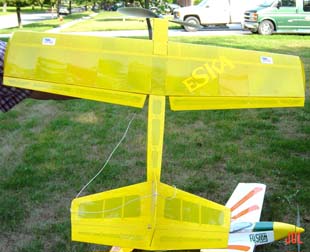
I have built all three of his kits to date. In addition to the fusion, he has the eSKA (electric simple kit airplane), and the Go-Go dancer. The eSKA is a 31" wing with a unique wing locking system, no bolts, and no rubber bands. It locks in solid, but will pop out if you meet terra firma nose down. The Go-Go is a 26" wing pusher, using CD-Rom motor that weighs 7 oz.
Two years ago Steve won the best sport plane award at the Mid-Am with the Fusion. Steve also sells his kits with a combo deal, motor, esc, and battery, to save a few bucks. These are the best kits that I have ever built.
Check them out at www.electroflying.com.
 Return to "What's In This Issue?"
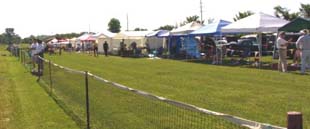
Upcoming Pontiac Miniature Aircraft Club Swap Meet
Sunday October 23, 2005
Waterford Oaks County Park - Activity Center,
2800 Watkins Lk. Rd., Waterford MI.48328
3/4 miles south of Dixie,
1/4 mile east of Scott Lake Rd
Entrance on Watkins Lake Rd
9 a.m. - 1:00 p.m.
$4.00 admission
Vendor Setup 8:00 a.m.
Tables: $10 advance $15 at the door
Buy Sell Trade 50/50-Raffle Door Prize
For info contact: Al Johnson PH: 248-459-0803
|
| Return to "What's In This Issue?"
Corby Starlet & Paramount 46
From Dick Corby info@altacom.us
Hi Ken:
In April we moved back to the Northwest. Enumclaw, Washington to be exact. Since then I've been to all but one of the regional IMAC contests with my son-in-law who has just finished his first year in competition. He's in basic so far, and now getting ready to move up. Of course his planes are gas, and huge.
Sitting on the sidelines and watching has finally gotten to me, so I have built 2 planes that may get me into competition next year after a lot of practice.
Both are electrically powered, and I used the same rationale to choose the power source etc. to fly them. Both have been flown numerous times, and both have the potential for competition. At every contest, there were one or more electrics in competition in all classes, and they are large enough to qualify and be competitive. Most have gone with gearboxes. I on the other hand don't want the problems associated with gearboxes, and have gone another route. So far successfully.
My method of choosing the right power package is pretty simple. First I chose the plane, and check out what gas/glow motor it was designed to use. Then look up the motor, find out its weight and what prop and tank was recommended. I add together these weights, including the approximate weight of the fuel in the tank. So far, using Li-Po's, I come out slightly lighter with my electric setup.
I then go to Hobby Lobby, and find an AXI motor that will fly the plane's specified weight, and use a prop one to 2 inches larger in diameter.
On one plane I built the motor mount myself, on the other I used the motor mount that is available for the AXI motors.
Sportsman Aviation Corby Starlet - 27% size Scale Model
Motor - AXI 4120/12
Prop - APC 15x10 E
Battery - Duralite 4S2P 5000 mAh
Receiver - FMA FS-8 Bulletproof
Servos - 4 Hitec HS-645MG High Torque Servos
Transmitter - Hitec Optic 6
ESC - Castle Creations 60Amp, BEC defeated and a 2S1P 1500-mAh pack using a FMA VR-1 Voltage regulator for Receiver power
Weight 114 oz
Static Thrust - 105 oz
Static Current Draw - 52 Amps
Watts - (Astro Whattmeter) 385
Wing Span: 60.75 inches
Wing Area: 730 sq. in.
Wing Loading: 22.49 oz/sq. ft.
Cubic Wing Loading: 9.99 oz./cu.ft.
The plane flies great, and is gorgeous in the air. I've added night lighting, and flying it at dusk is really a thrill. It's a great scale project. It flies at half throttle most of the flight and is good for 12 minutes without pushing the pack.
Sportsman Aviation Paramount 46
Motor - AXI 2826/10
Prop - APC 13/6.5E
Battery - Duralite 4S2P 5000 mAh
Receiver - FMA FS-5 Bulletproof
Servos - 4 Hitec HS-645MG High Torque Servos
Transmitter - Hitec Optic 6
ESC - Castle Creations 60Amp, BEC defeated and a 2S1P 1500-mAh pack using a FMA VR-1 Voltage regulator for Receiver power
Weight 82 oz
Static Thrust - 107 oz
Static Current Draw - 56 Amps
Watts - (Astro Whattmeter) 485
Wing Span: 50.75 Inches
Wing Area: 685 Square Inches
Wing Loading: 17.24 oz./sq.ft.
Cubic Wing Loading: 7.9 oz./cu.ft.
This plane flies the IMAC Basic routine perfectly (depending on the pilot). Half throttle for cruising around. 3/4 throttle for most of the IMAC maneuvers. I need a lot of practice to become competitive. It has vertical out of sight and is very maneuverable and predictable. Landings are soft as a feather. All in all it's a great plane. It says that it will fly 3D, but I'm not there yet.
Both are ARFS, and the quality of these kits was better than some of the ones my son-in-law paid thousands of dollars for. I expect to be competitive next season, without spending the cost of a Sports Car for airplanes. I agree with the gentleman about the TOC champs suddenly "discovering" electric. But then back in the late 60's people said proportional control systems could never replace the dependability of a reed system.
Perhaps this will give some guys an idea of what can be done with Outrunners, and Li-Poly batteries. Bye the bye, I have 2 Li-Poly packs that I've been using for over 18 Months. They are FMA products, and have in the range of 1000 flights on them. So the 250-cycle estimate is rather conservative compared to my experience.
I use an Astro Flight Charger, and on occasion discharge the packs down to exactly 3 volts per pack. I haven't noticed any decrease in performance on any of the packs so far.
I also built and flew about 100 flights on a Mini Funtana using an AXI 2212/20 motor swinging a APC 10x5 E prop on FMA 3S-2P Li poly packs. Lost it by dumb thumbs at low altitude. Was fun to fly though, while it lasted.
Dick Corby
www.altacom.us/p171.htm
Update!
Just got back yesterday from another IMAC contest in Oregon, and I'm getting hooked. The Paramount will fly the IMAC Basic routine, and is qualified for Basic. My son-in-law has finally coerced me to fly in the next event. Should be interesting since I haven't flown competition since 1974. And if I kick up the power on the Starlet to where it has more vertical ability, it is a 27% Scale model, and could be eligible should I progress beyond Basic.
Never thought that at my age I'd be considering competition again, but such is life.
Return to "What's In This Issue?"
Mid-Am Report to be in Upcoming October Issue
I had planned to get the 2005 Mid-Am report in this issue, but, as you can see, I ran out of space. Here's a teaser photo not in the .pdf version.
Early Sunday Morning down the Flight Line
Return to "What's In This Issue?"
|

