Emeter II: First Impressions and Use
By Ken Myers
January 13, 2009
Last update: January 27, 2009
This article is part of the February & March 2009 Ampeers
The Feb. '09 issue includeds how the Emeter II
was used to test a Scorpion S-3020-11 outrunner
& Scorpion Commander 45-amp ESC
The Emeter II & RDU became available on January 26, 2009
Sources: (do a search of there site for Emeter)
http://aircraft-world.com
www.allerc.com
www.quietrcflying.com
Bernard Cawley's "First Look at the Hyperion Emeter II:"
Part 1 appears on RC Groups 01/19/09
It is FINALLY here!
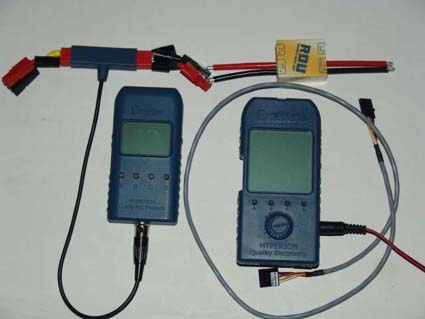
I have been using my Hyperion Emeter version 1 (Emeter I), shown on the left in the photo, for many years now. It has been my main test instrument for gathering electric power system data to add to Drive Calculator (www.drivecalc.de).
Unfortunately the Emeter I, because of the unavailability of certain parts, ceased production long before the demand ran out. The version 2 (Emeter II), shown on the right in the photo, is now available, and it certainly looks like it has been well worth the wait.
Mark and Phil Connolly have created a wonderful new tool for those who like to explore electric power systems, working together with David Radford who does development work for Hyperion products.Ę I want to thank David for the preproduction unit that is being reviewed here. http://media.hyperion.hk/dn/em2/
Over the past couple of years, I toyed with the idea of purchasing and Eagle Tree Systems' eLogger so that I could record in-flight data, but that would have required the purchase of a new laptop computer that uses the Windows operating system. I really didn't want to purchase a new computer, and I am not a fan of the Windows operating system.
When I heard that the new version of the Emeter had remote logging and did not require a Windows computer, I was elated!
The Emeter II consists of the main unit that has the backlit screen, SD card slot, navigation buttons, and potentiometer dial to control servos and ESCs, and an optical tachometer. It has a 5-cell 750mAh NiMH battery pack and built-in charger. According to the documentation that I have, the battery should now last between 18 hours and 50 hours depending on how the meter is being used. The Remote Data Unit (RDU) has the ability to record data to its own memory for later transfer to the main unit. When the RDU is hooked to the Emeter II, the data can be captured and displayed on the main unit when bench testing. A Data Cable is used to transfer files to the main unit from the RDU and to communicate data from the RDU during bench testing. The Emeter II may also be used for Hyperion Titan and Atlas ESC setup as well as the Hyperion digital servos. A Power Cable connects the main unit's charger to a 12v - 15v power source.
The Emeter II does not come with a SD card. I picked up a 4GB SD card, the largest usable size noted in the Quick Guide, at Staple's for less than $16.00 including Michigan sales tax. That large of a card is NOT really required though!
The first thing I did was put connectors on the power cable and attach it to my 12v Marine/RV battery for charging.
Next I crimped Anderson Power Poles (APP) onto the leads of the RDU and weighed it. The power leads on the RDU appear to be 10ga. wire, and the APP connectors accept 12ga. wire. I clipped off the pre-soldered part of the power lead wires on the RDU. I opened the APP connectors using a fine blade screwdriver so that the connectors would accept the 10ga. wire when screwed onto the bare wire. Then I crimped the connectors and slipped on the outer housings.
The RDU, with four APP connectors, weighs 33.55g/1.18 oz. I chose APP connectors because that is what I use. They would not be appropriate if used near the unit's maximum power level of 150 amps and 70v!
The RDU is used instead of the shunts that were available for the Emeter I.
I should note that there were no supplied manuals or guides with this preproduction unit. The only guide I had available for use when I started writing this was the Emeter v2 Quick Guide 2.06 dated December 28, 2008.
I read through the On Screen Help and Navigation section of the guide to get an overview of the operation and learned that there are two modes of operation. The Bench Test mode is when the Emeter II is attached to the RDU and the Analyser data is recorded to the SD card or saved as 1 of 8 Snapshots. During the In-Action mode the data is recorded to the onboard memory of the RDU and later easily transferred to the Emeter II.
To me, the SD card went in the side slot of the Emeter II upside down, with the label on the SD card facing away from the screen when inserting it.
When the Emeter II is turned on, that last action used will usually be the first screen displayed when the unit is powered up again.
Since my Emeter II is a preproduction unit it arrived with firmware version 2.04 installed.
I downloaded firmware version 2.06 from the Aircraft-world Web site onto my Mac. My Mac automatically unzipped the files from the download.
I decided to poke around the files a bit. I found that data is recorded in a .log file. It is a comma delimited text file. That means that the file can be opened in Excel or with the Open Office spreadsheet and the data can be viewed and manipulated with no other software needed. Cool!
I calibrated the meter using my Radio Shack #22-168A Digital Multimeter. It is not an inexpensive meter, but I have no way of knowing how accurate it is, but since I use it, I calibrated the Emeter II to it. The volts matched 100% and I adjusted the amps down on the Emeter II by 0.01 amps, which I'd call a close match. I used a short run of a motor I had on a test stand at no load as my constant amp reference to match the Emeter II to the multimeter.
I plugged my SD card reader into the Mac USB port with the SD card in it. The Icon for the SD card showed up on the desktop. Since the firmware update files were already unzipped, I dragged them over the SD card icon, and in a few seconds the files were transferred to the SD card.
The firmware upgrade to the Emeter II is done by holding down all four buttons, A, B, C, and D, and then turning on the Emeter II. The update started automatically, and was completed very smoothly. The hardest part to the update was holding down all four buttons at the same time and turning on the Emeter II. Luckily, I have pretty small hands.
Next, the RDU was updated using the easy to follow onscreen menu to RDU SETUP, holding down the D button for three seconds and then selecting Upgrade. That went smoothly by just following the prompts and confirmations.
The first batch of production units will have firmware version 2.06 or higher already installed.
I have always wanted a way to "run" my ESC without turning on my transmitter for bench testing. It can be done with the Emeter II. Plug the ESC lead into a servo driver port. Turn on the Emeter II. Plug in the power battery and control the ESC with the potentiometer dial on the front of the Emeter II. This will work no matter what other function of the Emeter II is being used. If a non-BEC type ESC is being used, a receiver battery can be plugged into the other open servo, as the two ports serve as a "Y" connector.
The Emeter II can display the pack resistance in Ohms in the READINGS section under the PEAKS menu. The cell resistance can be determined by dividing the resistance by the number of cells. There is currently a thread on RC Groups about a unit being designed by a fellow to do just this.
www.rcgroups.com/forums/showthread.php?t=980290. The Emeter II already does it.
I logged a "practice" Bench Test using the Emeter plugged into the RDU and an In Action "practice" test using just the RDU. The Bench Test, when ANALYSER mode is chosen, logs the file to the SD card with a push of the C button. When an In Action test is done, and data captured by the standalone RDU, the Emeter II automatically recognizes that the RDU has data on it when the RDU is connected to the Emeter II and the Emeter II is turned on. A button press transfers the data from the RDU to the SD card in the Emeter II.
Phil Connolly sent me a "preview" version of the upcoming manual. It arrived via email just before the January EFO meeting was to start, so I didn't really have a chance to go through it until the following day.
The Introduction to the manual really defines what this tool is:
"Introduction
Emeter II was designed as a standalone tool, which may be used to:
*Measure, record and analyse the key performance factors for electric powered models.
*set control parameters for Hyperion digital servos and Electronic Speed Control units (ESCs)
*simplify testing of components of an electric power unit with servo driver, servo tester, cell internal resistance and capacity checks
*support the operation of the model in the field with multiple stopwatches, countdown timer, altimeter and temperature gauges
It operates in the field or on the workbench without the need for a Personal Computer but can communicate simply with PCs if required. Unlike its version 1 predecessor Emeter II is also designed to capture data whilst the model is in action."
The Emeter/RDU is reverse polarity protected. Hooking up the main power pack will not "kill" the units, but it will not function properly.
After reading through the rough draft of the manual, I decided to see if I could program the Servo Tester to run up my ESC to full throttle and hold it there for 5 seconds. After a couple of tries, I had it programmed and ready to try a real world test.
I programmed the throttle on the Scorpion Commander V2 45 amps ESC to the Emeter II and then did my usual data collection for Drive Calculator with four different prop runs and two no load runs. The prop was mounted to the motor and then the Servo Tester started with its logging feature. Each of the six runs were logged, creating six logs files.
During this process, one minor, and I mean very minor annoyance showed up. The menus are moved through in a sequential order by pressing the D button. There is no way to "reverse" the order and go back up through the menu. The MAIN MENU, in order from top to bottom reads - READINGS, PROGRAMMING, STOPWATCHES, SERVO TESTER, LOG FILES, RDU SETUP AND EMETER SETUP. After using the SERVO TESTER to run my motor up to full throttle and log the data, I would then switch to the LOG FILES to see that the meter had captured usable data. When I was ready for the next prop, I had to continue to press the D button until I returned to SERVO TESTER, which was only one place "up" from LOG FILES, but it took 6 button presses to get back there following the sequential order. It is not really a big issue, but having a way to reverse the menu selection would be nice.
I opened up each log in turn using Excel and decided which data I wanted to add to the spreadsheet that I create for each motor that I test and put into Drive Calculator.
Next I opened Drive Calculator and input the data that I had gathered for the motor I was testing, a Scorpion S-3020-11T. The Drive Calculator virtual model was almost a perfect match to the data that I had gathered with the Emeter II.
This was much easier than taking the Snapshots and averaging them, as I had done previously with the Emeter I.
This is an amazing tool, and I am looking forward to more motor tests, as well as other uses of the neat features. I love this tool!
This tool should be available by the end of January 2009 and have a price of about $200US for the Emeter II and RDU. The phase tachometer and temperature sensor are sold separately for about $10US each.
Putting the Emeter II to use
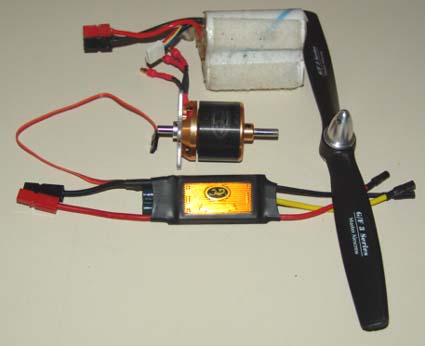
Scorpion S-3020-11T & Scorpion Commander V2 45-Amp ESC Review
By Ken Myers - 20 January 2009
I have a "new" 3S1P "A123" design in progress and I wanted a new motor and ESC for it. I wanted to try the Scorpion brand, as I have been recommending it to my flying buddies for quite a while now. I have found that a 1200ish Kv works well with a 3S "A123" pack and 10-inch diameter props from my experience with my Son of Swallow. The SoS uses a Hyperion 3019-10, but my particular motor is odd, because it has a Kv of just over 1200, as I've noted before here in the Ampeer. The Hyperion 3019-10 weighs 145g. I looked at the Innov8tive Designs site (http://www.innov8tivedesigns.com) and noted that the 3020 series motors weigh about 154g, which is close enough, but the highest Kv available is the S-3020-12 with a Kv of 1088. I know that the winds and Kv are pretty much proportional. I multiplied 12 (the winds) * 1088 (the Kv) and divided that answer by 1200 (the Kv I wanted). (12 * 1088) / 1200 = 10.88, which indicates and 11 wind.
I contacted Lucien Miller at Innov8tive Designs and asked if I could get a special 11-turn wind S-3020. He suggested that I contact Daniel Sny at www.gobrushless.com.
I contacted Dan by phone and asked if he could make me a special 11-turn wind using a Scorpion 3020 kit. He said that it was no problem. I ordered the Scorpion 3020 motor kit and had Dan do a custom wind for me.
To wind an 11-turn, the first tooth in phase has 6 turns then the tooth next to it has 5 turns. The phase is completed by winding a mirror image of these two teeth on the other side of the stator (this is what they mean when they say distributed LRK). It ends up with a total of 11 turns per tooth.
This is the information Dan sent to me via email and also along with my motor pertaining to my custom wind S-3020.
"11 turns, 20AWG, DLRK, Delta, using a 6-5 winding pattern.
12300 RPM at 10V, 2.78A, 1230Kv"
As soon as I received the motor I ran the drill press test to verify the Kv. The results of the drill press test yielded a Kv of 1226. Yes, a motor where the supplier got the Kv right! :-) Thank you Dan and thank you Scorpion.
I set up the Scorpion Commander V2 using the extremely easy to use IR programmer. I set the LVC to 6v for use with my 3S "A123&qot; pack and left the timing on Auto. This is one very easy to use ESC programmer and beats the heck out of using a transmitter and the beep, beep, dah, doos. I think I may like it even more than the Castle Link, which I like a lot, since I don't need a computer to use it. The ESC's response is smooth and it has a good range. It has a linear BEC, but that's not a problem at all with a 3S "A123" pack.
The only real problem that I have had so far with this ESC is that the instruction and use sheet uses a font too small for me to read, way too small. I couldn't find the instruction sheet on the Innov8tive Designs' site and had to go to the Scorpion Systems site. Once I had it on my computer I could read it.
I reversed the shaft of the motor so that I could use the "+" mount. It was a very easy process.
First I gathered data using my four selected props. The props were balanced and then run from the largest to the smallest, using the SERVO TESTER program that I wrote for the Emeter II.
PW-uS,DELAY-mS
00905,00500
01030,00500
01156,00500
01281,00500
01407,00500
01532,00500
01658,00500
01783,00500
01909,00500
02034,00500
02160,05000
00905,05000
All testing was done on a single, non-recharged 3S "A123" pack. The no load data was then collected. Here are the results that I put into Drive Calculator. Remember that the values do NOT represent the highest values that might be seen on a fully charged pack for each prop.
No Load #1 10-cell 1700mAh NiCad pack
13.1v, 3.1 amps, 15900 RPM
No Load # 2 6-cell 2000mAh NiCad pack
7.78v, 2.5 amps, 9420 RPM
APC 9x7.5E
8.79v, 30.95 amps, 8880 RPM, Drive Calc eff. 75.8%
parkzone T-28 9.5x7.5
8.745v, 32.9 amps, 8685 RPM, Drive Calc eff. 74.9%
APC 10x7E
8.83v, 32.65 amps, 8820 RPM, Drive Calc eff. 74.9%
Master Airscrew 10x8 G/F 3 Series
8.82v, 34.55 amps, 8715 RPM, Drive Calc eff. 74.3%
The Specifications:
Scorpion S-3020-11 (1230 Kv) Outrunner
Motor weight/no prop adapter: 148.6g/5.2417 oz.
Measured Kv: 1226 rpm/V
Outside diameter: 37.5mm/1.47638 in.
Bell length: 27.5mm//1.08 in.
Bell length w/protrusion: 34mm/1.34 in.
Shaft length: 76.5mm/3.012 in.
"+" mount w/4 screws: 5.5g/0.194 oz.
MPI MAXX ACC378 Prop Adapter (motor shaft 5mm/prop shaft 8mm): 12.9g/0.455 oz.
Master Airscrew 10x8 G/F 3 Series: 22.2g/0.783 oz,
Scorpion Commander 45A V2 ESC
Weight with connectors (3 bullets & two APP): 47.6g/1.68 oz.
Size: 3.625 in. L, 1.16 in. W, 0.4375 in. T
Size, metric: 92.1mm L, 29.5mm W, 11.1mm T
Note that the size differs greatly from the specifications that are:
75 x 30 x 9 mm (2.95 x 1.18 x 0.35 in)
I measured the length of the ESC from where the wires can actually bend, not from where they exit the ESC.
3S1P "A123" pack
w/Velcro & connectors: 241.3g/8.5 oz.
Total Power System weight: 430.5g/15.19 oz.
Earlier I mentioned that Scorpion did not produce a 1200Kv motor at the weight I wanted. They do have a S-3014-16 with a stated Kv of 1187 and weight of 122.1g/4.3 oz. While this may appear to be a better choice because of the weight, it isn't. Using Drive Calc figures for the 3S "A123" pack and the MA 10x8 G/F 3 Series prop:
S-3020-11 8.83v, 34.9 amps, 8687 RPM, 307.9 watts in, 228.9 watts out, Drive Calc eff. 74.3%
S-3014-16 8.89v, 30.5 amps, 8224 RPM, 271.3 watts in, 194.2 watts out, Drive Calc eff. 71.6%
The 3020-11 weighs 26.5g/0.93 oz. more but increases the pitch speed by 3.5 mph, and watts out by 34.7, easily offsetting the slight weight increase of the 3020. Also, an outrunner motor with less weight/mass is generally not as efficient as one with more mass and the same Kv. That can be seen in the efficiency numbers. The higher the efficiency, the cooler the system runs.
Many times, if the smallest possible motor is used, the battery must be placed very far forward, which exposes it to more potential crash damage than when placed further back in the airframe. This is especially true when using Li-Po packs.
While I am talking about weight and Kv, I would like to note that a truly meaningful way to name outrunners is by their weight and Kv. Therefore, my 3020 would be known as a Scorpion 149-1230 and the 3014 used in the example above as a Scorpion 122-1190. All of the other outrunner motor nomenclature can be ignored. (Continued in the March 2009 Ampeer)
Hyperion Emeter II & RDU: A Closer Look
Jan. 20, 2009
Monitoring a Battery Discharge:
I had a partially discharged 3S "A123" battery from the motor testing I did on my Scorpion 3020-11. I wanted to discharge it so that I could monitor a charge of the pack with the Emeter II using Zip charging.
According to version 2.07 of the manual, "In Bench-Test mode with the RDU and Emeter II connected, some actions such as accumulation of ma-h in/out and peak or minimum voltages and currents will continue even if the Emeter II is switched off. This reduces internal battery discharge rate to zero. The Emeter II will display the accumulated and peak figures from the RDU when switched on."
This made sense to me, as the RDU is what is collecting the data.
I used my AF 109 as the discharger, which takes forever, but at least it is a way that I can discharge a battery.
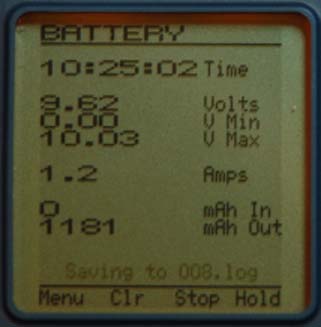
The screen shows that at 10:25:02 I had discharged 1181mAh. The battery was at 9.62v and the discharge had started when the pack was at 10.03v. My AF 109 on discharge is drawing 1.2 Amps. It also shows that I'm logging this part of the discharge to 008.log. I can stop the logging process by a press of the C button under the word Stop.
I did log parts of the process, but it doesn't seem that the data collected is all that valuable on battery discharge. By saving a Snapshot at the end of the discharge, that Snapshot could provide the most valuable data such as mAh Out and the starting and ending voltages.
To save a Snapshot press the D button under the word Hold. The Snapshot is then saved by pressing the C button, Save.
If the Emeter II is turned off during the test and it is logging, when it is turned back on, the RDU wants to log the data back to the Emeter SD card. Pressing Yes logs the data. I had completely cleared the log's folder before starting the record collecting. When I finished I had 9 logs.

At the end of the discharge, I took a Snapshot and saved it. I'd forgotten that the Snapshot memory is "onboard" the Emeter II, and tried to find it in the log files on the SD card. This is fine, since it can be recalled, but I would have to manually record the data, if I wanted to save it for some reason.
I expected to see the resistance of the battery pack on the BATTERY screen, but it never showed up during the discharge. A check of the manual showed that it is only displayed on the PEAKS screen.
Monitoring a Battery Charge:
During the Zip charge of the pack, I did a quick log at the beginning of the charge and another at the end to gather data that I could transfer to my Mac, instead of a Snapshot, which would have "left" the data in the Emeter II built-in memory.
To gather data for a charge, turn on the Emeter II, plug in the source to the RDU, in this case a 12v Marine/RV battery (it could have been a charger or Terminator II), start the log and then plug in the load, the battery to be charged. Stop the log after a few seconds. As the battery approaches the fully charged state, start the log again to capture the end of charge information. I had to manually stop the Zip charge, but a charger would have stopped automatically. Stop the log.
The starting log file indicated 9.72v, 24.2 amps, at 11:22:40 with an RDU temperature of 14.3-deg C. The ending log file showed 12v, 4.4 amps, at 11:33:50 with an RDU temperature of 17.3-deg C and 2084 mAh returned to the pack. It took eleven minutes and 10 seconds to charge the pack. The temperature of the RDU increased 3-deg C or 5.4-deg F during this fast charge.
I measured the "A123's" pack voltages the following morning using my Cellmeter-8 and found the cell voltages at 3.420, 3.468, and 3.379. The Astro Flight Blinky for "A123s" was connected to balance this pack, as it had not been balanced since mid-summer.
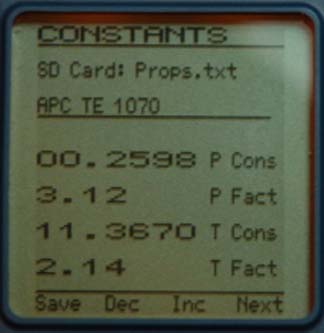
Prop Constants:
Choosing a prop from the HUGE prop database allows the Emeter II to mathematically calculate efficiency and thrust based on the prop constants in the database.
Because the prop database is so HUGE, I decided that I wanted to create a database of the props that I use most often and to add some props that I've gathered the constants for.
I checked the manual and found that the prop data is kept in a .txt file in the Data folder. The text file has fixed character lengths. The lines use this format: Name (20 characters then comma), ThrCons (7 characters with leading zeros if necessary then comma), ThrF (4 characters then comma), PwrCons (7 characters with leading zeros if necessary then comma) and PowF (4 characters).
ThrCons = Thrust Constant
ThrF = Thrust Factor
PwrCons = Power Constant
PowF = Power Factor
If you are familiar with Drive Calculator you know what these terms mean and how to derive them. If you don't understand them, the manual points you to where you can learn about them, and download more of them from the Internet.
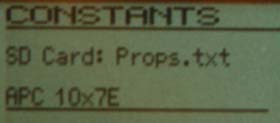
Since this may seem a little confusing an example is presented below. I've used a / as a character place holder and it has no meaning and is not seen in the real file. It is there so that you can count the characters. I've used the APC 10x7E from the database to show what it looks like in the .txt file. There are no / in the actual APC 10x7E record. They just represent blank spaces. APC (Advanced Precision Composites) is the prop brand. TE stands for thin electric, commonly called "E" props. 1070 means a 10-inch diameter and 7-inch pitch.
Example:
Name////////////////,ThrCons,ThrF,PwrCons,PowF
--------------------------------------------
APC_TE_1070/////////,11.3670,2.15,00.2598,3.12
This is what the APC 10x7E prop looks like when displayed on the Emeter.
Since the only file that ended with .txt in the Data file folder was the prop file, I made the INCORRECT assumption that I could create a file and call 10-inch.txt and then see that as a choice in the PROP CONST menu of the Emeter II. I carefully reread the manual and learned that the Emeter II will only call a file named Props.txt. Darn! That means the original file must be saved on the computer and the new file renamed as Props.txt.
After saving the original file on my Mac with the new name orgProps.txt I saved my 10-inch.txt file as Props.txt. When I viewed the new Props.txt file, which now listed only 10-inch and 10.5-inch props, I learned that an underscore should be used as a placeholder, a space will not work.
I reworked my original 10-inch.txt file and added underscores where I wanted spaces to appear on the Emeter II screen.
This turned into an inordinately long process, as I made several mistakes that did not allow the .txt file to be displayed correctly. It took several hours, and a lot of switching the SD card from the computer to the Emeter II, and then trying again when I found my mistake. Hopefully, the software, that should be released soon, will allow an easier way to do this.
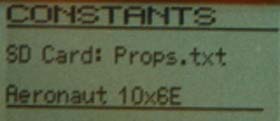
After I made a 10-inch diameter file named Props.txt, I decided to just go ahead and add all the props that I am most likely to use. I eliminated all of the folding props, APC SF props, GWS props and others that I don't use. I also added several props that I've created the constants for. Now I had a Props.txt file with just the props I use in it, which made advancing through the props with the press of the C button a lot easier!
The original Props.txt file holds 293 records. My new Props.txt file has 61 records and is much more manageable. I renamed the props in the .txt file so that they made more sense to me, as they are now what I usually call them. They now look like this:
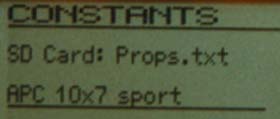
There are also some APC pattern props and the parkzone 9.5x7.5 prop in my Props.txt file.
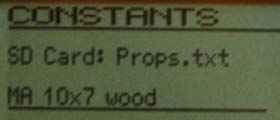
Here are a few props that I have the power constant and power factor for, but I do not collect thrust constants or thrust factors, therefore that data should be entered as zeros.
parkzone 9.5x7.5 PwrCons 00.2100 PowF 3.20
MA 10x7 wood PwrCons 00.3755 PowF 3.00
MA 10x8 wood PwrCons 00.4460 PowF 3.00
MA 10x8 G/F 3 series PwrCons 00.3550 PowF 3.00
MA 11x7 wood PwrCons 00.5150 PowF 3.00
MA 11x8 wood PwrCons 00.5859 PowF 3.00
APC 12x10 pattern PwrCons 00.7700 PowF 3.00
APC 12.5x10 pattern PwrCons 00.9500 PowF 3.00
APC 14x8.5E PwrCons 00.8160 PowF 3.20
Checking the Resistance of the Battery Pack:
The PEAKS screen data is only available from the "onboard" memory of the Emeter II. It must be looked at and a Snapshot taken and saved if the data is to be retrieved before the Emeter is shut off.
The pack resistance is shown on the PEAKS screen.
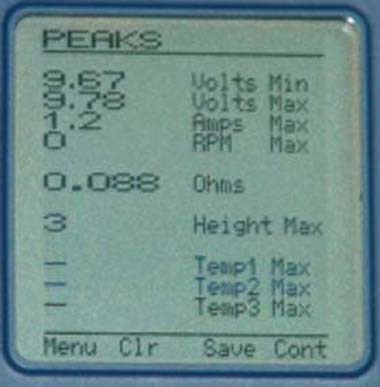
I used the same 3S "A123" pack that I had been using and discharged it on my AF 109. I put the Emeter II inline with the battery and discharger. At a 1.2 amp discharge the pack resistance was recorded as 0.088 Ohms or 0.029 Ohms per cell. (see above)
I charged the pack using my CellPro 10S. It said that the cell resistance in Ohms for each of the cells was 0.0092.
Once the pack was charged; I hooked it up to the motor on the test stand again. Using the ESC program that I wrote, I cycled the motor, with the prop attached as a load, several times to warm up the pack and then captured a pack Ohms reading with the Emeter II.
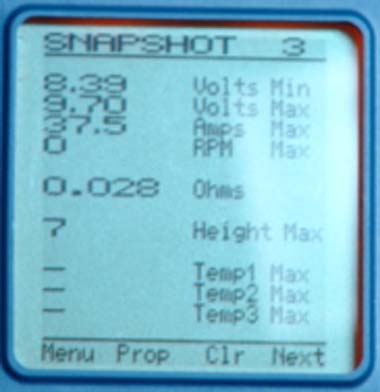
0.028 Ohms divided by three equals 0.0093 ohms per cell, and matches what was displayed on the CellPro 10S.
I continued to "heat things up" a bit with a few more runs, and the screen showed 0.040 Ohms for the pack.
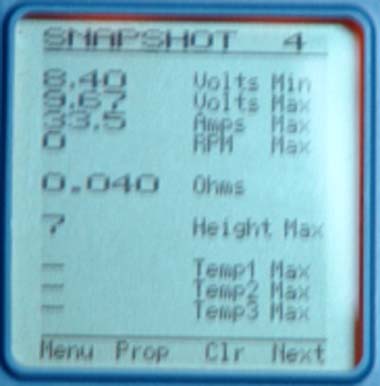
That works out to 0.013 Ohms per cell, which would be expected as the pack heats up.
It can be seen that with the pack at about the same temperature such as it was while on the CellPro 10S and after just a few runs with the motor, the cell values are about the same.
Power System Test Equipment that the Emeter Might Replace
Unlike a power meter, not everyone needs an Emeter II and RDU. But, if part of your enjoyment of the hobby is finding out what your power system is really doing, the Emeter II & RDU might replace many tools in your flight box.
It is not an inexpensive tool with an upfront cost of about $240 for the Emeter II, RDU, phase tachometer lead and leads for the 3 temperature sensors, but it could replace the following tools.
Power meter/wattmeter/whattmeter - ~$55.00
Optical Tachometer - ~$20.00 to $30.00
Cell Internal Resistance Meter - $50.00 - $60.00
*eLogger V3, PowerPanel LCD Display, Brushless Motor RPM Sensor, 3 Micro Temp Sensors - ~$110
Total: ~$240
*Windows computer required
As you can see, it is just about a wash, as far as the cost goes. I should note that at this time the eLogger has many more options for recording even more in-flight data. I used just the RPM sensor and 3 micro temperature sensors to keep the comparison close to the same abilities of the Emeter II as it is released. Also, the power meter and optical tachometer could be eliminated from the list, since the Eagle Tree Systems eLogger can perform the same functions.
Most of you have a computer that runs Windows; so running the eLogger software is not a problem for you. For those of us who don't use a Windows computer, the Emeter II and its RDU has a HUGE advantage.
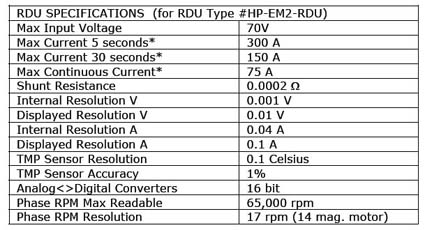
Specifications for the Emeter II & RDU
Update Feb. 7, 2009
Hyperion ATLAS and Scorpion Commander II ESC Programmer
Using version 2.08 of the firmware, the Emeter II has the ability to program Hyperion ATLAS and Scorpion Commander II ESCs.
I already had my Scorpion Commander II 45-amp ESC programmed for the motor testing of my Scorpion S-3020-11 mentioned in the February 2009 Ampeer.
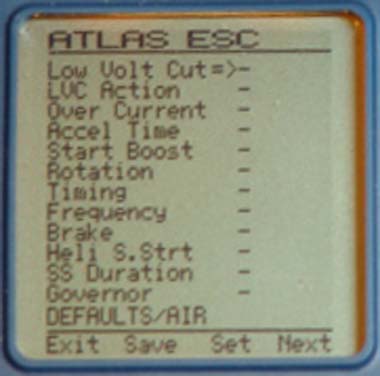
I thought that I would try the new function to see just how it worked. I removed the prop from the motor on my test stand. Next I followed the directions by turning the Pot Dial to the minimum position, selecting my type ESC (15v in this case), connecting the ESC 3-pin connector to leftmost Servo Driver Port, connecting the Main Power Pack to ESC and pressing the D (Go) button.
I expected to see the settings that I had the ESC programmed to with the Scorpion IR programmer. I didn't. This is what I saw.
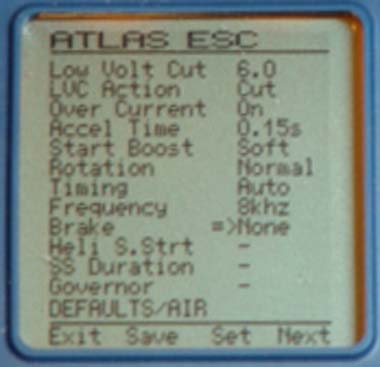
Next I reprogrammed the Scorpion Commander II 45-amp 15v ESC. It was quite easy to do by pressing the C button to Set my selection and the D button to go the Next menu item. When I was finished I pressed the B button to save my selections to the ESC. It took a few seconds to update the ESC with several displays on the screen and beeping from the ESC via the motor as the selections were confirmed. When I finished, I pressed the A button to Exit the programming set up. My selections were as follows.
Once again I hooked up the ESC to see if it would display my settings. It didn't.
I checked the SD card to see if the Emeter II had saved a file for this setup, and I found that it didn't.
It would be a nice feature to have the Emeter II display how the ESC is setup when it is plugged in. It would also be handy to be able to recall previous setups with one button press and have the new ESC set up like and existing one.
To Reach Ken Myers, you can land mail to the address at the top of the page. My E-mail
address is: KMyersEFO@mac.com
Electric Flyers Only of southeastern Michigan WEBsite
|