06/01/19 12V Fuses and 12V Circuit Breakers That Look Like Fuses
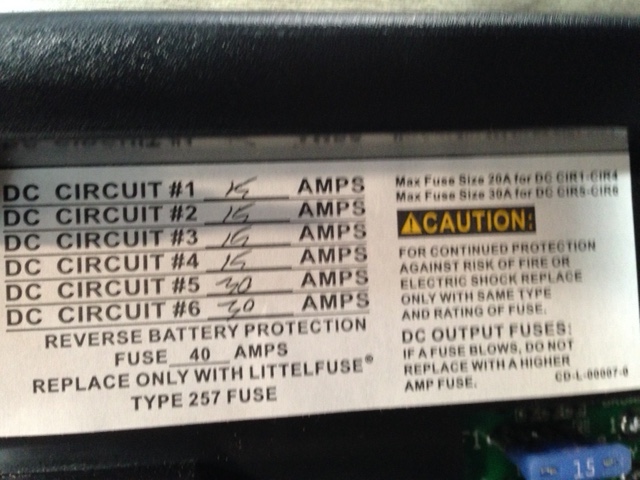
The black looking 15AMP fuse is not a fuse. It is a circuit breaker by Snap Acton. It is a 15AMP AT2 Type II. It should not have to be replaced. The two gold looking 30A fuses are not fuses. They too are circuit breakers. They should not need replacing, but I do have a spare, as well as a 40A and several 15A fuses in the trailer. 06/10/19 A Getting the License Plate Problem It took a very long time to get the permanent license plate! The temporary plate ran out on May 31st and the permanent plate did not arrive in the US mail, from Haylett RV, until 1:23 p.m., Friday, June 7. That was a full week after the temporary plate expired. I was given the excuse, via email from my sales person there, that they had to wait for my personal check to clear, but my bank account records noted that the check was cashed on May 20. That was four days after I gave them the check on May 16. 07/01/19 The Weights Collected at the Landscaping Scale, the Trailer is "Nose Heavy", and The Haul Gauge Doesn't Work for ME The trailer was taken to Angelos Supplies on Wixom Road. The car had a full tank of gas. The Ascent weighed 2.36 tons or 4720 lb. That is what was expected from a previous weighing on a CAT scale. The combination of the car and trailer weighed 4.13 tons or 8260 lb.
Both the car and trailer weights were very close based on the CAT scale weight of the car and the running total weight on my trailer weight spreadsheet. The Ascent, with the trailer hooked up to it, but with the trailer wheels off the scales weighed 2.4 tons or 5200 lb.
The Haul Gauge did not provide an accurate tongue weight. I will no longer be trying to use it. 07/25/19 Rearranging Trailer Items to Lower the Tongue Weight On July 1, the tongue weight was 480 lb. based on the weight values and calculations provided by a local landscaping supplier's scale and 482 lb. on the physicians' scale. The pass through storage originally contained 79.3 lb. of items After repositioning the items from the pass through storage, the remaining items weighed 40.7 lb. 5 gallons of water, about 42 lb. was added to the black tank for a new tongue weight of 421 lb. The total tongue weight change was about 65 lb. 07/31/19 Still Trying to Find a "Fix" for the Heavy Tongue Weight & Lubricating the Scissors Jacks The trailer was loaded with all of the items that "live" in the trailer. Their placement had been changed on July 25. There was no water in the any of the tanks, including the black tank. Only a small amount of propane had been used on the first trip. The new, all metal, faucet had been installed to replace the original plastic faucet in the bathroom. 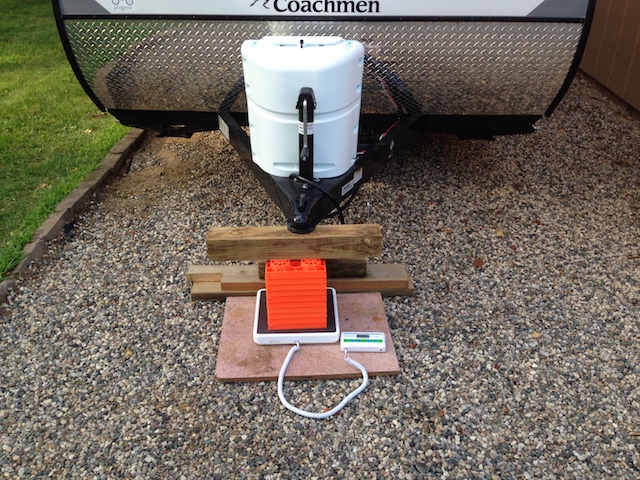
The weights noted DO NOT INCLUDE the weights for the Lynx Leverlers and 4 x 4 piece of lumber used to level the trailer. Three measurements were taken of the tongue weight using the physicians' scale. The three tongue weights were; 433.6 lb., 433.6 lb., and 434 lb. for an average of 433.7 lb. The 9.2 lb. original equipment shore cord was moved from the pass through storage to the storage in the back, lower bathroom cabinet and NO water was added to the black tank. Four tongue weights were gathered, with the shore cord moved, and they averaged 424.1 lb. Only a few items, totalling 31.5 lb., remained in the pass through storage, rendering it almost useless. Possibly adding a porcelain toilet could lower the tongue weight a bit more. The difficult to crank up and down stabilizer jacks were lubricated with silicone spray. 08/07/19 Attempted Scissor Jack Replacement The rear, camp side scissor jack was taken to Harbor Freight. Harbor Freight's 2.5 ton trailer scissor jacks are NOT a drop in replacement for the mount already on the trailer. They were not purchased. After lubricating the original scissor jack from the trailer with silicone spray, it was reinstalled. 08/09/19 Stone Guard Note The "chrome plated" stone guard appears to be some type of plastic. 08/11/19 Dangling Wires Under the Trailer & The Refrigerator Getting Too Cold 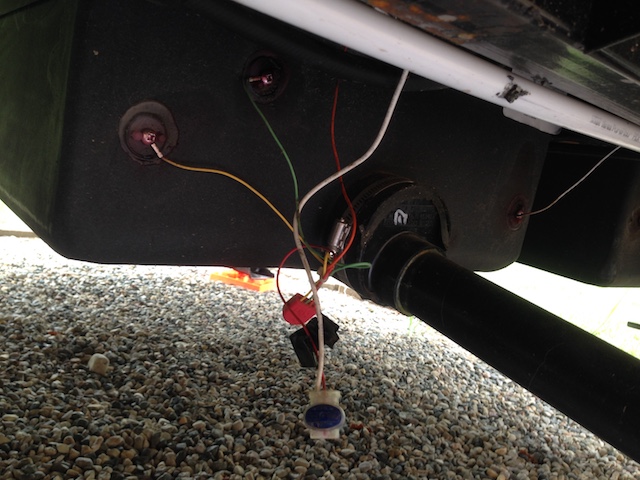 There were wires dangling under the trailer. The wires were for the gray tank sensor. The wires originally only had one wrap of electrical tape holding them in place. The tape let go, as electrical tape usually does. A couple of zip ties were used to secured them. Zip ties were also added to the tool kit in the trailer. 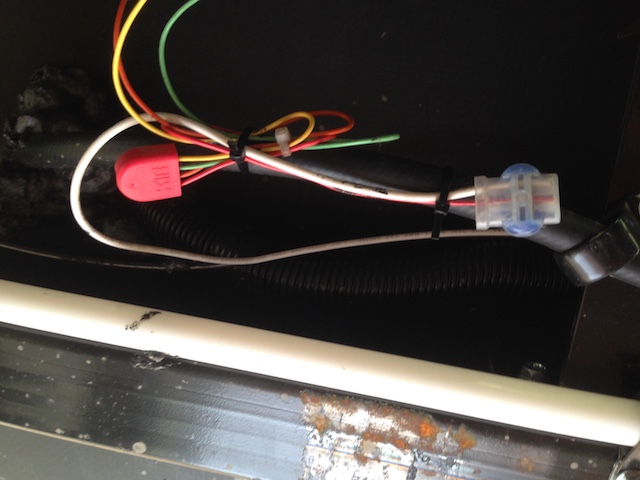 The shore power was plugged in at 5 a.m. and the refrigerator and refrigerator fan were started. The temperature in the refrigerator and freezer was about 66 to 68 degrees at that time. At 1:15 p.m. the freezer was down to 0 degrees F and the frig was down to 32 degrees F, which is too cold for the refrigerator. The bar slide in the refrigeator, to adjust the temperature, was moved downward to adjust the temperature in the refrigerator to a warmer position. 08/12/19 Data from the Trip to the Covert KOA & the Broken Shelf in the Rear Bathroom Lower Closet For this trip, the trailer weight was just over 3700 lb. with a tongue weight of 411 lb. The trip on 2-lane, paved roads took 5 hours. There was a 20 minute stop for lunch in the trailer. Because of the winding and hilly roads and detours, the average mph was only 37.5 for the 5 hour trip. The weather for the drive was partly sunny for most of the day with the temperatures ranging from the low to mid-80s. The temperature gauge on the Ascent was mostly in the middle for the whole trip. The Ascent pulled the trailer with no problem. The cable to the TV, from the antenna/satellite plug, must be plugged into the antenna connector in the trailer when cable is used. It was hard to finger attach the cable for cable TV to the connector on the exterior connection of the trailer. A small wrench was added to electronics box that fits the external cable nut. The total distance traveled was 191 miles. The car took 12.667 gallons to fill it.
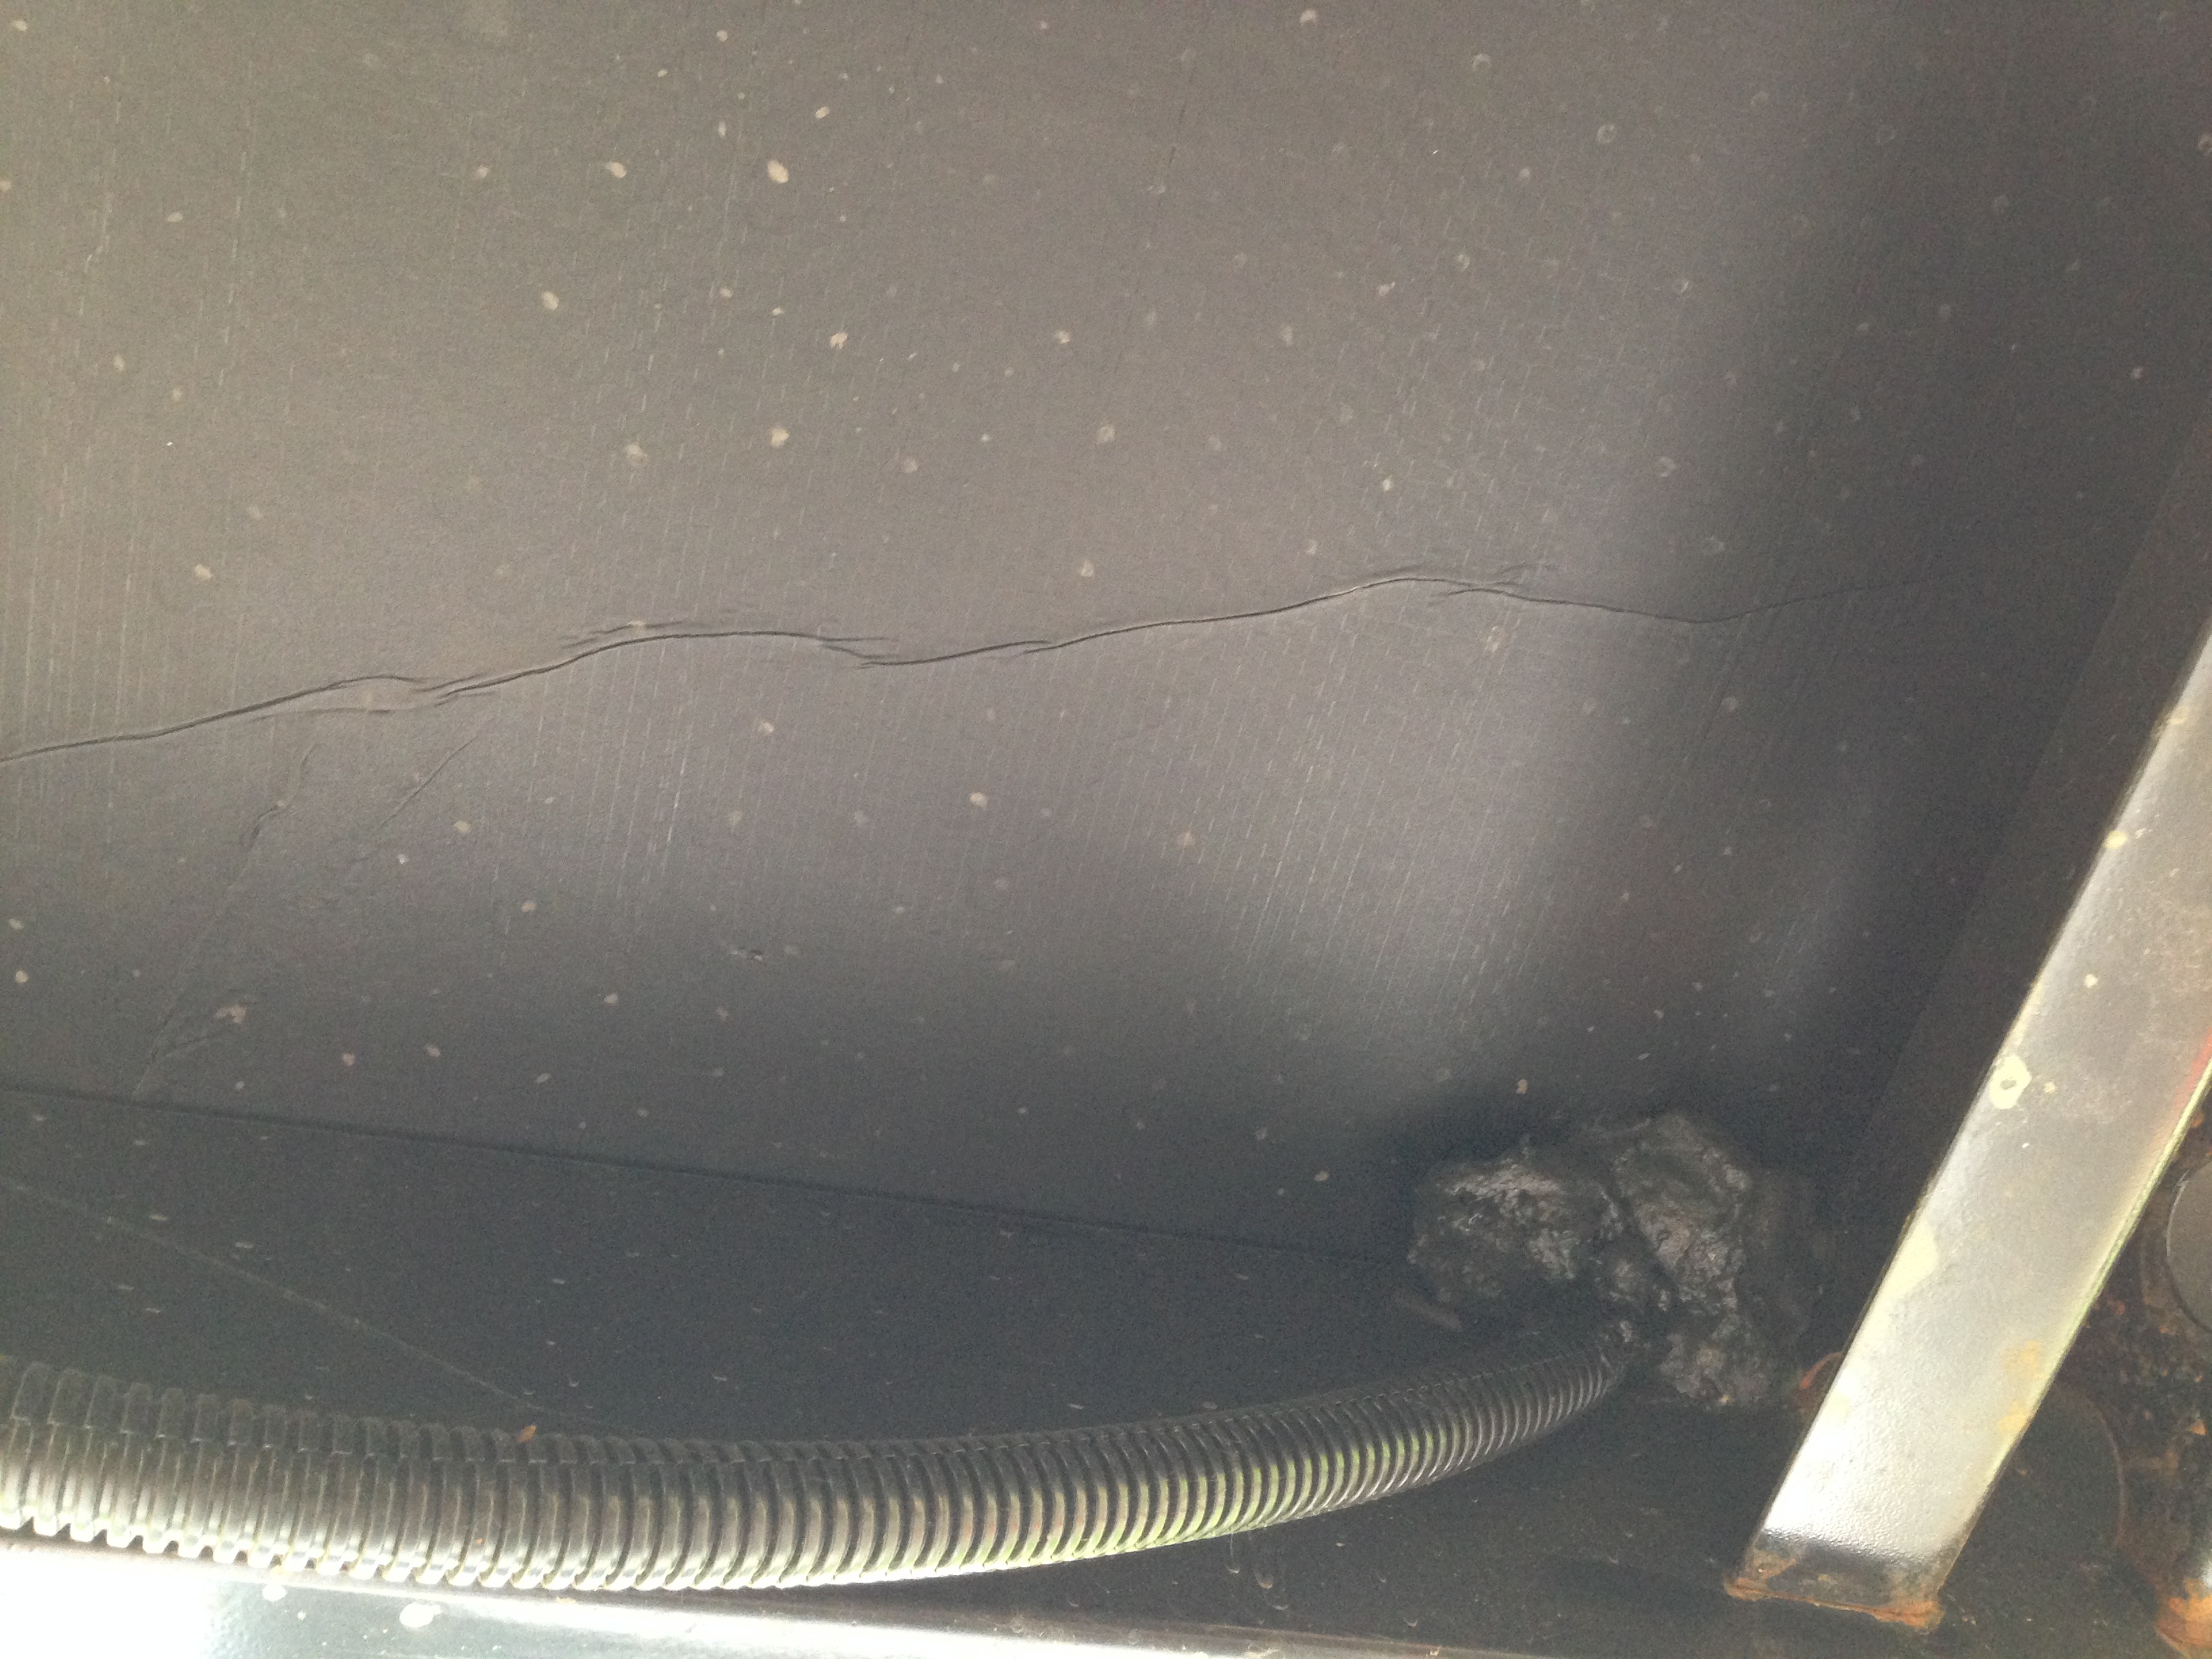
 The site at the Covert, MI KOA was okay, but not great. It was a bit too close to the main road, M-140. The lower shelf in the lower bathroom closet collapsed and pulled down from where it was originally stapled up from the bottom, and the shelf had fallen on top of the water heater. The way the shelf is installed, stapled from the bottom up UNDER the rails, means that it can only hold a small amount of weight, not the 68.5 lb. that was on it. 08/16/19 Low point leak again! 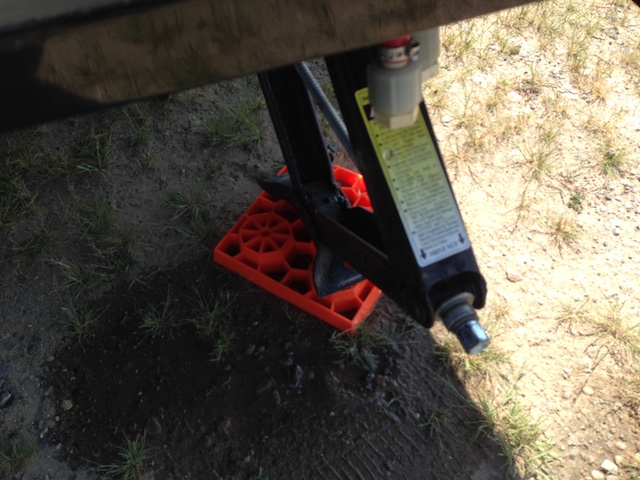 While at the Covert KOA, the low-point drains were leaking again. They were tightened. 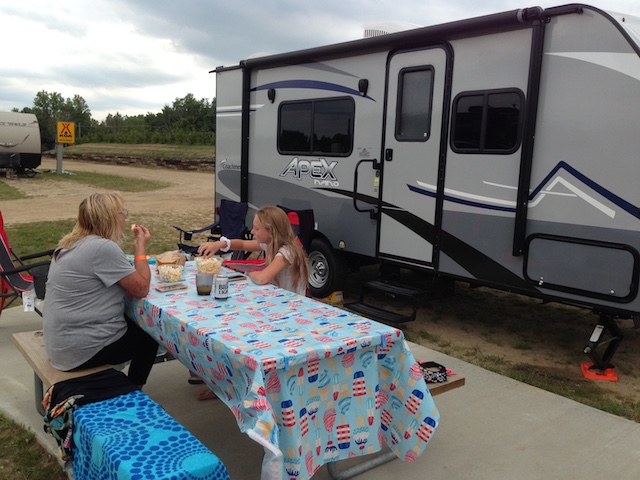
Enjoying a Camping Mid-afternoon Snack 08/17/19 Towing Data for the Return Trip From Covert, MI It took four hours and 16 minutes to drive home via I-196, M6, and I-96. That was all freeway driving, for the most part. There was about a 20 minute break at 1:00, in a rest area, for lunch in the trailer. The weather was sunny but there was some wind to contended with and temperatures were in the mid-80s. After arriving home, the car was filled at the BP station 3 miles away. It took 11.819 gallons and the car had traveled 197 miles since the fill up in Covet. From the camp site to the Marathon station in Covert was less than 2 miles. 197 miles divided by 11.819 gallons is an average of 16.7 mpg while pulling the trailer at 55 mph. I-96, crossing lower Michigan, is basically flatland type towing. The total trip time was 4.25 hours. That is an average of 46.4 mph, which is about 10 miles per hour faster than the two lane roads taken to go there. 08/18/19 The Broken Shelf in the Lower Bathroom Closet 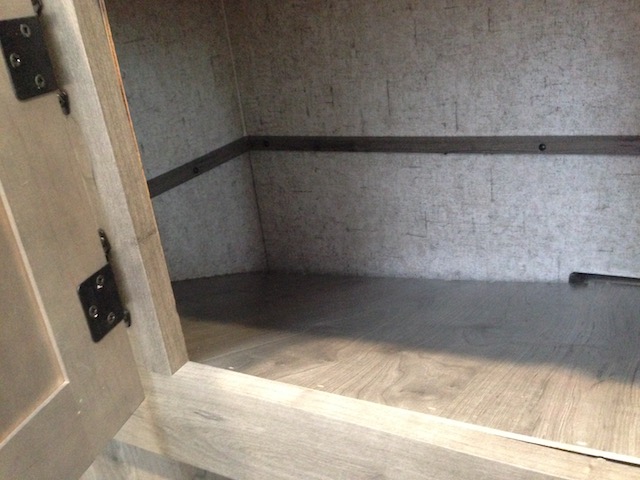
Note that the shelf was attached to the bottom of the rails. During the trailer set up at the KOA in Covert, MI, the shelf over the water heater and water pump, in the bottom bathroom closet, was discovered to have broken. The shelf was only made of 1/8" Lite Ply with a thin veneer on it. 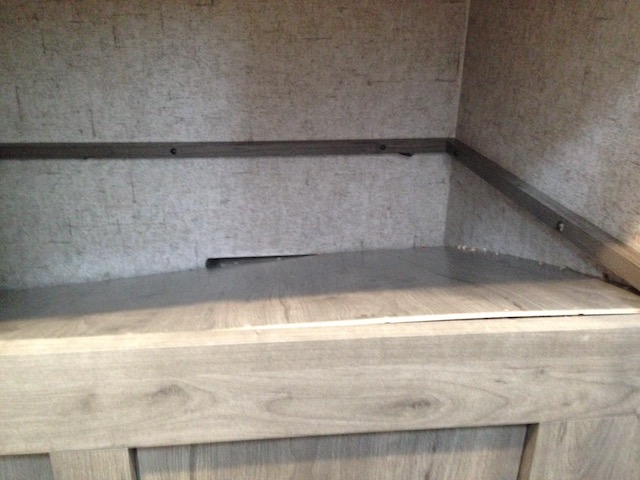 The weight of the items on that shelf was 65.8 lb., which was apparently too heavy! 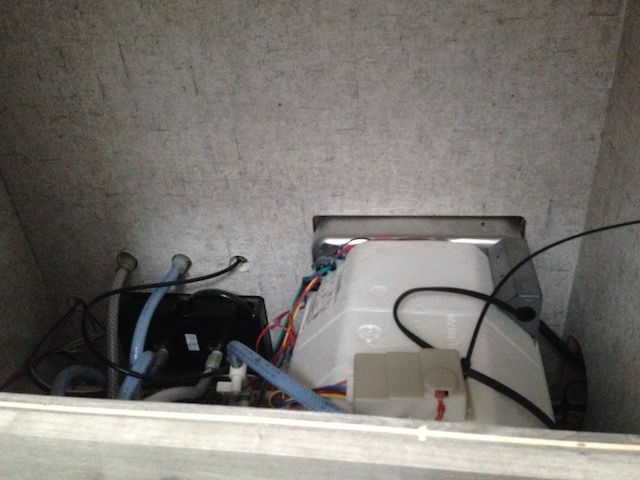 The "top" three rails were removed. The end rails were only held on by two long Phillips screws and the rear rail by three Phillips screws. The front rail was loose and needed to be reattached. 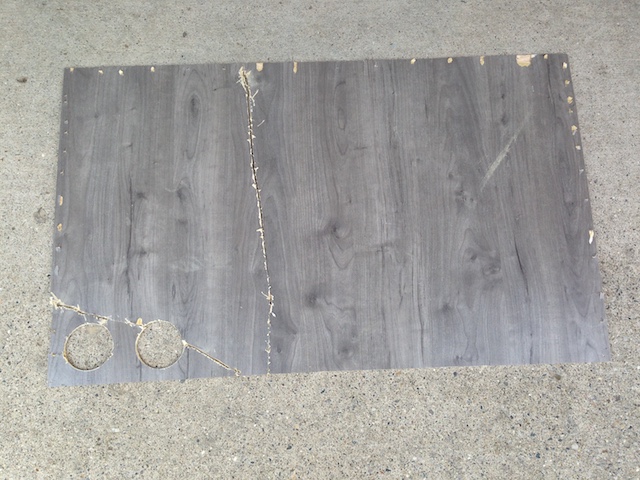 The original shelf measured 36" long and 21-31/32" wide (just under 22"). The original shelf had one hole for the black tank breather pipe and another hole had two water tubes that stick up. The staples were removed from the top of the front rail, where they had pulled through. The shelf had actually been attached to the bottom of the rear and side rails with no support under them. The front rail was glued and nailed back into place. The rear and side rails were glued and screwed back into place. The original position of the back and side rails is 1-1/16" higher than the front rail. 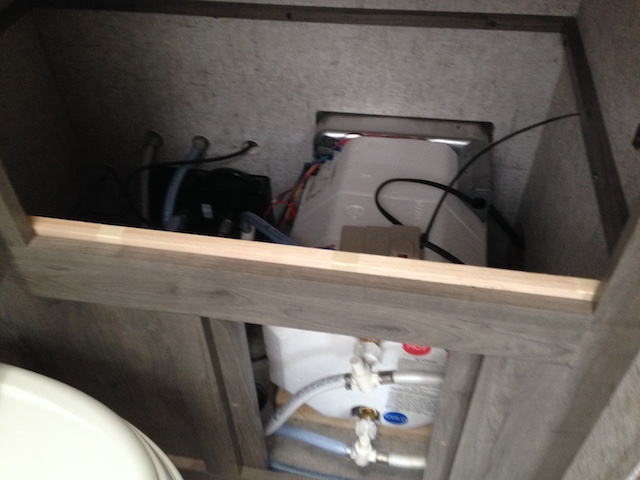 A piece of of hard balsa wood was used to create a 5/8" x 1-1/16" x 34-7/16" riser. That piece was laminated to the front rail to raise it. 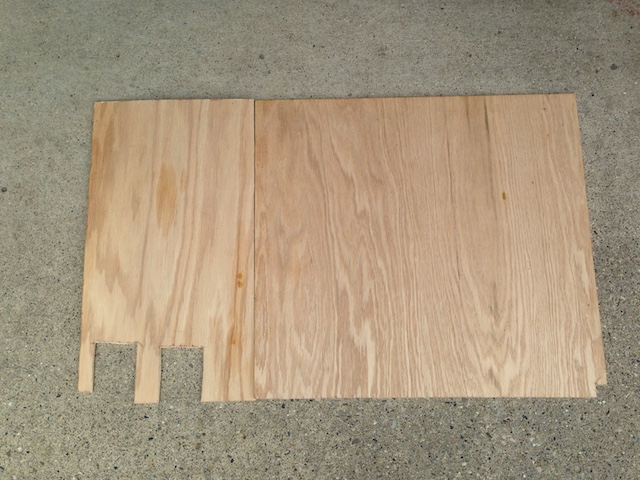 Two new shelf boards were cut from 1/4" x 2' x 2' real plywood that I had on hand. The new shelving was slid into place and it is not attached to anything. There is now an easy access to the water pump from inside the trailer. 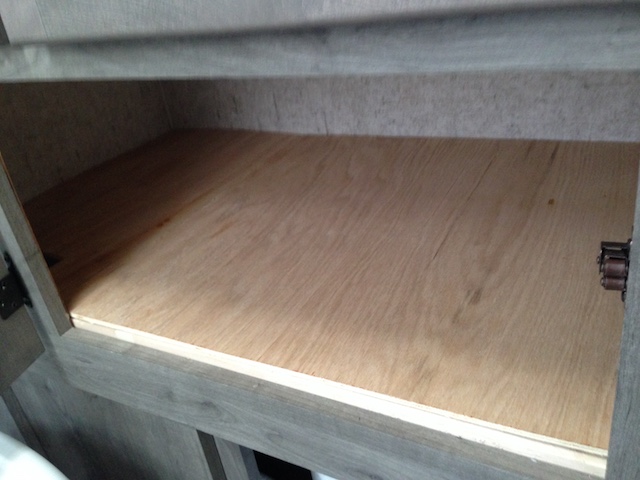
The city water was attached to the trailer and no leaks were detected in the repaired area. 08/20/19 A Small Bed "Fix" During our second camping trip, my wife mentioned that she thought that it felt like her head was going 'downhill', even though the trailer was perfectly level. 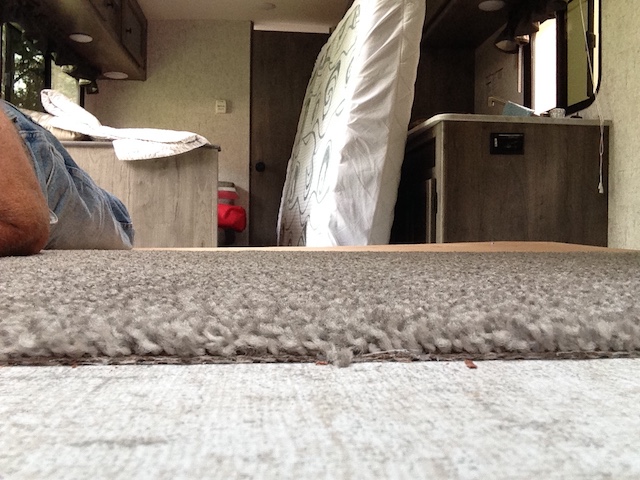
The height difference. The carpet makes about a 5/16" drop to the vinyl and plywood over the pass through at the head of the bed. 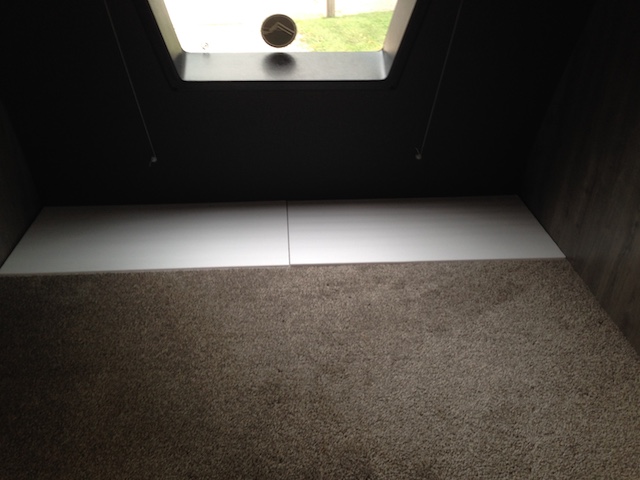
The foam board pieces in place. Four sheets of Dollar Tree foam board were cut into 14-3/4" x 30" strips to fit across the plywood at the head of the bed. The foam board pieces weighed 0.7 lb. The pieces are stacked two high, which makes their thickness just a bit higher than the height of the carpet. That allows for the foam board to compress some over time. 08/31/19 The Pass Through Door Frames 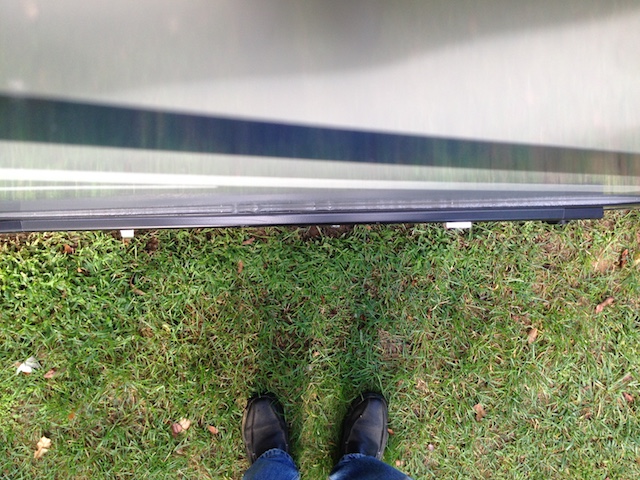
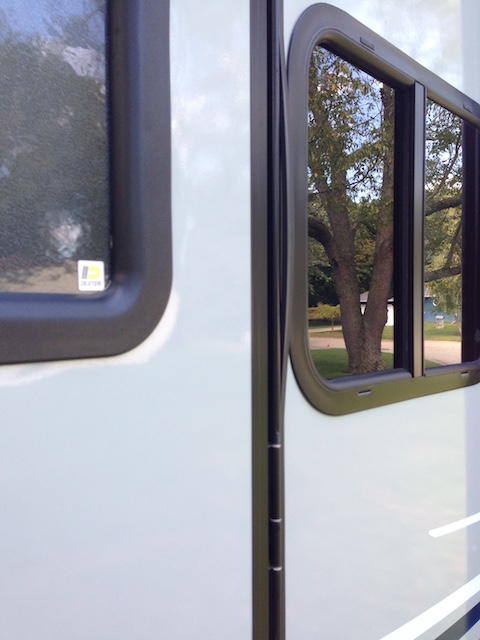
Camp side pass through door frame as seen from the top. The frames for the pass through storage doors do not fit the cutouts in the side walls of the trailer, like the kitchen window and the front, camp side bedroom window. 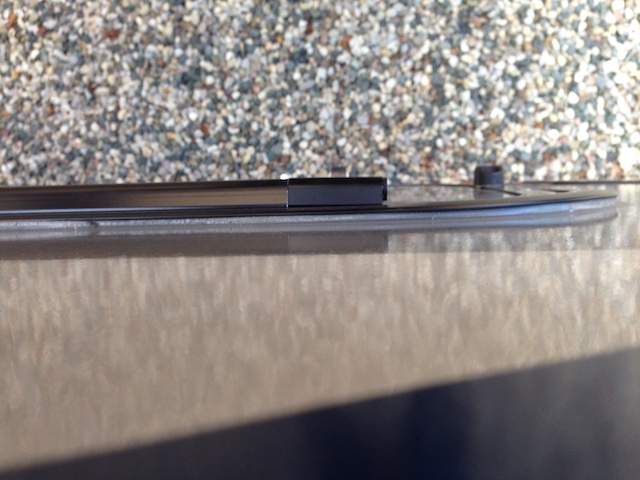
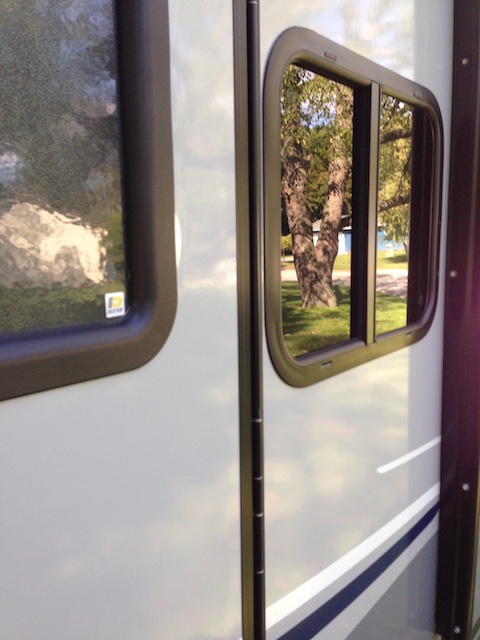
Driver side pass through door frame as seen from the top. 09/04/19 Data From the Tow to North Park Campground, Harbor Beach, MI The packed trailer weighed 3,684 lb. There was 96.8 lb. of food and beverages and 46.4 lb. of personal items in the trailer. No water was carried in the tanks. The tongue weight was 425 lb., or 11.5% of the total trailer weight. The 130 mile trip took 3 hours and 20 minutes (3.33 hours). There was one short stop in North Branch, MI. The average speed for the whole pull was 39 mph. During the whole drive we encountered winds of 15 plus mph. The Ascent did a great job of keeping the trailer behind us and pulling the trailer along at 55 mph when legally possible. The wind caused our gas milage to go down. The onboard computer noted 14.1 mpg, when we arrived. 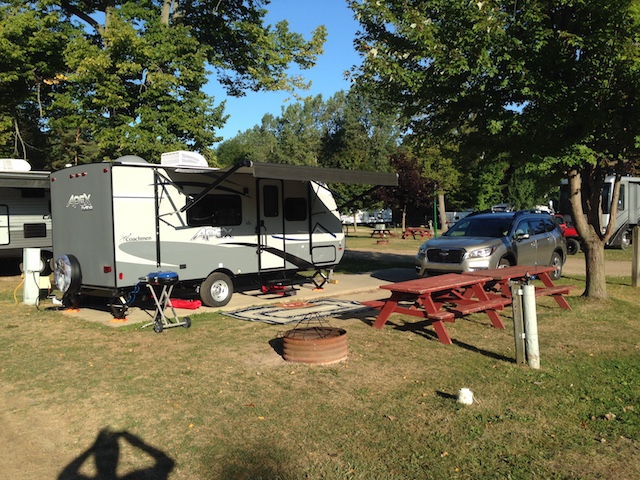 We got the trailer set up on a concrete pad. Set up went well and easily. 09/05/19 The Mattress & Furnace and the MPG Data The mattress is an RV queen size, which means that it is the same width as a typical queen size mattress, but it is a bit shorter. It is quite firm. (A subjective statement.) For us, it is just perfect. We both sleep very well on it. The temperature had dropped into the low 50s over night. When the furnace was turned on, it lit quickly. In just a few minutes, it rapidly took the chill out of the trailer. The Ascent was filled up with 9.259 gallons of gasoline. We had traveled 135 miles. 131.2 miles of that was pulling the trailer. The Ascent had averaged 14.5 mpg. 09/06/19 Finally, a Decent Table Lamp One of the big sales pitches for modern travel trailers is that they have interior LED lighting. The interior LED lighting is very bright, and useful at times, but not all of the time. For us, the LED lighting is too harsh for relaxing in the evening in the trailer. During this third camping trip, we tried only having the bathroom light on with the door shut. We did not find that way of the lighting the trailer, in the evening, satisfactory. At the Fort Gratiot Walmart, we purchased a small table lamp and another tension rod. 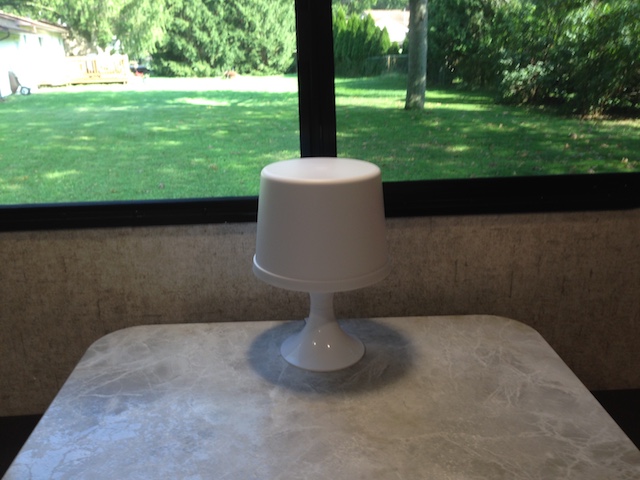 The lamp is a Mainstays 3.5 Watt LED Desk Lamp. Ours is white, but I can only find the pink one on the Walmart Website. The entire lamp is some type of plastic with the bulb inside. We tried the table lamp, and it was just what we were looking for. It worked out perfectly. The new tension rod was put up lengthwise, across the front of the shower to be used as a towel rack. That worked out well too. 09/08/19 Notes From Our Third Camping Trip and Synopsis of All Three Camping Trips With This Trailer The non-stop trip home took about 3 hours and covered 129.8 miles towing the trailer for an average of 43.3 mph. The total miles, including the milage to the gas station in Harbor Beach and the BP station for the fill up here in Walled Lake was 134 miles. The fill up took 9.039 gallons for an average of 14.8 mpg pulling the trailer. It was extremely windy, 15 plus mph, for most of the trip home. The Ascent handled the tow very well. There was no noticeable sway and I was comfortable driving at all times on the two-lane highways. There was no freeway driving during the trip, so speeds never exceeded 55 mph. There were no trailer "issues" that needed taking care of during this trip, except that the refrigerator seems to be too cold and sometimes freezes items with it set to the highest Warmer level. Ice cream and foods in the freezer stay frozen well. 5 gallons, 42 lb., of water was added to the black tank for towing home to try and get the tongue weight down some. 1st Trip July 22 - 24 to Groveland Oaks County Park
2nd Trip August 12 - 17 to Covert, MI KOA Near South Haven, MI
3rd Trip September 5 - 8 to North Park Campground, Harbor Beach, MI
All three trips could be considered flatland towing, even though there were a lot of "hills" and curves going up and down, there was no signage indicating significant grades.
The Ascent handled the trailer well in some pretty good wind and no sway was ever noted, although I could feel the Ascent "working" to keep the trailer trailer straight, my wife didn't notice anything. I believe that my feel was feedback through the steering wheel and just being aware of all of the little movements. The "feel" wasn't much, but I was aware of it, but it never bothered me and I felt confident at all times.
09/10/19 Awning Lubrication & Shower Pan Re-caulking
The awning bolts were lubricated with BLASTER brand INDUSTRIAL STRENGTH SILICONE LUBRICANT with Teflon. The stabilizer jacks were lubricated again with silicone spray lubricant, even though they worked well during our last camping trip. I had lubricated them before we went.
A complete inventory, of what is in the trailer, was created and the items' locations were noted.
The shower pan and its seals were inspected. I noticed that the corner of the shower pan, by the sink, presses down and opens a crack in the rear seal of the shower pan between the pan and the wall. The crack was sealed with a first coat of white bathtub caulk.
Tools and other items that might be used before spring and items that probably would not do well in the cold were brought into the house.
09/11/19 Second Coat of Caulk on Rear, Cabinet Side of Shower Pan
A second coat of white bathroom caulk was placed on the right rear of the shower pan and extended along the wall to the end of the shower pan.
I am thinking again about adding a porcelain toilet to add more weight to the back of the trailer, but that would reduce the cargo carrying capacity more.
09/18/19 Moving the AC Receptical Under the Rear Bench
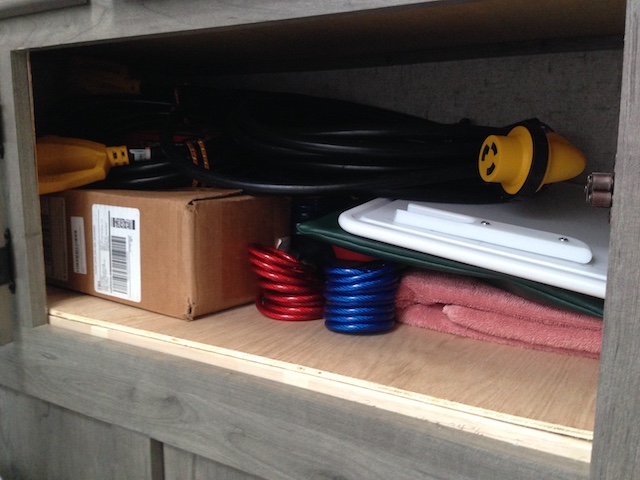
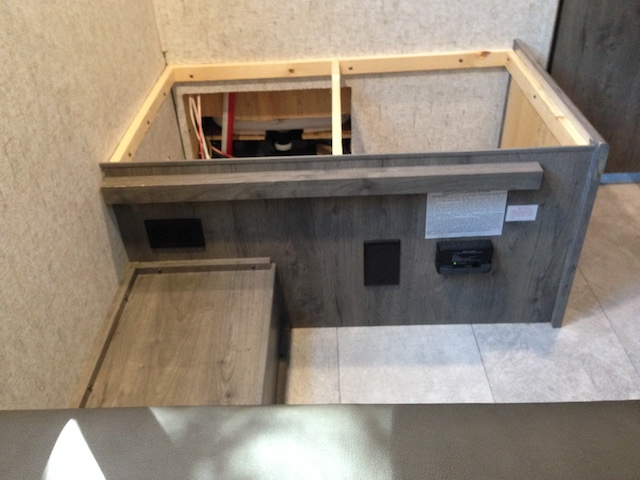
The position of the AC outlet in the rear bench was a problem. It was awkward to reach the receptical to plug anything in and a cord, plugged into the outlet, interfered with the legs of the person sitting on the rear bench seat.
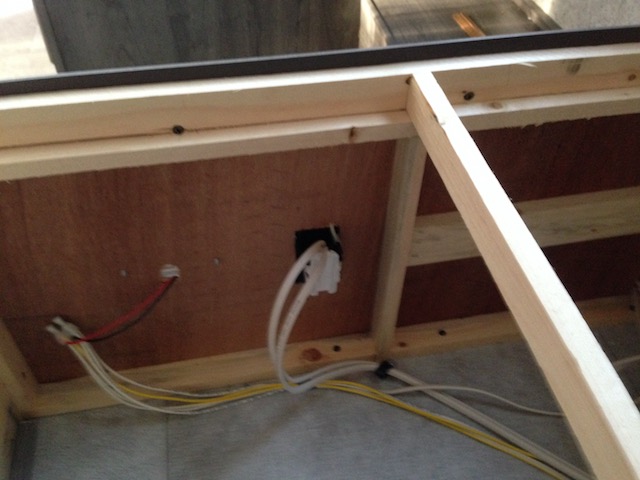
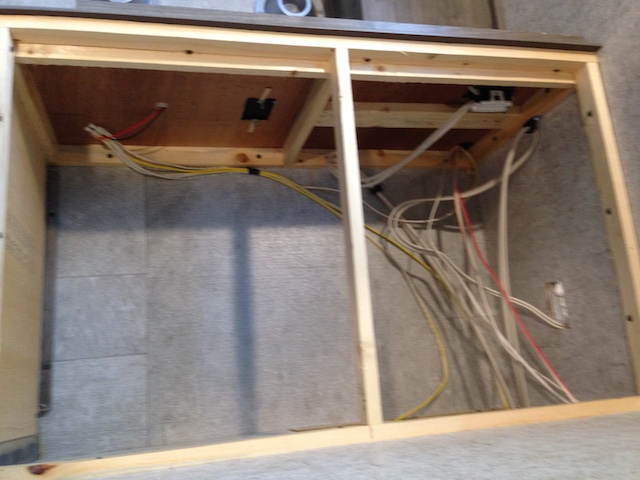
There was enough wire on the plug to move it to a position over the wheel well and out of the way, if the plug was rotated to the horizontal position.
A paper template was made for the new location. A jig saw was used to cut the horizontal cuts and a Dremel to cut the vertical lines for the new AC outlet hole position over the wheel well.
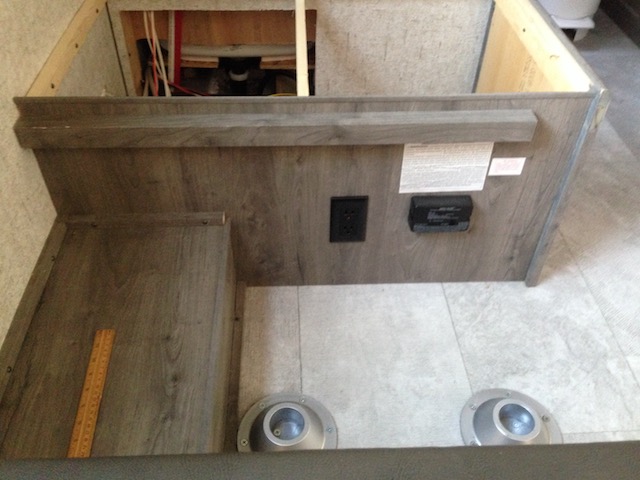
The AC outlet receptical was moved to its new position and screwed in. The original AC outlet hole was covered with a blank cover plate.
It is much easier to plug anything into the outlet now and there is no cord interference for the legs of the person, or persons, sitting on the rear bench.
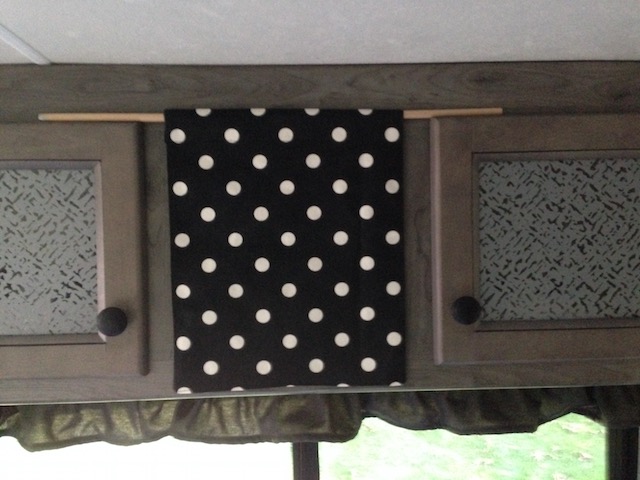
09/19/19 Blocking the Light Emitted by the Clock and Radio Combination
Both the radio and clock combination and the microwave emit light.
My wife prefers to have it dark when trying to return to sleeping after a late night/early morning visit to the bathroom. She found the light from the clock and radio combination particularly annoying.
To solve this problem for US, WE decided to sew a wrap of material around a dowel rod and place the dowel rod on top of the upper cabinet doors over the dinette. It works perfectly, and since we do not open the doors when we are sleeping, or getting up during the night, it should not be a problem.
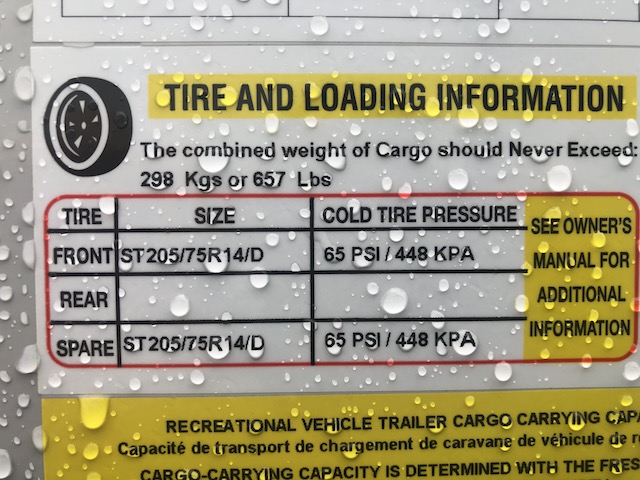
09/19/19 More On the Tires and the True Cargo Carrying Capacity
The following is information that is actually embossed on the tire. The embossed information is shown in italics.
Brand: Lionshead CASTLE ROCK ST RADIAL ST226
MADE IN CHINA MLR11
SPEED RATING "L" (75MPH/ 120KM/H MAX)
Therefore the tires on the 187RB, together, can carry a load of 4080 lb. (4038 lb.) at 65 psi.
The informational sticker on the A-frame of trailer notes, "Dry Weight: 3100 LBS"
The top informational sticker on the front driver side notes:
The middle informational sticker on the front driver side notes:
The bottom informational sticker on the front driver side notes:
Note:
What is the TRUE Cargo Carrying Capacity of this trailer?
The simple method, the method used on the Coachmen Website, indicates an incorrect answer.
The propane tank needs to be filled - ~20 lb. (The propane tank itself was delivered with the trailer and is part of its dry weight.)
Coachmen's 700 lb. (simple method) - 126 lb. equals 574 lb. for everything else going into the trailer, but...
Today's weight for just the trailer, and the stuff that "lives" in the trailer, is 3552.2 lb.
For the first camping trip the food, beverages and personal items totaled 162 lb., the second 212 lb. and the third 143 lb. It looks like we were close to the maximum on the 2nd trip.
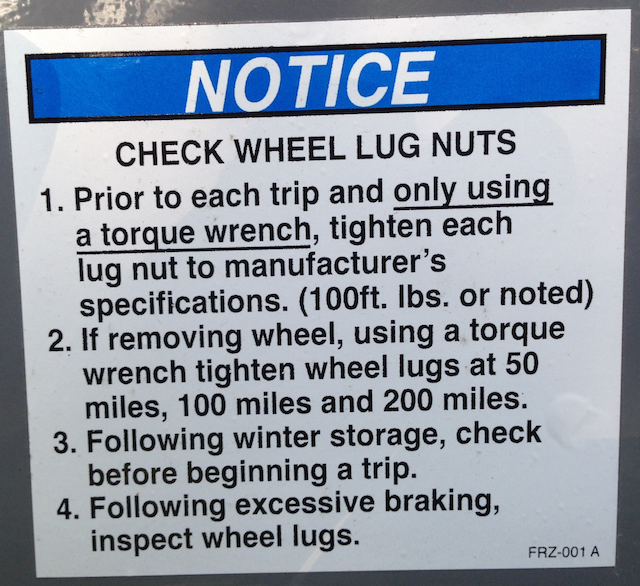
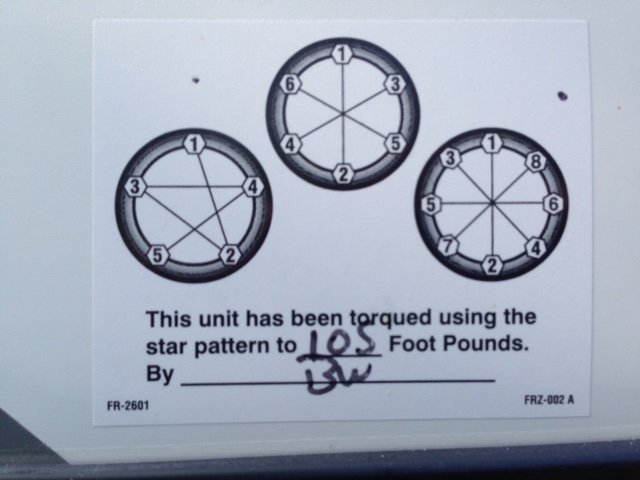
These are the two stickers on the trailer that give information about the tightness of the lug nuts. The informational sticker over the camp side wheel well notes that a torque wrench is a required tool.
09/21/19 More on Frame Rust
The frame was produced by Lippert Chassis Group.
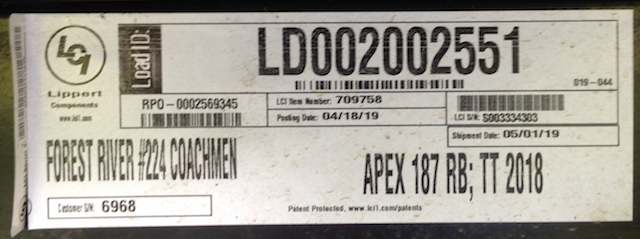
This is Lippert's informational sticker on the frame. A date on the sticker states 04/18/19 but it wasn't shipped until 05/01/19 and the trailer was built on 05/07/19, which is 13 months later. The customer ID is noted as 6968, which I found odd, as shown later, because the number on the "A" frame is clearly 6967.
In a video on YouTube, I noted several instances where there was rust on the frame components.
I did a more through inspection of just the top of the "A" frame and found some things that I'd originally missed, as well as more rust.
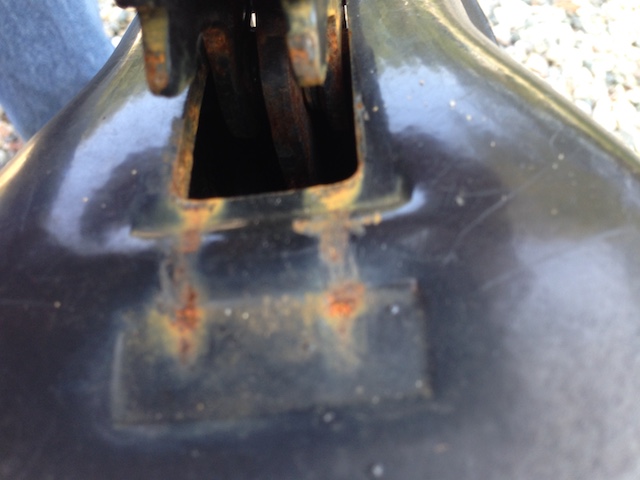
The "A" frame is welded to the front of the frame and has the battery box rails, LP tank holder, tongue jack holder and hitch lock plate welded to it.
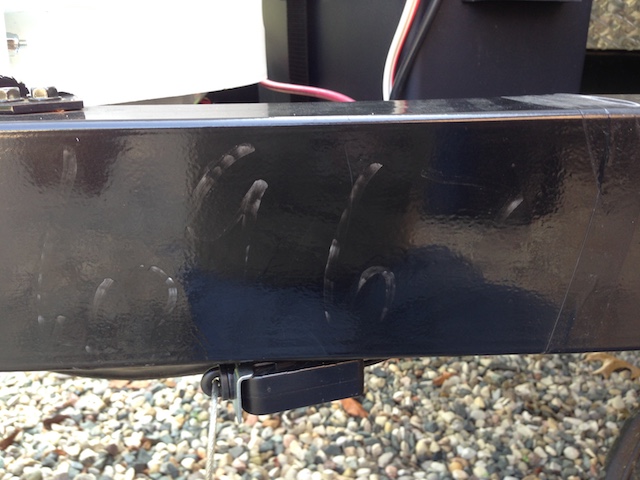
On both the driver side and camp side outside of the "A" frame rails, the number 6967 is visible, or at least part of it is. The numbers do NOT wash off. When I run my figure over the digits, they feel somewhat raised and they are, maybe, under some kind of paint or coating.
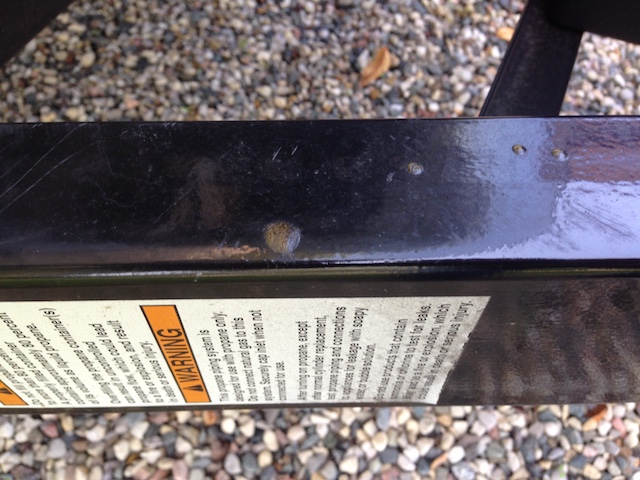
There are some very strange bumps on the top of both sides of the "A" frame rails. I cannot determine if they are drips, or blobs, from welds or possibly something else.
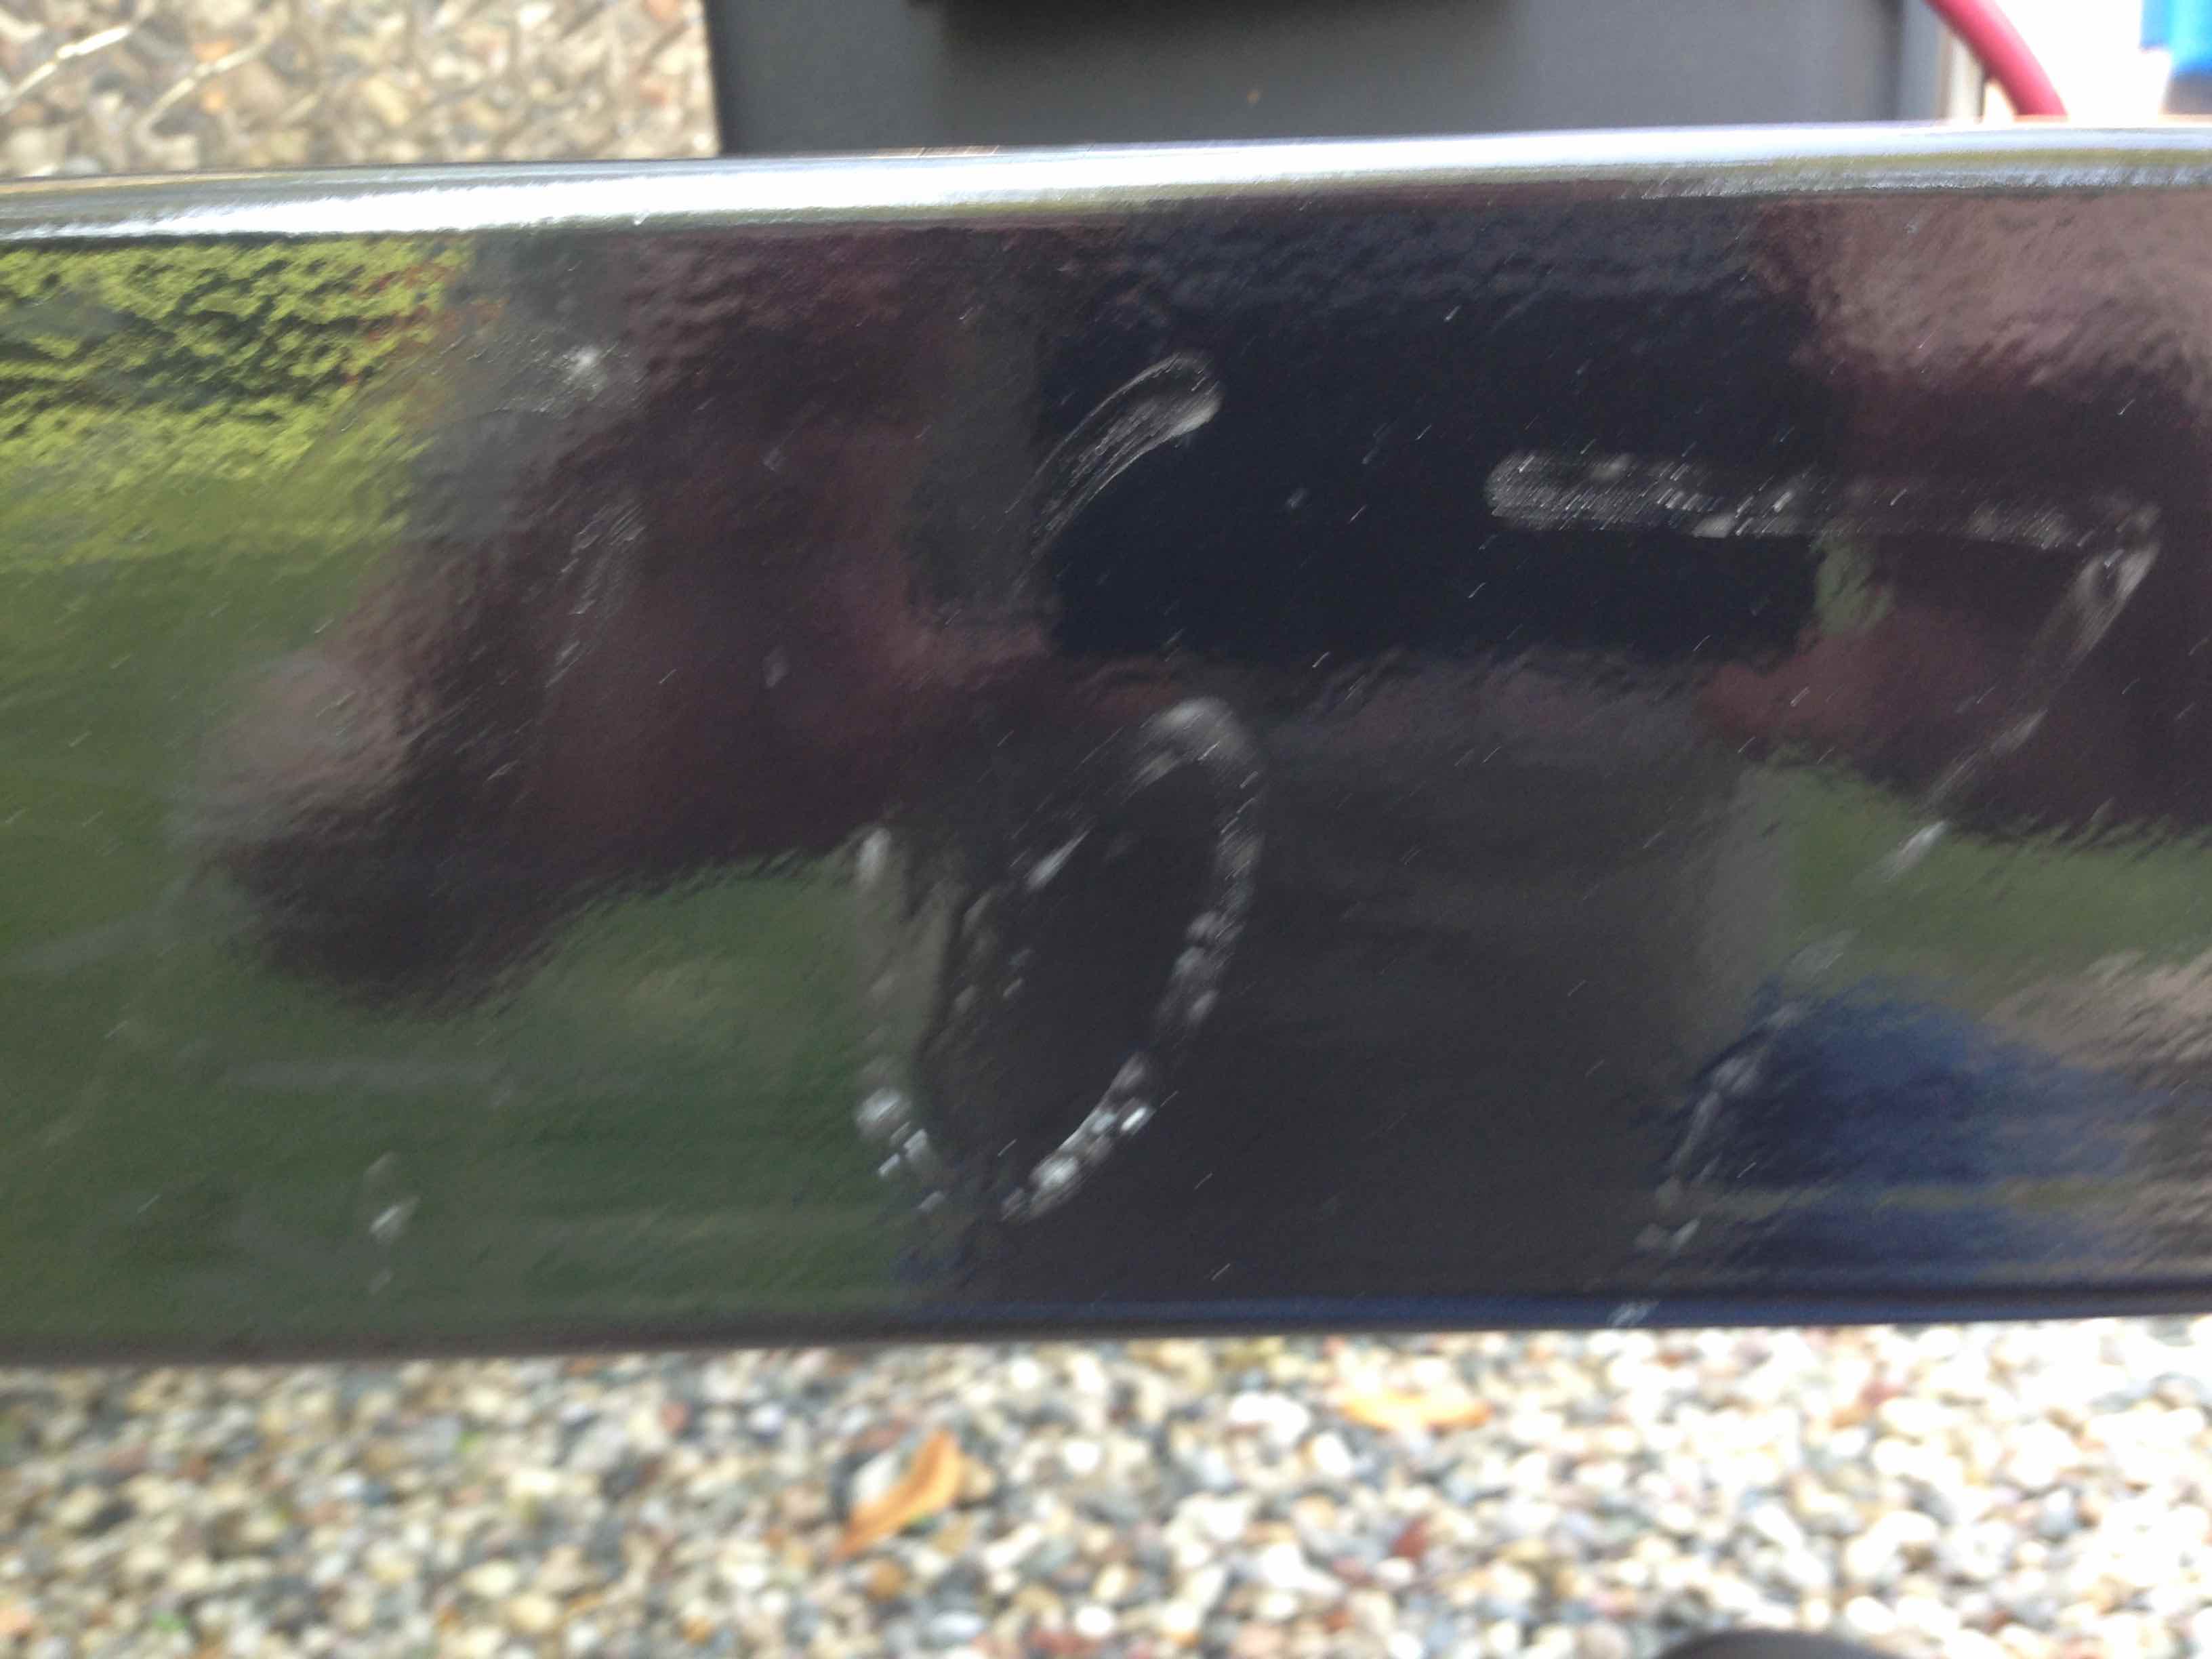
This photo shows the bumps on the camp side towards the rear of the "A" frame. What appears to be black paint overspray is on the sticker. There are also scratches that can be seen to the far left, and there is nothing on the trailer that could scratch there.
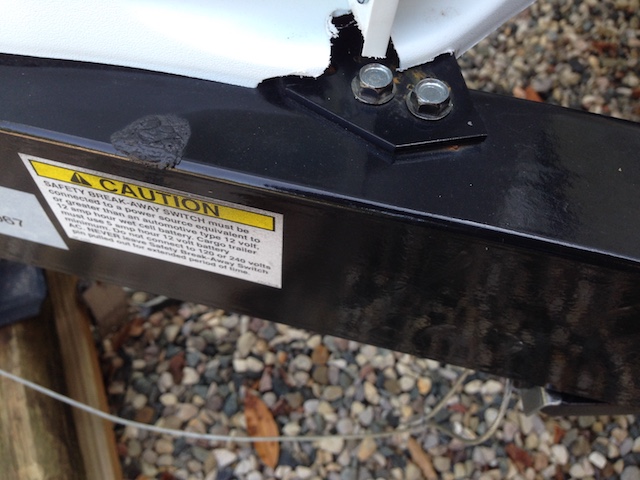
The bottom photo shows the bump with what appears to be black paint overspray along the top of the sticker and rust on the LP tank bracket near the bolts. I did not remove the LP tank cover to look at the other side yet, but I imagine there is also rust on the other side of the LP tank bracket as well.
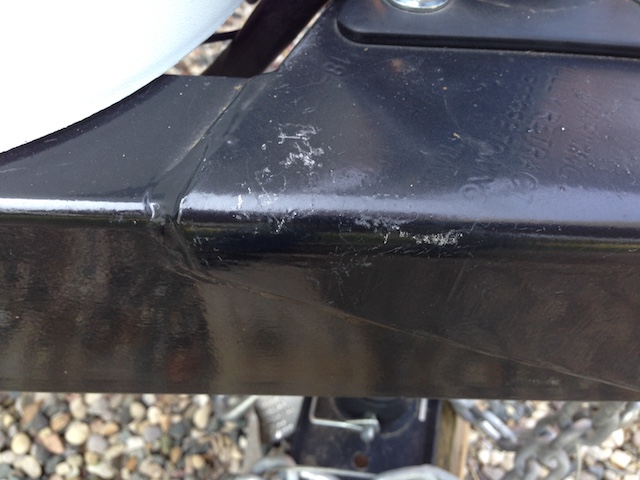
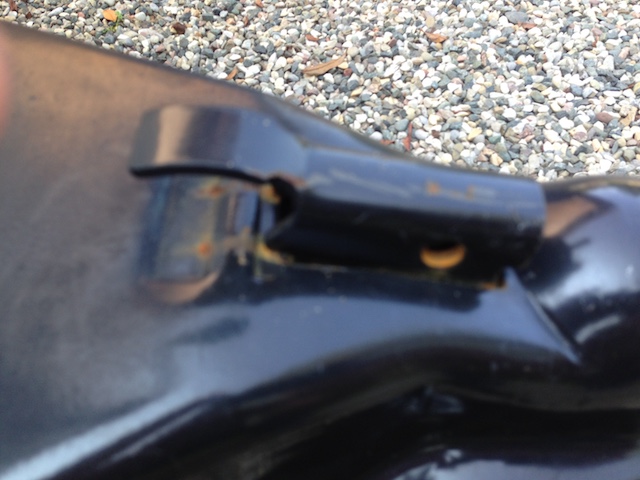
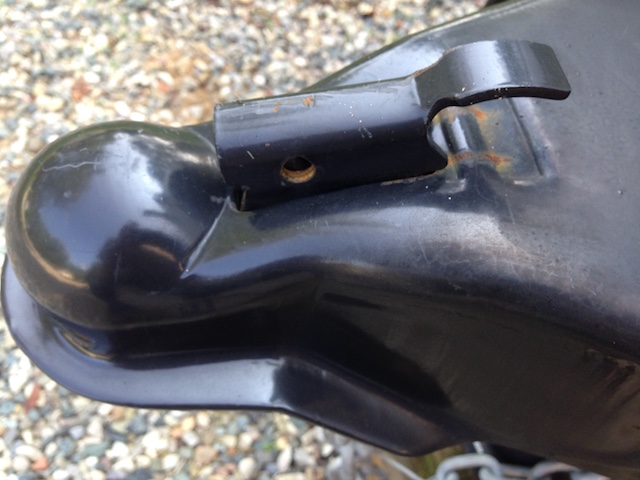
There was "missing" paint on the bracket that holds the tongue jack bracket and hitch lock plate. There is nothing on the trailer could have rubbed on these areas where the "missing" paint is located.
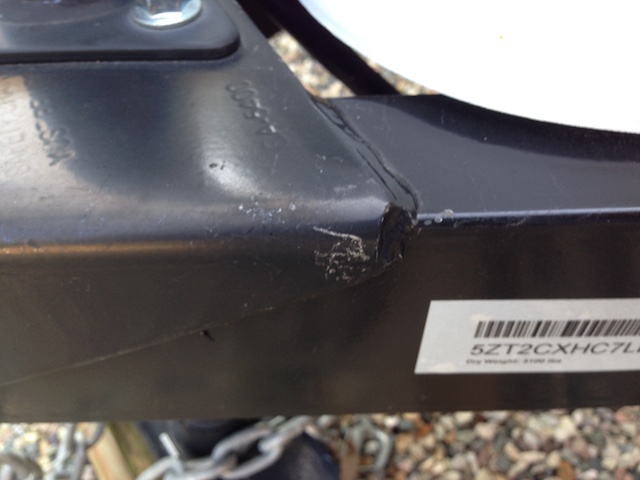
There is a lot of rust around the tongue lock mechanism.
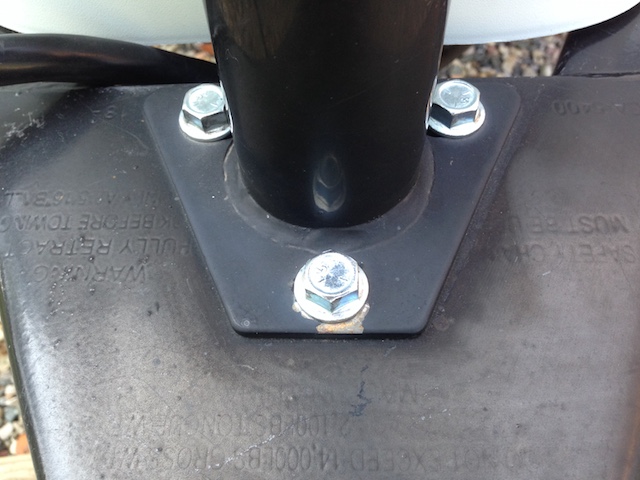
The tongue jack plate has rust on it.
09/24/19 Winterizing the Water System
The broken shelf in the lower bathroom cabinet allowed for clarification of the water system plumbing for winterizing purposes when part of the replacement shelf was removed.
The Coachmen manual shows the bypass system using three (3) two-way valves. THIS IS NOT WHAT IS USED ON THE 2020 APEX NANO 187RB.
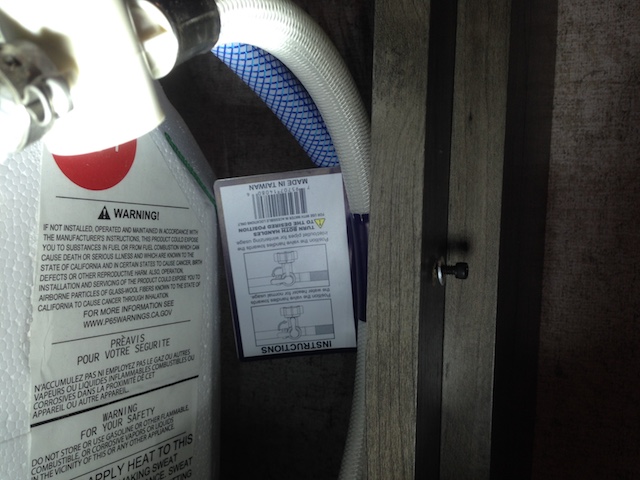
Tucked into the far right corner of the water heater access area, where it can't really be seen, is a tag attached to a water line with tape. It really cannot be read, or even noticed, in that position. It is even taped on upside down.
The tag was removed and scanned.
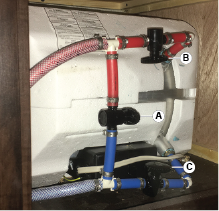
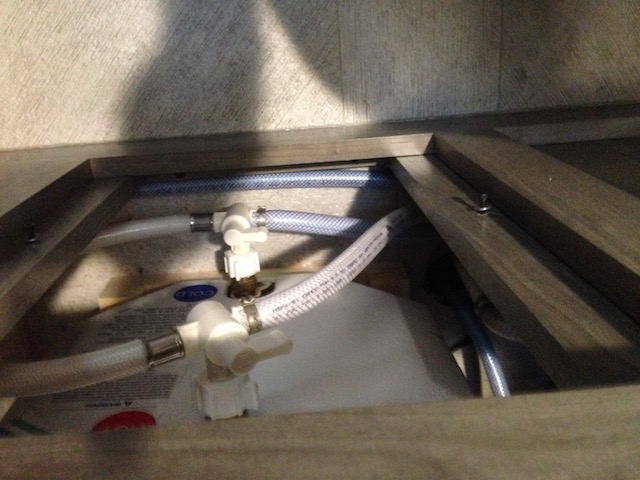
The tag, and visual inspection, showed that this unit uses two (2) three-way valves to bypass the water heater.
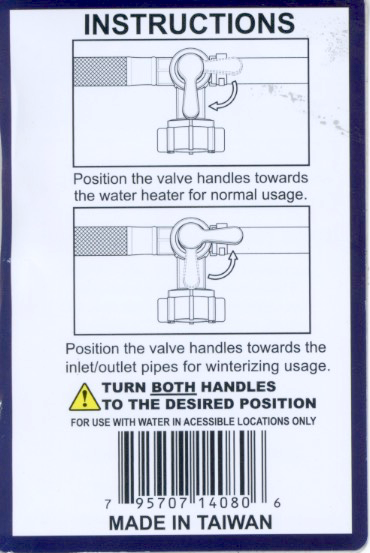
How to use this type of bypass is described on the Instructions' tag.
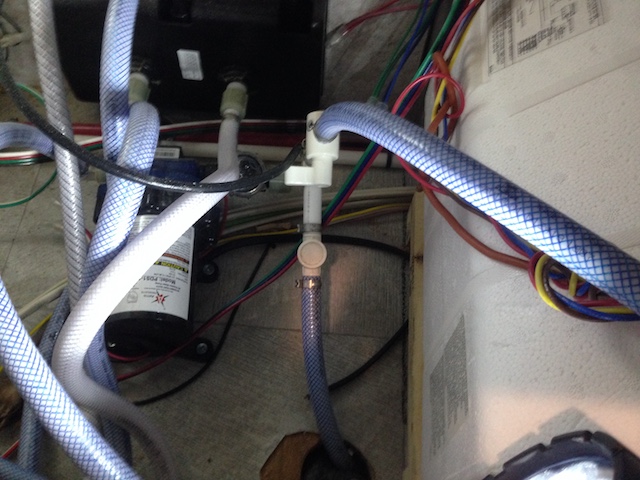
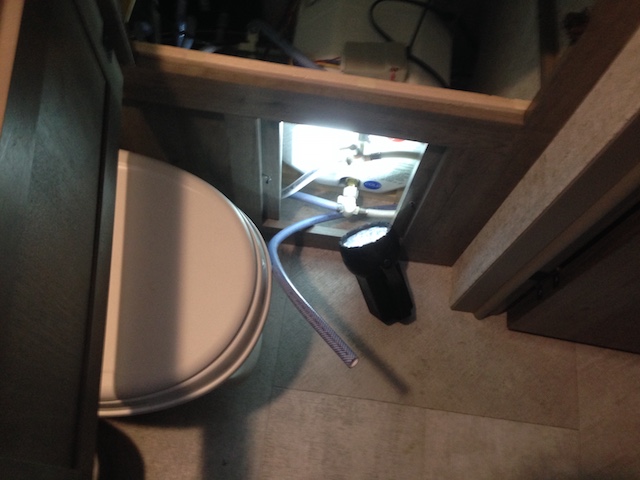
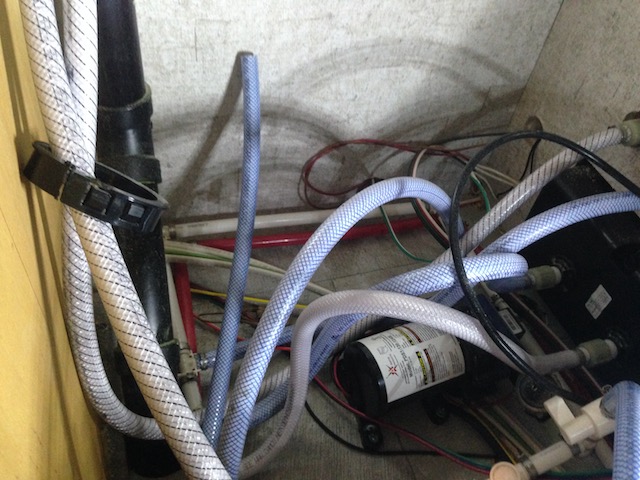
During the visual inspection, it was discovered that the pump has a 2-way valve and an unconnected water line connected to it so that the valve can be turned and then the pump can pump RV antifreeze directly from a gallon jug using the unconnected water line.
The unconnected water line is the one on the floor in water heater access compartment that is closest to the access panel opening.
The unconnected water line can be pulled through the access panel opening and inserted into the jug of RV antifreeze. The antifreeze can then be pumped through the water system using the water pump.
During the walk through of this trailer at Haylett RV, Norm was asked directly about pumping antifreeze through the system for winterizing. His answer was vague, at best, and he did not point out the unconnected water line that is attached to the pump.
Finding this pump and winterizing set up already onboard the trailer negates my recommendation number 14 in the video, as Coachmen already has it set up.
The Actual, Physical Winterizing of the Water System
First, the two 3-way valves, on the back of the water heater, were set to their winterizing positions. (See Instruction tag)
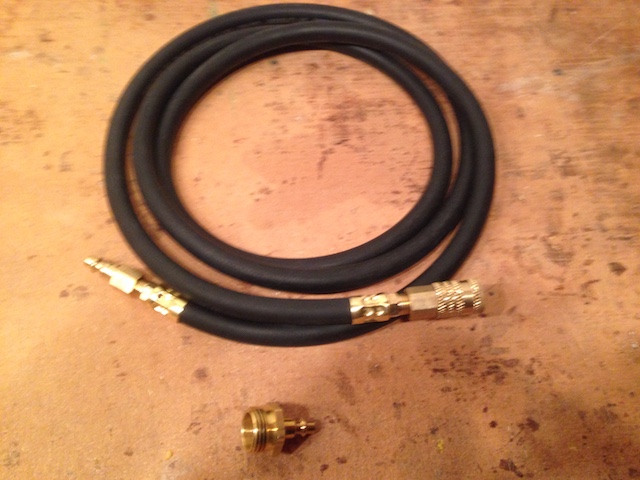
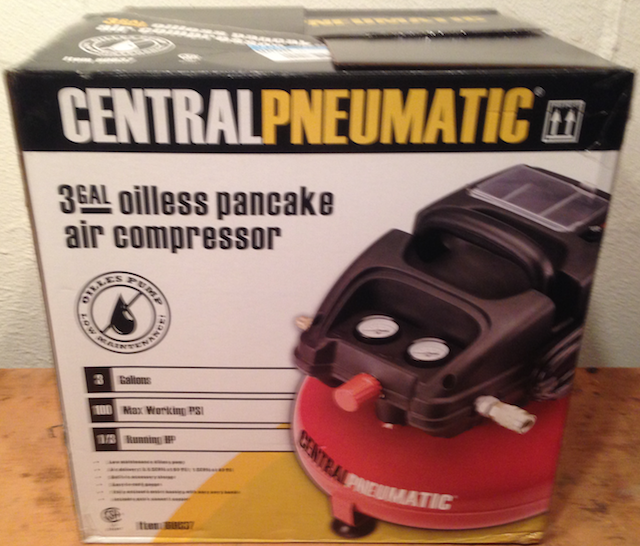
The air hose fittings, 1 male and 1 female 1/4" quick connect, were attached to the air hose for the CENTRAL PNEUMATIC® 3 Gal. 1/3 Hp 100 Psi Oil-Free Pancake Air Compressor, item number 60637. The Quick Start Guide and User Manual are found online and packed with the compressor. All of those items were purchased from Harbor Freight.
The compressor was broken in using the manual's directions on page 7.The regulator valve and drain valve were opened. The Sioux Chief tomahawk Brass Garden Hose Blow Out Fitting (937-95301001), purchased at Menards and found in the plumbing department, was fitted to the hose to allow the air to flow during the break-in.
Winterization and De-winterization per Coachmen
Information from that page indicated that the air pressure should be set to no greater than 30 PSI.
The inside access panel to the water heater was removed and the two valves attached to the back of the water heater were moved to the pass through, winterizing, position.
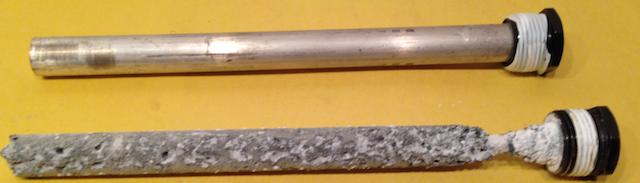
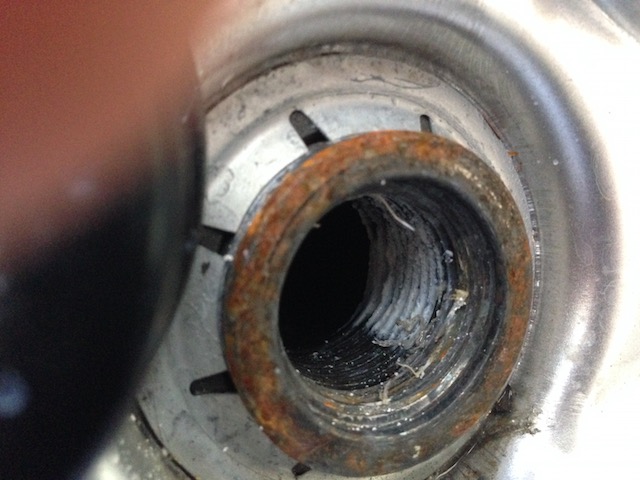
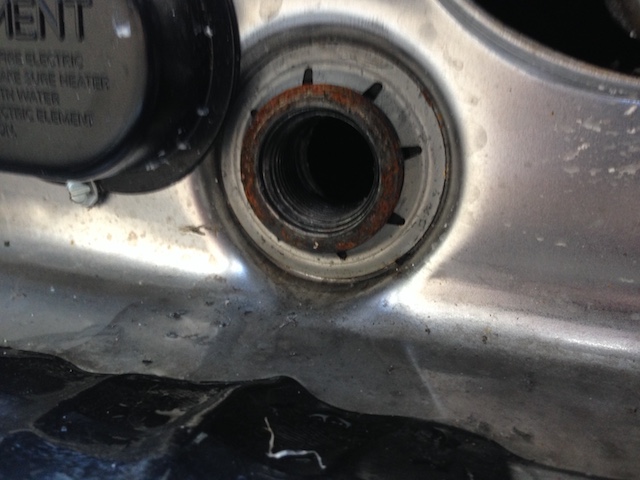
The water heater pressure release valve was moved to the open position. A 1-1/16" socket was used to remove the water heater plug and anode combination. The plug was screwed in very tightly and was hard to get started.
Even through a lot of the anode was still there, it didn't look good near the plug. I noted rust on the screw head of the anode and plug combination and the hole that the plug screws in to.
The Suburban water heater manual states that water should not be left in the water heater for prolonged periods of time. Water was in the water heater from the middle of May until the end of September. This was never discussed during the walk through at Haylett RV.
While the water heater was draining, the low point caps were removed so the water could drain directly onto the rear, driver side scissor jack, as the low point drains emptied. The cap for the black and gray tanks was removed and the handles opened to drain them. The cap was removed from the fresh water tank to drain it.
The shower faucets, bathroom sink faucet and kitchen sink faucets were opened, as well as the outside shower faucets. The outside shower compartment was wiped out, as it was full of sand and road dust.
A small, flat tipped screwdriver was used to remove the washer and screen combo from the City Water inlet.
The compressor was moved into position and plugged in. The brass blow out fitting was screwed into the City Water inlet on the trailer.
The compressor was allowed to fill its air tank and then the pressure going into the trailer was adjusted to 25 psi. Quite a bit of water blew out of all of the open lines. The toilet pedal was held down while the compressor was working. After a few minutes the pressure was down on the compressor tank, so it was allowed to run to, with the outlet valve closed, fill the tank again. The compressor was set to 25 psi and the lines blown out again with the toilet foot pedal depressed.
Another run was made with all of the inside and outside faucets closed, but with the low point drains open. More water came of the low point drains onto the scissors jack. Another run was made with only the low point drains open after the pressure built up in the tank again.
Getting the exterior shower hose and head back into its compartment was difficult. Wrapping the hose around the faucets tended to turn them on. This will be something to check in the spring.
The blow out fitting was removed from the City Water inlet and placed into the Black Tank Flush inlet. The washer with screen was returned to the City Water inlet.
The compressor was used to blow out the black tank.
While the compressor was refilling its air tank for another blow on the black tank, the fresh water and low point drain plugs were hand tightened back into their respective places. The water heater door was temporarily put back in place, until the new anode rod arrived.
Two cups of RV antifreeze, purchased at Menards, was placed into the shower drain, bathroom sink drain, and both sides of the kitchen drain, even though they drain to the same trap. Two cups of RV antifreeze was also put into the black tank with a 1/2 cup added to the toilet to sit on top of the seal.
The gray and black tank valves were closed and the cap put back on the system.
The rear, driver side scissor jack was dried, from the low point drains draining on it, and then lubricated with silicone spray.
The water heater bypass values were returned to their normal position, per the Instruction sheet.
The water heater access door panel was screwed back into place.
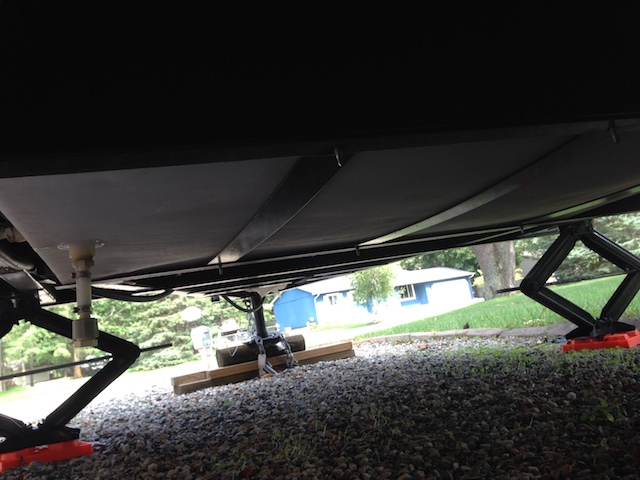
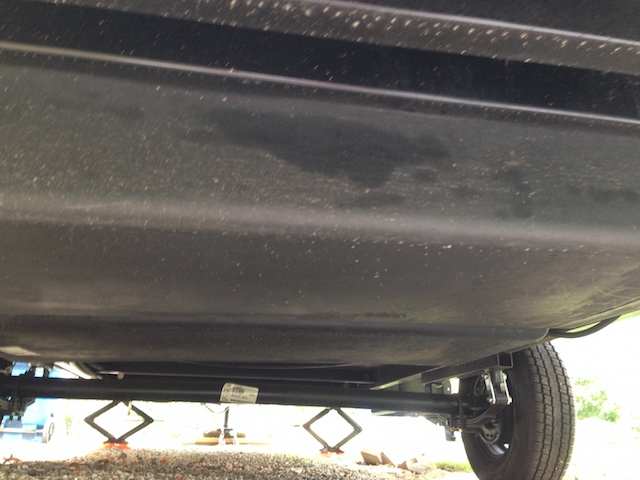
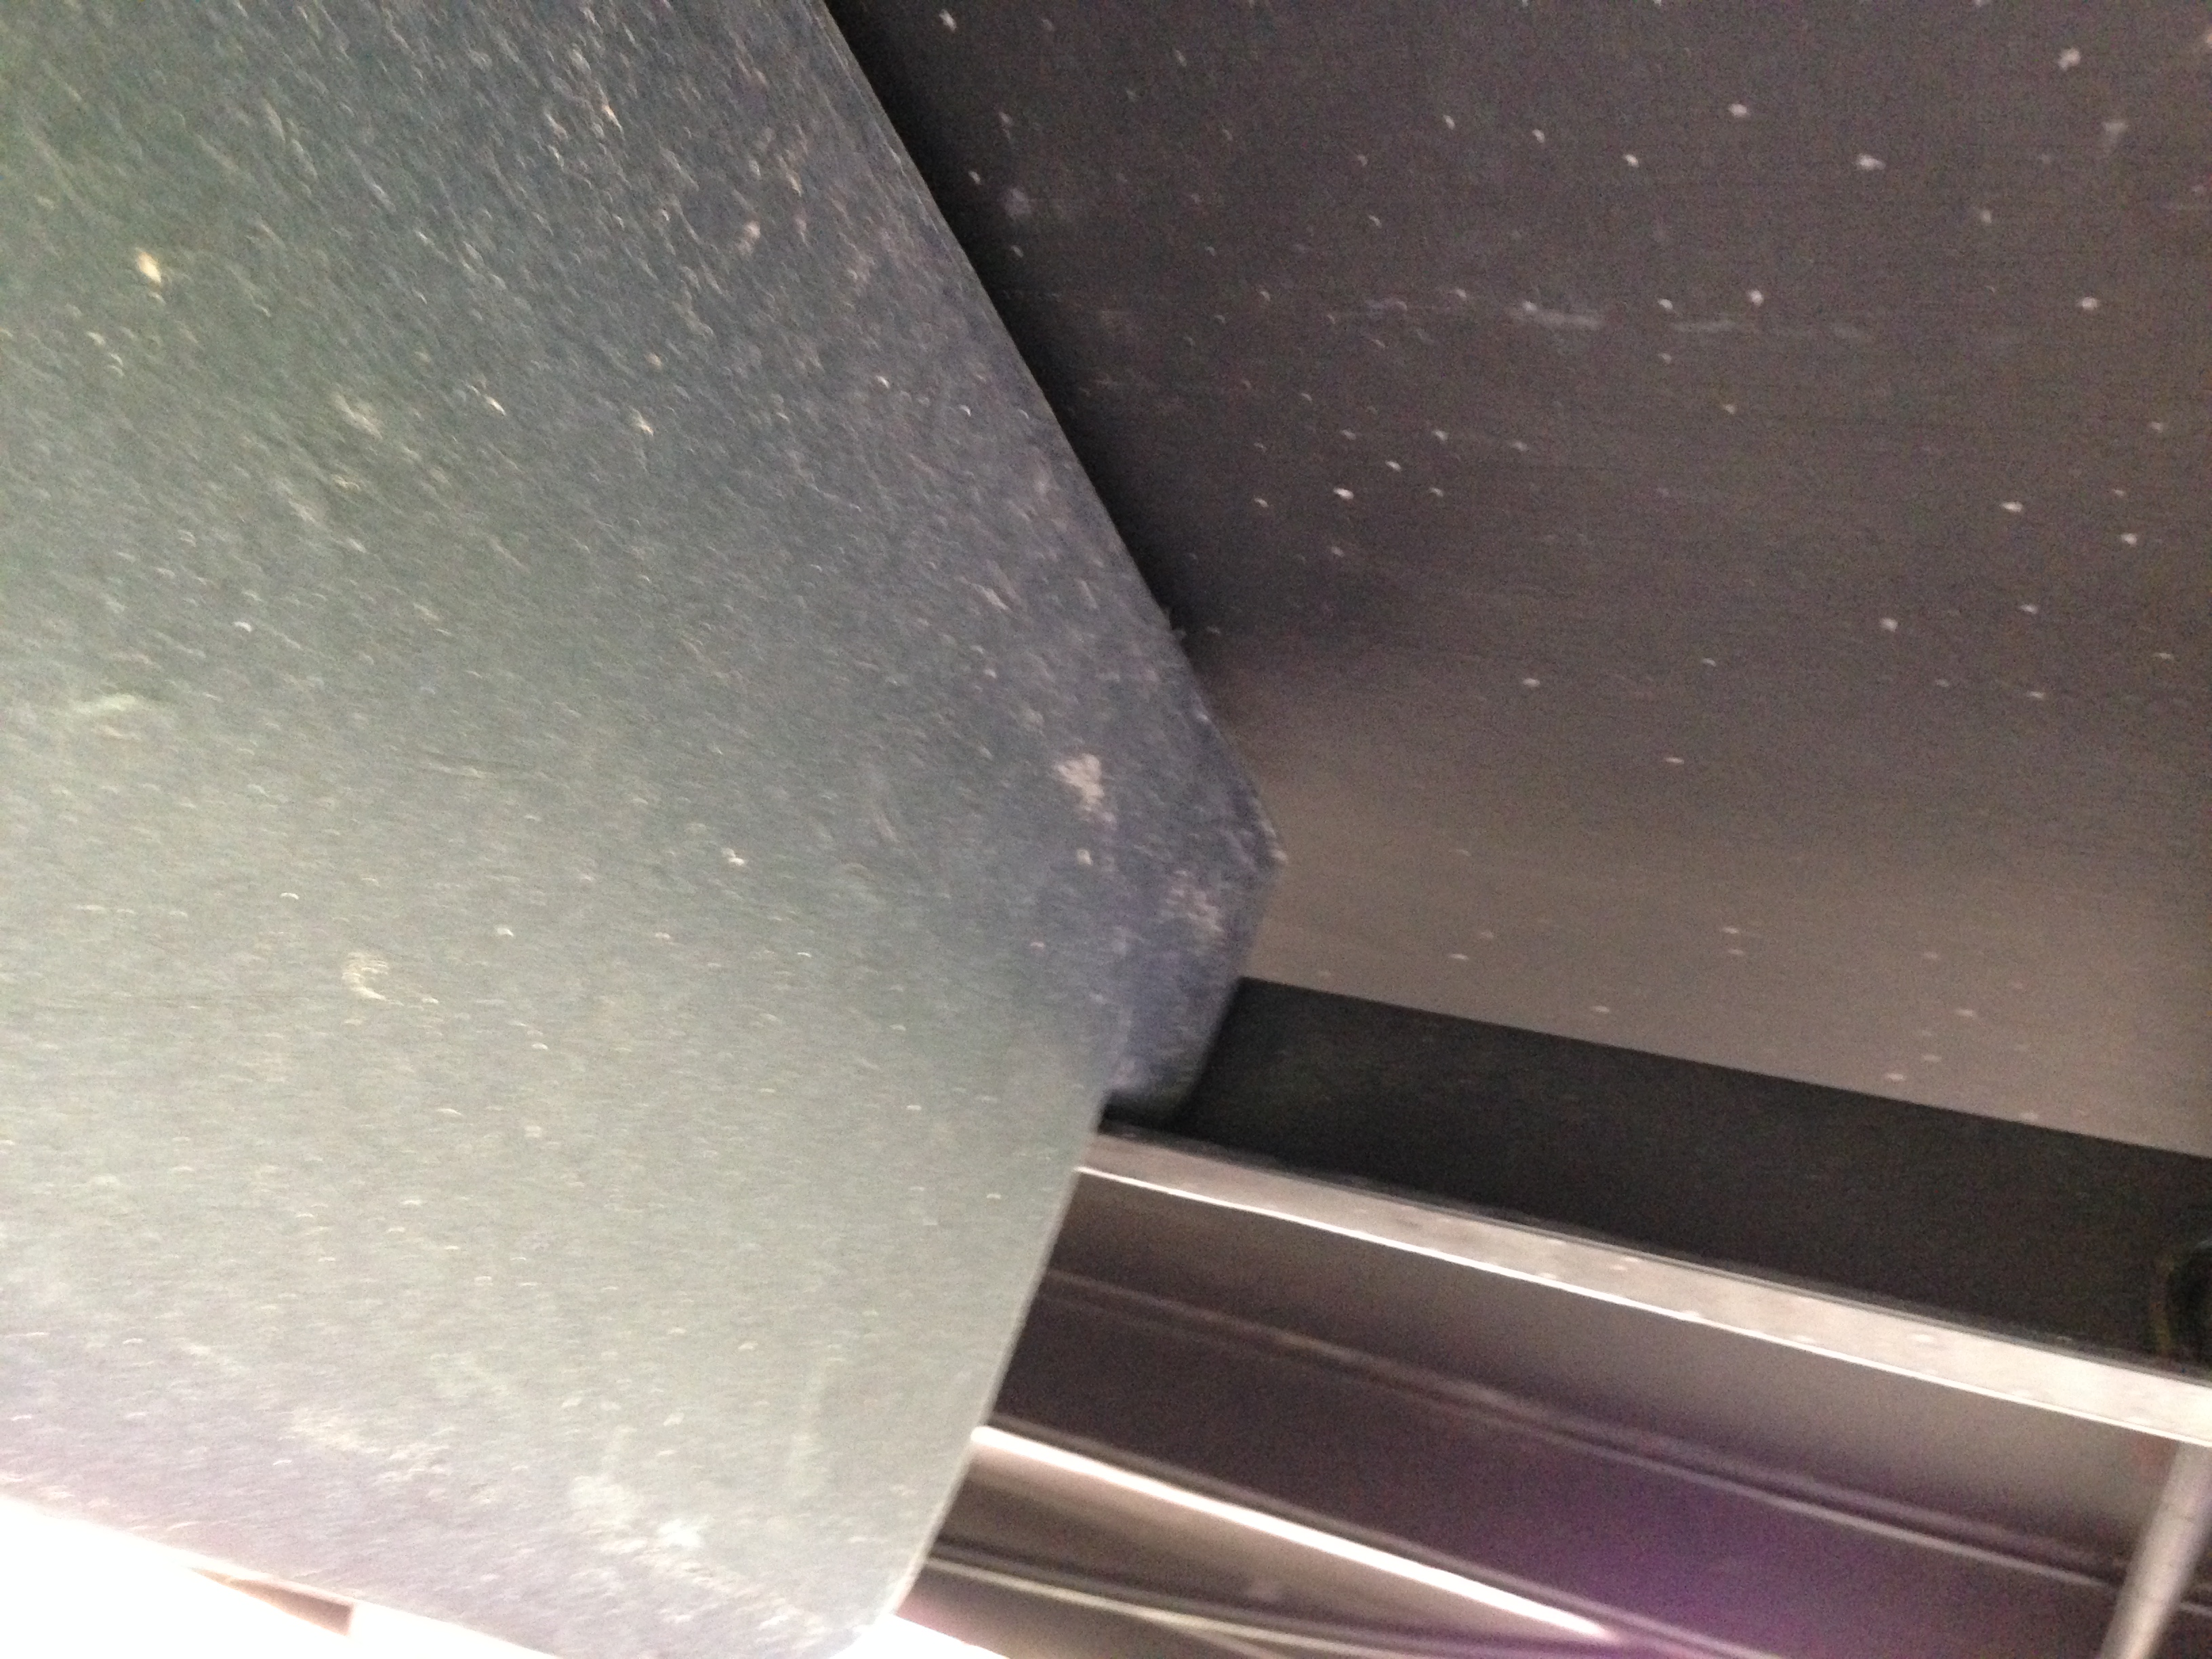
09/25/19 Under the trailer photos
An under the trailer inspection was performed today to check the tightness of the nuts and bolts on the spring hangers and axles, and to note whether or not all of the tanks are strapped, and to check for rust.
All of the bolts on the spring hangers and axle appeared tight, but I did not check them with a wrench yet.
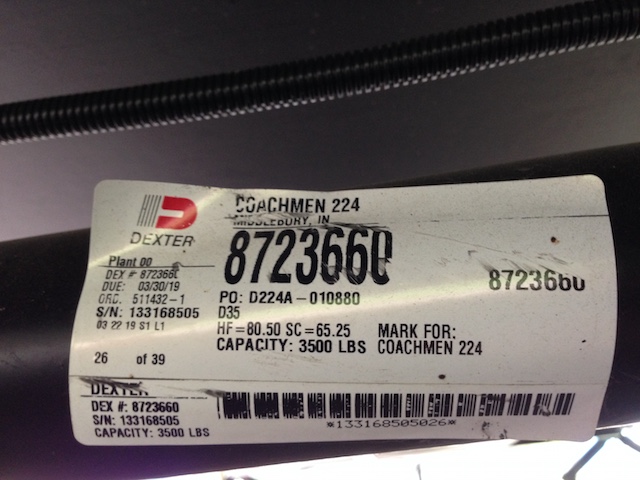
A photo of the Dexter sticker on the axle shows a date of 03/30/19, which appears as the due date. It is a 3500 lb. axle, as previously noted.
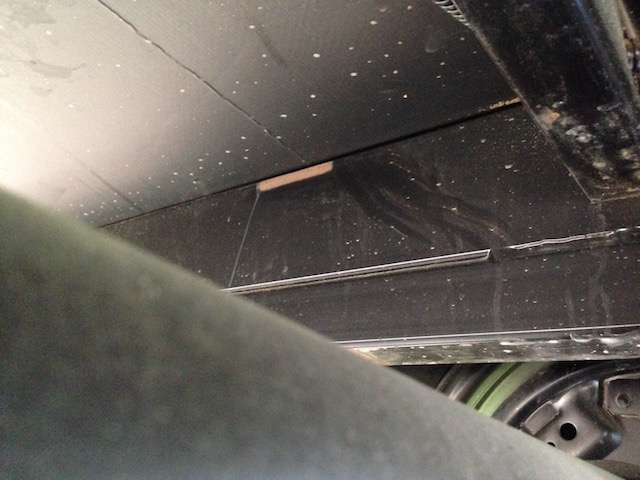
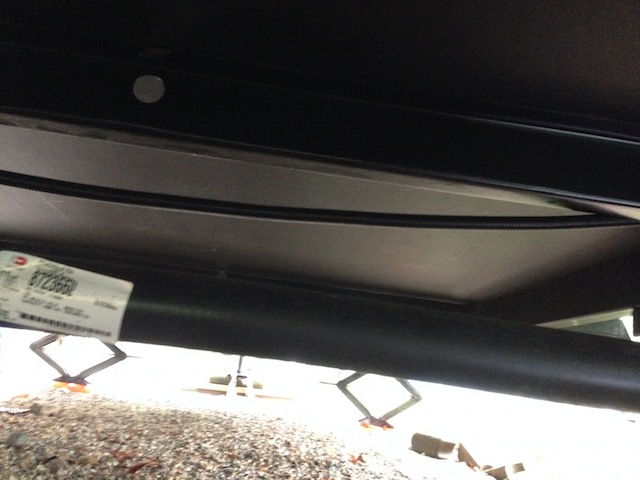
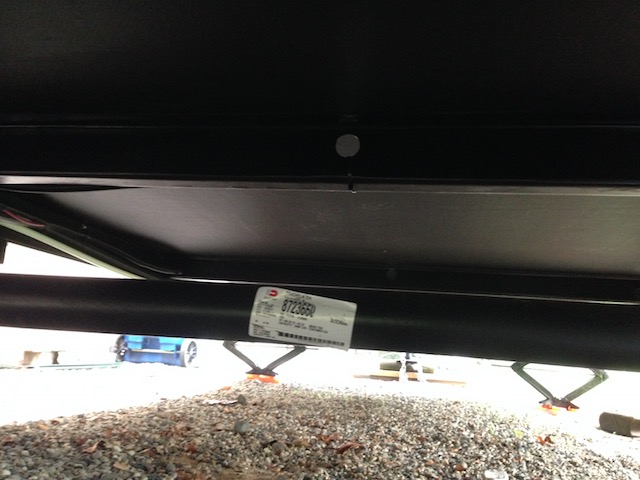
The 30 gallon fresh water tank is strapped into place as well as being held in by "L" shaped cross-members.
The 30 gallon gray water and 30 gallon black water tanks have no straps.
The gray water and black water tanks are only held on by some "L" shaped cross-members.
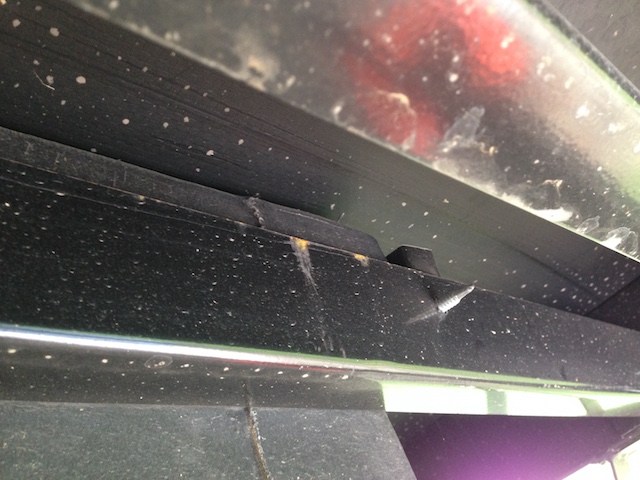
More Rust Found on the Frame and Frame Components
This shows the rust on the lower, outside area of the spare tire bracket.
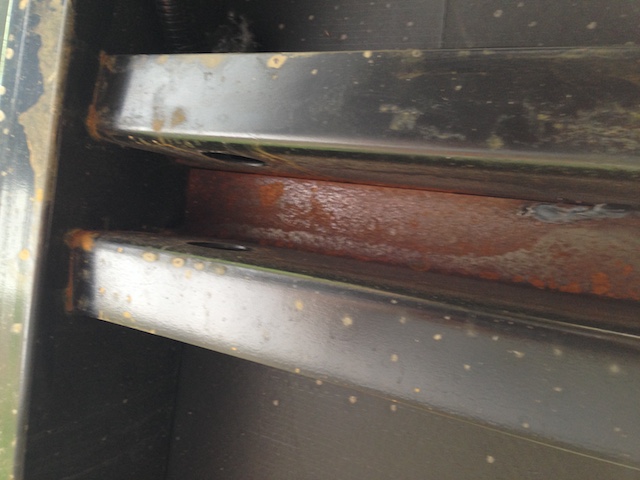
Rust on a black tank cross-member can be seen in this photo.
There is rust high on the frame on the camp side in front of the axle.
The photo shows rust on the camp side between, and on, cross-members.
There is rust and some black stuck on stuff on the frame bottom on the camp side, near the axle. There is a ripple in the underlayment too.
There is a crack or ripple in the underlayment on the camp side somewhere near the rear bench and wheel well area.
09/26/19 The New Anode Rod Arrived
The new Suburban brand anode rod arrived from Amazon yesterday evening and it was installed this morning
That is a simple enough statement, but...
The threads were wrapped with Teflon plumber's tape.
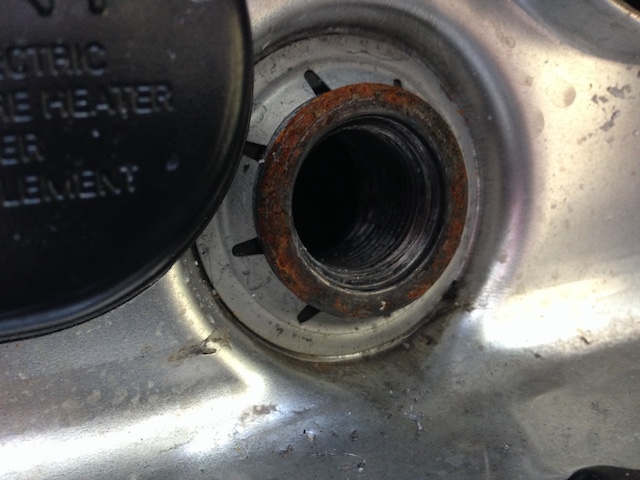
The plug would not screw back into its threaded hole. What?
A Google search revealed that this is a common problem, and several solutions were given on various Websites.
I chucked a steel rotary brush into my Dremel tool and cleaned the "goop" and debris out of the threads. The threads were wiped with a rag.
By pushing in on the plug with the thumb of my right hand and turning the plug with my left hand, I was able to get the threads started.
Once it was started, the 1-1/16" socket, using the socket wrench with an extension, was used to tighten it snugly, but not too tightly.
09/27/19 Preparing to the Paint Frame
A few sections of the frame, along with the rest of the bottom of the trailer, were washed today to be able to locate rusted areas of the frame.
Three more areas of rust were found and marked on the frame and there locations were marked with sidewalk chalk on the frame. A very large, long rusted area was found on the frame rail bottom near the sewage outlet plumbing.
09/28/18 Washing the Wheels and More Preparing to Wash Under the Trailer
The underlayment between the frame and the flooring is called Darco.
Even though it was sprinkling, the tires, wheels, plastic wheel liners and plastic hub caps were washed. There is some type of "dirt" in the embossed writing on the camp side tire that has been extremely difficult to remove. Even after washing and scrubbing several times, there is still a bit of that "dirt" there.
09/29/19 Finish Preparing Frame Washing to Paint It, Found Minor Problem Under Trailer
The washing of the frame and its components for painting was completed. Most of the areas of the locations of rust on the frame, cross-members and out riggers were noted on a sheet of paper to be able to locate them during the rust converting and painting.
There were a lot more rusty places like the one shown, on the bottom of the frame, on the driver side to the rear of the wheel.
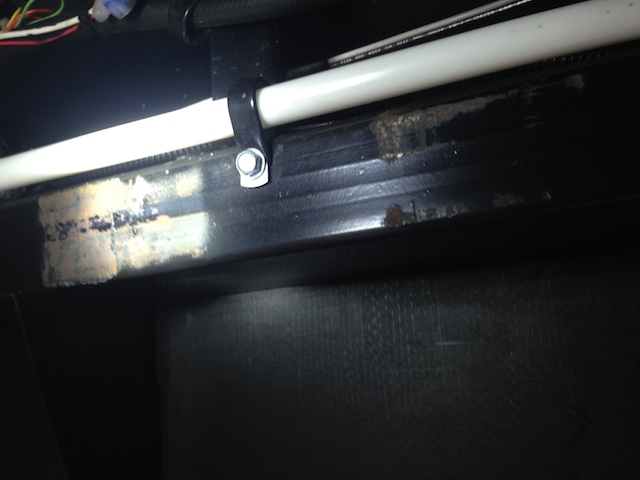
The plastic conduit, that crosses from the driver side to the camp side, over the axle, that carries electrical wiring, was just hanging over the axle. I zip tied it up through a hole in the cross-member above the axle.
09/30/19 Uncooperative Weather - Rust Converting and Painting on the Frame Under the Trailer
RUST-OLEUM RUST REFORMER is their brand name for a product type known as a rust converter. The instructions for the 8 fl. oz. plastic jug container, for painting on with a brush, contains no information about the temperature and humidity conditions for application. The instructions on the jug container do note, "For aerosol paint, wait three days." The 10.25 oz. spray container of RUST REFORMER notes, "Use when temperature is between 50F and 90F (10-32C) and humidity is below 85% ..."
The 8 fl. oz. can of GLOSS BLACK notes, "Use when temperature is 32℉ (0℃) and 92℉ (32℃) and humidity is below 65%..." The 12 oz. spray GLOSS PROTECTIVE ENAMEL (black) notes, "Use when temperature is between 50℉ (10℃) and 90℉ (32℃) and humidity is below 65%..."
A Weather Forecast Problem:
Work has NOT started yet on the spare tire bracket, the steps and the "A" frame.
The roof needs the seals inspected and to be washed.
The whole exterior of the trailer needs to be washed and the awning inspected for dirt and stains and dried out.
2:20 p.m. Temperature 68℉, Humidity 84% and dropping.
The vertical surfaces on frame were sprayed with RUST REFORMER. Masking tape, with arrows created with a black marker, was used to point to sprayed areas and to delineate sections that were painted. The sidewalk chalk was not working well.
3:10 p.m. Temperature 71℉, Humidity still 84% but supposed to be dropping. Sun is out now.
The rust on the bottom of the frame was painted with the liquid RUST REFORMER.
The steps were washed and dried very well and the rusted areas were noted.
The spare tire cover was removed. Surprisingly, there was water on the top area of the tire even though it had been covered with the tire cover. The tire and the spare tire bracket were removed. The lock washers and nuts, that hold the bracket to the rear bumper, were rusted a little. They were placed in vinegar to remove the rust.
The spare tire bracket was washed and dried.
The lock washers and bolts, that had been in the vinegar, were rinsed with water, given a bath in baking soda and water, rinsed again and then dried. They were sprayed on both sides with dry lube.
The bolts on the spare tire bracket were wrapped with painter's masking tape, since they were not easily removed, and the rusted areas of the bracket were sprayed with RUST REFORMER. The rusted areas and wear spots on the steps, and the brackets for the steps, were also sprayed with RUST REFORMER.
10/01/19 RUST REFORMER on the "A" Frame, Checking the Propane Level & A Possible Bulge in a Tire
It appears that the "A" frame had been spray painted before I received it. There is black paint on the safety chains and overspray on the stickers on the "A" frame. There is also black spray paint on the bottom, rear of the LP tank.
The bungee cords, holding on the LP tank cover, were removed along with the propane meter and padding under the LP tank. They were stored in the basement.
The LP tank has a TW (tare weight) of 18.6 lb. The whole tank now weighs 29.0 lb. There is 10.4 lb. of liquid propane in the tank after three camping trips. Several spots of rust were noted on the propane tank.
The battery strap was removed. The battery was disconnected, including the battery disconnect. The acid fluid level, of the MASON 12V Marine/RV battery, was checked and each cell appeared to be slightly low. A very small amount of distilled water was added to each cell.
The battery was placed on charge on the NORCO genius GT7200 battery charger. It took very little time for the battery charger to indicate a full charge with a steady green light. The battery and battery box were taken to the basement after the charger stopped charging.
Surprisingly, there was water on the top of the battery and quite a bit in the battery box.
The scissors' jacks were retracted and the tongue jack cranked up 30 cranks to wash the underside of the "A" frame. Rust was noted on the bottom of the tongue jack post.
The underside of the "A" frame doesn't look too bad. The top side, and its components, have quite a bit of rust on them, as well as the lower portion of the tongue jack.
Liquid RUST REFORMER was used to touch up rust spots in areas where the spray RUST REFORMER would have provided too much overspray. The rest of the rust on the "A" frame and tongue jack pole bottom was sprayed with RUST REFORMER.
Correction to video: there is NOT a lot of rust under the "A" frame, there is some, but not a lot.
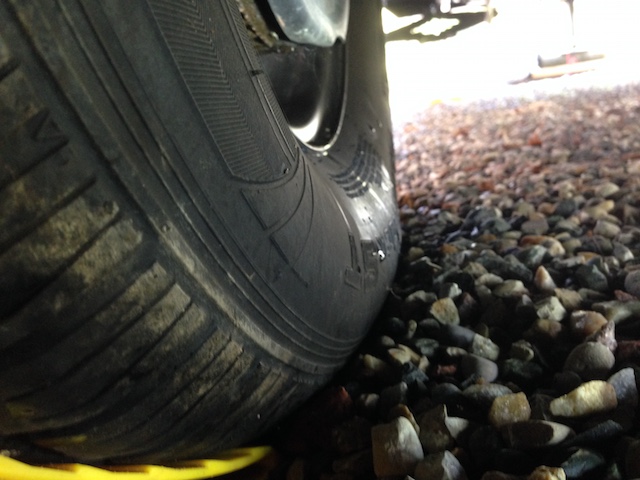
There is, what appears to be, a bulge on the bottom of the driver side tire (left photo) that is not in the camp side tire (right photo). The driver side tire measured 66.5 psi and the camp side measured 67 psi at the time the photos were taken.
The tongue was lowered, the trailer leveled and stabilizer jacks put down.
The CAMCO Flow-Through Wash Brush was opened to sweep the roof. The roof seals were also checked at this time.
The roof was too wet, from the heavy dew this morning, to sweep, so all of the debris on the roof was picked off by hand. The seals looked good and the sealant was pliable.
The new 5L VIVDSUM Compression Sprayer was opened and tried.
About 32 oz., of a 64 oz. bottle of THETFORD PREMIUM RV RUBBER ROOF CLEANER, was poured into the sprayer. It is NOT a concentrate, so no water was added.
The new zero-G 25' hose was opened, and tested.
The light metal garden hose was wrapped around the stepladder, vertically to hold it in place and the gero-G hose hooked up the the garden hose so that only the zero-G hose went on the roof with me. The flow through brush was tested.
The cloud cover was 100% and the temperature 79℉.
The rubber roof cleaner was sprayed on in small areas, scrubbed with the flow-through brush and rinsed with water flowing through the flow-through brush with the nozzle turned on.
Once the whole roof was washed, the roof was rinsed with clear water.
The little remaining roof cleaner was poured back into the Thetford bottle.
The sprayer was rinsed out and then Meijer wash & wax concentrate and water was put into the sprayer. The Meijer product is supposed to; have sheeting action, a high sudsing formula and dry to a spot free finish.
The rest of the trailer was washed using the sprayer to apply the wash soap to an area, and then scrubbed with the brush and finally rinsed using the water through the flow-through brush.
After washing the trailer, the inside windows, vents and air conditioner were checked for water leaks and none were found.
The zero-G hose was folded up and had two small bungees wrapped around it. It then replaced the green 50' garden hose in the pass through storage. The weight difference was already taken care of on the spreadsheet.
10/02/19 New Info on the Poor Stabilizer Jacks and Filling the Propane Tank
It rained today.
A YouTube video shows that the stabilizer jacks are supplied by the frame supplier, and that Coachmen is not directly responsible for the selection of the poor quality stabilizer jacks.
Jacks shown on the frame as received at Coachmen.
Rust on the spring hanger bracket.
More Rust on the Spring Hangers.
One gallon of propane weighs 4.2 pounds. A "full" 20 lb. cylinder should have 4.7 gallons or propane in it. That would be a weight of 19.74 lb. With a TW of 18.6 lb. the full tank on this unit should weigh 38.34 lb.
2.2 gallons of propane was put into the tank at Tractor Supply for a total of $5.93. 2.2 gallons should weigh about 9.24 lb. The "full" LP tank weighs 38.2 lb., which is very close to what it should weigh as noted above.
10/03/19 Window and Pass Through Storage Frames Not Fitting Well Looked Into - Sidewall Nuts Checked
It rained today.
The "indoor" time was used to investigate the following question concerning the ill-fitting window frames and pass through storage door frames.
The question: "Are Coachmen cutouts in the exterior wall hand routed using a template or CNC routed?"
The link to the first video lined below indicates that the cutouts might be hand routed by Coachmen.
How ARCTIC FOX RV'S Are Made | FULL FACTORY TOUR !!
No definitive answer was found to the question.
Using my fingers, I tried to unloosen all of the nuts that run through the outriggers and hold the walls on. None were found to be "finger" loose.
10/04/19 An Excellent YouTube Travel Trailer Mod Video
There is an EXCELLENT YouTube video on modifications and upgrades for a travel trailer.
Here is the link to a YouTube video with several travel trailer modifications and helpful suggestions.
Several of these ideas will be used on our 187RB.
10/05/19 A Look At Our Trailer's "A" Frame As It Was Shipped to Haylett RV, Coachmen's Take About Rust On the Frame
2020 Apex 187RB Summit vs Standard Edition AZDEL Ultralite Couple's Coachmen Travel Trailer
The YouTube video shows the "A" frame as received by Haylett RV near the first part of May 2019. The white letter numbering is clearly visible on the "A" frame. This indicates that someone at Haylett did the painting on the "A" frame.
APEX NANO BY COACHMEN 187RB EXT @ OTTAWA'S #1 RV DEALER PRIMO TRAILER SALES
Shown in the video is an additional informational sticker on the camp side "A" frame, near the LP bracket, that is not on ours. The sticker may, or may not, be something that is required in Canada.
The narrator states, "If you have a 3500 lb. rating, this is an ideal couple's model."
He also notes that the front cap is ABS plastic.
This version of the trailer is noted as having an Atwood water heater.
There is an orange spinner tightener on the black tank flush.
There is only one furnace exhaust outlet. That might indicate a different brand of furnace.
I thought that I was getting a bit anal about the rust on the frame until I found this in the 2020 Coachmen online Owner's Manual, in the section titled, "Frame/Extrusions/Aluminum Surfaces", "Check the condition of the frame regularly. Keep it clean and repaint as necessary, to help avoid rust."
10/06/19 Tire Rotation, Frame, Step and Spare Tire Bracket Painting
The humidity did not drop down to the 65% range until this afternoon, when it was suitable for painting.
The QUINN 1/2" DRIVE DIGITAL TORQUE ADAPER, from Harbor Freight, was opened. The Certificated of Inspection sheet, packed with the unit, noted that is was Version 2 and dated August 2010. The Owner's Manual & Safety Instructions had a copyright date, by Harbor Freight, of 2017.
The spare tire was inflated to 67 psi. It was at 57 psi.
The trailer was hooked up to the Ascent and the parking brake engaged.
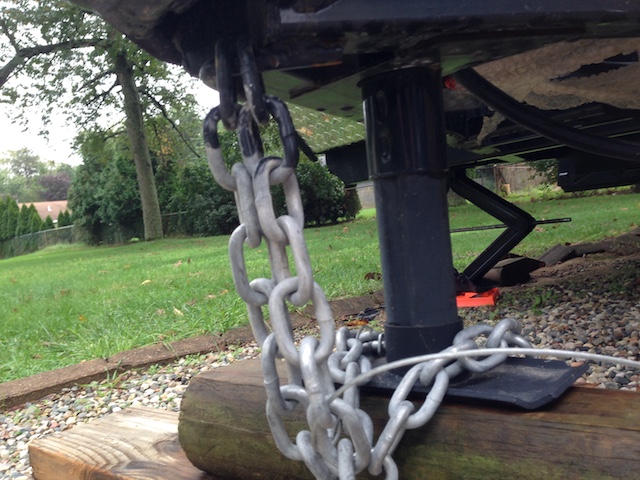
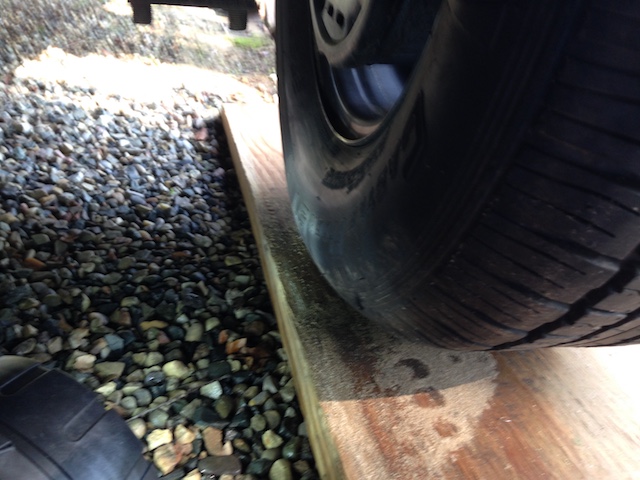
For the camp side tire, the 2-ton ACDelco scissor jack was set on top of the 2" x 10" x 36" treated lumber board that is carried in the trailer and the other 2" x 10" that the wheel was on in the gravel drive. 8 Lynx levelers and the 4" x 4" x 40" were placed on top of the 2" x 10"s.
The ACDelco jack handle, supplied with the 2-Ton jack, could not be used to raise the jack. The jack is placed too far under the trailer. The breaker bar, with an appropriate socket and adapter were used to raise the jack.
The breaker bar was used to loosen the lug nuts, the jack raised, the lug nuts removed and the spare tire was used to replace the camp side tire.
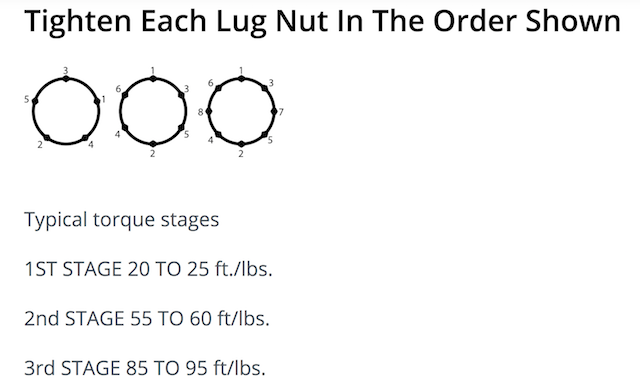
The lug nuts were torqued in the three stages as shown below, but the final torque was to about 100 ft.-lb., as that is what is noted on the trailer informational sticker. The first stage started at 29.5 ft.-lb., because that was the lower limit of the tool.
Lug nut information from the Coachmen Interactive Manual
Note Found in the Coachmen Manual:
The camp side tire was inflated to 67 psi and the driver side tire marked with chalk, where I thought there is a bulge.
For the driver side wheel removal, the 2-ton ACDelco jack was placed on a 2" x 10", four (4) Lynx levelers and the 4" x 4" x 40".
The breaker bar was used to free the lug nuts on the driver side.
The trailer was jacked up and the camp side tire was swapped for the driver side tire.
The driver side tire was inflated to 67 psi.
I still couldn't tell if the original driver side tire, now off the trailer, had a bulge, but it still looked like it to me.
Painting
The vertical surfaces on the frame, under the trailer, were spray painted with gloss black and their corresponding painter's tape, marking the area, was removed. One side of the spare tire bracket was spray painted. After the step treads and the nuts holding on the steps were taped, the steps and the areas that could be spray painted with the steps in the OUT position were sprayed.
The tops and vertical parts of the "A" frame were spray painted. The other side of the spare tire bracket was spray painted. The parts of the steps, when the steps are folded, were spray painted.
The masking and painter's tape was removed from the "A" frame.
10/07/19 Brush Painting the Underside of the Frame and "A" Frame
The painter's tape was removed from the nuts and bolts of the steps and the spare tire bracket as well as the tread grip material on the steps.
The front stabilizer jacks were put down on 5 Lynx levelers while the tongue jack was at its highest point, so that the underside of the "A" frame could be painted.
Gary came over to look at the suspect tire. Gary was the head, hands-on, guy of the tire and brake testing area at the Ford World Headquarters in Dearborn, MI. He said that the tire seemed solid in the area of the bulge that I'd marked and that it should be good enough to be used as the spare without worries. The "bulge" is NOT a bubble. A bubble in a tire is an entirely different thing and a tire with a soft bubble in the sidewall MUST be replaced.
The bottom of the frame was painted with the liquid gloss black RUST-OLEMUM paint using a brush in the areas that I had noted with tape after the RUST REFORMER was put on.
The trailer was leveled.
The spare tire bracket, spare tire and spare tire cover were put back on.
The full propane tank was put back on and connected to the LP line without the meter placed back in line. The meter is in the basement for the winter.
The battery wires were bungeed to a battery cross-member of the "A" frame so that the ends are not touching the frame, or each other, and so that they are up off the ground.
The brake adjustment holes, in the brake drums, were checked for dust covers. There are none.
10/08/19 Washing the Awning
The battery had previously been removed from the trailer and the propane was off.
The shore cord was plugged in. The furnace blower came on, although the thermostat was set to off. The ambient temperature was 62 at the time, but the inside of the trailer "seemed" cooler.
The microwave started on its own and was running. It was truly on, not with just the clock showing that it needed to be set. The question is, why?
For the awning to work, using the shore cord, the 30A AC circuit power breaker, branch 3 must be turned on, as well as branch 1, which is the 30A service. The other breakers were turned off.
There was a lot of water dripping off the the awning when it was rolled out.
There was a line of dirt, about a foot down from the top of the awning, on the top side, and at least one "white" spot towards the front, about 1/2 way down the awning.
The underside was not really all that dirty, but it was washed to wash off all of the bugs that got rolled up in the awning.
The awning side rails were pulled all the way down and the awning locked in that position.
A tall, eight step, stepladder was used to reach the top of the awning while washing it with the fully extended CAMCO soft bristle brush. The top of the awning was hosed down with water. A DAWN and water solution was scrubbed onto the top side of the awning and then rinsed with water again.
Both sides of the flap, at the front of the awing, were scrubbed using a handheld brush.
The underside of the awing was scrubbed and rinsed in the same manner as the top, using the CAMCO soft bristle, long handled brush.
As much of the awning as possible was wiped down with dry towels and the awning was left to air dry.
10/09/19 Finishing the Winterizing
The temperature, humidity and lighting were just right on the driver side this morning to show some of the sidewall framing and where the TV backer actually is, which is to the rear and above the front window.
Coachmen has a YouTube video that shows their wall construction on Apex Nanos. The photos can be compared to what is shown in the video.
Coachmen Apex with the Summit Package - Extended Edition
Checking the awning and trailer before covering it with the ADCO RV Cover.
The awning was rolled out. No water dripped off it and it looked quite clean, top and bottom. It was rolled back up.
A spill was found in the bottom door rack of the refrigerator. It was cleaned and returned to its position in the refrigerator.
All of the cabinets were checked to be sure that nothing was left in the trailer that could possibly freeze or that might be needed over the winter.
All of the shades were pulled down and the blind in the kitchen let down and closed.
The door was locked.
Putting on the Cover
Before putting on the ADCO RV cover, while putting the "booties" on the down spouts, to protect the cover, it was discovered that some trim was loose on the righthand side of the door.
Several methods, and tools, were tried to get the trim back into its slot, but none really worked well. Finally, the trim was pressed back into place by pulling it towards the front of the trailer and pressing the trim in with a thumb. It seems to be holding now.
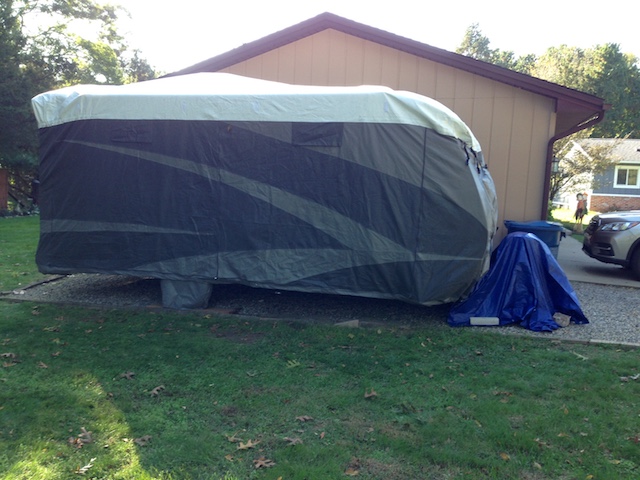
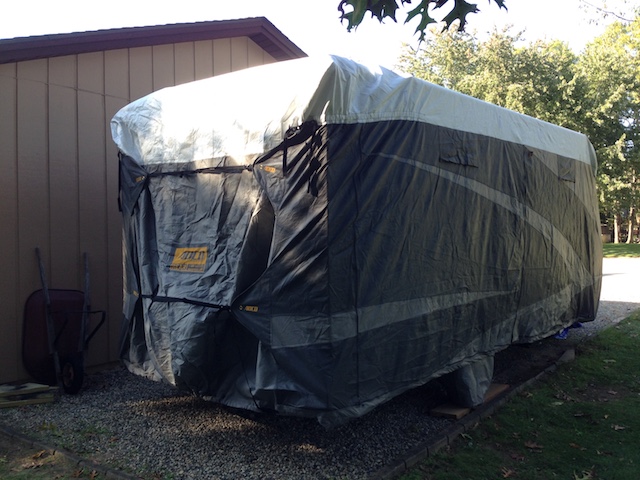
The cover was rolled up correctly when put away after the trial fitting in the spring. The ADCO cover was pulled up onto the roof and spread out over the sides, as demonstrated in the ADCO video.
How to Install An RV Cover by ADCO Products
Before tightening up the cover, the stabilizer jacks were raised so that they would not be resting in the snow.
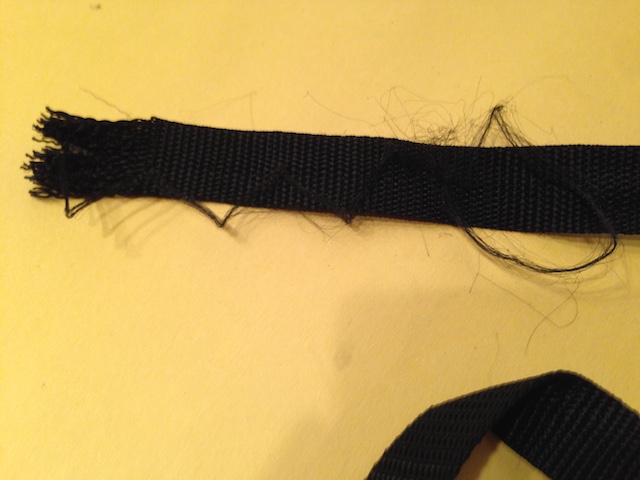
Everything went well when tightening the straps in the order that ADCO recommended in the video until the last strap. The rear, top, driver side strap pulled right out as I pulled on it to tighten it.
The photo shows that it is frayed at the end where it was sewn into its pocket. It just pulled right out without all that much pull on it.
A cheap, blue plastic tarp, from Harbor Freight, was laid over the "A" frame and secured to the ground with rocks. The trailer was now ready for winter.
10/14/19 Called ADCO About Torn Out Strap
I called ADCO about the ripped out strap and started a warranty claim by giving the lady on the phone the information.
10/15/19 Heard from ADCO & A New Iteration of the 2020 187RB Noted in Haylett Video
I received an email from ADCO (Vicki Poepke) at 5:07 p.m. requesting more information about the torn strap.
Josh Winters, of Haylett RV, posted a video on YouTube of a 2020 Coachmen Apex Nano with Summit package and the Off Grid package in the mid-afternoon.
How the Off Grid Package Differs From Our Plain Summit Package Version
Likes
Neutral
Dislikes
The video notes the UVW as 3165 lb. 65 lb. heavier than mine.
The graphic near the beginning of the video shows the Cargo (capacity) as 766 lb. which is totally incorrect.
10/16/19 Emailed Haylett Requesting More Information on the Weights - No ADCO Warranty Claim
I heard from ADCO again and I decided NOT to get replacement cover, yet, and sent email to that effect.
10/17/19 Haven't heard from Scott or anyone from Haylett RV
Nothing heard back from Haylett.
10/19/19 Still No Word from Haylett Regarding the 187RB Off Road - Contacted Aaron Suozzi
Contacted Aaron Suozzi at Haylett for photos of weight information found on the Off Grid trailer.
10/21/19 Aaron Replied with Photos
10/26/19 The Weight Values for the Off Grid Don't Look Good
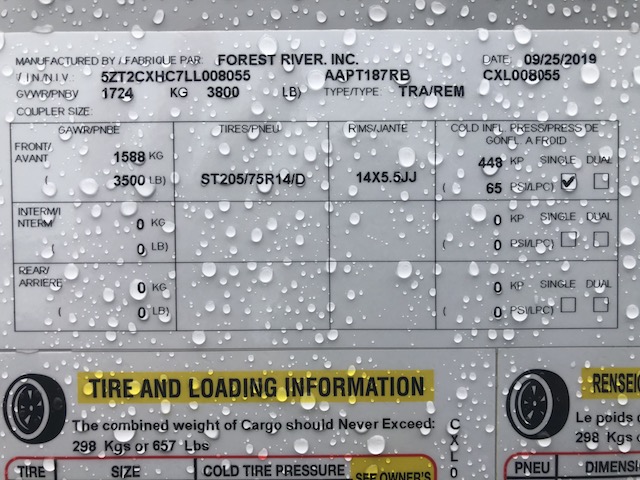
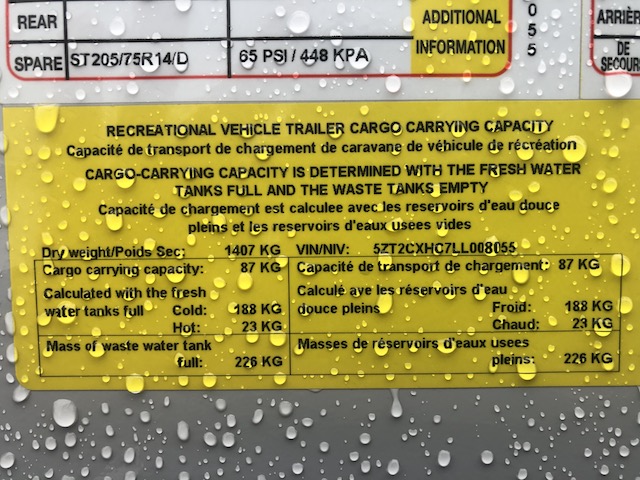
The dry, or delivered weight, showing on the photographed informational sticker is 1407 KG or 3102 lb. That differs a lot from the 3165 lb. noted in the video.
The 20 lb. propane tank on my unit has a tare weight of 18.6 lb., so the weight of the Off Grid version had to go up more than that because of the solar additions and other changes.
The graphic shown in the video notes a "Cargo" capacity of 766 lb. That capacity only applies to the non-Summit version with a stated dry weight of 3034 lb. by Coachman on their Website. The 316 lb. dry tongue weight graphic on his video also only applies to the non-Summit, non-Off Grid version.
The tire information on the Off Grid version states, "The combined weight of Cargo should Never Exceed 298 Kgs or 657 Lbs". My Summit package version notes 679 lb. on the same type of informational reference.
Full Cold Water Tank weight from sticker 188KG or 414.5 lb.
The cargo carrying capacity, with full cold & hot water tanks, for going off grid, is noted as 87KG or 191.8 lb.
The propane in the two full 20 lb. propane tanks and the battery Haylett installed on mine weigh about 80 lb. If the 50 gallon fresh water tank and 6 gallon water heater are full, the weight is already over 3700 lb. without bedding, clothes, tools, food, etc.
It is my opinion that if the off grid version of this unit is used to its fullest potential that only the items that are required to be cold could be loaded into the refrigerator and everything else would have to go in the Ascent, everything else!
11/26/19 Finally, a video of the latest 2020 187RB without the off grid package.
I had been extremely curious to see if Coachmen made any of the upgrades to the standard Summit package, when compared to the off grid version.
There was FINALLY a video posted of a 2020 187RB with Summit Package but NOT the off grid package. It was posted by Guaranty RV on Nov. 25, 2019. It should be noted that Guaranty is in Oregon, so it is a west coast trailer.
The ONLY apparent changes inside were the addition of a wooden towel hanger for two towels above the toilet and circular towel hanger (it's three in the off grid) and a bottle cap opener on the front of the sink cabinet.
I was very disappointed that it doesn't have the kitchen sink, kitchen faucet and stove top upgrades.
The water heater and furnace appear to be the same as the ones in ours.
01/10/2020
The version that they videoed has two covered propane tanks, instead of one uncovered tank, and a different tongue jack. The dry weight is noted as 3,180 lb., which is 80 lb. heavier then the dry weight of ours. It appears to have the same furnace with the single outlet. There is a light and plug-ins in the pass through storage. There is something on the ceiling over the bed, near the light, that is not on ours. It has a double bowl kitchen sink with covers, a much taller kitchen faucet neck, inset cook top and bottle opener in the kitchen. It has a two hook towel rack on the wall above and behind the toilet to the right of the circular hand towel holder.
|