To see what tools and materials would be needed to complete the structure, the first page of the instructions was read. The previously purchased cardstock, purchased at Walmart, was noted as "Pen+Gear Premium White Index Card Stock, 8.5" x 11", 199 GSM, 150 Sheets. It also noted that it is 110lb., 94 Bright. On Team Track's instruction sheet, it notes that the parts should be printed on 20 lb. Bond computer printer paper. The instruction sheet also noted the following; "We base our models on common paper and card materials found at craft stores. However, paper products vary, and you may wish to reuse material you already have on hand. Use this guide to help determine the thickness of your materials in order to determine its best use." This graphic, on the first page of the instruction sheet, is presented after that statement on the first page of the instructions. 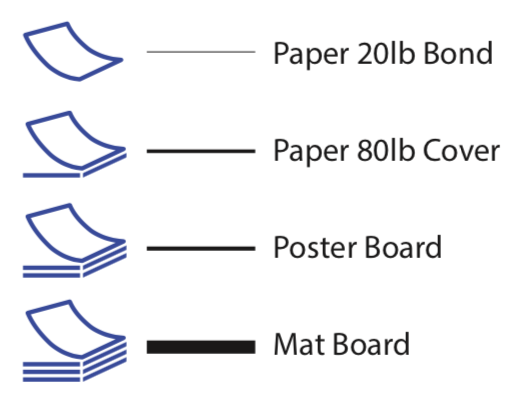
Cardstock, Poster Board and Mat Board Research Since the weight or thickness of the poster board and mat board were not specifically called out, a lot of research was completed regarding poster board and mat board, as well as cardstock. It appears that the Walmart cardstock is pretty much equivalent to 80 lb. cover paper, according to the following graphic. Paper 101 - Paper Weight Guide 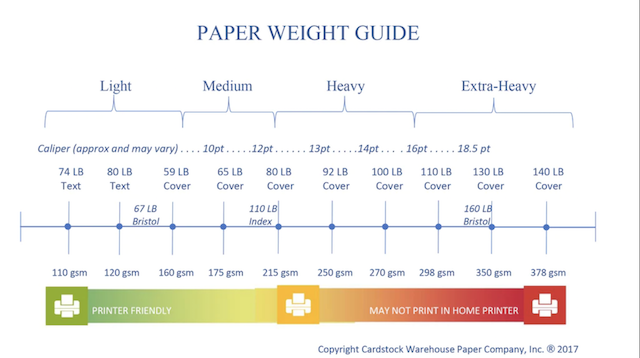 Card Stock & Cover Paper found on line .
Cover stock: is a specific term reserved for heavy weight paper of a decorative nature; found in an assortment of colors, finishes, textures, and coatings. Sticking with technicalities, cover stock is generally classified by paper basis weight, rather than caliper, or thickness. Card stock: is a more general term, defined by heavy weight paper of a simple, generic variety. Card stock is generally classified by caliper. Unfortunately, no cardstock or cover paper is called out on the print pages for the ACME Transfer Warehouse. Mat Board and Poster Board are called out.
Paper Sizes Our latest models use a universal document size that prints within the limits of both US Letter and A4 paper sizes. Please note the typical paper sizes for each model. HO - U.S. Letter
Paper Types
Poster Board (US) or Card (UK)
More Research on Poster Board Poster board - comes in a range of sizes, including 11"x 14", 14"x22", and 22"x28", as well as different calipers, such as 12pt. and 18 pt. for colored boards and 10-11 pt., 14 pt. for whiteboards. 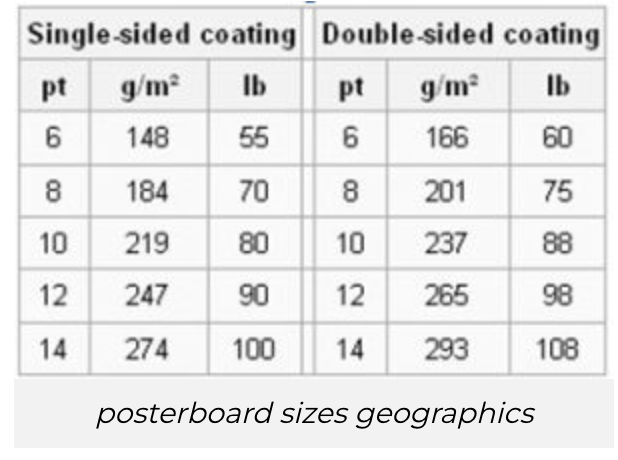 About Poster Board Thickness In the U.S., Poster board, Cardstock and Cover Stock thickness is usually measured in points or mill. This measurement gives the thickness of the sheet in thousandths of an inch. Example: a 10 pt. card is 0.010 inch or 0.254 mm thick ; a 12 pt. card is 0.012 inch or 0.3048 mm thick. Team Track Models on Mat Board
Mat Board mat board - The thickness of a mat board, indicated as "ply," is often an afterthought when it comes to selecting a mat board. In general, 4-ply (1/16-inch thick) (1/16" is 0.0625" * 1000 = 62.5pt KM) and 8-ply (1/8-inch thick) (1/8" = 0.125" * 1000 = 125pt KM) are the most common, but 6-ply is also available. That seems straight forward enough, but Mats come in either 4 PLY (0.040-0.052") or 8 PLY (0.125") but that doesn't mean all PLY are the same. Importantly, I learned that the program used to print the PDFs makes a difference. I first tried using Preview, on my MacBook, to print ATC-HO.pdf. There was no roof texture for the warehouse or office visible in Preview, nor printed. The Team Track Models' Website has a page titled, "Modeling Scale Buildings with Paper and Cardstock". In the section titled "Basic Steps in Building a Paper Model", they show how to set up printing with the Adobe Acrobat Reader program. ACROBAT READER MUST BE USED FOR PRINTING! The roof color and textures were visible when the ATC-HO.pdf was opened in Acrobat Reader and printed with the print selection set to Size > Actual as noted on that page. Simultaneously, more tools and mat board were ordered, from Amazon, on Saturday, March 18, 2023.
The Jetmore 100 Pack Hobby Blades Set #11 and Craft Knife Blades Refill Hobby Knife Replacement Blades and Fiskars' 165110-1001 Easy Change Detail Craft Knife No. 11 blade were due to arrive from Amazon on March 19. By March 26, 2023, they never arrived. That order was cancelled. On March 26, 2023 the Fiskars' 165110-1001 Easy Change Detail Craft Knife No. 11 blade and Nicpro 120 PCS Hobby Blades Set SK-5, Utility #11 Art Blades Refill were ordered from Amazon and noted as due to arrive on March 27, but they did not arrive until March 28, but at least this order arrived! Adobe Acrobat Reader has a tool in the menu bar, Edit>Take a Snapshot, that allows only a portion of a PDF to be selected and then printed. To save costly ink, this function was used to print only the portions of a page, from the ATC-HO.pdf, that were needed for the craftsman version. This process gave me a chance to look carefully at the pages before they were printed. That careful look allowed me to understand more about the structure's construction. The instructions were actually read multiple times. Sections F and M have an inset window, but not the door. To practice construction of a complete section, and also see if a door could be inset, like the window, only the parts for wall part M were printed, with a second complete exterior M texture print and a small section of print of the exterior M containing the door. After several missteps, it was determined that insetting the door was possible and the final details are described later. For more practice, all of section M was completed, including the backside of the exterior wall. Craftsman step 2.6 starts the construction of the inner wall face for the back of the exterior wall. The interior wall panels, for the exterior walls, serve two purposes. The top of the poster board piece provides a "shelf" for the roof to rest on and be attached to. The top of the poster board inner wall should also be colored using a No. 2 pencil so that no white will show around the roof seam if the roof and joint with the walls is not perfect. The interior poster board wall panels also provide placement for the window, as seen from the outside, and finish to the interior.
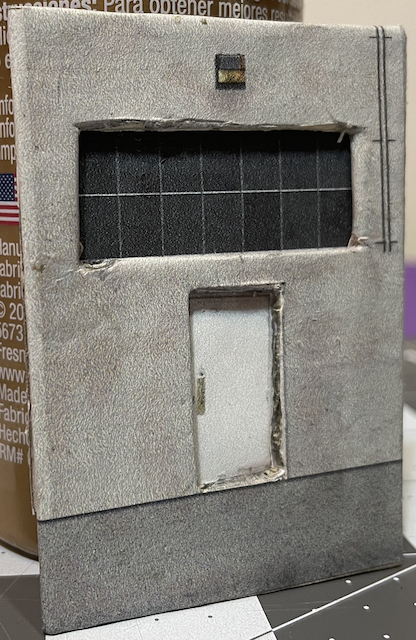
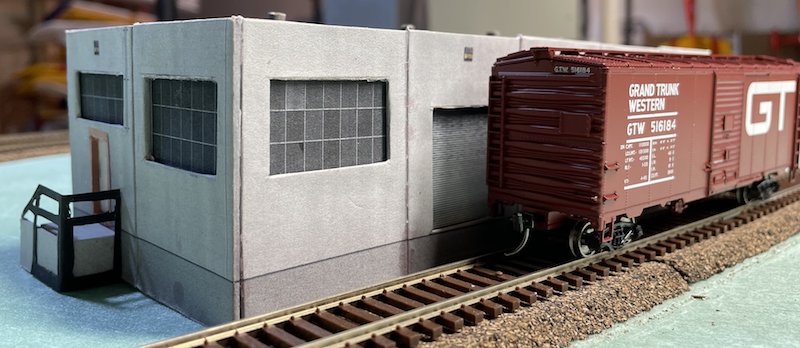
The photos of the second test wall M, taken at different angles, demonstrates some of the problems. 1/16" balsa was substituted for mat board, as the mat board had not arrived yet. If the mat board can be cut more cleanly than the balsa, the puckers around the window should disappear. It is hard to see in the center photo, but the black line, under the door, is running up hill from left to right and is not caused by the angle that the left and right photos were taken. At the end of the Steves Trains video, when he's showing the completed building, you see that the black lines are also not matched from section to section. What I learned from the practice
LOCTITE SPRAY ADHESIVE MIDDLEWEIGHT BONDING was used to glue the sheets of printed paper, noted as being glued onto the mat board, to the mat board. A rolling pin was used to press the paper to the mat board. Poster board was created by using the spray adhesive to laminate two pieces of Walmart cardstock. A rolling pin was used to press the two pieces of cardstock together. Unfortunately, this created poster board didn't hold together as well as hoped. Using real "poster board" worked much better. Spray Adhesive was used to glue the sheets of printed paper, noted as on poster board, to the previously created poster board. A rolling pin was used to press the paper to the poster board. 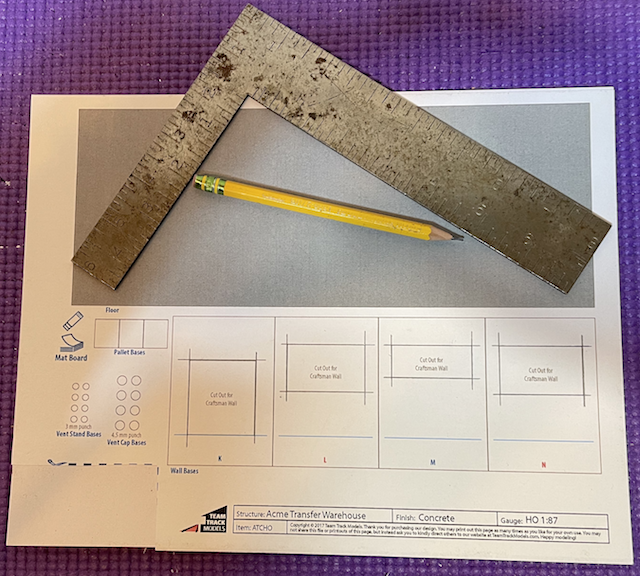 The warehouse exterior wall bases were cut out first. The printed wall bases have a blue alignment line on them. That blue alignment line is right at the bottom of the loading door sections. To maintain the integrity of that line meant cutting the cutouts inside the lines. A straight edge obscures the corners when cutting on the inside of the printed black line. A freshly sharpened No. 2 pencil was used to extend the cutout lines.  An X-Acto knife, with #11 blade was used to cut out the loading door and window cutouts on printed page #2. They were cut out on the Yoga mat mentioned in the grocery store construction. A slit was punched through each corner, with the cutting edge facing the opposite corner, to define the beginning and end of the cut and then the blade was dragged between the two defining slits to finish the cut of that line. The Yoga mat allows the slit to be made, while the Fiskars' cutting mat wouldn't.  The other parts, on the printed page 2, were also cut out. Long, straight cuts were made using a single edge razor blade. Printed sheet 3 was completed in the same manner. Part G did not turn out well. A new part G was printed, A Elmer's Disappearing Glue Stick was used to glue the mat board and part G was cut out again. Using two sanding blocks, one with a medium grit and one with a fine grit, all 14 wall bases were sanded to the same width. Clothespins were used to hold the bundle of wall bases together for sanding. Exterior Texture A and B were cut from printed page 13 and applied to the backside of the wall bases A and B. Putting glue stick on the backside and gently moving the printed piece around before pressing down allowed me to align the bottom of the texture to the bottom of the basewall. The flaps were folded back and glue sticked to the inside. The black line on the texture paper aligned pretty well with the blue lines. The cutouts and cuts for wall textures C, D, E, G, L, and H were cut out and made. The office wall textures, with the lowercase letters a, b, c and d, were not cut out at this time. Once the exterior texture was added to wall bases A, B and C, it was apparent that they were not the same height at the point where they join at the top. 
Lined up A - N The wall bases were lined up, with the interior, letter side, down, using a 4' straight edge. Wall base G was found to be the shortest. All of the other wall base tops were sanded so that they were all the same height where the top joint would match the next section. (Wall base A has no texture on it at this time, as this was the third attempt at getting it correct!) 
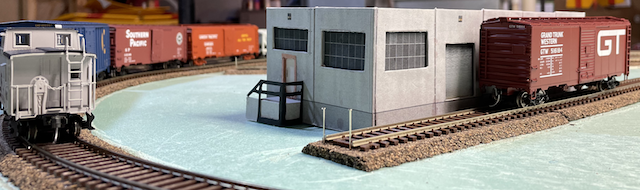
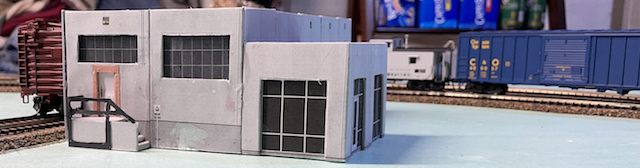
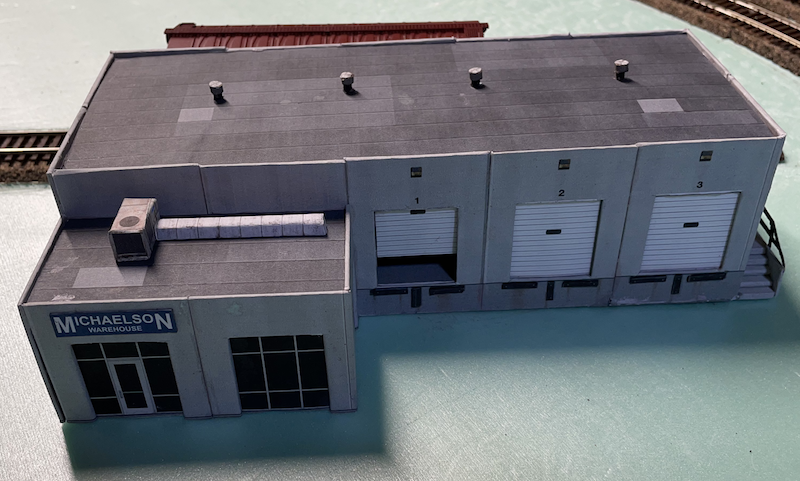
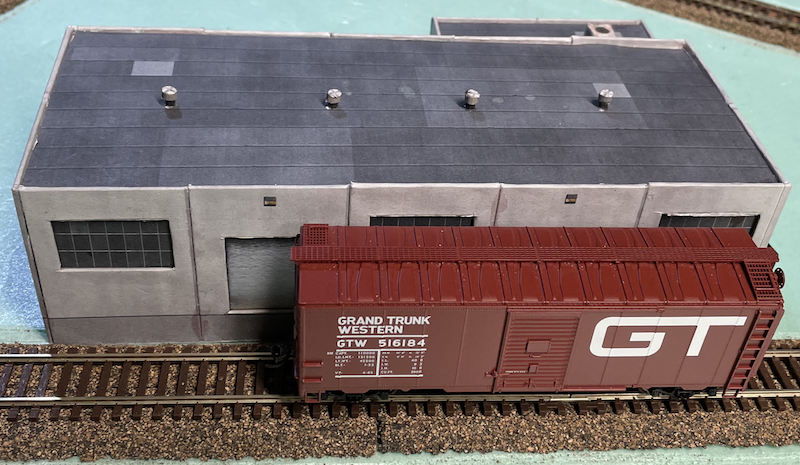
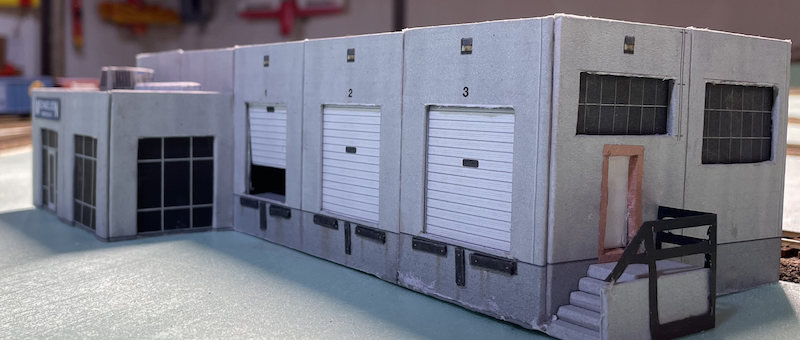
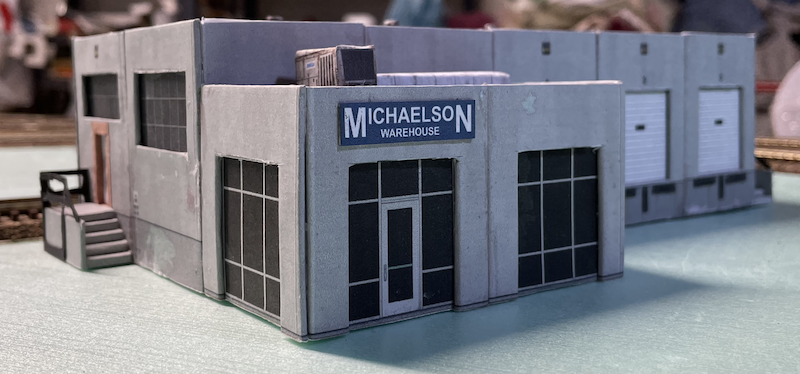
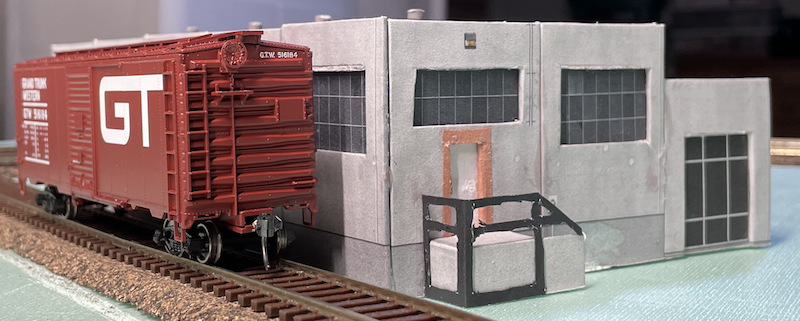
Lined up B - N and then A at the far right Wall base A (no texture on it) was moved to the right side of wall base N to make sure that they matched up in height at the joint, as they butt together at the last corner. When lining up the wall sections, the letter side of the wall base must be facing down! The exterior texture was added to wall bases A, C, D and E. This modification requires two full texture printed pages of section F, and later section M, for each of these walls and a bit of the texture around the door area. 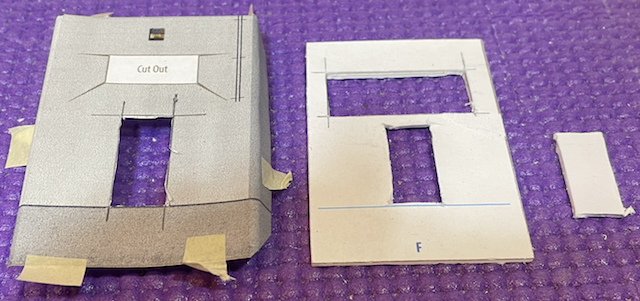 A printed texture was masking taped onto wall base F using just a few bits of tape. The door was cut out of the F wall base. 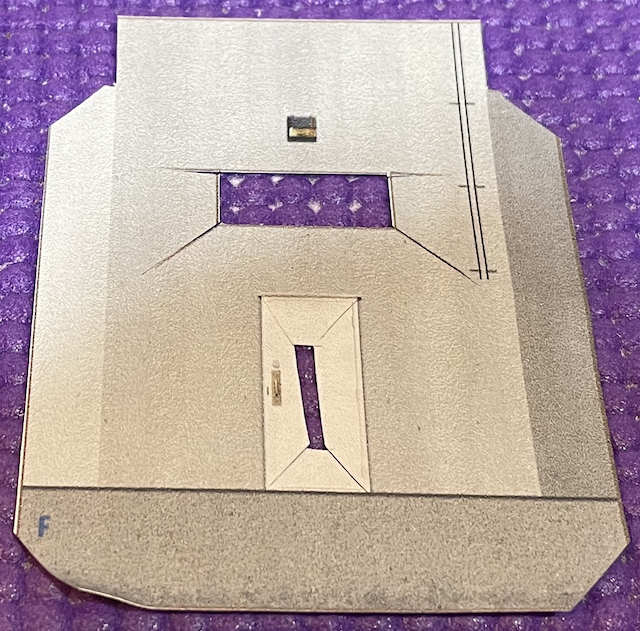 For the door opening in the wall base, cuts were made in the second new printed texture F. The cuts were like the ones used for the the windows. That texture was then applied to wall base F.  The new printed door area was trimmed to about 1/8" around the outside of the door. It was glued, using Aleene's Original Tacky Glue into place behind the door cutout. Using the Tacky glue allowed the door piece to be moved into position before drying too quickly.  Using No. 2 pencil to darken the area around the door didn't look right.  Brown construction paper was used to create a door frame around the door. While the frame is too large, about 5 scale inches, it looks better with the frame. The remaining exterior textures were glued to the wall bases G - N. That also included doing an inset door, with frame, on wall base M. The interior side of the wall bases were started. Except for sections A and B, the interior side wall bases are decorated on both sides before gluing them to the exterior wall bases. I glued all of page 9 to the created poster board using spray adhesive and rolled it with a rolling pin. The interior wall base sections are glued to backs of the corresponding letter exterior wall bases with the windows and loading doors facing out, toward the exterior. The added printed textures on the interior wall bases face inward. All 14 sections of interior wall bases were cut out of the poster board using a straight edge and single edge razor blade. All 12 sections of interior texture were cut from the printed paper using a straight edge and single edge razor blade. The interior wall base was trial fitted to its corresponding exterior wall base to be sure that the interior wall base did not overlap the exterior wall base in width. The interior wall base was sanded to fit when necessary. An open loading door was created for wall base C. The instructions for Step 2.10a Roll Up Doors was read several times. I chose to just use Tacky glue to attach the top of the cut off door to the top of the cutout for the door. The remaining interior wall bases had their textures applied and were glued to their corresponding exterior wall base section. The warehouse floor had been previously cut from the mat board. The roof of the warehouse was cut from the mat board. The floor and roof parts were compared to each other and sized together using a sanding block. Assembling the wall, as described in the instructions, seemed a bit tedious to me. 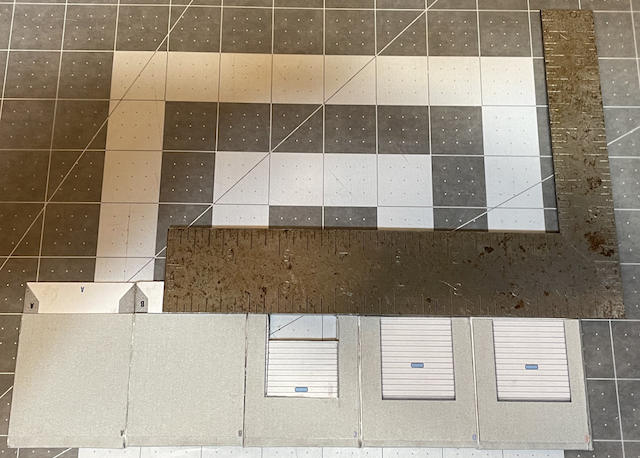 A piece of wax paper was placed on the cutting board. Tacky Glue was used to join each section A - E and a straight edge was used to align the poster board "lips" in a straight line. The A - E unit was allowed to dry. The other side and end sections were completed in the same manner. The bottoms of the wall bases were sanded to allow the structure to sit flat.  The building end walls were Tacky Glued to the front wall (A - E). 1-2-3 blocks were used to keep the end walls vertical while the Tacky Glue tried.  The roof and floor were trial fitted. Tne opposite wall bases were glued and held in place with 1-2-3 blocks. 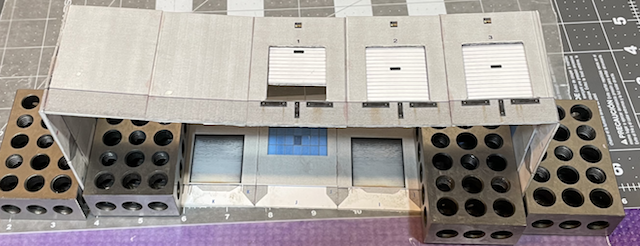 The backside wall was glued to the sidewalls. Note how the mat board is very, very bowed. The floor and roof needed a bit of sanding, with a sanding block, to fit perfectly.  The photo shows the floor glued in with Tacky Glue. The roof is in place, but not glued in at this time. 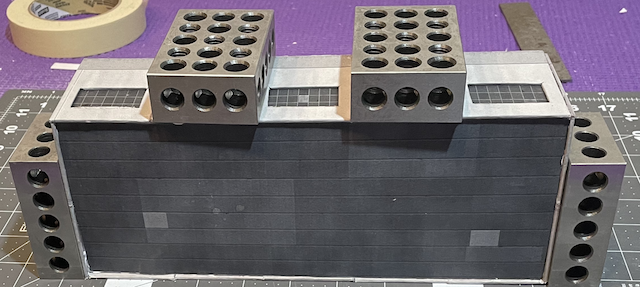 The roof was glued in and the basic warehouse structure was completed. The construction of the office sections, a - d, was next. All of the remaining poster board and mat board pieces were cut out. The texture paper was glued to the exterior and interior wall base sections using the glue stick. The construction uses the same method as the wall bases for the warehouse. It is important to note instruction 2.8 of the instructions PDF, as a bit of the exterior texture, on the interior wall base, extends below the interior wall base. Sections b and c were glued together using Tacky Glue and a straight edge was used to align their bottoms. Once the Tacky Glue dried between the section b and c, they were turned over and sections a and d were Tacky Glued to sections c and d with 1-2-3 blocks holding them at 90 degrees. The width of section d appeared to be printed to the same width as section a. This is a problem. I fixed section d by cutting off about 1/16" at its rear. The width to be cut off on section d was determined by placing the roof and floor into position. An email was sent to info@teamtrackmodels.com noting the problem with office section d, but there was never any response. The roof and floor were glued in with Tacky Glue. The office was glued to the warehouse using Tacky Glue. The warehouse was turned on its side and 1-2-3 blocks were placed on the front of the office to hold it in place against the warehouse wall. The steps and landing, for both exterior doors on the warehouse were made following the instructions, except that for the warehouse door, near the track side, the stair structure was made with the wall on the left so that people don't go down the stairs towards the tracks. Creating poster board thickness out of two pieces of laminated card stock was a failure. I picked up a package of 5 sheets of poster board at Meijer. It is call Crayola Project White Poster Board and measures 11" x 14". It has an average measured thickness of 0.011". It is shiny on one side. I wanted safety railings for the stairs and landings. It took four days to develop a means of creating the railings. I considered making them with balsa wood, match sticks and small diameter wire, but these materials were eventually discarded in favor of poster board. Several variations of the poster board railings were drawn up in a 2D CAD program and then built. There were actually eight tries until success was reached on the fourth day. An 11" x 1.5" strip of poster board was painted flat black. It did curl when painted on one side. When the other side was painted, much of the curl disappeared. Once three coats of paint had been applied and dried, the poster board strip was placed between wax paper and 1-2-3 blocks were set on the strip until it was needed. A stairway and landing, with no texture paper added, was constructed to use as a test model and the test pieces were cut from printer paper. Several failures followed. I was trying to make the railings too complex for such small parts. Finally, on the seventh try, a method appeared to work.
The printed CAD drawing template, on printer paper, was applied to the black painted poster board. To keep the black paint from peeling from the shiny side of the poster board, blobs of Tacky Glue were applied to the backside of the template in areas that would be cut out using a toothpick. Masking tape was also applied over the template ends and sides to hold it in place on the Yoga mat for cutting. The part was cut out with a #11 blade. The railing part was then carefully glued to the stair structure and wall with Tacky Glue. 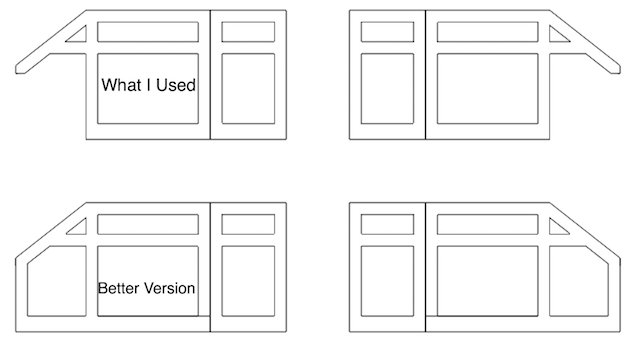 A reverse image of the template was also created for the opposite stairway, as it had been reversed so that going down the stairs didn't end up going toward the spur track. After I had glued on both railings, I did come up with even a better template, but since the railings looked okay, I didn't change from the original. I could not make the HVAC system following the instructions. I printed two new HVAC textures. One was glued to Crayola poster board. It would become the inside of the box so that the crease lines could be made with an awl. The other would was cut out of the printed paper and became the outside of the HVAC unit. I thought that the Duct would work as described in the instructions, but it didn't. I followed the same method as I used for the HVAC unit. Once the HVAC unit and Duct were assembled, Tacky Glue was used to attach them to the roof of the office. I used 1/8" diameter by 1/8" length dowel pieces, cut with my small Dremel table saw and painted black for the vent stand base and 3/16" diameter by 1/8" length dowel for the vent top. The vent top textures were cut out of the printed texture sheet. Tacky Glue was used for all of the gluing. Tacky Glue was used to glue the vents to the roof of the warehouse.
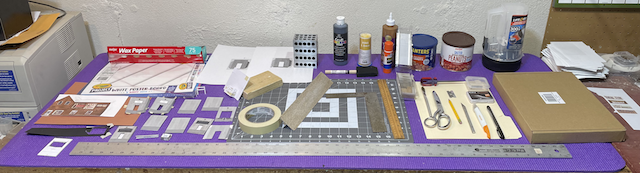
What the item is, and what it is used for, is obvious for many of the items. Some items do need explanation though. The brown box, on the far right, contains mat board. Laying the flashlight, to shine on the cut lines of the items being cut out, makes it easier to align the straight edge being used with the cut lines. One peanut can is used as a receptacle for used blades. The other is used to keep the Tacky Glue at the ready. The peanut can's top is removed. The Tacky Glue, with its top on, is placed in the open can. The Tacky Glue is then at the ready without having to do a lot of squeezing and waiting for the glue to flow to the tip. The manila folder was used to store the prints from the PDF file on the 20 lb. Bond paper. Many of the prototype trials and a lot of learning chances (mistakes) are shown in the lower lefthand corner. The purple Yoga mat is used as an alternate cutting board when it works better than using the Fiskars' cutting mat. My wife's tweezers, some of her acrylic paint and her black Sharpie are not shown. Those items MUST be returned to their exact position in her craft sroom immediately, or else!!! |