All of the necessary pages were printed and placed in a manila folder. The manila folder was also used to temporarily store parts of pages that were not needed at a given point and that would be cut out and used later. Tools, Supplies and Notes Page 1
Cutting mat board is difficult. If the office roof and floor are cut out accurately, their widths are the same but the floor is slightly shorter to allow for the width of the poster board of the Interior Wall Bases. The HVAC, Duct Base and Loaded Pallet Bases were not cut out at this time. They were set aside for later. Page 2 The cut lines of all of the doors and windows were extended using a straight edge and #2 pencil. That makes the beginning and end of the cut lines easier to see when covered by a straight edge. The door and window openings were cut out first. All of the tools, supplies and notes were used as on Page 1 and the following were added:
Doing the door and window cutouts is a tedious process. The Pallet Bases, Vent Stand Bases, Vent Cap Bases, and Bumper Board Bases were not cut out at this time. The Poster Board Bumper Boards Bases were accidentally glued to the Mat Board for this page and have to be reprinted. All of the parts that were not cut out were set aside. Page 3 The lines on all of the doors and windows were extended using a straight edge and #2 pencil. That makes the beginning and end of the cut lines easier to see when covered by a straight edge. Door and window openings were cut out first. All of the tools, supplies and notes were used as on Pages 1 and 2. The following were added:
The Fiskars' handle with a #11 blade was use to cut out the doors and windows and several single edge razor blades were used to cut all of the straight line cuts. After all of the base walls were cut out, they were measured from the blue line to the bottom of the wall using millimeters (mm). All were very close to 9mm. The sides were squared to the bottoms using the 8" L-square and a sanding block. All of the wall pieces were lined up, letter side down, as they are on the inside, in a-b-c order, along the 4' metal rule. The tops were sanded to the same height so that they didn't look staggered on the roof. That also provided a means to check the joints between the wall sections. (This was a mistake to do it now for the modified version of this warehouse. The walls are to be rearranged so that the office goes on the end of the building. This will be done again later.) All of the stair parts were stored in a plastic snack bag. Page 4 The lines on all of the doors and windows were extended using a straight edge and #2 pencil. That makes the beginning and end of the cut lines easier to see. Cut out the door and window openings first. All of the tools, supplies and notes were used as on Pages 1, 2 and 3. The following were added or used differently:
All of the Office Wall Bases are the same width when printed. A problem was discovered with the Office Wall Base Parts, especially Part d, when completing the first model. Part d is too wide as printed. It prevents the office from butting up flush to the warehouse side. The rear of the Office Wall Bases a and d, as well as the rear of the roof, MUST butt up flatly against the warehouse wall. The problem is shown in the CAD top view below. 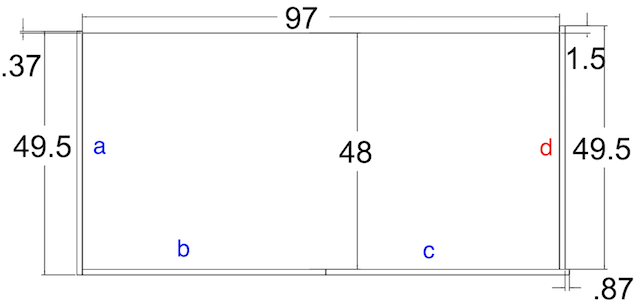
All of the dimensional values are in millimeters (mm) The CAD program, used to create the drawing, does not place a zero in the ones place. The dimensional differences of 0.37mm and 0.87mm can be ignored, as they are quite insignificant. The 1.5mm difference, almost 1/16", is significant and needs to be "fixed". The Fix The 4' metal rule, the 8" L-square, Part d and one of the other Office Wall bases was used to adjust Part d to the correct length. 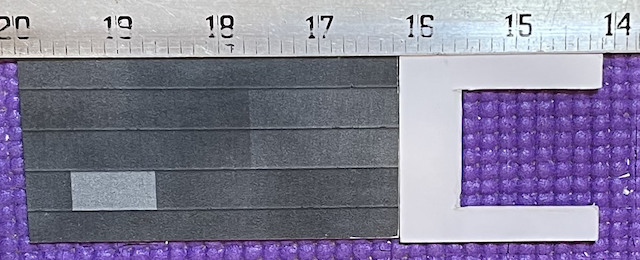 The rear of the roof and Part d, letter side down, were aligned. As the CAD drawing demonstrated, Part d is too wide. It should stop at the front of the roof to be behind Part c, which overlaps it. The L-square was aligned with the front of the roof with its leg resting on one of the other Office Base Walls. 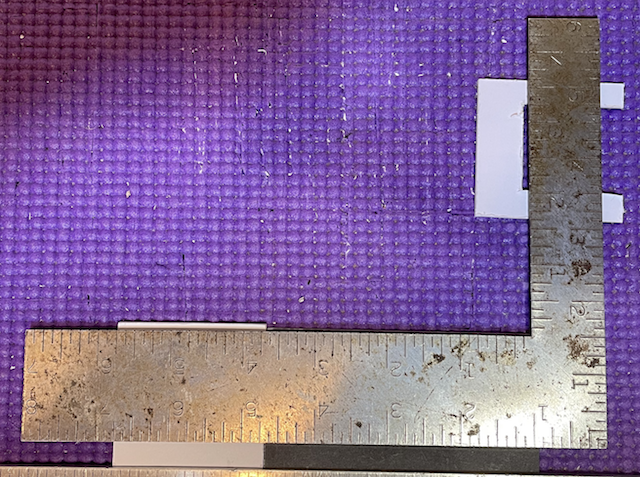 Once aligned, it was mark with a sharp #2 pencil and the excess width cut off. 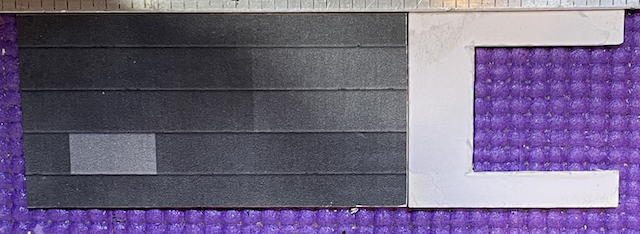 It now fit correctly behind Part c. (Mine took a teeny bit of sanding with a sanding block to appear as in the photo.) 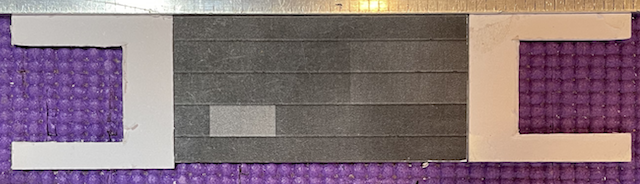 The slightly over-sized Part a was laid, letter side down, into position. It should extend past the front of the roof by the width of the mat board. (Mine took a teeny bit of sanding with a sanding block to appear as in the photo.) 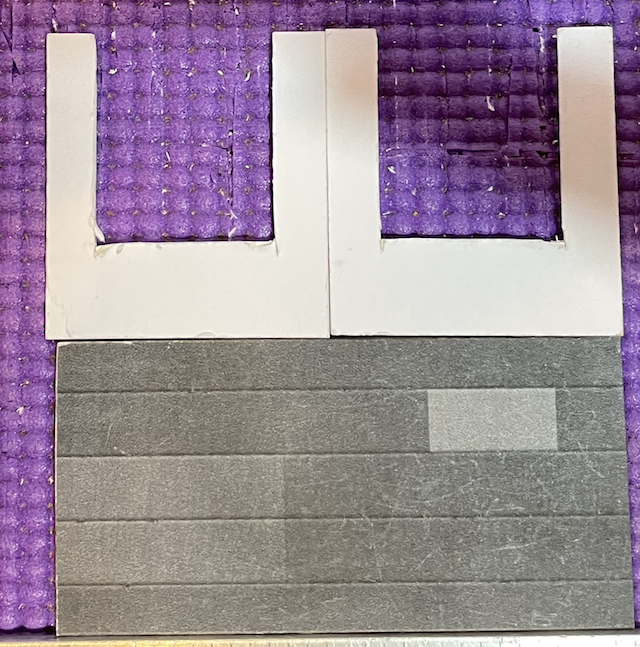 Align Parts b and c, letter side down, as shown. Part c should extend past the roof the width of the mat board thickness.  When finished, the parts should align like in the photo.  The parts were aligned along the 4' metal rule, in a, b, c order, and their heights sanded so that one section was the same height as the section next to it. Pages 5 through 8 These are the exterior textures for the Standard version. Page 8 also has the Loaded Pallet Textures. They were not printed. Page 9 Tools, supplies and notes Only Poster Board, the printed Page 9, Spray Adhesive, rolling pin, a single edge razor blade, and the 4' metal rule were used. The whole page was affixed to the poster board using spray adhesive and rolled with a rolling pin. This was the easiest page to cut out so far. The parts were set aside. Page 10 Only Poster Board, the printed Page 10, Scissors, Spray Adhesive, rolling pin, a single edge razor blade, the 4' metal rule were used. The bottom portion of Page 10 was cut off using scissors and stored in the manila folder. The poster board parts were cut out using only a straight edge and single edge razor blade. The Print Only Portion of Page 10 textures were cut out using a straight edge and single edge razor blade. Masking tape was used to hold the printed partial page to the Fiskars' cutting board. The Interior Wall Textures from this sheet were set aside. Page 11 All of the textures on Page 11 were cut out after being masking taped to the Fiskars' cutting board and then set aside. Page 12 & 13 Tools
In turn, Pages 12 and 13 were taped to the cutting board and the textures cut out and then set aside. A Warehouse Wall and Roof Problem The following was A BIG MISTAKE to do it now! It should have been done AFTER THE EXTERIOR WALL TEXTURES had been applied! While the procedure was correct, making new warehouse base walls should not have been done until after everything was lined up with the Exterior Wall Textures applied to the wall sections. 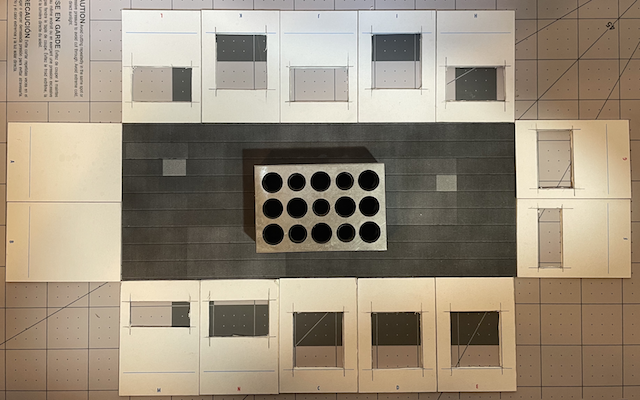 The wall parts were laid along the roof and they didn't match up correctly. Parts E, right bottom, and L, top left, should have extended past the roof the thickness of the mat board. I made a new C, E and I. They were cut a little larger in width by cutting on the outside of the line. It worked okay, but E was short by about 1mm. A new part D was cut outside the line to make it a bit wider as well. 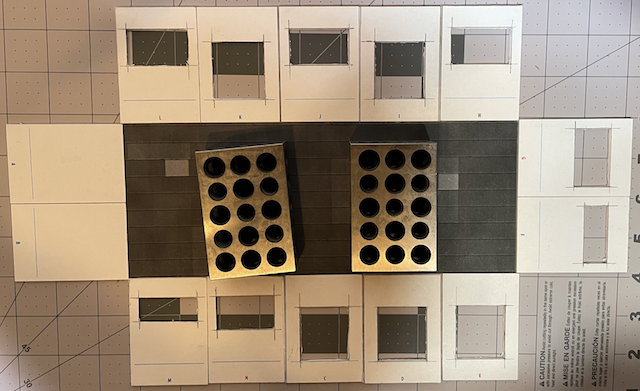 With a bit of sanding, Part D did the trick.  All of the wall parts were lined up along the 4' metal rule, letter side down, to adjust their height and angles next to each other in their new order. The new order is A, B, M, N with the rest in order from C - L. Exterior Wall Textures Applied Tools and Supplies
All of the exterior wall textures were applied to the Exterior Walls with a glue stick. Again, all of the wall sections were lined up around the roof.  Oops, I made the long walls too long! Look carefully. This is when I learned that the fit should be checked after the texture is on the exterior wall bases. I cut the parts so that they would fit correctly with just the mat board thickness as the over lap on the corners. Much, much better. Whew.  Note: It does take quite a long time to cut out and fit the parts correctly. Note: Tacky glue was applied to the parts with a toothpick. Tools and Supplies
Since the office was going to be on the end, that moved the Interior Wall Bases A and B to the end. Interior Wall Base B was now in the place where Interior Wall Base N was in the original instructions. Interior Wall Base B was trimmed to the width of Interior Wall Base N and that cut off piece glued to Interior Wall Base N. Using a glue stick, the Interior Wall Bases A and B were affixed to the Exterior Wall Bases A and B, with Interior Wall Base B aligned to the right side and both aligned with the blue line on the inside of the Exterior Wall Bases. I do not construct the warehouse and office in the manner describe in the instructions. The completed walls A and B were Tacky glued together, using a toothpick to apply the glue, along their thickness. The assembled walls were laid on wax paper and an 8" L-square was used to align their bottoms. A 1-2-3 block was placed on them while the glue dried. The exterior texture, that shows through the cut outs, was added to the Interior Base Walls M, N, C, and D. Walls M, N, and C were completed. The door was cut out of the Interior Base Wall D. It was shortened to represent it being open. Scotch Matte Finish Magic Tape was used to tape the partially open door to the inside of the Interior Base Wall. Wall D was completed. Wall E was also completed with the texture added as is. Completed Walls, M, N, C, D, and E were joined together with Tacky glue like the completed walls A and B. Walls F and G were completed and Tacky glued together like walls A and B. Walls H - L were completed and Tacky glued together like walls M - E. Once the glue had dried, all four side were once again laid around the roof. Everything seemed okay to start to put together the warehouse. 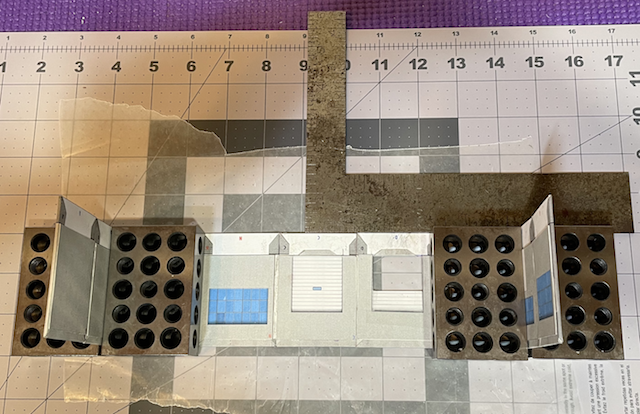 The combination walls A-B, M-E and F-G were attached as shown in the photo using a toothpick to apply the Tacky glue. The 8" L-square and the 1-2-3 blocks were used to square up the walls. Once the glue had dried the warehouse floor and roof were trial fitted. The roof needed just a touch of sanding, to reduce its length ever so slightly, with a sanding block. A 1-3/4" wide strip of poster board was cut for the personnel stairways railings. It was painted flat black with acrylic paint using a 1" wide foam brush. Each side was allowed to dry and then the other side done. It took several coats of paint. It does curl when painted. This process was continued while other construction was being completed. Once the painted strip was completed and had dried, it was placed between wax paper and 1-2-3 blocks were set on the wax paper to "flatten" the strip of poster board until it was needed. After observing similar structures, the personnel doors on the warehouse were not cut out on this modified version. 
Practice Walls After practice, on several textures glued on mat board with the personnel doors in them, an awl was used to depress the door line from the frame line around the door. A sharp #2 pencil was used to darken the creases made by the awl. 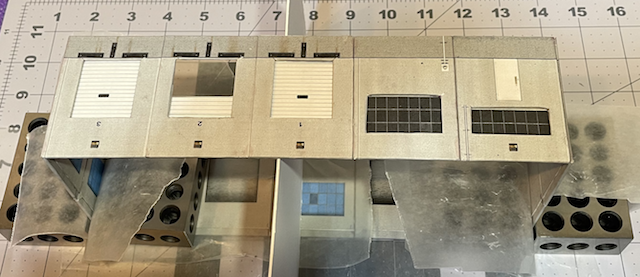 The completed fourth wall was laid on wax paper. The fourth wall was glued on with Tacky glue applied with a toothpick. The bottoms of sides A-B and F-G were aligned to the bottom of the fourth side. 1-2-3 blocks, with wax paper on them, were used to hold the end walls vertically and the warehouse floor was used to hold up the middle, as seen in the photo. 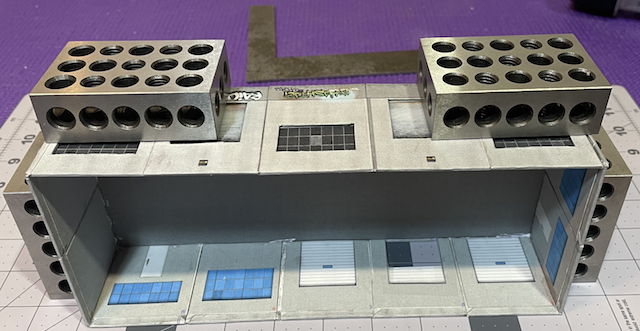 When the Tacky glue was dry on the fourth wall, the floor was glued in with Tacky glue and weighted and aligned using 1-2-3 blocks. When the Tacky glue was dry on the floor insertion, the roof was glued in with Tacky glue and weighted and aligned using 1-2-3 blocks. The office was carefully assembled. Section d still needed some sanding to reduce its width to fit around the roof. Completed Office Walls b and c were glued together with Tacky glue. After the glue dried, completed Office Wall a was glued to wall b using 1-2-3 blocks for alignment and to hold Wall a at a 90 degree angle. Once that glue dried, Wall d was glued to the other side using the same procedure. Tacky glue was applied to the tops of the Office Interior Wall Bases all the way around the three sides. The roof was installed. 1-2-3 blocks were used to hold the walls to the roof. Once the glue had dried, the office floor was checked to see that it did not protrude past Walls a and d, and adjusted with a sanding block so that it didn't. Tacky glue was applied, with the toothpick, to the three floor edges that join with the walls. The floor was placed on wax paper with a 1-2-3 block on it. The three office walls were slid into position and 1-2-3 blocks were used to hold the walls in place. The warehouse was set on wax paper. Once the glue on the Office floor dried, using a toothpick, Tacky glue was applied to the edges of walls a and d and the roof. The office was slid into place on the end of the warehouse and held in place with 1-2-3 blocks. The strip of Stair Textures and Stair Wall textures were cut from the previously cut off part of Page 4, NOT THE INDIVIDUAL PIECES!. They were cut so that the fold lines remained usable. All of the folds were made before cutting out the individual textures. The individual textures were cut out. The sandwich bag of stair parts, already cut out and on the mat board were dumped out. They were constructed following the instructions. The completed stairs were Tacky glued into position on the warehouse. The roof vents on the first warehouse were made using 1/8" and 3/16" dowel rod. The 1/8" dowel rod was painted flat black and the 3/16" rod gray and allowed to dry. The painted dowel was cut into 3/16" long pieces using the Dremel table saw. The Vent Top textures were cut out of Page 4 and applied to one end a 3/16" dowel piece and the, black, 1/8" dowel to the other. Once the vent assemblies dried, they were glued to the roof of the warehouse using Tacky glue. I had a problem creating the HVAC unit on the first warehouse. I measured the HVAC texture. I went to my balsa wood scrap box and found 3 thicknesses that, when laminated, would be the width of the HVAC. They were Tacky glue laminated together. The length and height were cut out using a single edge razor blade for trimming and Dremel table saw and finish sanded to the exact dimensions for the HVAC texture. The HVAC texture was cut out and applied to the balsa block using the glue stick. The HVAC duct work bases were cut out, as well as the HVAC texture. The duct was assembled per the instructions using a glue stick. The HVAC pieces were Tacky glued onto the Office roof. The Bumper Board Bases were reprinted, as they had accidentally been glued to mat board. The Bumper Board Bases were attached to poster board and cut out. The Bumper Board texture was cut out and applied to the bases. A black Sharpie was used to color the individual ends of the 9 bumper pieces. The bumpers were Tacky glued onto the warehouse. The railings for the stairways, that I created, were cut out of the 1-3/4" strip of poster board that had been previously painted black. The railing pieces were cleaned up with the #11 blade in the Fiskar's knife handle. All of the edges, and anything else showing white, were painted black. Tacky glue was used to attach the railings to the warehouse stairs. 1-2-3 blocks were used to hold the railings in place while the glue dried. ACME Transfer texture signs were cut out and affixed to poster board using a glue stick. They were placed on the office and side of the warehouse. Both the loaded and unloaded pallet pieces were cut from the mat board using a single edge razor blade. The part of Page 4 that contained the loaded pallet textures was printed, cut into manageable strips, folded and then created following the instructions. I'd tried it again, as I had tried it on the first one. It's hard, but can be done. For a second loaded pallet, I made a poster board box to wrap the texture around. That worked much, much better. |