|
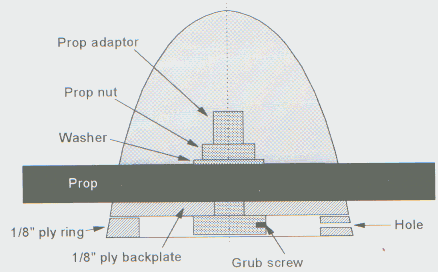
mount the spinner to the backplate, and install it on your plane. You may wish to reinforce the holes in the balsa with a squirt of glue.
Mounting
 There is a problem here. Because the prop adapter stands proud of the ply backplate, you will have a gap of about 1/8" between the spinner and the nose. Cut a ring of 1/8" ply and glue it in place, then sand to match the fuselage profile neatly. Astute modelers will find that they cannot get to the grubscrew in the prop adapter any more! Drill a hole, or cut a thin slot in the ply ring to allow an allen key to fit through. There is a problem here. Because the prop adapter stands proud of the ply backplate, you will have a gap of about 1/8" between the spinner and the nose. Cut a ring of 1/8" ply and glue it in place, then sand to match the fuselage profile neatly. Astute modelers will find that they cannot get to the grubscrew in the prop adapter any more! Drill a hole, or cut a thin slot in the ply ring to allow an allen key to fit through.
Run the motor up to full speed, and sand the spinner to shape using a rigid sanding block. When you are happy with the result, give the spinner a generous coat of glue (epoxy, PVA, etc.) and spin it up to full speed again to get rid of the excess. (Point the nose into a box or jar first, the glue travels a surprisingly long way when it flies off!). When dry, sand it smooth again and you're almost done.
 Unless you are very lucky, your spinner will still have a slight wobble due to varying grain density in the wood. Lightly touch a pencil to the spinner while it is turning, this will show the heavy side. Remove a small amount of wood from the inner face, and try again. Repeat until the prop is balanced, then install the prop again (you did balance the prop beforehand, didn't you?). Make a small mark on the spinner, and a matching one on the backplate, so you always install it the right way around. Unless you are very lucky, your spinner will still have a slight wobble due to varying grain density in the wood. Lightly touch a pencil to the spinner while it is turning, this will show the heavy side. Remove a small amount of wood from the inner face, and try again. Repeat until the prop is balanced, then install the prop again (you did balance the prop beforehand, didn't you?). Make a small mark on the spinner, and a matching one on the backplate, so you always install it the right way around.
 Of course a balsa spinner will not survive a serious crash. As the first part of the model to hit the ground, it will usually split in two upon impact. You may be able to glue the pieces back together, but this may give balance problems. One variation I have not tried is to make up the balsa block from laminations with the grain running in different directions, this would take longer but would give more resistance to splitting. I think it would be easier to make several spinners in the first place, building several Of course a balsa spinner will not survive a serious crash. As the first part of the model to hit the ground, it will usually split in two upon impact. You may be able to glue the pieces back together, but this may give balance problems. One variation I have not tried is to make up the balsa block from laminations with the grain running in different directions, this would take longer but would give more resistance to splitting. I think it would be easier to make several spinners in the first place, building several
|
|

