A Power System Introduction and Some BASICS By Ken Myers kmyersefo@theampeer.org Updated: December 2015 Warning! The many facets of Electrically Powered Flight ARE Addictive |


The very first item to purchase, when getting into electric power, is a power meter. The power meter is also known as a wattmeter, watt meter and Whattmeter (Astro Flight brand and first in RC the market). The meter is connected between the battery pack and electronic speed control (ESC) and usually displays the volts at the input of the ESC, amps drawn by the power system, energy delivered over time (Ah - amp hour or mAh - milliamp hour) and the watts input at the ESC. W = V * A Alternately, P=V*I or (P)ower equals (V)olts times (I) electric current also P=VI The purpose of the power meter is to provide information about the power system (battery, ESC, motor & prop). The information provided by the meter allows the user to adjust the prop (load) so that all parts of the power system are within a safe operating range. The meter is ALWAYS used at full throttle. Partial throttle readings mean nothing. A power meter measures watts in (power in), not watts out (power out)! The Power Meter by E-flite is NOT RECOMMENDED. It does not display all of the essential information on one screen. Online sources: 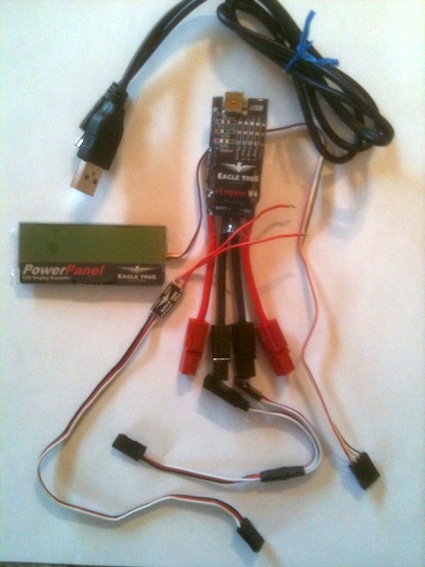
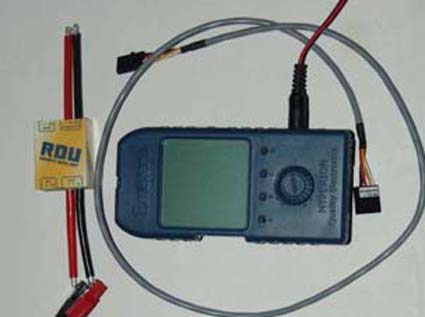
Eagle Tree Systems eLogger V4 The eLogger V4, with the optional LCD display and optional phase tachometer, is a very good 'bench testing' tool. Its light weight allows the eLogger V4 to be flown in the plane for in-flight power system data gathering.

Progressive RC PowerLog 6S This meter includes an optical, rather than phase (electronic), tachometer and has the ability to log data to a file on a computer.
This meter included BOTH an optical and phase tachometer and had the ability to log data to a file on a computer. It also had a 'Hold' button to keep the information onscreen.
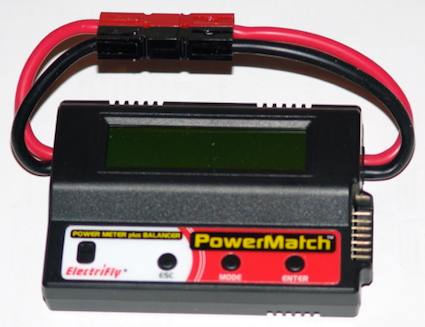
Great Planes ElectriFly PowerMatch Power Meter Balancer This is a multi-function power meter. It is a very versatile and useful tool.
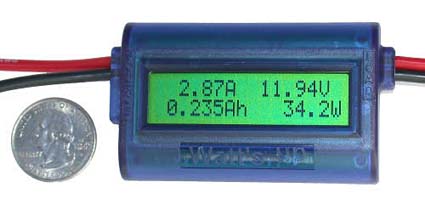
Watt's Up Meter This style is typical of many of the power meters and has been copied and 'cloned' a lot. 
P1 from Hobby Partz and similar meter at Hobby King BP Hobbies has several choices Other power meters can be found online at Tower Hobbies and additional sources. How to Use a Power Meter The Manual for the Watts Up meter may be applied to all types and is found on the PowerWerx site. Power Meter Videos:
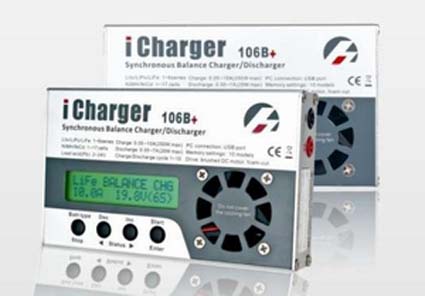
When I previewed the information about power meters being the first electric flight purchase, at the December 2011 EFO meeting, everyone one nodded and agreed that this is an essential first purchase. Get one ASAP! Hint! If you do not have a power meter with a hold feature, video the data and then record the data when playing back the video. Chargers A high power, balancing, multi-chemistry charger with discharge function is the 'best' choice. It should charge and discharge Lithium Polymer (LiPo/Li-Poly), Li-Ion (Li-Io), Lithium Iron Phosphate (LiFe), NiCad, NiMH, and Pb (lead acid). 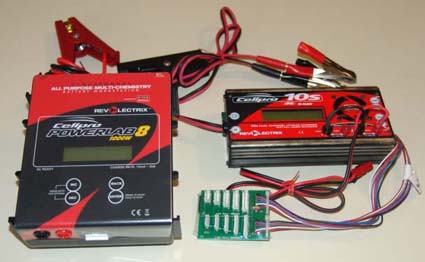
FMAdirect Power Lab 8 & CellPro 10S (shown) - now called CellPro 10XP
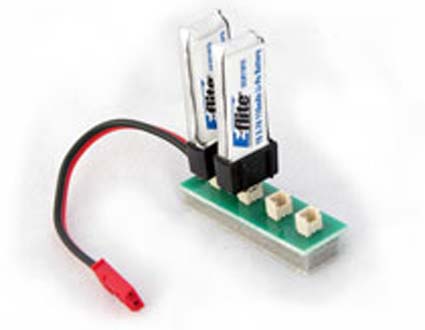
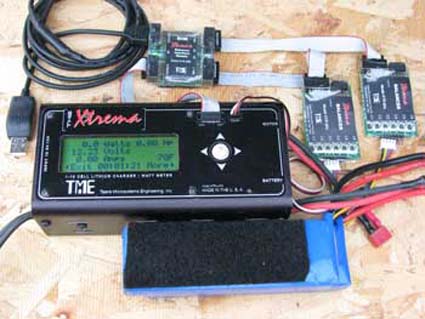 Another good charger is the TME (Tejera Microsystems Engineering) Xtrema. The Xtrema has a built in wattmeter, so there is no need to purchase a separate wattmeter. TME also has a neat adapter board for charging single LiPo cells.
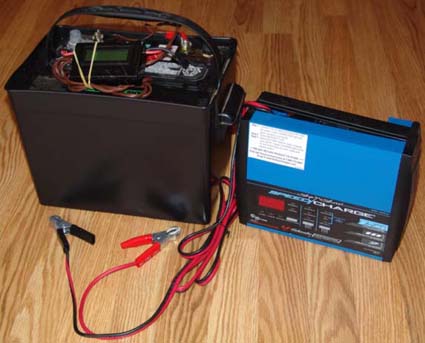
12-volt Deep Cycle Marine/RV battery, battery case from NAPA, Walmart 12-volt charger - also shown is an Astro Flight Whattmeter Decent chargers require an external power source such as a Deep Cycle Marine/RV battery or power supply - NOT a car battery! Generally, chargers with built-in power supplies, called AC/DC chargers, are too limited in power output to be useful for most purposes. It is very handy to have a charger that will discharge a LiPo battery to storage charge. For long life, LiPo batteries should be stored for somewhat long periods of time at a storage charge. When set to storage charge, many chargers automatically charge/discharge to 3.85v per cell. 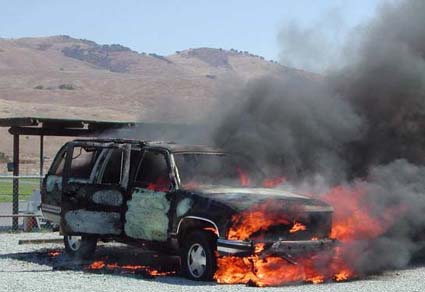 It is best not to plug a charger's input connector into a 12-volt socket in a vehicle. A vehicle battery is not designed for that use. LiPo batteries should NEVER be charged in or on a vehicle. 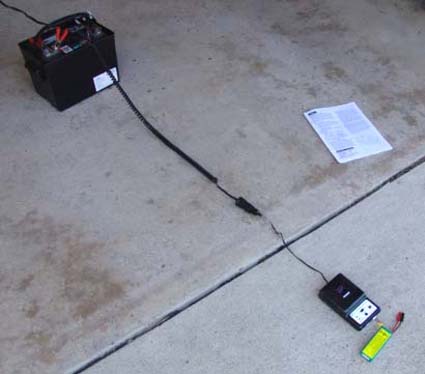 The photo shows a safe way to charge a LiPo battery with a car plug type connector. The charging is done in the middle of a cement driveway, away from all combustibles. The adapter hooked to the battery is from Radio Shack. Similar adapters are available at auto parts stores like AutoZone. The manual was removed before the actual charging took place. LiPo Batteries Lithium Polymer (LiPo) batteries are the most common type of power battery in use today.
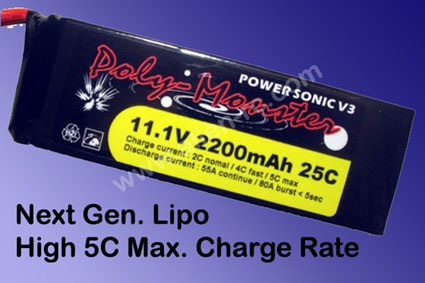
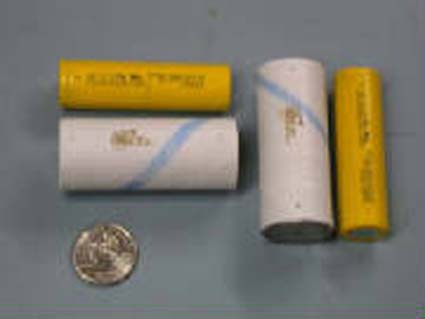
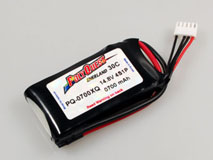
LiPo cells are said to have a nominal voltage 3.7v per cell. Actually, with a resting voltage of about 3.7v per cell, they are almost empty. 11.1V is the nominal voltage of 3 LiPo cells assembled in series (aka 3S). The charged voltage is 12.45v (4.15v per cell) to 12.6v (4.2v per cell) for a 3S pack depending on the charger. 2200mAh (milliamp hours) is the capacity (C) of this battery. 2200mAh is 2.2Ah (amp hours). 25C means that the supplier or manufacture implies that the longevity and performance of the pack will not degrade quickly if the battery is DISCHARGED up to this C-rate. The maximum amp draw for the battery is calculated using the capacity in Ah (amp hours) times the rate multiplier. The rate multiplier is the number preceding the letter C. In this instance it is 25 (rate multiplier) times 2.2Ah (C) or 55 amps. There is no industry standard regarding the C-rate and a manufacturer or supplier may claim whatever they want as the C-rate. Charge current
NOTE: Many people using and supplying LiPo batteries still recommend a 1C charge rate (1 hour) for LiPo batteries. For the example battery, that would be 2.2 amps. The burst amps really mean nothing. Charging this battery at 5C requires a charger that can output a bit more than 12.6v at 11 amps. (12.6 * 11 = 138.6 watts) The charger needs to be rated for at least 155 watts or more for a 5C (12 minute) charge. 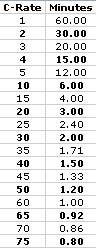
C-Rate in minutes The chart shows approximately how long it will take to fill an empty pack or deplete a full pack at the C-rate. High charge rate LiPo batteries, mated with a good charger, reduce the time spent in the immediate area of a charger. When the charge time is shorter, there is less waiting time for the battery to completely charge. Update:
LiPo Battery Storage and Safe Handling LiPo batteries contain a lot of potential energy. They require special attention and care when in use and in storage. Good charging practices include
LiPo batteries that allow the use of a high charge rate makes staying in the immediate area of a charging LiPo battery much easier, but may decrease the battery's life cycles. The charge time is much shorter.  It is best to charge in a REAL Li-PoSack brand charging sack. Some off brand generic LiPo bags have been known to burn! Really. Distributors of the REAL Li-PoSack can be found on their Web site.
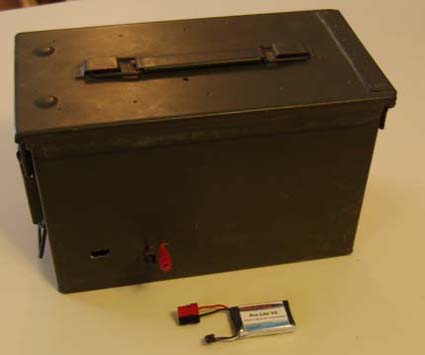
An ammo box with charge leads going into the box and a hole for the balance connector. Another storage and charge safety system is the LiPoLocker. The LiPoLocker.com Battery Charging Security System Review can be found on RC Groups. It is another LiPo safe charging and storage system. LiPo battery packs puncture easily. Keep them away from sharp objects. Do not allow bolts, screws or other sharp objects to protrude into the battery area of the aircraft. Protrusions will puncture a LiPo battery in a crash. Be sure the battery is secured very well in the aircraft. Dispose of punctured or puffed packs immediately.  Lithium Polymer disposal instructions from Common Sense RC 1) Discharge the battery to 0 volts.
Some folks disagree with the above disposal method.
Put a storage charge on LiPo battery packs that will not be used for weeks or months and store in a safe container away from all combustibles. It is best to purchase LiPo battery packs just before they are to be put into service. They don't have as long a 'shelf life' as other types of batteries. To preserve long life for LiPo batteries, they should not be flown to the low voltage cutoff (LVC) of the ESC or too deeply discharged. It is best to use the "80% of the capacity rule" to avoid premature death of a LiPo battery pack. Here are a few examples of the 80% of capacity rule:
Step 1: fly the aircraft in the manner that it will normally be flown for 3 minutes using a timer
If the mAh/Ah returned to pack is greater than the 80% capacity number, reduce the flight time. Repeat Step 1.
Repeat Steps 1 & 2 until the normal flight time for use of 80% of the capacity is established for the plane, flying style and individual pilot throttle management. NOTE: Extremely windy weather will increase the mAh/Ah taken from the pack and decrease the useful flight time. What happens if it is slightly over the 80% point, say 82%?
The actual capacity and manufacturer or supplier's capacity may not be exactly the same. Capacity changes over time. As a battery ages, the capacity decreases. It is important to be aware of this factor. Online Resources: Understanding RC LiPo Batteries
Other Flight Power Batteries
A very few electric power modelers use power batteries made up of cells from A123 Systems, Inc. The A123 cell is only available in a 2500mAh capacity. The cell has a nominal cell voltage of 3.3v per cell and a charged voltage of 3.65v per cell. I actually charge mine to about 3.75V to 3.8V per cell. A123 cells are Lithium Iron Phosphate (LiFePO4) chemistry. They are heavier than an equivalent LiPo cell, but much lighter than NiCads or high-energy NiMH cells. Many people consider them safer than LiPo cells. More Information on A123 cells LiPo Batteries for use in a Transmitter Some modelers are using LiPo batteries in transmitters. LiPo batteries may require a voltage regulator and the battery must be removed from the transmitter before charging them outside the transmitter. A few, newer style, transmitters do recommend LiPo transmitter batteries. If the transmitter is accidentally left on, the pack will be ruined because it will be too deeply discharged. The Sanyo, now Panasonic, Eneloop low self-discharge (LSD) NiMH cells make excellent batteries for transmitters. They come in a 2000mAh capacity. Once fully charged, they'll hold that charge for weeks.
Temperature Effects on Batteries Batteries work best at room temperature. Operating batteries at a high temperature shortens their useful life. At low temperatures, the performance of all battery chemistries drops substantially. A battery may be capable of operating at cold temperatures, but it may not allow charging under those conditions. The charge acceptance for most rechargeable batteries, at low temperatures, is extremely limited. Most rechargeable batteries need to be brought up to temperatures above the freezing point for charging. Even then, they will not charge well until they are at room temperature. There will be a noticeable performance drop of the power system if the battery temperature is below 50 degrees Fahrenheit or 10 degrees Celsius. Battery Resources regarding temperature Battery University.com
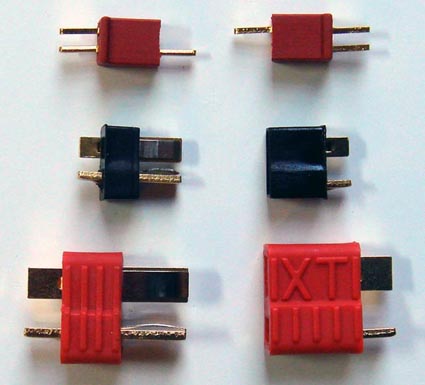
Connectors Power lead connectors from the battery to the Electronic Speed Control (ESC) There are many types to choose from. An article by Stefan Vorkoetter gives the statistics and reasons for using many of the connectors discussed here. 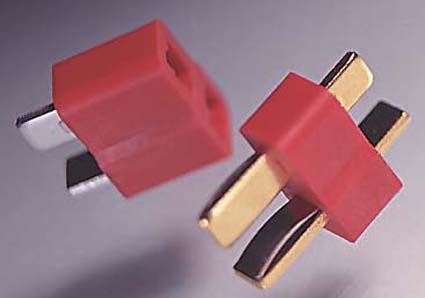 A common power lead connector is the Deans Ultra, which is usually just called Deans. There are Deans Micro Plugs as well. 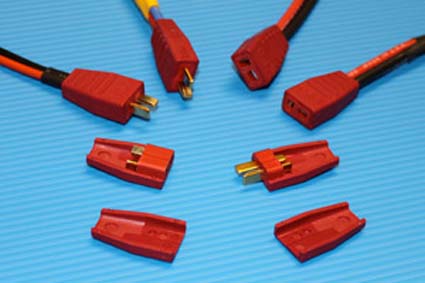
At one time there were Handy "Gripper" Covers for Deans Ultra Plugs from HDi because they are so hard to separate.
The Deans Ultras are similar to the XT plugs sold by Progressive RC, except that the XT is ribbed for gripping. The Progressive plugs come in three sizes, T-plug, Mini T-plug and Micro. These are NOT Deans plugs. 

Anderson Power Poles (APP) aka Sermos
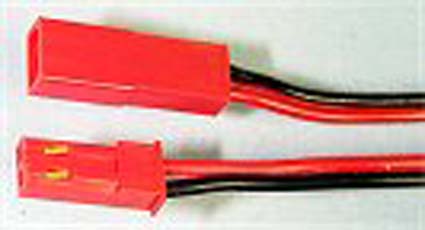
The JST-RCY plug is used for small planes and low current applications. It is also often called the BEC plug or P connector. 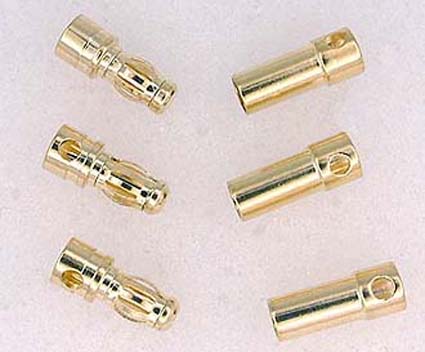
Bullet type connections come in various metric sizes Bullet connectors are available in various sizes ranging from 2mm diameter and up. The larger ones are used for larger amp loads. They are not really interchangeable by brand. They are used most often for the motor to ESC connection, but they are occasionally used for the battery to ESC connection. 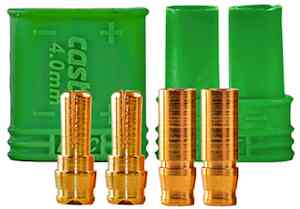
Typical for polarized bullet connectors is the Castle Creations 4mm Polarized bullet connectors are used by many LiPo battery suppliers. They are bullet connectors in paired housings. Typical examples include the Castle Creations' 4mm & 6.5mm, XT-60, and HXT 4mm & 6mm (AKA Super Tigre). The previously noted EC3 and EC5 are also examples of this type of connector. There is often controversy raging on RC Groups as to what is the best connector. Here is a thread on that topic. 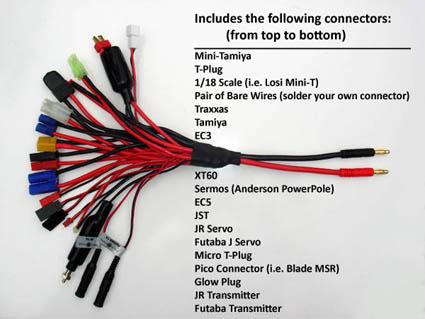
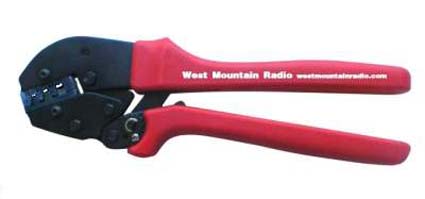
Multi power plug adapter from Progressive RC - $16.99 Having an adapter for the various power plugs comes in handy at the field to help others or yourself when unexpected charger problems arise and you may need to 'borrow' a charge or someone wants to 'borrow' some electrons from you. Power Wire and Power Wire Sizing The power wire most frequently used, and recommended, for electric power systems is often just called 'silicone wire'. The wire is a flexible, multi-strand wire with a silicone jacket insulation. The size, which is known as gauge, of power wires between the battery and electronic speed control (ESC) is based on the application, the expected maximum current between the battery and ESC and the length of wire from the BATTERY TO THE ESC AND BACK TO THE BATTERY. That is the total length of the positive and negative leads combined. In North America, American Wire Gauge (AWG) is used to identify the wire 'size'. The Internet can be used to convert AWG size to equivalent metric sizes and visa versa. VERY IMPORTANT NOTE! The smaller the gauge number, the larger the wire diameter is. Large gauge (small gauge number) wire can safely handle more current, over longer distances with less voltage drop than small gauge (large gauge number) wire, but it is heavier. Wire, capable of 'handling' the current (amps) without too much voltage drop, also has to be sized for the aircraft. For Example: AWG #12 gauge wire is not a good choice for a two ounce plane requiring only a couple of amps. It would be too heavy.
Lucien Miller, of Innov8tive Designs, suggests in a post on RC Groups, that for our purposes, "in RC applications, we can use 100 circular mils per amp or even 75 circular mils per amp..." 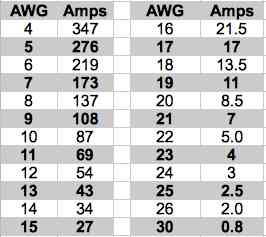 The above table is based on a conservative 120 circular mils per amp. The table values are very similar to anecdotal information provided by Bob Aberle in his books and articles on electric flight as well as authors. The amps shown in the table are well below what Progressive RC suggests as the amp carrying values of their silicone wire. Progressive RC's amp ratings for their silicone wire is about 75 circular mils per amp. Not all AWG gauges are available in multi-strand silicone wire. The Power Wire and Power Connector Relationship The gauge number and connector list indicates the maximum wire gauge a given connector will accept. There is no direct relationship between the connector's maximum acceptable wire gauge and the amp rating the manufacturer or supplier specifies for the connector. Smaller wire gauges can be fitted to most connectors. #4: Progressive RC (PRC) 10mm bullet
For the least voltage drop and highest performance, it is 'best' to use the largest practical wire gauge and power connector. The 4 Major Balance Plugs, Taps, Nodes or Node Connectors Please NOTE: The following listing of LiPo brand names may no longer be current. Polyquest (PQ) balance connectors are used on: Enermax, E-tec, Extreme Power, Fliton, Hyperion, Impulse, MaxAmps, Pache, Poly RC, Polyquest, True RC and Xcite battery packs. 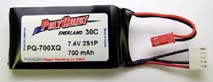
 Note that the PQ types use the same connector for several battery configurations and skips pins that aren't required. 2S and 4S packs shown. The 3S also uses the same connector as the 2S. The connectors are known as JST-XH. Thunder Power (TP) balance connectors are used on: Apex, Danlions, EVO, Flight Power, Kong Power, MPX, Outrage, Tark Power, Thunder Power and Vislero battery packs. JST-XH balance connectors are used on: 3E Models, ABF, Air Thunder, Align, Common Sense RC V2, DN Power, Dualsky, Dynam, E-flight, Electric Power, Electrifly, Energy EC, Esky, E-Watts, Exceed RC Fusion, Fully Max, GE Power, Grayson Power, Hextronix, HI Model, Hobby City, Hobby Loong, Hurricane Flight Systems, Imax, LOSI, Mega Power, Mystery, PowerSource, Protec, Rhino, Tenergy (rev polarity), Tower Hobbies, Trinity, Turborix, Vampower (new), Venom and WOW RC, X-Caliber and Zippy battery packs.
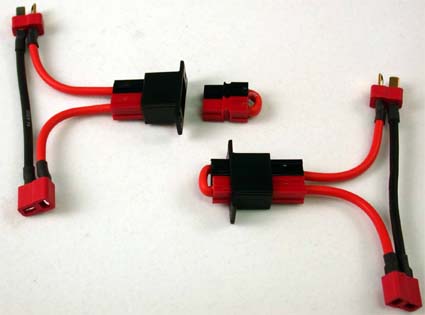
Kokam JST-XE balance connectors are used on: Apogee (but you need to remove lock), Core, Graupner, Kokam, New / Neu Motors, Orion Avionics and Vampower (old) battery packs. Many suppliers of Chargers also supply adapter boards for the various types of balance connectors for use with the chargers they sell. A look at the balance boards shows how the 4 major balance plugs are configured and how many pins each connector has. 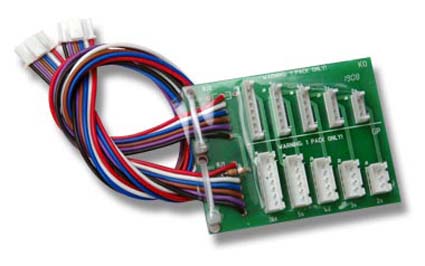 This is the adapter board for a CellPro 10S/10XP for the Kokam JST XE (top) and Align JST XH (AL) (bottom) balance taps. Note that each connector size is only used once and has one more connection than cells in the battery. 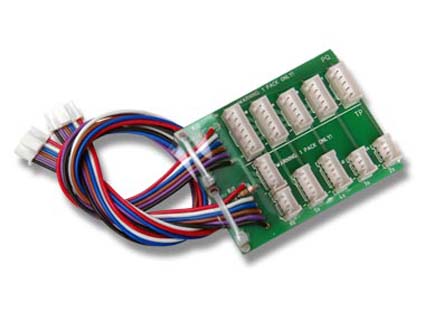 This is the adapter board for a CellPro 10S/10XP for the Thunder Power (TP) (bottom) and Polyquest (PQ) (top) balance taps. Polyquest uses the same connector for 2S, 3S and 4S packs and different connectors for 5S and 6S. Thunder Power uses the same connector for 2S and 3S packs and then a different one for 4S and 5S packs and double connector for 6S packs. Parallel Charging There are parallel charging adapters that allow more than one LiPo battery to be charged at a time on a single port charger. 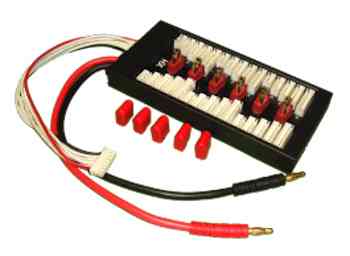
One style of Parallel Charging Adapter from Progressive RC There are also chargers that will charge more than one LiPo battery at a time. 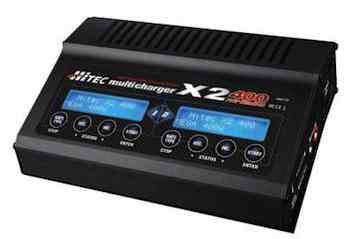
A Hitec Two-Port Charger Hitec and other manufactures also produce four-port chargers. Brushless Electronic Speed Controls (ESC) Basics Many of today's brushless ESCs have three distinct parts or circuits built into them. The speed control - There are a lot of electronic 'things' happening in the speed control, but basically it is an electronic on/off switch that is turning on and off extremely rapidly. When it is On the voltage and amperage are at maximum. When it is off, there is no voltage or current passing. The RPM is controlled by how long the On cycle is on compared to how long the Off cycle is off. ESCs are 'sized' by their suppliers' maximum continuous amp draw recommendation. To provide a safety margin, and to have the ESC run cooler, 80% of the maximum continuous amp draw should be used for sizing purposes. The Low Voltage Cutoff (LVC) circuit was originally designed to stop or reduce power to the motor to reserve battery power for the receiver and servos for a safe landing. It is even more important today because it can save LiPo batteries from being ruined by being too deeply discharged. LiPo batteries should never be flown to the point where the safety LVC circuit kicks in. Always time electric flights with either the transmitter timer or a typical kitchen timer. 
Kitchen timer that I use The Battery Eliminator Circuit (BEC) is another circuit designed into an ESC. The BEC allows the power battery to be used to power the receiver and servos. It is basically a step down voltage regulator. Linear (most common, cheap): It works by converting the excess voltage into heat. The higher the input voltage, the more heat generated in the BEC circuit. If there is too much heat, the BEC will either 'fry', or shut down! With a 3S LiPo battery the linear BEC is only able to provide about 0.5A before it overheats. That's only good for about 3 standard servos and the receiver. Many people overstress this type of BEC. Most ESC manufacturers don't recommend the use of a linear BEC with a 4S LiPo battery.  The Castle Creations Thunderbird line of ESCs contains linear BEC circuits. Switching (best type, expensive): A switching regulator works by taking small chunks of energy from the input voltage source, and moving them to the output. This is done with an electrical switch and a controller. They regulate the rate at which the energy is transferred to the output. That's why it is called a "switching regulator". A switching regulator can typically have and efficiency of 85%. A switching regulator can easily power heavy loads from a high voltage source. 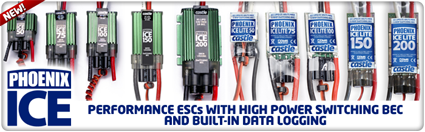 The Castle Creations Phoenix Edge line of ESCs contains switching BEC circuits. The High Voltage (HV) Edge have no BEC and are Optically Isolated to avoid radio interference. A NiCad, NiMH, A123 or LiPo receiver battery is required to power the radio system when no BEC is used. A receiver pack may also be used with an ESC that has a BEC IF THE BEC IS DISABLED, which is easy to do. There are also stand alone switching BECs like the Castle Creations BEC or BEC Pro which may be used to power the radio system. Sources for more BEC Information
Motors for Electric Flight Today, brushless inner runner motors are mainly used in electric ducted fan (EDF) applications and helicopters.
One of the main characteristics of the brushless outrunner is that its magnets are housed in a bell. The stator, or armature, is on the inside of the motor. That is just the opposite of a brushless inner runner. The outrunner provides more torque than an inner runner and the outrunner can turn prop sizes that the brushless inner runner would need a gear reducer to turn. Outrunners are generally less efficient than inner runner types with a gear reducer, but they are still efficient enough for general use. There are hundreds of different sizes of outrunners from very tiny to massively huge.  Outrunner nomenclature is not standardized. Comparing one company's outrunner to another's is often difficult. Some companies use the outside measurements to describe their motors. 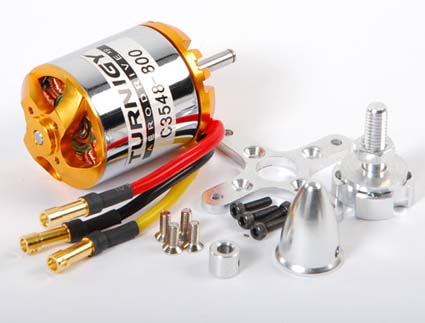 Hobby King has a motor that it calls the TR 35-48-C 800kv weighing 163g. Hobby King uses outside dimensions to designate its motors. The C dimension (diameter), in the illustration, is about 35mm and B dimension (length) about 48mm. The stator dimensions are 28mm x 26mm. Dimension A (shaft diameter) is 4mm. Maximum current is rated at 55 amps.  Scorpion has a motor that it calls the Scorpion SII-3020-780 weighing 166g. Scorpion uses the stator dimensions to designate its motor numbers. It has a Kv of 780 RPM per volt (about the same as the Hobby King motor). The C dimension (diameter) is 37.5mm and B dimension (length) is 45.7mm. The stator dimensions are 30mm x 20mm. Dimension A (shaft diameter) is 5mm. Scorpion does not give the useless maximum current but does rate this motor at a continuous 40 amps with a continuous power level of 800 watts in. Hobby King would call the Scorpion motor a Turnigy 38-46 780Kv (they tend to put a dash between the external dimensions, but not always) and Scorpion would describe the Hobby King motor as a Scorpion 2826-800. The two motors are not the same, but with a similar weight and Kv, they might be expected to perform close to the same level with the same battery, ESC and prop.  The former Cermark NEO 25-780 had a similar 780Kv, but it only weighed 149g. Using its outside measurements it would be called a 42-40 780Kv. It had a 5mm shaft. It was rated for a maximum of 460 watts in and 55 amps. It required a larger diameter prop with more pitch to achieve the same watts in as the other two motors. It was not similar to either of the other two motors, and its performance was quite different. Manufacturer or Supplier motor weights do NOT include the weight of the prop adapters, motor mounts and their related screws. Kv or RPM per Volt (RPM/V) Kv is a motor constant and is directly related to Kt, the motor torque constant. The specific motor's design and construction determines this constant. The Kv motor contant is NOT directly related to the applied voltage. It is part of the motor's physical makeup. There are electrical and mechanical losses in all motors. Voltage out times the Kv yields the RPM.
The higher the voltage drop through the motor, the lower the RPM will be. The higher the current is, the greater the voltage drop will be. The less efficient a motor is, the higher the voltage drop will be. More on Kv and how to measure it Timing and Apparent Kv Timing affects the apparent Kv, both with brushed and brushless motors. Advancing the timing on a brushless motor, using an ESC setting, increases the RPM by forcing the motor to turn at a rate higher than the native or raw Kv. Advancing the timing increases the power out and the current draw and decreases the efficiency. Power In versus Power Out The power meter measures the power IN at the ESC. There are electrical losses in the ESC, and there are electrical and mechanical losses in the motor. The majority of the losses are turned into heat. The power out is considerably less than the power in.
How do you know the power out? You don't! There are ways to measure the output, but they are too complicated for most modelers. Motor/prop/battery computer programs like Drive Calculator can estimate the power out. Drive Calculator is a FREE computer program and runs on Mac, Linux and Windows operating systems. Power out may also be estimated using something known as prop constants and the measured RPM. It is not really necessary to know the watts out. When electric fliers and authors use the term watts, they are referencing watts in. Prop Shaft Rotation It is easy to change the prop shaft rotation of a brushless motor. Switch the connection of any two leads between the motor and the ESC. The color coatings on the leads from the motor to the ESC mean nothing. Different brands use different colors on the motor leads to the ESC and also different colors on the ESC to motor leads. Props APC props, slow fly (SF), thin electric (E), multi rotor (MR), sport and pattern have RPM limits. The limits are listed on their Web site. They all have applications that work well with electric motors. Master Airscrew standard wood props and G/F 3 series work well with electric motors. The Master Airscrew electric props are not very efficient and should be avoided. Zinger props are not useful for most electric applications, but make excellent prop blanks, according to Keith Shaw, if you want to create your own props. GWS has basically two lines of props, RS and DD/HD. The RS (reduction series) are used in applications similar to the APC SF type props. The DD/HD (direct drive/hyper drive) props are used in applications similar to the APC E, but have lower RPM limits than the APC E props. Selecting the CORRECT Supplier Recommended Props Many times a supplier will recommend props for a motor and battery combination. It can be confusing. 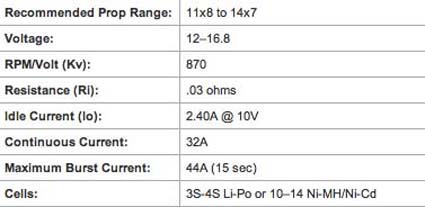 The graphic was captured from the specifications for the E-flite Power 25 870Kv BL Outrunner at Horizon Hobby. The props and battery packs (Cells) are listed from 'smallest' to 'largest'. What is NOT apparent is that the largest prop (14x7) is only the largest prop for the 3S pack and the smallest prop (11x8) is the largest prop recommended for the 4S pack. It is not a range at all, but a recommendation for each type of pack with this motor. A much better way to list them would be
Not all props are created equal. That is another reason for having a power meter! One manufacturer's 14x7 will not be placing the same load on the motor as another manufacturer's 14x7. It is entirely possible that one company's 14x7 will fall within the safe operating limits for the power system while another company's will be outside the safe operating zone. Only flying will prove which prop is best in a given application. Safety Precautions 1.) Store LiPo batteries safely and away from combustibles.
Maxx Products Arming Switch Tips for Being Successful with Electrically Powered Flight 1.) Start out slowly and take the time to learn what you need to know
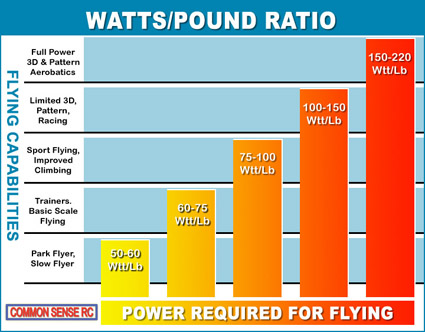
This is Common Sense RC's table suggesting power levels based on Watts (watts in) per pound for ready to fly aircraft weight. It is a reasonable guide. Wing Cube Loading Defines Aircraft Types and Missions Wing cube loading is a much better comparative number than the commonly used wing area loading. 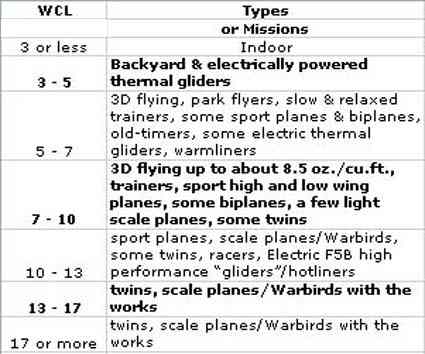
Wing Cube Loading Table Note: Wing Cube Loading (WCL) does NOT have units attached to it. WCL is a factor. Online Sources for WCL "Cubic Wing Loading: What it is and how to use it." Also known as - Wing Cube Loading by Ken Myers "MODEL DESIGN & TECHNICAL STUFF: WING CUBE LOADING (WCL)" by Frances Reynolds, Model Builder - September 1989 "Aircraft Performance Parameters Revisited : WING CUBE LOADING", by Roger Jaffe, Model Builder - June 1994 "3D Wing Loadings: a Better Way to Scale Models and Compare different size models easily", by Larry Renger, Dec. 1997 Online WCL Calculator:
Other Resources: Online forums: RC Groups, Watt Flyer, RC Universe and more - be aware that some of the experts on the forums started flying electric RC last week. Most forums contain about 98% 'noise' and about 2% decent advice. There is useful advice to be found, but finding it can be quite time consuming. An excellent independent site is RC Model Reviews. The author has excellent knowledge and is the most unbiased reviewer I've ever read. The reviews and information provided on the site are not just for electric fliers. Unfortunately, for us airplane fliers, he's mostly into multi-rotor and FPV flying. His archive and videos still contain valuable information. Books: The majority of books about electric flight are 'old' and contain a lot of outdated information.
The EFO Web site and monthly Ampeer electric flight newsletter have a lot of reliable information regarding electric flight topics. I'm willing to answer, or try to find answers, for questions regarding electric flight at kmyersefo@theampeer.org Ken Myers' Modeling Background:
Over the years Ken Myers has authored articles for "Model Airplanes News", "Sailplane and Electric Modeler", "Electric Flight UK" and other magazines. Ken Myers, President Electric Flyers Only (decades), Editor Ampeer electric flight newsletter (decades), Vice-president Midwest RC Society (decades), Editor Midwest Monitor newsletter, President and founder of the Union Lake Flying Organization (now United Flying Organization in Hartland, MI), Contest director (UFO pattern meets 1980-1986, electric meet Mid-Am since 1985), AMA NEAC (National Electric Aircraft Council) SIG chairman 1995 & 1996, Head flight instructor Midwest since 2008, AMA Leader Member (decades), AMA Carl Goldberg Award (2011), AMA Hall of Fame (2012) Major accomplishment in electric flight, learning from and reporting on Keith Shaw's phenomenal Scale electrics. Main interest - sport and sport scale electrically powered fixed wing aircraft. |