By Ken Myers Preface Please be aware that this is an opinion piece. MY OPINIONS are based on over 50 years of flying RC planes and well over 40 years as a RC flight instructor. YouTube has a lot of videos covering the topic of RC airplanes. That's good, but... Visiting an RC flying site, where you can actually see RC model airplanes in use, is better. Real life experience is invaluable. While visiting, you will see the area required to fly different types of planes and actually see various types of planes in action, as well as the support equipment being used. Local hobby shops, that have a good selection of RC equipment, usually have a list of known flying sites in the area The Academy of Model Aeronautics has a list of chartered flying sites. A search within 25 miles of my zip code showed 17 clubs in this area of southeastern Michigan. You may, or may not, want to join a club. That's fine. You should still try to visit a club in your area just to see the 'hobby' in action. There are links to the various clubs' Web sites on the AMA search site. Their Web sites usually have maps to their flying sites. Plan your trip on a good flying day. Do not try to visit an RC flying field when its too cold to be comfortable outside or when the wind is standing flags straight out and the traffic signals are swaying a lot. That tip about the 'weather' also holds true when you are learning to fly. While the day may seem very pleasant, temperature-wise, it may not be a good RC 'learning to fly day'. When just learning to fly RC planes, breezes should be at a minimum. It is imperative to be patient and wait for the correct conditions, whether you are teaching yourself or you have located a flight 'instructor/mentor'. YouTube videos show planes flying, but until you actually visit an area where RC planes are being flown, you have no reference as to how much area your choice of an RC training plane actually needs. Words like 'backyard' and 'park' abound in many sources. In reality, those descriptions, are at best, subjective, as to the actual physical size of the area. More importantly, the area to fly in is dependent on the skill of the pilot. As a beginner, your skill level is zero. Flying in a 'park', with others present that are not involved in your activity, presents a clear and present danger to them and it is a liability that you have chosen to introduce in that area. The area required is also dependent on the type of plane you select as your trainer. There are a lot of planes that make excellent trainers that cannot be flown in a 'backyard' or 'park'. You need more room than you think. The area needs to be clear of 'objects' such as trees, poles, fences, goals, backstops etc. If they are present in the area you've chosen to fly in, you WILL hit one of those objects. The YouTube video shows a beginner who chose to fly in a 'park'. It didn't work out well for him. He also made the mistake of not choosing a good trainer plane as his first RC airplane. Don't let this happen to you. Even very experienced RC pilots can misjudge and not choose the correct flying area. I wanted to do a maiden on a new 'park flyer' type plane, but I didn't want to drive out to the RC flying field I use. I did everything wrong. The area, a local park just down the street, was large enough. It was early enough in the spring that there was no one using it. Unfortunately, it is filled with many objects. It flew okay. The wind was quartering from my front right side, so I chose to land at an angle to how I was flying so that I could land into the wind. There were no leaves on the trees yet. I didn't see the 15 foot tall tree behind me and to my right. I flew right into its branches. The plane caught and rested in the branches about eight feet off the ground. A trip home, to get a ladder, was required to retrieve the plane. The point; choose an area that is larger than you 'think' you need and be sure it is free of objects. Choose to orient your flight so that takeoffs and landings are into the wind. This is a 'sad' video. The user was a low time pilot who chose a horrible flying site. If there are poles or trees, you WILL hit them. The pilot lacked both the skill to fly the plane, even though the advertising states in the supplier's video, "THE ALL-PURPOSE AIRPLANE THAT ANYONE CAN FLY", he also lacked sound flying site selection judgement. Don't let this happen to you! When setting up to fly, be sure that the sun is behind you while you are flying in front of yourself. If the sun is not behind you, you WILL fly the plane between you and the sun. It WILL happen. When it does, you WILL be blinded for several seconds. Spotting the plane again and picking up its orientation will be extremely difficult. About 5 seconds of this video shows what happens when a plane flies through the sun. The camera recovers much faster than your vision! Your flying gear should also include a hat with a brim and sun glasses. The brim, if worn to the front of the hat, will help shade your eyes for a better view of the plane and sun glasses will reduce squinting when looking at a bright sky. A bright sky can even happen on a totally cloudy day. Dark, totally cloudy, days are not good days for beginners to fly. No matter what color the training plane is, it tends to 'look' gray against a very gray sky. There is little definition between the plane and its background. Orientation becomes extremely difficult. Even very experienced pilots can 'lose' the plane for an instant with this type of cloud condition, but their experience usually 'saves' them, while a low time pilot can totally 'lose' orientation and crash. The Flite Test video shows two planes flying on a bright, yet totally cloudy day. Selecting a good trainer airplane is extremely difficult. You will hear many, many, many opinions on what makes a good trainer. Your individual financial circumstances, personality and location play an important role in determining what plane will be best for YOU to begin with. No matter what decision, or path, you decide to follow, there are some basic 'rules' for selecting a plane that will work as a good RC trainer. Some, or all, of these suggestions should be taken into consideration when selecting your first aircraft. 1. The fewer the number of functions you control, the easier it is to learn.
2. The plane should be 'relatively' slow. This allows your 'untrained' brain to 'learn' the stick inputs required to 'make' the plane do what you want it to do. A plane can only fly slowly if it has a low wing loading. 3. The plane should be somewhat durable. That doesn't mean that it won't break if an unintentional landing occurs, but that most of it will be flyable again soon after a minor repair. Foam type planes are, for the most part, the easiest to repair and get flying again. 4. The plane should not necessarily be 'beautiful' in your mind. Beautiful planes come later in the learning curve. There should be no fear of messing up your trainer in the back of your mind. If there is, you've chosen the wrong trainer. 5. Electrically powered trainers have almost no learning curve regarding the operation of the power system at the flying field. Turn it on and go flying. Gasoline and glow fuel powered engines do have quite a learning curve themselves. Move onto them later if you are interested in them. 6. The plane's flight characteristics must match the area you intend to fly in. It is not so much a matter of size of the area, but how much room the plane needs to land when flown by a beginner. 7. A larger size plane, with a low wing loading, is better to learn on than a smaller size plane with the same wing loading. The flying area must be suitable for landing the larger size plane. 8. Your progress is totally based on you as an individual. Some folks pick up RC flying more quickly than others. How quickly it is 'learned' depends on often RC flying can be practiced and how frequently the sessions can be connected. The Types Ready to Fly (RTF), everything is in one box that allows you to make one flight and then wait a considerable time for the provided single battery to recharge on the extremely low powered battery charger provided in the box. Bind and Fly (BNF), almost everything is in one box that allows you to make one flight and then wait a considerable time for the provided single battery to recharge. A Spektrum brand transmitter (Tx) is a required purchase to match the Spectrum receiver (Rx) installed in the plane. Tx-R (transmitter ready) planes, sold by Tower Hobbies require a transmitter that can transmit on the SLT protocol; Tactic or the newer Hitec. FTR (Futaba Transmitter Ready) planes, sold by Motion RC, require a Futaba transmitter. Receiver Ready (Rx-R) or (RR+), much of everything is in one box that allows you to make one flight and then wait a considerable time for the provided single battery to recharge. A transmitter (Tx) and receiver (Rx) of the user's choice is required. Ready Built/Plug and Play (PNP) or (RR), much of everything for the airframe is in one box with some onboard equipment installation completed. Some assembly of the airframe is still required by the user. It also requires the battery, battery charger, transmitter and receiver to be purchased separately. Almost Ready to Fly (ARF), contains the pre-finished airframe parts ready for assembly. The user must install the radio system and power system of choice. Kits, assembly from some type of construction material is required. All of the components for the power and radio system must be selected by the builder and installed. Scratch Built, the airplane is built from plans using some type of construction materials. All of the components for the power and radio system must be selected by the builder and installed. Glow powered trainer conversion to electric power, ABSOLUTELY NOT FOR BEGINNERS. Self-designed, scratch built, ABSOLUTELY NOT FOR BEGINNERS. 1. 3-channel electrically powered gliders
2. 3-channel electrically powered glider-type pushers
3. Micro 3-channel Trainers
4. Conventional (tractor type) 3-channel Trainers
5. (Pusher type) 4-channel/function glider-like
6. Conventional (tractor type) 4-channel/function Trainers
Only two Radio Systems were used to calculate the pricing on the "Ken's Recommended Top 5 Trainers; Spring 2018" and the "30+ RC Trainers; Spring 2018" listings. The Horizon Hobby Spektrum DXe transmitter, and any required accessories, was paired with the Horizon Hobby BNF planes. The Tower Hobbies 424 4-Channel SLT System was used for the recommended radio system for airframes that require both a transmitter and receiver. They were chosen because they are the least expensive, reliable options from major US suppliers. The transmitters are both known as Mode 2 transmitters with yaw (Rudder) and thrust (throttle) control on the left stick and roll (aileron) and pitch (elevator) control on the right stick. 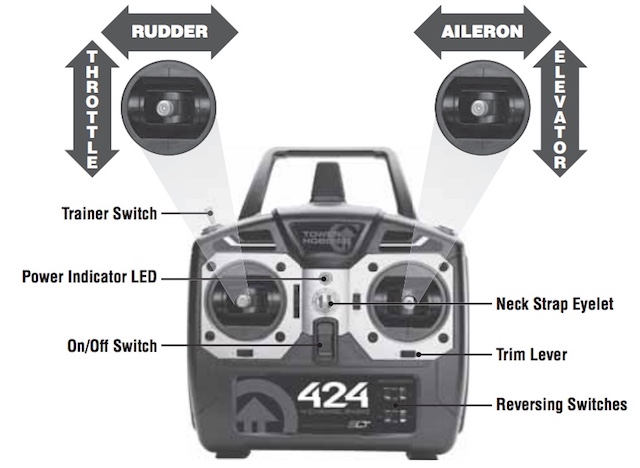
Tower Hobbies Photo/Diagram Mode 2 is the most used mode in the US. There are also Mode 1, Mode 3 and Mode 4 transmitters with the yaw, thrust, roll and pitch functions assigned to different sticks and stick movements. The manuals for each of the trainer aircraft show the stick movement in relationship to the moveable surface movement on the airplane. 
Diagram from the Horizon Hobby Super Cub S The diagram shows a typical 3-channel setup from the rear. If a transmitter is used that has an 'LCD screen' on it, and it provides a means for the mixing of the channels, typically called a computer radio, the rudder channel can be mixed 100% to the aileron channel. The result is that either the left or right stick can move the rudder equally. Be sure that the rudder moves in the same direction with both sticks. Using the left stick, by moving it left and right, on the ground provides for steering in a similar manner to a typical 4-channel set up and moving the right stick, right and left in the air, provides turning in the air in a similar manner to a typical 4-channel set up. The particular radio brand used will determine which channel to plug the rudder servo into. Some trial and error is required with each system. 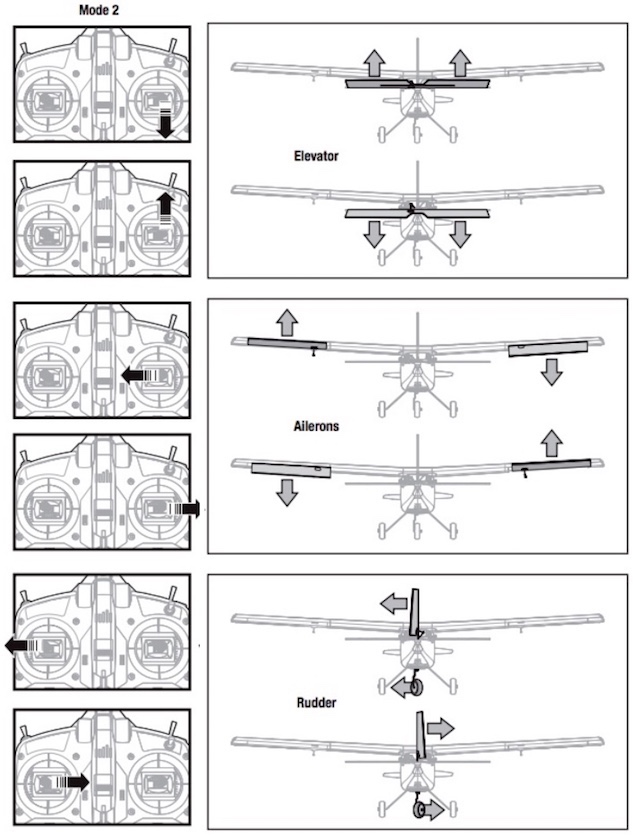
Diagram is Modified from the Horizon Hobby Apprentice for a 4-channel Apprentice The diagram shows the movable surface movements, from the rear of the airplane, in relationship to the stick movements on the transmitter. The view of the plane is from the rear. If you choose to use an RC instructor or mentor, the best way to start, he or she may have specific recommendations for a radio brand based on personal experience and the ability to 'buddy box' the plane to their personal transmitter. Selecting a Radio System is a difficult decision for a person new to RC airplanes. Ready to fly (RTF) packages include an installed radio system and transmitter. Other types of airframes require some choices to be made. Today's 2.4GHz radio systems, provided by US suppliers, Horizon Hobby (Spektrum), Hobbico (Futaba, Hitec, Tactic, and Tower Hobbies), and Aloft Hobbies (FrSky), are all pretty reliable. It is important to keep in mind that while all of the transmitters are transmitting across the 2.4GHz band, using spread spectrum frequency hopping, the way that they communicate with the 'receiver', their protocol, is different for each brand. A transmitter of one brand cannot usually communicate with another brand's 'receiver'. The user is then somewhat 'locked into' that brand. Many, if not most, of the modelers, who've been in the hobby for awhile, will have more than one transmitter and may even have different brands of transmitters for different purposes. Trainer planes only require the simplest of radio systems. The suggested, and recommend, Tower Hobbies radio system is for all of the airframes noted that are not sold by Horizon Hobby. It is relatively inexpensive and comes with its companion receiver. Tower Hobbies is an extremely reputable supplier in the US and backs up what they sell. The Tactic radio system uses a protocol known as SLT. It is also the same protocol as used by Tactic radio systems. The SLT protocol can also be selected, as one of two protocols, on the newest Hitec radio systems. When using only 3-channels of a 4-channel (4 function) system, or more, the roll/yaw control needs to be on the right stick. That means that the rudder servo needs to be plugged into what the supplier calls the 'aileron' channel. On a Tower Hobbies or Tactic radio system that is Channel 1 on the receiver. The receiver channel position will vary with other brands of receivers. Channel 3, the throttle channel, on the transmitter needs to be reversed to operate with electronic speed controls (ESCs). This also applies to Futaba systems. Other systems will vary. Purchasing a radio system from overseas can, for some people, be a problem. The transmitter should be configured to Mode 2 when delivered or at least note that it can be configured to Mode 2 by the user. The radio system SHOULD NOT NOTE that it is for use in the EU. The European Union (EU) and other countries in Europe require less power output of the transmitter to meet their specific radio frequency transmission regulations for these types of transmitters. Less power out equates to less range. The above paragraph, in red, is in error. Andy Kunz notified me via RC Groups on April 17, 2018 and wrote the following. The following is by Andy Kunz: American users should not care about if their radio has any label about EU. They should ONLY care that their radio has a valid FCC ID. Operating equipment in the USA that is not approved for use in the USA is illegal. The range of modern radio systems, even in EU power levels, is measured in miles. While it is true that lower power will result in shorter range, it really doesn't matter because the range is still several times farther than the eyes can see your model. Whether a radio is generating 100mW or 200mW output doesn't make any difference for normal RC operations - 100mW will still control the model over a mile away. The output power is only about compliance with the law; it has no practical bearing on the effective range for the average modeler. Now to the practical application of this information: We build all of our DXe radios to be compliant with EU law, meaning that a DXe labeled for use in the USA will have the same output power as a unit labeled for use in the EU. All the module systems that we made (DM8 and DM9 being most popular) were always built to EU power levels. At Joe Nall about 9 years ago we did a demo of Mike McConnville flying a giant scale biplane to demonstrate the range. It was a mile out before Mike pulled it to vertical - it was almost invisible before he did that. (We advertised this in our "JR Challenge Series" ads.) Andy As with most types/brands of radio systems they require that specific brand's receivers. Since the radio system and its components are coming from overseas, deliver times can be quite long at times. The reliability of the overseas' company to deliver as promised sometimes comes into question. There are NO trainer planes that come with everything you actually need; zero, nada, zip!!! Many suppliers 'suggest', as optional items, more batteries, a 'better' battery charger and most importantly of all, a fire resistant container for Lithium Polymer (LiPo) batteries. Those three items are REQUIRED to learn how to fly RC planes and to protect yourself and your property. More than one battery is required, unless you want to wait an hour or more between flights. That is the typical time it takes a depleted LiPo battery to recharge, especially with the provided chargers in RTF and BNF packages. The chargers supplied in RTF and BNF packages are dumb. They provide no information to the user as to the state of charge or milliamp hours (mAh) returned to the battery during a charge. LiPo batteries should never be drained to more than 80% of their stated capacity. The mAh returned to the pack is used to determine how deeply the battery was discharged. The supplied chargers could also be called, "Plug and Pray" chargers. LiPo batteries should always be charged outside your vehicle, or your house, on a noncombustible surface and away from anything combustable. Some of the "Plug and Pray" chargers plug into an accessory socket of a vehicle with a chord that is not long enough to exit the vehicle, so that the LiPo battery cannot be charged outside the vehicle. Other supplied chargers plug into a USB port. That port could be on a device in your house or your vehicle. Some are even supplied with an AC adapter to charge in your house. Both types of supplied chargers are a bad idea just waiting for a LiPo event to happen. LiPo batteries can contain a lot of energy. They are energy dense when fully charged. They should NEVER be stored for long periods of time at the full charged state. Some folks say that stored LiPo batteries, not fully charged, have no risk of causing an event. I personally know two people who will disagree with that statement, as they both had 'stored' LiPo events. Here is a link to some more reported events on RC Groups. I can only recommend one brand of LiPo Sack or Bag, the real LipoSack brand from Mark Wood in California. There are cheap bags. They will actually burn. The video shows many other brands actually have a coating on them that will burn and add fuel to the incident. To learn more about LiPo incident containment, see Part 2 of "Learning About LiPo Batteries". Disclaimer: I do not know Mark Wood. I have never met Mark Wood. I have NO financial interest in LipoSack. I am a paying customer, like anyone else. Please, do yourself a favor and purchase only the REAL LipoSack that meets your needs. It is made here in the USA and it is really cheap insurance. LiPo batteries should not be discharged to lower than 80% of their stated capacity. A flight must be timed to keep this from happening. A timer on a smart phone or inexpensive kitchen timer can be used. Some computer-style radios have built-in timers. The use of a timer is essential for electric flight. LiPo batteries should not be discharged too deeply, or they become permanently damaged, lose capacity and wear out quickly. Running a LiPo battery down to the low voltage cutoff (LVC), which is set in the electronic speed control (ESC), is too low! Don't do that. Use the 80% 'rule'. That means do not discharge a LiPo battery lower than 80% of the stated capacity as noted on the label. The best option is to have a transmitter that has a count down timer than can be set to trigger on the throttle channel to count down every time the throttle is "on". Unfortunately, that kind of timer is only available on some of the computer type transmitters. When a transmitter does not have a timer, a stand alone timer can be used. Before the age of smart phones, with a built in timer app, kitchen timers were used. On occasion, I still use the Taylor Digital Compact Timer, sold at Meijer for less than $5, as I find it more convenient than a smart phone. When a battery is charged, on a decent charger with a screen display, the display indicates the milliamp hours (mAh) returned to the pack. Sometimes the display may indicate amp hours (Ah) for larger capacity batteries. To change Ah to mAh, multiply the Ah by 1000. If a label notes the LiPo battery's capacity as 2100mAh, it should NOT be discharged lower than 2100mAh * 0.8 = 1680mAh or 1.68Ah. At home: Determine the maximum capacity to be returned to the pack or packs.
Take that number with you to the flying site. How to use the timer at the flying field is found here. I extensively researched 30 RC planes which suggested, in their literature, that they were 'trainer' types. The complete list, and my notes are located here. I was very surprised, after analyzing my data, that four of the five planes I am recommending are from Horizon Hobby. All four have AS3X stabilization and two also have a version of SAFE. Watching about one minute of this Flite Test video gives some important information about using SAFE and weaning off it as soon as possible. Don't confuse SAFE and its variations with AS3X stabilization. I've tried to give a close approximation to the actual amount of money that might be involved in getting into the hobby. I have included an extra battery or batteries, a decent charger for the type of battery and a LiPo sack in the pricing to more closely reflect the actual cost. Shipping and taxes are not included. Specific recommendations, my comments regarding the aircraft and links for purchasing items can be found here. 
Horizon Hobby Photo hobbyzone Champ RTF ($89.99), wingspan 20.3" - $178.90 The Flite Test video shows how well, and easily this plane flies while the guys are having some fun as well. 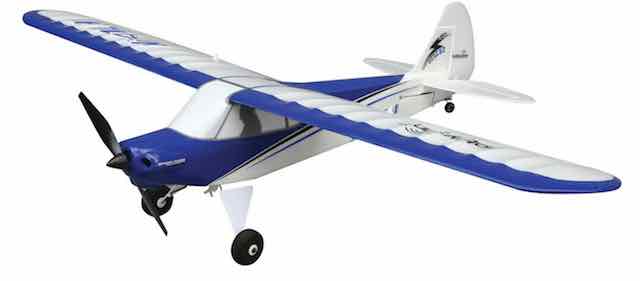
Horizon Hobby Photo hobbyzone Sport Cub S RTF with SAFE ($129.99), wingspan 24.3" - $219.90 The Flite Test video shows three of these planes in action indoors. 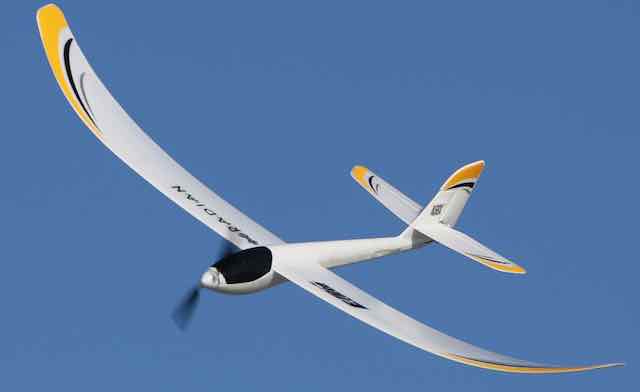
Horizon Hobby Photo E-flite UMX Radian BNF with AS3X ($89.99), wingspan 28.7" - $241.89 - Transmitter is purchased separately but included in the price you see. The Flite Test video shows three of these planes in action. 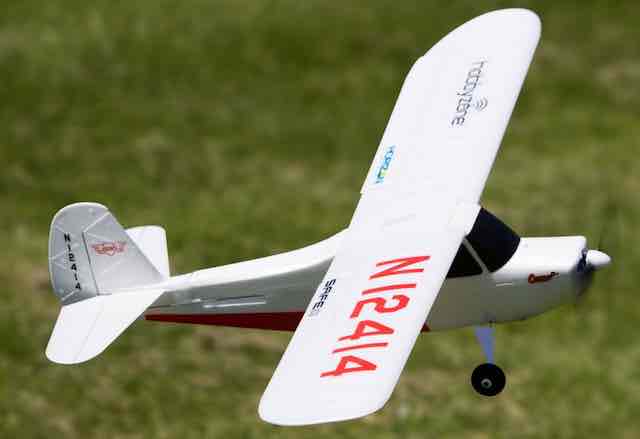
Horizon Hobby Photo hobbyzone Champ S+ RTF ($169.99), wingspan 27.3" - $287.92 The video is from an unbiased 3rd party who shows it actually working as described. 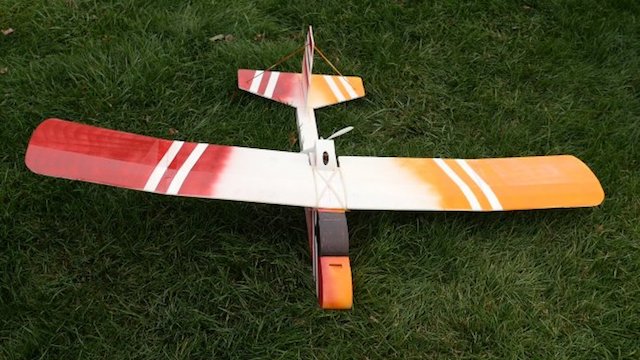
Flite Test Photo FliteTest FT Explorer wingspan 57" - $254.33 to $291.33 plus adhesives
Building from a kit or scratch building from Flite Test's free plans is an excellent way to enter the hobby. If you think that you can't build your own trainer, watch the build video to see how easy it can be with the help of the folks at Flite Test. Some people find computer RC flight simulators useful in learning hand to eye coordination and enhancing muscle memory. The Phoenix R/C Pro Simulator V5.5 with DX6i Transmitter is $219.99. The transmitter is a generation old, but could be used instead of the DXe mentioned in my component listings. The Great Planes RealFlight RF8 w/InterLink-X Controller is $179.99. The controller can only be used with the simulator. A Detrum 8-Channel R/C Flight Simulator Controller is $29.99. It requires the purchase of the ClearView RC Flight Simulator for $39.99. The Dynam 6CH 6-Channel FMS USB RC Flight Simulator DYU-1002 Mode 2 Left Throttle Packaged with the free FMS RC simulation software can still be found on Amazon for $29.64. Do a search on Amazon for it. More information on RC flight simulators can be found in the RC Groups Simulators forum. Almost all RC Flight Simulators computer programs are for Windows OS systems. I wrote a review of AeroFly RC7 for the Mac. Many areas in the USA have venues that allow indoor flying for certain types of small RC model aircraft. A Google search for indoor RC flying in your area might list some of these venues with dates and times. Unfortunately, indoor RC flying is scheduled at venues when they are not being used for their primary purpose, and that means the hours for RC flying are generally while folks are at school or work. There is a lot of information in the manual that comes with the plane regarding having a successful first flight. Read it and then reread it. If at all possible, have an instructor/mentor fly the first flight, which is called the maiden flight. The FliteTest video is very good. It clearly demonstrates what to do when arriving at the flying site. The very first skills to be acquired are takeoff/launching and landing as demonstrated in the video. All of the demonstrations in the video have the pilot standing behind the plane for takeoff. This is the perfect place to start, but the pilot cannot stand behind the plane when it is landing. To prepare for landing, the flight path should be a rectangular pattern with 90 degree turns where the 'long' sides of the rectangle parallel the center line of the runway. This is demonstrated in Flite Test's next video. The plane is always kept in front of the pilot. The pilot's shoulders should parallel the center line of the runway. The pilot's head needs to turn to look at the plane when landing. Practicing takeoffs/launches and landings with the plane starting parallel to the pilot's shoulders are required before actually starting to fly.  In the example diagram, the wind is blowing from the west, the pilot is facing north, away from the sun. The plane's takeoff position always remains the same; the far east end of the runway in the example. It doesn't matter whether the plane is taking off on wheels or being hand launched by a buddy. The pilot starts the takeoff in Position 1 and does a landing straight down the center line of the runway. After several takeoffs and landings down the center line of the runway, the pilot moves to Position 2 and repeats several takeoffs and landings. The process is repeated until the landing space is too short to safely land on the runway. Position 5 in the diagram hints at an ending position. If the plane is moving parallel to the pilot's shoulders from the pilot's right side, moving the stick to the right moves the plane away from the pilot. If the plane is moving parallel to the pilot's shoulders from the pilot's left side, moving the stick to the left moves the plane away from the pilot. Once the parallel takeoffs and landing have been mastered, it is time to fly. The Flite Test video on How to Fly does a good job of describing how to control the plane in the air by moving the transmitter sticks only a little bit and then releasing them. They are not held in any position for too long. Practice flying the rectangular pattern in both directions, using 90 degree turns, along with horizontal figure 8s are demonstrated, as stressed, in the video. Be sure to follow all of the preflight checks noted in the Takeoffs and Landings Video. Also take ALL of the manuals and instructions received with the plane, radio system and battery charger to the flying site. 1. Pick the calmest day possible
After performing all of the preflight check list checks and practicing Takeoffs/Launches and Landings, and following the advice in the flying video, the first flight, or maiden flight, has a high degree of success. For an even higher degree of success, an instructor/mentor is recommended. Keep in mind that the area to fly in must be appropriate to the size, weight and speed of the finished plane. There should be no obstacles present. The flyover area MUST be clear of people, animals or moving vehicles. You should never fly the plane toward yourself. If the plane is coming at you, turn the plane to resume a rectangular pattern. Once you have mastered flying, it is time to use the timer to check for the safe amount of time to fly without exceeding 80% of the battery's capacity. 1. Set the timer for 3 minutes, but donŐt start it yet.
Use a 2nd fully charged battery and follow the same procedure for a second flight. The second flight is used to verify the first flight. Charge the 1st battery used and note the mAh, or Ah, returned to the pack by the charger. It is displayed on the charger screen. Using the 2100mAh battery as an example.Ę
1150mAh divided by 3 minutes gives the average capacity used per minute.
With 530mAh still available, setting the timer for 4 minutes and repeating the procedure should be safe. Charge the second pack flown. Use the same procedure to verify the numbers from the first flown battery. The process is continued until the mAh consistently returned to the pack is close to the number calculated as 80% of the pack's capacity. The useable capacity, calculated for the 2100mAh pack, was 1680mAh, therefore whatever flight time consistently gets the pack to around 1700mAh should be just fine for the example battery. This video is Flite Test's "RC Planes for Beginners: How to Choose" from their Beginner Series. This is Ep. 1 - Oct. 16, 2013 The video is sponsored by Horizon Hobby. The aircraft shown are, or were, available from Horizon Hobby as well as local hobby shops. There are other suppliers of good beginner aircraft. This is Flite Test's "Top 5: Best First RC Planes" - Feb. 13, 2017. It is an update of the original's information. The video covers both 3-channel and 4-channel planes. "1 Tip for New Beginner RC Airplane Pilots" is a thread on RC Groups where folks share tips for beginning RC pilots. EVERYTHING YOU WANTED TO KNOW ABOUT ELECTRIC POWERED FLIGHT" by Ed Anderson, is an online book. "Getting Started in Electric Flight: A Power System Introduction and some BASICS", by Ken Myers, is an article covering the basics of electrically powered flight. To Reach Ken Myers, you can land mail to the address at the top of the page. My E-mail address is: KMyersEFO@theampeer.org |