By Ken Myers, October 5, 2016 There are a lot of different 'foams' used in the construction, or partial construction, of RC airframes. Building and Flying Electric Sport Scale
Keith noted several uses for 3/16" foam board (foamboard) in his beautiful scale planes.
There is a wonderful material called foamboard. It can be purchased at art stores. It's basically 3/16" foam with index card bonded to both sides. It has no apparent grain. Therefore, great big holes can be cut out of it. It weighs about the same as 3/32" balsa. It's a little thicker. Virtually every single airplane I fly has bulkheads made of foamboard. The only drawback is that you MUST use RC56 glue. I haven't cut a balsa bulkhead in many, many years. I just don't know how to cut balsa bulkheads without grain fractures. Weldbond sticks to the foamboard. If you use epoxy, or typical white glues, it makes a very hard joint, causing a delamination failure. Weldbond All Purpose Adhesive, (identical to RC56), can be purchased from a hardware store. It's a milky white liquid that smells a little like vinyl. It's actually a polymer. You can use that to glue the foamboard to the balsa. The bulkheads can be cut on a band saw. Just treat it like balsa. On great big airplanes, I've used it for ribs - I mean 14 foot wingspan. In the forward fuselage there are usually enough stringers for strength. Use some sort of balsa block for the nose with another bulkhead just aft. With foamboard half shell fuselages, on every bulkhead, somewhere in the middle, like with the crutch, set up a place where there is going to be a pair of lengthwise 1/8" x 3/8" pieces of spruce. All of the outer structure is gong along for the ride. It is just there to make the model look like a real airplane. The inner structure is carrying the load. Since the bulkheads are load bearing, face small areas of the bulkheads with 1/64" ply to help carry the load. The load goes from the strips to the 1/64" ply and is transmitted across a larger surface of the foam board, tying them together, distributing the load.  To make a curved tail outline with straight pieces is a pain. Making a laminated tail is easier. Use a piece of foamboard and undercut the outside dimensions by about 1/4". Cut strips of 1/16" X 1/4" balsa and stack it up with white glue between the laminations, wrap it around the foamboard and tape it in place. Let it dry, take the tape off, pin it down and fill in inner structures. You can use 1/32" strip for the really small airplanes. It is very strong, like eggs and circles. It weighs virtually nothing. 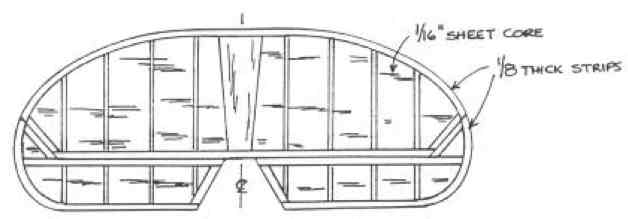 If you don't want to do all that, you can use the "core" method, leaving the foam board inside.  Turn it over and repeat on the other side. Sand it to section. My History
In 2009 I built a foam board airframe based on Carlos Reyes' Modifly. It used a KFm1, bottom-stepped, flat-plate type airfoil. The hardest part of building it was removing the 'card stock' to just use the foam. The parts had to be soaked in my bathtub to remove the 'card stock'. The 'card stock' on Dollar Tree Foam Board peals off easily. Some might say, too easily. The plane flew okay, but not great. In December of 2015 I started a project where I was learning more about LiPo batteries. I'd purchased a lot of 3S 1000mAh batteries, but had no plane to fly them in. I wanted something really simple to build. I remembered that EFO vice-president Richard Utkan and EFO member Owen Morgan had brought Dollar Tree Foam Board (DTFB) planes to EFO meetings. In January of 2015, Richard shared his Flitetest Old Speedster. 
EFO vice-president Richard Utkan with his FliteTest (FT) Old Speedster The previous March, Owen Morgan shared his Flitetest Spitfire. 
EFO member Owen Morgan with his FliteTest (FT) Old Spitfire Their successful planes, constructed of this, new to me, building material, intrigued me. I started searching and researching Flitetest. DTFB is a bit less than 3/16" thick light foam covered with craft paper-like card stock.It costs $1.00 per sheet at Dollar Tree stores. Its proper name is, "Readi-Board, FOAM BOARD, ADAMS, R.L. ADAMS Plastics, Inc., Wyoming, Michigan 49519". It is said to be 30 inches by 20 inches, but it is NOT! For 12 example pieces, the supposed 30" length was never 30". It averaged 29-13/16", give or take a little each way. The 20" width never measured 20". It ranged from 19-15/16" to 20-5/32". Those dimensions are really only important for scratch designers and builders when they are laying out parts. It is approximately 0.177" (4.5mm) thick. It weighs, with the craft 'card stock' on it, about 0.19 grams (0.0067 ounces) per square inch or 26.9 grams (0.95 ounces) per square foot. The average weight for the average 599 square inch sheet was 113.3g (4 ounces). The typical, 0.215" (5.5mm) thick , foam board sold at Meijer, Walmart and craft stores weighs about 219.5g (7.75 oz.) per sheet or 52.85g (1.86 oz.) per square foot.
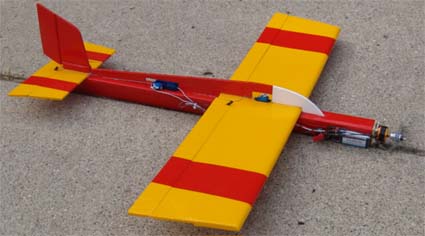
I decided that the simple looking Flitetest Old Fogey, enlarged 1.22 times for my 3S 1000mAh packs, would make a good learning project. Since I quickly learned that I could not use my wife's hot melt glue gun and glue, it was the wrong type gun and glue, FOAM-TAC, basically a type of contact adhesive, was used throughout the construction, and many, many reconstructions of the prototype. The reconstructions were caused by the Old Fogey being and almost unflyable design! DTFB allows modifications to be made easily, quickly and cheaply. There were a lot of modifications needed to my Old Fogey! Once the prototype was flying reasonably well, a completely new second version was created. The second version included all of the modifications I found necessary, and it was covered with TopFlite EconoKote, which worked very well. Video of the final prototype Old Fogey 1.22x flying. During the time I was working on the Old Fogies, I was learning more about DTFB. Besides FliteTest, I found several sources of information on RC Groups and the Internet with DTFB tips, tricks, and plans for airframes. On RC Groups, in the Foamies (Scratchbuilt) section there is a sticky named Foamboard Scratchbuild University. There are also a lot of threads in that forum with the words Dollar Tree Foam, FliteTest or FT and DTFB in the title. A search of the forum using those and similar words will bring them up. Later in the year, I decided I would like to have a flying discharger for the left over charged LiPo batteries from training sessions where I did not use all the batteries that I had charged. I looked at several possibilities. Something with an "Armin Wing"? 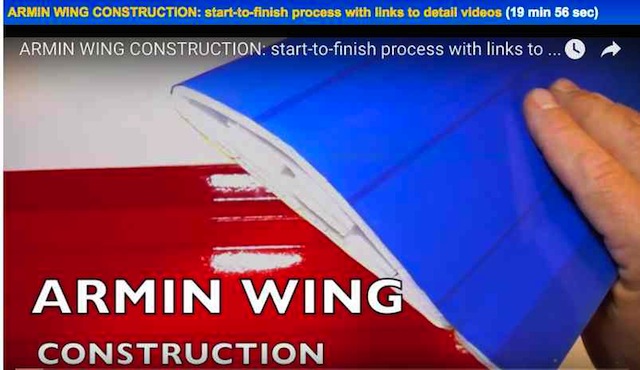 No, I didn't really want a flat bottom wing, and I really did not like the construction. The FliteTest (FT) Racer, Slinger version  No, I didn't care for the wing construction. While watching the video for the FT Baby Blender v2 build, I saw a construction technique more to my liking. Wing construction starts at about 19 minutes into the video. 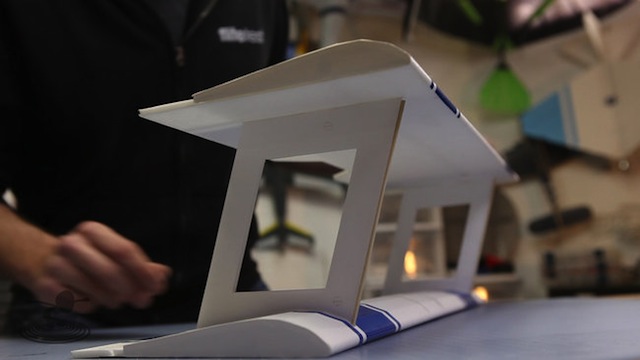 While the airfoil was not what I was looking for, part of the technique seemed like it should work and would be able to make a symmetrical or semi-symmetrical airfoil. I decided to try to create an Ugly Stik based on the original Phil Kraft design. 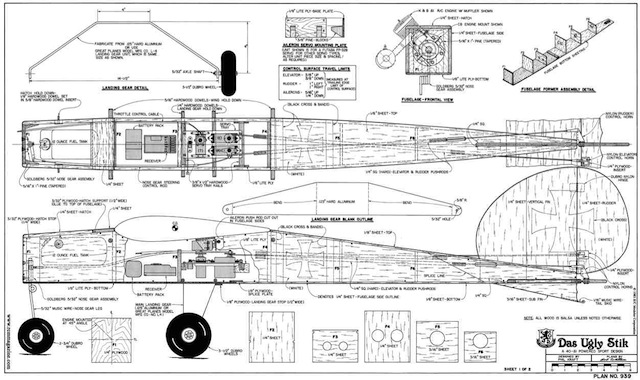 The original version of my Stik used the identical proportions of the Phil Kraft design. A Clark-Y airfoil was chosen, although not used on the original. Once the wing was 'designed' in CAD, a span shortened full-size prototype model was made. The original design was later modified, but proved that I could make a Clark-Y airfoil using DTFB. The whole design went through several changes, including a completely new, longer fuselage, 3/16" plywood firewall and new vertical fin and rudder. The final change was modifying the angle of incidence, by decreasing it, right on the second fuselage, so that they plane would not climb too much at full power. Again, the modification was fairly easy right on the previously finished and the now flying fuselage.  The airframe was covered with TopFlite EconoKote. I measured the weight of the airframe before applying the covering and again after. The EconoKote covering added 44.5g (1.57 oz.) to the overall weight of the airframe. The wing area is approximately 340 sq.in. or 2.36 sq.ft. The covering added about 0.66 oz./sq.ft. I'm pretty sure using colored packaging tape, an often used technique for DTFB covering, would have added that much, or maybe more, weight. Adhesives I've Used
Other Construction Materials Used Besides DTFB
Construction Tools
Be careful where parts are laid if spray adhesive is use to affix templates to the foam board. It will pick up bits of 'stuff' after the template is removed. Adding pull strips to the paper templates, that have no spray adhesive on them, makes the templates easier to remove. Use Great Planes control horns. They use Phillips screws instead of straight slots. On Tuesday, October 4, I remembered that I had forgotten a reference that I'd run across. It was for Nic Lechner AKA nerdnic. I watched is video about the design of what he calls his 'nnSpeedwing'. I believe the wife heard the forehead slap upstairs. The technique was basically the same as mine. Duh. There are some technique differences between our two methods. Instead of using a few 50% cut lines in front of the spar on both the top and bottom inside the wing area, I removed the paper/'card stock' between the front of the spar and leading edge on both the top and bottom and gently encouraged the foam to bend in the direction I wanted before actually gluing the top of the wing panel in place. I also built a capture 'spar' to align with the rear of the top spar to help in alignment. My leading edge was created using a Phillips head screwdriver. I put my servos on the outside of the wing. He used a hot melt glue gun and I used Titebond, pins and bricks. For the type of wing on the Stik, I used 'actual' built on wing tips. Even with the differences between nerdnic's method and mine, overall, his ideas are really good. I plan on using them in my next build, as the plane I have in mind has the same 'shape', but it will have landing gear in the wing. Note: I did find out why I didn't run across Nic's video when doing earlier research. It was not posted until September 26, 2016. |