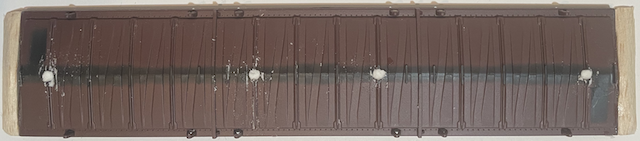
NMRA Recommended Weight The NMRA provides recommended weights, based on the length of the rolling stock, in each scale. I created a tool to find out how much the caboose should weigh according to NMRA recommended practices for HO scale. The tool in PDF format for downloading.
 According to the guide, the caboose should weigh 3.5 oz. or about 99 grams. It only weighed 2.18 oz. or 61.9g as delivered. According to the NMRA recommendation, it needs about 1.3 oz. or 37g of weight added, which I added. Using the recommended weight helps the rolling stock have less derailments and also "look more realistic" when rolling down the track. Once the track-work problematic areas seemed to be worked out, there were occasional problems with some of the rolling stock coming uncoupled when the trains were run or cars were being shunted onto spurs during simulated prototypical operating sessions. The reasons for the unwanted uncouplings were very apparent. The coupler matings were not all at the same height on the rolling stock and many did not center well. 
Side view Kadee #148 From watching many YouTube videos, it appeared that "Kadee" couplers were still the "gold standard" for couplers. Kadee #148 couplers were chosen to replace all of the couplers provided with the rolling stock. A Kadee HO height gauge was used to set the mating height of the couplers and to adjust the trip pins for proper clearance. Kadee #147's were chosen for the front couplers on the two Walthers' GP15-1s. Why the #147 couplers were chosen is discussed in and shared in this section where a car by car description of each conversion is detailed. Information regarding the rolling stock that came with the train set is shared here, as well as how the loose weight in the boxcar was fixed. On December 7, 2022, 7 pieces of rolling stock were ordered from Yankee Dabbler to continue testing the track and to have two trains running at the same time. They were shipped on December 13 and arrived on December 15, 2022 via the USPS 2-Day Priority Mail. The rolling stock included a:
The Lionel rolling stock had some major issues, and Lionel rolling stock is NOT RECOMMENDED. The two Atlas kits had issues with the instructions and parts fit. While getting the rolling stock into useful condition, a problem was discovered with the original Walthers' Conrail GP15-1 that caused a new one to be ordered. Lionel 1954380 2-Bay Covered Hopper PRR - Pennsylvania #257912 HO Scale ($9.99)
Both have coupler mounted trucks, plastic axles with metal wheels and plastic pins to hold the trucks to the frame instead of screws. Neither car rolls well. Coupler height seemed okay when compared to the other rolling stock, but it wasn't. Weights as received:
Atlas 20003019 C&O-Style Seel Center-Cupola Caboose - Conrail #46114 (MOW Scheme, gray, black) HO Scale ($18.99) Frame mounted coupler with plastic axle trucks. It doesn't roll well. Coupler height seems okay. It is attractive. Weight as received:
1782 Walthers Mainline / 40' 48AAR Bx GTTW #516184 (Scale = HO) Part # 910-1782 ($19.98)
Both have frame mounted couplers and plastic axle wheels. They both roll very well and the coupler height seems okay. Weight as received:
The first run, with all of the original rolling stock and all of the new cars at this time, showed a problem with the Lionel covered hopper going through one of the turnout's curve. None of the other cars demonstrated this problem through the same turnout. After watching the YouTube video "Lionel HO 2022 Rolling stock...it has some issues", I looked into what might be causing the derailment problem. Since I did not have a NMRA-98-1 Standards Gauge HO at that time, a Pittsburgh (Harbor Freight) 6" digital caliper was used to compare the width between the flanges of the Walthers GT boxcar and Lionel covered hopper. The Walthers width was 0.62x" and the Lionel width was 0.60x", that is only about a 0.02", or 1/2mm, difference. The covered hopper's axle/wheels were removed and adjusted to a width of about 0.62". The covered hopper was backed through the problematic turnout several times and appeared to be working. The whole train was once again used in both forward and reverse through the majority area of the track work. A new problematic switch area did show up with both Lionel cars and even the 53' gondola. 1/32" shims were added to the switch area in question. The whole train was run again with special attention given to the area that was just shimmed. 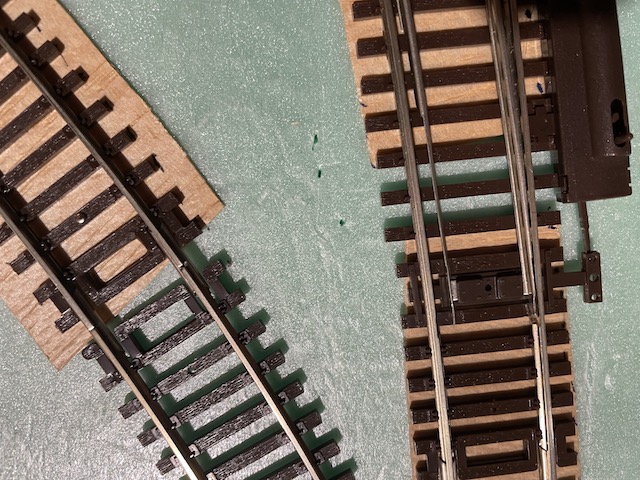 That did not totally fix the derailment problem. The covered hopper's wheels were picking the point when backed through the curved section of the turnout. The curved section points were adjusted using needle nose pliers. The whole train was run through that section of track with no problems evident. The Yankee Dabbler order included two pieces of kit rolling stock that had to be built.
STARBOND "Gap Filler" Thick 2000 CPS Viscosity Adhesive was ordered from Amazon on December 15, 2022 to assemble the kits per Jimmy's, recommendation via his DIY and Digital channel on YouTube, in his video titled "Avoid the frustration: Model Railroad Kit Building Tips and Tools for Beginners". Both boxcars are 5-3/4" long
The builds were more difficult than they needed to be. The instruction sheet parts diagram did not match the parts provided in the box. The coupler assembly was unnecessarily difficult to assemble and the coupler pocket covers were not the type shown on the instruction sheet. There were screws in the box to attach the coupler cover to the coupler pocket, but they were not noted. All of the parts appeared to be identical in both boxes but one box had the trucks, coupler parts and screws in a heat sealed poly bag while the other had the same type of parts in a resealable type baggy. There were some small molded plastic pins that were not noted on the instructions and appeared that they might have been used, at one time, to attach the trucks to the frame. They were not used in my build. It ended up taking a lot longer than it should have for two simple boxcar kits. Also, they were short of NMRA recommended weight by about an ounce each. They did not roll well, but are somewhat better at rolling than the Lionel covered hopper and tank car. The STARBOND "Gap Filler" Thick 2000 CPS Viscosity Adhesive finally arrived in the evening of December 18, 2022. By then I had already assembled the two boxcars using Jet Medium CA to glue on the sliding door brackets, the provided nuts for weight and an additional ounce, in each car, of RC plane stick on weights. The rest of the boxcar assembly really needed no glue. Once the boxcars were completed, the rolling stock was split between the CSX and Conrail locomotives with their respective battery cars to create two trains. Both trains were controlled by the LocoFi™ App on the Galaxy S7 Edge. The double run went well with no derailments, even when it was being demonstrated for my wife. Derailments occur more frequently when someone else is watching, or at least that seems to be the case. When I was at a train show in East Lansing, MI, in mid-November of 2022, I purchased the top of a 50' boxcar for $1.
The boxcar top was turned into a 53' gondola cover by shaping 1/4" balsa triangular stock and adding it to each end of the boxcar top after removing the top walk and filling the holes that attached the walk to the top of the boxcar.
The cover was primed with some gray spray paint and then spray painted gloss white.
1/16" square balsa cross pieces were glued to the bottom of the ends to align the cover over the battery car gondola. Access for changing the batteries was now very easy and the cover looked reasonably good.
The covered gondola battery car can be seen in this photo behind the CSX locomotive with its new cover. While retesting the run around between the two loops I managed to physically break the negative pin between the Conrail locomotive and battery box in the Soo Line boxcar while trying to figure out why the locomotive was derailing when it hadn't done that before. All of the rolling stock, moving in reverse, went through the turnout just fine but the locomotive kept derailing. 02/13/23: This was when the problem with the Conrail first appeared. That locomotive was replaced. New Micro-Mark pins were installed to replace the male that broke off in the female. I was never satisfied with the way the wires exited the Soo Line boxcar and the way the removable box part of the boxcar set on the frame. That was also taken care of. The Conrail GP15-1 with its Soo Line boxcar battery car was tried several times through the problematic turn out. Once it seemed that that combination was working the whole train was run in reverse on the inside loop and into the dog bone created by the run around tracks between the reversing tracks. All once again seemed fine, at least for now. The Conrail, with its battery car was set aside. The GP15-1 CSX was connected to the battery boxes in its gondola battery car. The new motive power was hooked up to the train. The train was run at 40 scale mph through all of the track work and turnouts in both forward and reverse. There were no derailments.
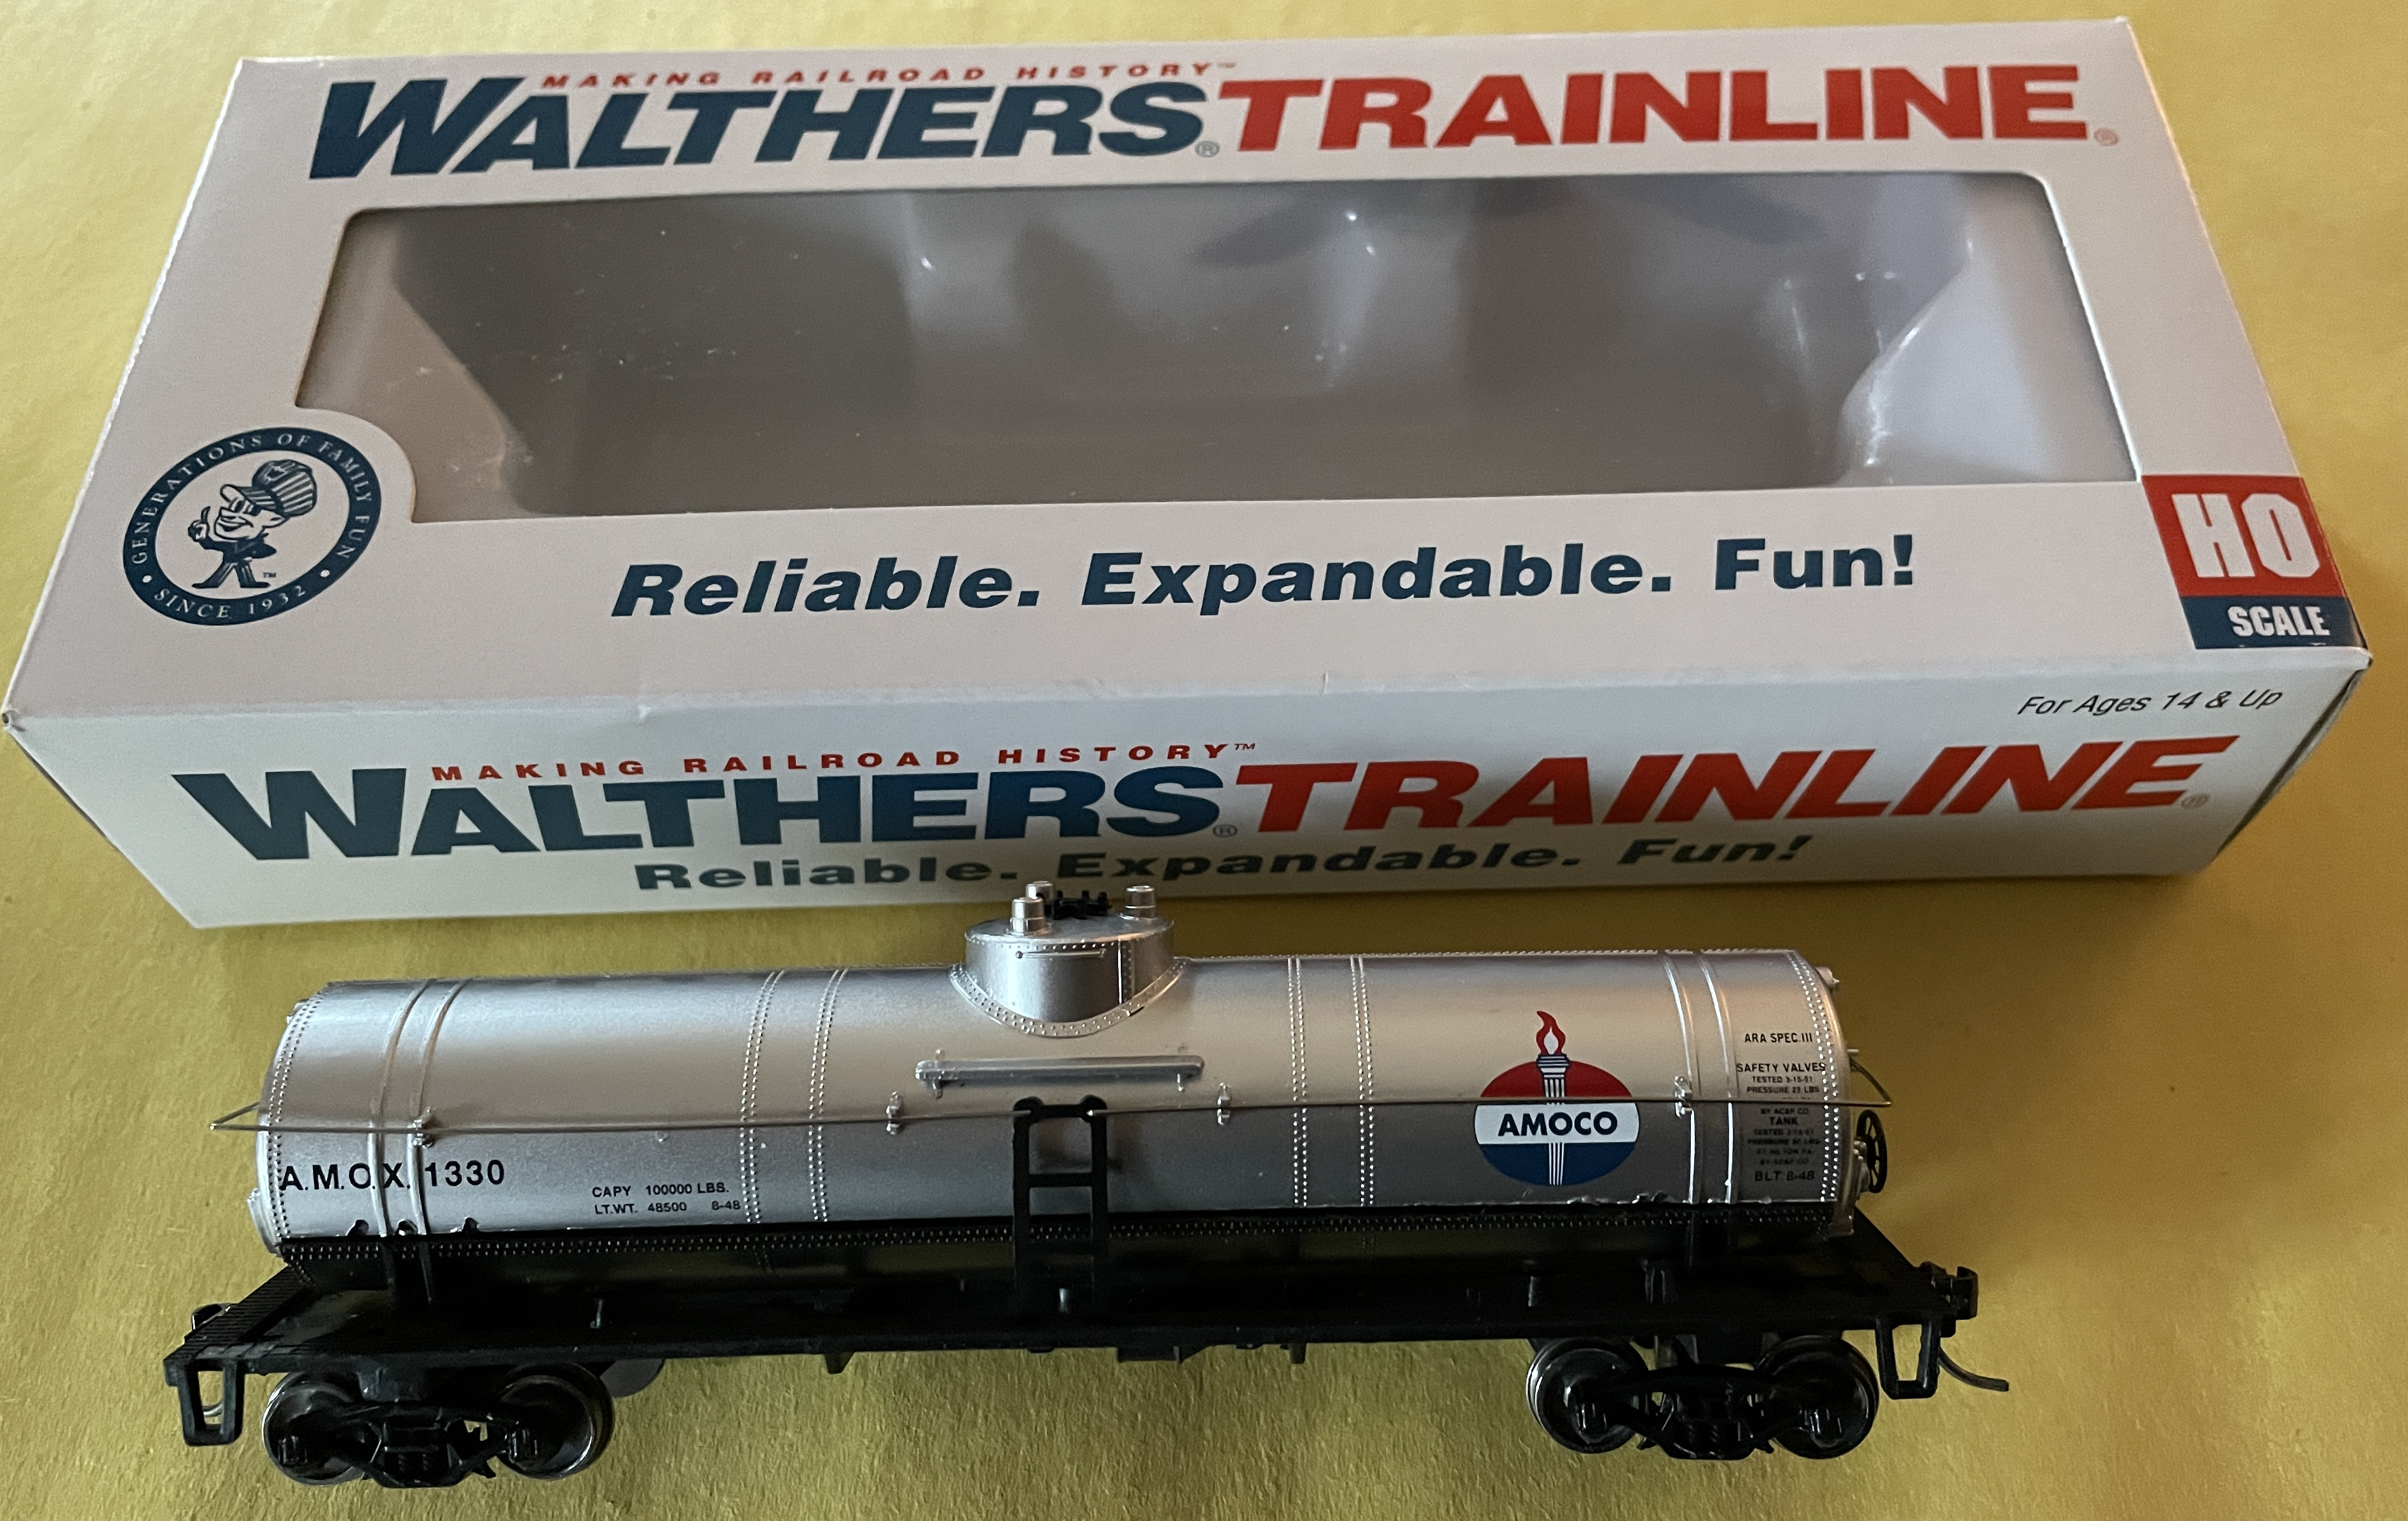
I wanted to honor my father on my model railroad. My father was an agent for the Standard Oil Company, which became AMACO while he still owned his bulk plant. He delivered home heating oil to homes, gasoline, diesel and lubricants to farmers, as well as delivering diesel fuel, gasoline, 55 gallon drums of lubricant products and greases to various gravel pits and cases of motor oil and other lubricants to Standard Oil/Amoco gas stations in the area. He also delivered kerosene. 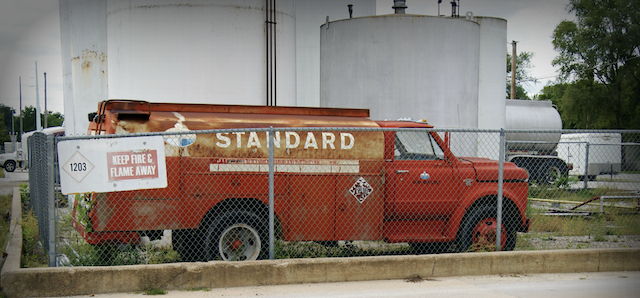 He used a truck very similar to the one I found online, which is shown with a bulk plant in the background. He also had a stake truck for delivering drums and cases of oil products. He was a very, very hard working man with a very physical job. Over the past couple of years, a tank car, with AMOCO on it, kept appearing in some searches I was doing. I needed some Kadee couplers for a project I was working on in March of 2024. I ordered the couplers from Yankee Dabbler and found that they had a Walthers AMOCO tank car at a very reasonable price and that the shipping would have been the same price whether I just ordered the couplers or added the Walthers’ tank car. On March 24, 2024 I ordered the (HO Scale) WAL-931-1613 40' Tank Car AMOX for $14.38 and a package of Kadee / Mtl SelfCtr Whisker Cplr (HO Scale) Part # 380-149 for $4.79. The shipping was $6.89 for a total of $26.06. The order arrived on March 29. I knew that Walthers Trainline cars were "toy" grade, as I already had some, but they worked for my purpose. There is a section on my Website where I describe all of the rolling stock that I have in use. I thought that this tank car could not be worse than the Lionel 1954200 Tank Car GATX #86059 HO Scale that I'm already using. Once the tank car arrived, it was time to get it ready to roll. A Kadee #205 height gauge was used to check the height of the supplied Walthers' couplers. The couplers were a bit too low. I figured that I'd just unscrew the trucks and replace the couplers with Kadee #148s and add the appropriate Kadee washers as needed.
The Walthers' couplers were also checked over the Kadee magnets I had in the track. They didn't perform as well as I thought they should, but that was not a problem, as I'd already decided to use Kadees. I weighed the tank car. It weighed 64g. That delivered weight was far from the NMRA recommended weight of between 99g and 113g. 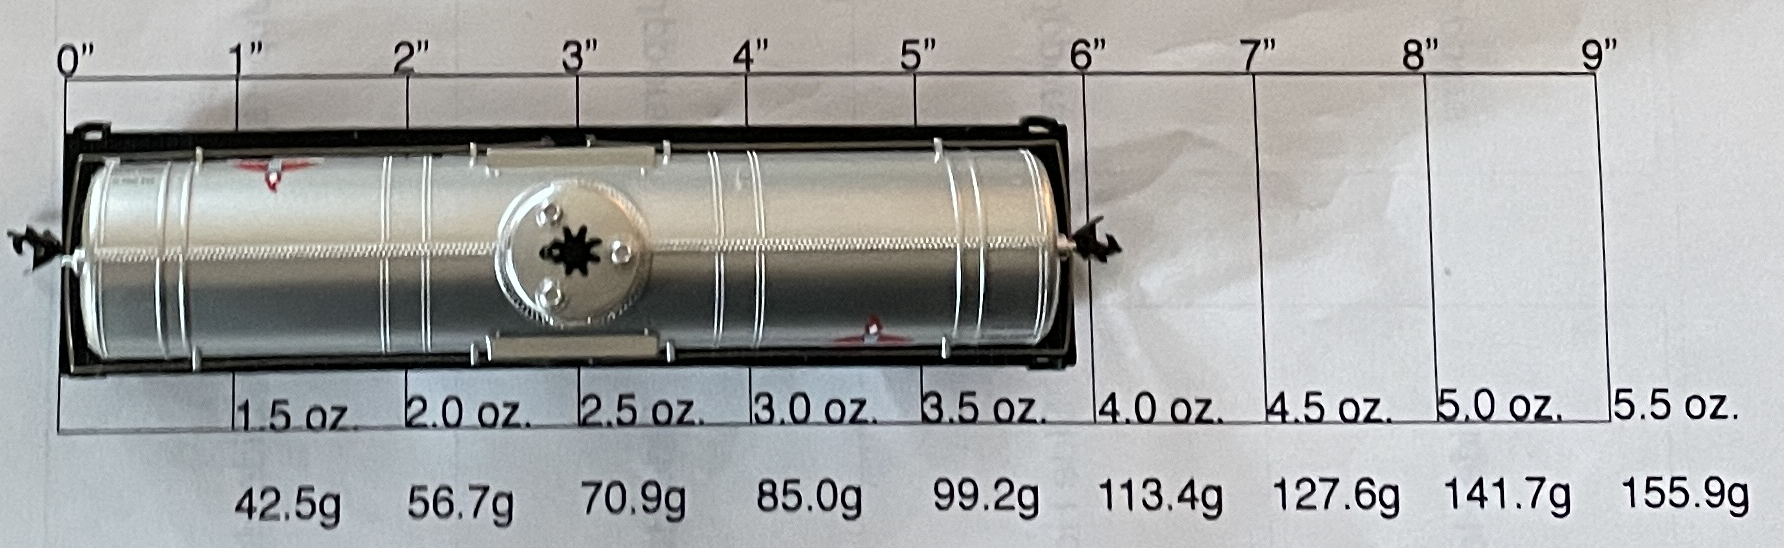 My pdf measuring page was used to determine the NMRA recommended weight. I tried to unscrew the single slot screw holding the truck to the frame. That did not work. It would not unscrew! I found a video on YouTube that showed the disassembly and reassembly of a similar tank car. The tank car in the video is not really an identical one, but the construction is very similar. The tank car, in the video, has horn-hook couplers on it. The video is titled, "Rebuilding an Inexpensive HO Scale Tank Car". While rewatching the video I found that, in the description, he noted the Evergreen tubing used to refit the trucks to the bolsters and that he needed a 0.015" washer to shim the trucks for Kadee couplers. I carefully pried the trucks off the frame using a small screwdriver. I could not figure out how to reattach the trucks since they were held on with what I call a compression pin through the frame and then passing through the hole in the truck assembly. After I had completely rebuilt the tank car, I found a YouTube video titled, "Weathering Project 3: Making a Cheap Tank Car more Realistic". He does not address the coupler height problem. Also there was no way to reuse the compression pin, as there was not enough room for a 0.015" washer. The compression pin was clipped off and removed from the frame. Using the first video as a guide, I carefully pried the bottom of the tank from the frame using various small screwdrivers. I next pried the top of the tank from the bottom of the tank along the joint. This broke the pins that held the top and bottom together. Even with all the prying, I managed not to break any of the frame or tank. I installed a pair of Kadee #148s into the coupler pockets. To reaffix the trucks, a 2-56 x 1/2" Socket Head Cap Screw was run through a 2-56 lock washer and then the bottom of the hole in the truck frame. Because it fit the hole in the frame perfectly, a small bushing was made from a piece of yellow, inner NyRod, used for RC control surface connection. The inner NyRod was drilled out to allow the 2-56 x 1/2" Socket Head Cap Screw to pass through it. Small pieces of the modified NyRod, the depth of the hole, were cut to make a bushing. A Kadee 0.015" washer and the cut piece of inner, yellow NyRod was placed on top of the screw passing through the truck. The NyRod acted as a bushing in the large hole in the frame. That assembly was run through the hole in the frame. A 2-56 lock washer was slid over the screw and then a 2-56 nut was tightened down. The 1/2" screw stuck up above the frame. I did NOT cut off the extra screw height. Holes were drilled in the tank bottom to allow the truck screws to protrude slightly into the bottom tank piece. Holes were drilled in the frame and lower portion of the tank to allow the frame to be screwed to the bottom portion of the tank using #2 x 3/8" button head screws. 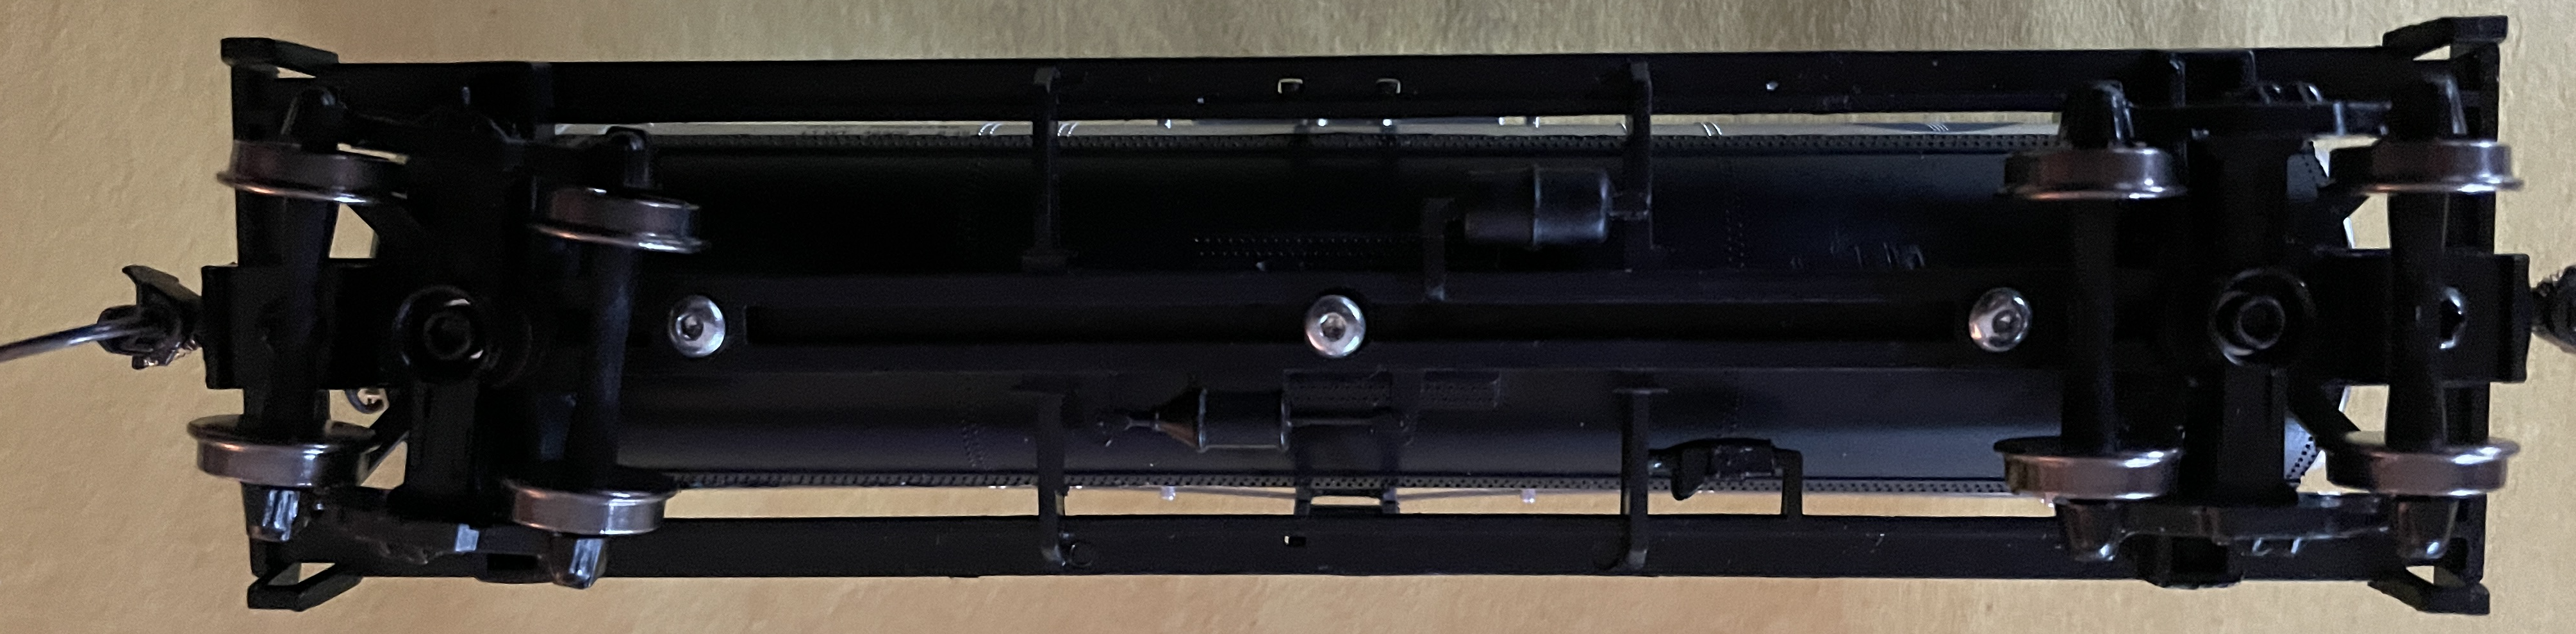 The heads of the 2-56 x 1/2" Socket Head Cap Screws and lock washers can barely be seen in the truck screw holes. The heads of the three #2 x 3/8" button head screws can be clearly seen. (They were left unpainted for this photo.) Four 1/4 ounce, self stick, lead weights were added to the lower portion of the tank assembly. Each 1/4 oz. section had to be cut separately so they could be turned and fitted into the lower part of the tank. The top portion of the tank was replaced with the ladders positioned into their slots in the frame. The upper portion of the tank just "sits tightly" on the bottom portion of the tank with no attachment of any kind. The completed tank car weighed 97g. I couldn't physically fit another weight into the bottom portion of the tank car, and avoid the screws, so it was just left with the four 1/4 ounce weights. The AMOCO tank car was run with the rest of the rolling stock, prototypically, for 30 minutes. All appeared to be working well with the coupling and uncoupling, running and shunting.
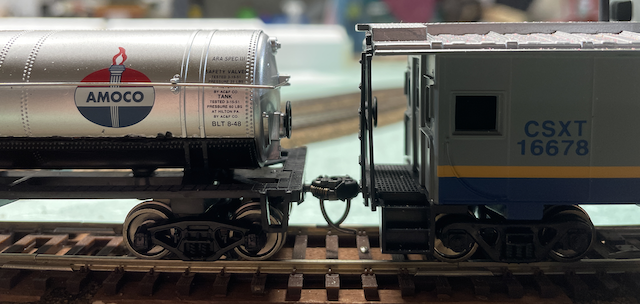
The photo shows that the Kadee couplers are well matched between the tank car and same caboose that was used previously.
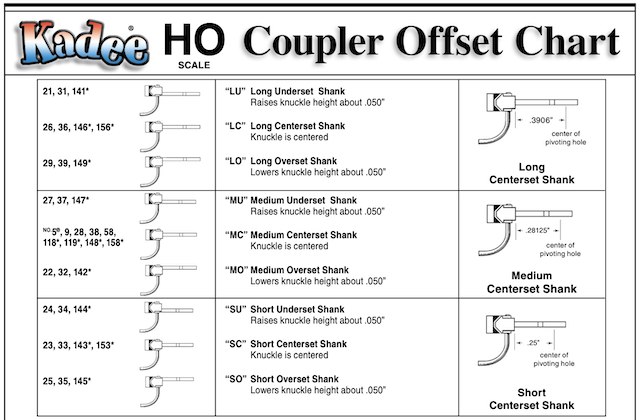
Since hindsight is 20/20, it is possible that a Kadee #147 HO Scale 140-Series Whisker Metal Couplers with Gearboxes - Medium (9/32") Under Shank might be able to be used without all that work, but then the weight could not have been added to the bottom portion of the tank. Also, the #147 might have been too high. The under shank raises the coupler approximately 0.050", according to the Kadee HO Scale Coupler Offset Chart, and only 0.015" was needed to achieve the coupler mating shown in the photo.
|