|
Flying High With Electric Power!
The Ampeer ON-LINE!
Fly the Future - Fly Electric! |
|---|
Site Table of Contents
| President: | Vice-President: | Secretary-Treasurer: |
| Ken Myers | Richard Utkan | Rick Sawicki |
| 1911 Bradshaw Ct. | 240 Cabinet | 5089 Ledgewood Ct. W. |
| Commerce Twp., MI 48390 | Milford, MI 48381 | Commerce Twp., MI 48382 |
| (248) 669-8124 | (248) 685-1705 | (2480 685-7056 |
 | ||
| Board of Directors: | Board of Directors: | Ampeer Editor |
| David Stacer | Arthur Deane | Ken Myers |
| 16575 Brooklane Blvd. | 21690 Bedford Dr. | 1911 Bradshaw Ct. |
| Northville, MI 48168 | Northville, MI 48167 | Commerce Twp., MI 48390 |
| (248) 924-2324 | (248) 348-2058 | (248) 669-8124 |
| The Next Meeting: Date: Wednesday, April 13 Time: 7:30 p.m.
Place: Ken Myers' house (address above) | ||
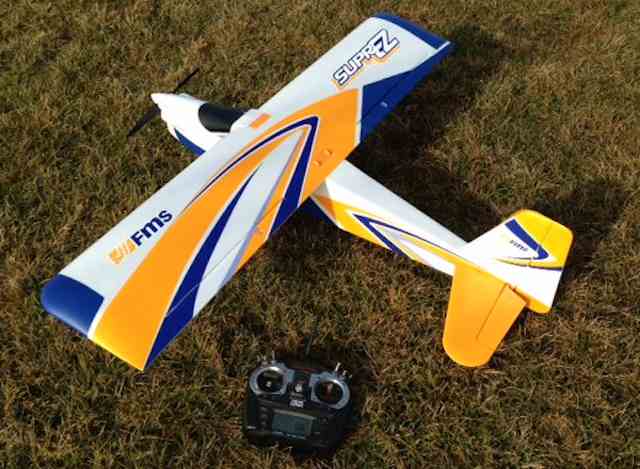
| The FMS SuperEZ PNP AKA SupREZ Review: Part 2 Ken Myers continues his review of this plane, along with some final thoughts about it. | Upcoming Keith Shaw Birthday Party Electric Fly-in 2016 Meet announcement from Dave Grife. | |
| The February 2016 EFO Meeting Highlights from the February meeting; Ken's SuperEZ, Denny's 1/6-scale Mooney Mite, Roger's Lazy Cub & Part 2 of "Learning About LiPo Batteries". | Thoughts On AC/DC LiPo Chargers: An Editorial Ken shares his views on AC/DC chargers and charging inside. | |
| Some New Tools Added to the Collection Ken shares information on some new tools he's recently purchased. | ||
SuperEZ Manual By Ken Myers
Part 1, the assembly, with hints and tips, was in the March 2016 Ampeer. The maiden flight was on February 1. The sun was out and the temperature was 390 F at the flying field. The wind was about 7 mph to 10 mph out of the west. The throw directions of the control surface movements were checked one more time. A radio range check was performed. Two 3S 1000mAh packs were charged at home and brought to the field in a container that would keep them warm. The first battery used was the 'best tested' 3S 1000mAh, which was also used for the power testing figures. The plane lifted easily off the bumpy, rough grass surface into the wind. It needed a little left aileron trim and just a tad of left rudder trim to do nicely rounded loops into the wind. The plane was flown as if I had a student flying it. The motor power was on for 4 minutes and 2 seconds. (Gotta love those countdown throttle timers.) I did do a couple of rolls, which were fine, and only needed a touch of up elevator, if any, when inverting through the roll. The landing was totally uneventful, even on the rough terrain. The power is adequate for the intended purpose. The loops aren't large and there is not a lot of vertical climb, but that is just fine for a basic trainer. On the second flight, the 'worst tested' 3S 1000mAh pack was used. It was very easy to tell that this pack was not on par with the previous pack. It required the throttle stick in a more advanced position to cruise at the same 'speed', and loops from level flight 'just made it around'. The plane was still easy to fly and it would have been fine for a training flight with this battery. The motor power was on for 4 minutes, 1 second. The plane flies as easily as a Sensei or Pandora, but it is flown a bit closer to the pilot at, due to its smaller size. It can also fly a bit slower than the Sensei and Pandora. This is not surprising since the wing area loading is 11.5 oz./sq.ft and the wing cube loading factor is 6.64. The paint and colorful graphics present well in a blue sky. At home, after the two flights, the packs were recharged using a FMA Direct (Revolectrix) CellPro 10XP charger to see how many milliamp hours (mAh) were returned to each battery after the approximately four minute flights. An ElectriFly PowerMatch and an ep-plane.com CellMeter-8 were used to check how much capacity was remaining in the packs. The meters use a voltage reading to approximate the percent of capacity remaining in the pack. My CellMeter-8 is NOT the Hobby King Cell Meter 8. It was sold by Hobby Lobby, years ago. Best Pack
Obviously, the 'meters' use different algorithms to estimate remaining pack capacity. Worst Pack
Using different pieces of test equipment yields somewhat different results. Which is correct? There is no real way of knowing. The numbers indicate that the two flights were quite similar. There is only a small difference in the mAh returned to the packs and the average amps. The CellPro 10XP's IR (internal resistance) numbers also indicate the performance differences between the two packs. While the packs were charging, to check the mAh returned to them, and then being discharged to storage voltage, the clevises were adjusted on the ailerons and rudder to remove the left trim showing on the transmitter. I like to have the transmitter trims at zero. Partially, this practice stems from the 'olden days' when the trims were analog and easily bumped out of position on the transmitter during transport or storage, but it also makes setting up a buddy box system much easier. The transmitter countdown timer was reset to 5 minutes for the next flying session. It will be adjusted again, after the next flying session and recharge to check the mAh returned to the battery. After the initial flights, a second TTX650, that I use for flight training, was set up for this plane. My aileron vertical throws are set up even less than the recommended low rate throws. During the initial flights, I could do a series of rolls with the plane quite easily, because I was flying using my initial maximum throws. FMS believes it is for the total beginner to radio control airplane flying. They say, p.3, "- the Super EZ (Yet another spelling for the name. KM) has great trainer aircraft flight characteristics! No need for electronic stabilization or advanced transmitters, the Super EZ allows for very easy flights. Learn how to fly in an extremely short time!" Unfortunately, the manual is set up very poorly for a true beginner. IT REALLY DOES REQUIRE A READ THROUGH FIRST, as well as the ability to remember what was read about an unfamiliar subject. For most people, with zero RC experience, the manual will be an obstacle to overcome. Many folks will miss "The transmitter and model setup" on p.7 where it says to set up the radio system first. There is no listing of required tools. You'd think with a plane this simple, there wouldn't be a need for that, but there is! Tools I needed or used to complete this EZ.
Although the term ESC is used a lot throughout the manual, the definition of ESC does not appear until p. 15, the last page of the manual. The programming the ESC information, on p. 15, is totally useless as presented. There was no mention of how to correctly calibrate the throttle, or that calibration of the throttle is even needed. The few paragraphs regarding flying the model are not very informative, and even at times a bit obtuse, "Climb to a aspects of flight, including high speed passes, inverted flight, loops and point rolls." That is not my mistyping, that is exactly what it says. Sometimes their advice made me chuckle. Their advice for taking off, "While applying power slowly steer to keep the model straight, the model should accelerate quickly." Regarding landing, "Recharge the battery and repair the model as needed." I can't make this stuff up! On the positive side, the manual does have a lot of very good advice and information in it. I've never seen some of the good advice and information in other manuals. Overall, the model is easy to fly, but really no more so than any of the other good 'trainers', when they are set up correctly for training. Could a beginner succeed in getting the plane together? I am pretty sure they could, but it could be quite an adventure for him/her. Unfortunately, the simplicity of design and the small parts count makes the assembly seem deceptively easy. It is not. Could a beginner succeed in learning to fly on his or her own? I doubt it. Anything is possible, but the recommended throw on the ailerons might prove to be too much for most people without assistance of a flight instructor. Is it going to be a 'good' trainer for my student pilots? It will be, because I'll be sure that it is. Is it going to see more 'air time' than the Sensei and Pandora? I doubt it, but it will be 'fun' to find out. My Flyzone Sensei Review
1. For many, the instruction manual will be the first experience with a brand-new subject; RC Flying. The manual needs to be totally reorganized so that the information is presented in a linear fashion. The information that is needed first should be at the front of the manual and not scattered randomly throughout the manual. The typos and grammar in the text and the outright errors need to be corrected. Inch measurements need to be added to the text and diagrams. There is no need for the dual rate recommended throws, as long as the servo arm and control horn positions are noted for a basic, non-computer radio. How to secure the spinner cap, with the prop nut in it, needs to be explained. How to to calibrate the ESC to the transmitter's throttle channel needs to be explained. The weird ESC programming symbols need to be removed or a note of how to enter the ESC programming mode and how to program the ESC using the transmitter throttle needs to be added. The CG location should somehow be 'marked' on the bottom of the wing. The section on receiver installation needs to be redone. There should be a note, or addendum, about contacting a RC club for flight instruction. There should also be a note, or addendum, regarding the mandatory FAA registration in the US. 2. Include the two required screwdrivers. 3. Use different aileron control horns. The horns should be 'longer', for less throw, and they should be less flexible. They should also be much easier to install. 4. The set up diagram for the ailerons should be changed to show the pushrod connected to the innermost hole of the servo arm and outermost hole of a 'longer' servo arm. 5. A change may need to made to the size of the hole in the fuselage for the stabilizer joiner tube (Pipe) so that the tube actually fits through it. 6. Include at least one extra servo screw. 7. Make the elevator joiner, on the elevator halves, easier to slide together. 8. Add a definitions page near the front of the manual for specific terms regarding the assembly of the airframe and RC terms regarding the radio and power system. To much is taken for granted. Other items used
Videos Addendum:
FMS SuperEZ First Look and Maiden Flights
FMS 1220MM superEZ TRAINER.GARY GAU LEARNING TO FLY UPSIDE DOWN
RC FMS SUPER EZ TRAINER PLANE
Upcoming Keith Shaw Birthday Party Electric Fly-in 2016
The Balsa Butchers will once again be hosting the "Keith Shaw Birthday Party Electric Fly-In" at their field near Coldwater, MI. The event will take place on Saturday June 4, 2016. It will be a one day meet this year. The event consists of Open Electric Flying with a "Special Guest of Honor Theme". Enjoy a day with the "Pioneering Master of Electric R/C Flight". 8 am - 5 pm Saturday, $10 landing fee. For additional information contact Dave Watson 517-250-6190 or email: flybuddy619@yahoo.com
The field will be open to guests to fly Sunday as well. Directions: Quincy is approximately 4.5 miles east of I-69. Clizbe Road is approximately 1.6 miles east of Quincy. The Flying site is approximately 1.5 miles south of US-12 on the west side of Clizbe Road. 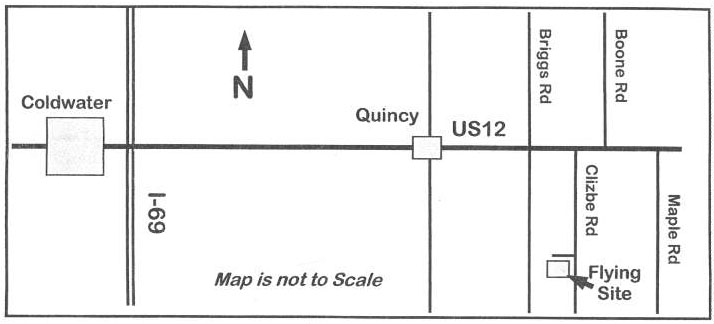 The February 2016 EFO Meeting The evening of Wednesday, February 10, was fit for neither man nor beast. We had a mini-blizzard here in Commerce Township, MI. Fortunately, six brave souls made it here for the meeting, and it was a good one. 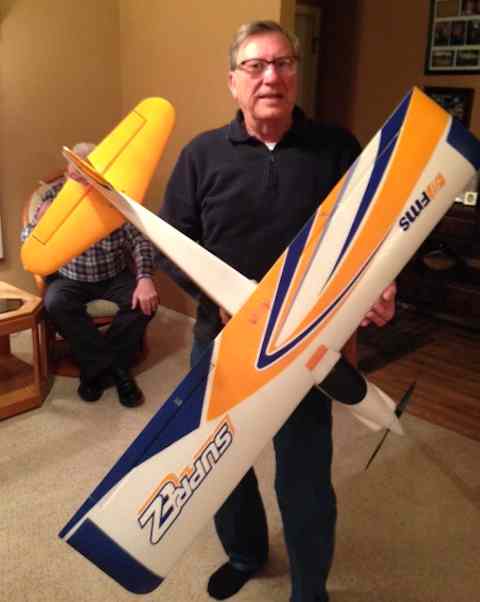 Ken Myers lead off the meeting by sharing the information on his FMS SuperEZ. The members were impressed with the little trainer, as it is physically quite nice, especially for the $140 delivered price tag.  Ken also noted that he's been following the progress of Denny's 1/6-scale Mooney Mite thread on RC Groups. Denny was in the 'covering stage' at the time of the meeting. Roger Wilfong shared his all foam Lazy Cub from KensCADmodels.com. 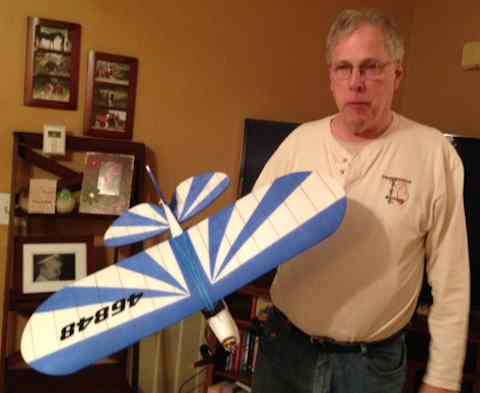 It weighs about 150g to 160g ready to fly. He penned on the ribs with a gold Sharpie and used acrylic paint for the blue. He patterned the finish after Hazel Sig's Clipped Wing Cub. It flies well indoors, but he's not had a chance to try it outside yet. Ken presented part 2 of his presentation on "Learning About LiPo Batteries." The members found it thought provoking, and several noted they were going to 'rethink' there LiPo storage and charging practices. The LiPo conversation continued through the 'snacking time'. It was a very good and productive meeting. Thoughts On AC/DC LiPo Chargers:
In the past, I have advised my new student pilots not to purchase an AC/DC charger. This advice was based on the fact that, until recently, AC/DC chargers have been 'low wattage' chargers (50W to maybe 80W), which limited their usefulness to low cell count, low capacity, batteries. The Hobby King Turnigy Reaktor 300W 20A AC/DC Synchronous Balance Charger / Discharger (US Plug) removed the low wattage argument. I continue to advise MY student pilots not to get an AC/DC charger. In Part 2 of my presentation "Learning About LiPo Batteries", I noted a statement on RC Groups regarding the 'best environment to charge batteries.' Mark Wood, producer of the real LipoSack, summed it up in one word, "Outside." I am sure he meant outside, in a safe and secure area and using some type of container to contain any incident. Purchasing an AC/DC charger 'implies' that charging will be done inside. Charging a LiPo battery inside adds an extra layer of risk. That risk is not really necessary. Who is the target market for AC/DC chargers? In general, it is the beginner into the RC hobby. It is the person who wants to keep their initial investment in equipment to a minimum. AC/DC chargers also appeal to someone who lives in an apartment, or possibly a teen, or preteen, wanting to charge a battery for a car or multi-rotor to 'run around the neighborhood', or someone who just does not have a secure area outside, or someone who is just 'too lazy' to charge in the safest environment. All of those scenarios bother me a lot. The resulting damage, of a LiPo battery incident, could not only affect the individual, but many, many others! A video titled "Lipo Battery Fires are Real" demonstrates the possible loss. The fire happened to an 'expert' with many, many years of LiPo charging experience. His stand alone shop, and all of its contents, was a total loss . There is a linked list of LiPo battery fires on RC Groups. Most of the reported incidents were while charging. A large number of those charging incidents reported damage to, or total loss of, a structure. The scenario that bothers me the most is the young person charging in the bedroom. The parent may have no idea that there is a possibly explosive device in their house. The young person either doesn't know any better or doesn't know enough to care. The young person, with no experience, might think, despite the warnings supplied with all LiPo batteries, that if chargers are sold with AC plugs, they must be safe to use in the house. Nothing could be farther from the truth. Charging hobby type LiPo batteries is never safe. There are always risks. Unfortunately, I believe that no parent will ever read this and take the precautionary step of obtaining a fire safe to store the charger as well as the accompanying LiPo batteries in fire retardant storage bags. The parent must also keep the key secure. I will continue to recommend against the use of AC/DC chargers and charging inside. Some New Tools Added to the Collection
I am always on the lookout for tools that will make modeling easier for me. There is nothing better than having the right tool for the job! I previously noted that I had some problems with locating the 'right' screwdrivers when assembling the FMS SuperEZ. I could not tell whether the small screws were Phillips head or Japanese Industrial Standard (JIS). A true JIS screw should be marked with a little dot on the screw, but they aren't always. If you are not familiar with the difference between a Phillips head screw and a JIS screw, there is a good video on the Internet that clearly shows the difference. Many servo screws are JIS screws, not Phillips. One source for a set of four JIS screwdrivers is RJR Cool Tools. While searching the Internet for other sources for JIS screwdriver, I found a site called IFIXIT. 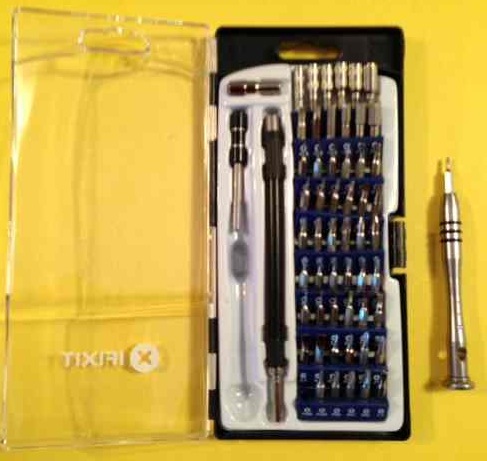 They have a really nice 54 Bit Driver Kit that includes 5 Phillips drivers, #000 through #2, and 4 JIS drivers, #000 through #1. There are also a lot of other very useful driver bits included. It was ordered on Friday, Feb. 12 and arrived on Tuesday, Feb. 16 via US mail. (Presidents' Day was Monday) The total cost, with shipping, was $37.35. Part of my learning about LiPo batteries involved measuring a LiPo battery's IR. Noting the temperature is very important when gathering a battery's IR. I found that I could not get consistent temperature readings from a LiPo pack using my infrared thermometer. I purchased a Signstek 3 1/2 6802 II Dual Channel Digital Thermometer with 2 K-Type Thermocouple Sensor Probe for BGA rework HVAC 13000C 23720F. 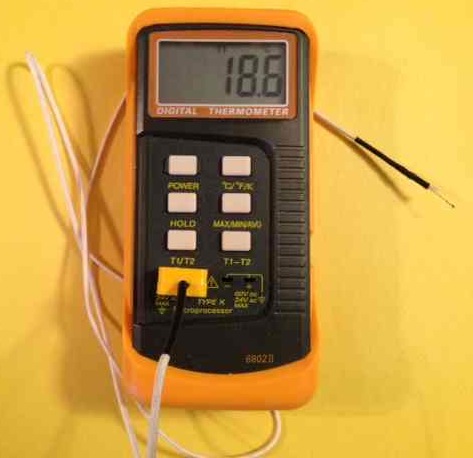 It seems to work well for me and was $17.99 plus shipping. 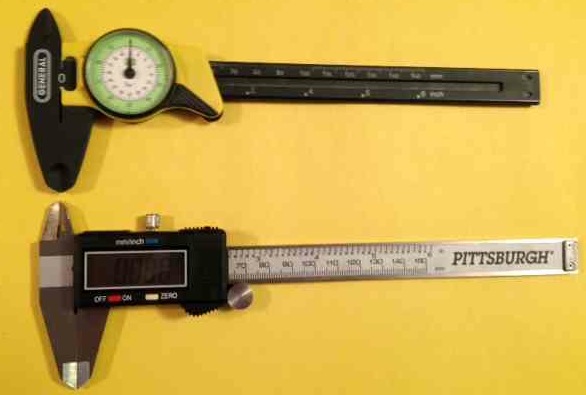 I've had, and frequently use, a General 6" Dial Caliper for a long time. Harbor Freight has digital calipers that measure both in millimeters and inches. I have wanted to get one from Harbor Freight for a long time, but the closest store was in Pontiac. They now have a store in Walled Lake, MI, and I now have a digital caliper. It is a Pittsburgh Model 47257 for about $19 including Michigan 6% sales tax. 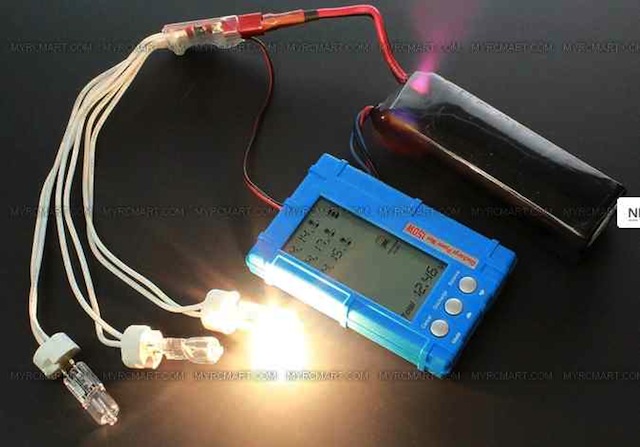 I saw a thread on RC Groups that contained a video describing an "Inexpensive Lipo Discharger That Works!" I watched a second video online, "RCX 3-in-1 Battery Balancer, Discharger & Voltage Indicator (150W Discharging) - MyRcMart.com". I decided to order one. I made the mistake of ordering one through Amazon and paid way too much for it. I don't use it often, or see much use for it, but it does work okay. The biggest problem for me was that it can only take a cell down to 2V. I was hoping to get it much lower for disposal. To Reach Ken Myers, you can land mail to the address at the top of the page. My E-mail address is: KMyersEFO@theampeer.org |