|
Flying High With Electric Power!
The Ampeer ON-LINE!
Fly the Future - Fly Electric! |
|---|
Site Table of Contents
| President: | Vice-President: | Secretary-Treasurer: |
| Ken Myers | Richard Utkan | Rick Sawicki |
| 1911 Bradshaw Ct. | 240 Cabinet | 5089 Ledgewood Ct. W. |
| Commerce Twp., MI 48390 | Milford, MI 48381 | Commerce Twp., MI 48382 |
| (248) 669-8124 | (248) 685-1705 | (2480 685-7056 |
 | ||
| Board of Directors: | Board of Directors: | Ampeer Editor |
| David Stacer | Arthur Deane | Ken Myers |
| 16575 Brooklane Blvd. | 21690 Bedford Dr. | 1911 Bradshaw Ct. |
| Northville, MI 48168 | Northville, MI 48167 | Commerce Twp., MI 48390 |
| (248) 924-2324 | (248) 348-2058 | (248) 669-8124 |
| The Next Flying Meeting: Date: SUNDAY, June 12 Time: 10 a.m.
Place: Midwest RC Society 7 Mi. Rd. Flying Flied | ||
| Avoiding Some 'Crashes' Ken notes some ways that some crashes might be avoided. | Upcoming Keith Shaw Birthday Party Electric Fly-in 2016 Meet announcement from Dave Grife. | |
| FlightTest.com & The Old Fogey Ken discusses some of the problems with the Flite Test Old Fogey, some solutions, and his enlarged version. | ||
Editorial By Ken Myers Recently, at the flying field, I witnessed two crashes. One of the crashes could have been 'avoided', the other, maybe or maybe not. Neither 'crash' was due to the pilot's ability to fly the aircraft types. He was an extremely competent and experienced RC pilot with decades of RC flying, of various types of aircraft, under his belt. He is used to being a maiden flight pilot. His skills were absolutely not in question. The first 'crash' was not a destroy the airplane crash. It was a remove the landing gear 'crash' with some airframe damage 'crash'. Previous to the maiden flight, the plane had been checked out very carefully by its owner and then the pilot. The control surfaces moved in the correct directions, the radio was working well and the CG was within the supplier's recommendation for this 3D/precision aerobatics type balsa and plywood ARF. In the air, the plane was overly sensitive to all control inputs. It required all of the pilot's skill to make a few passes and bring it in, hot. Unfortunately, it came in too fast, bounced toward the safety fencing, was turned slightly away from the fence and on the second bounce, lost its undercarriage and plopped down. There were all kinds of bits of damage to a brand-new plane. Dang!!! Just about everything had been done correctly, but there was no joy after the first flight. The second 'crash' was a bit worse, and a lot more 'scary'. The plane was a well known scale-like/trainer EPO ARF type. It used a very popular transmitter and receiver from a very popular supplier. It was given the once over by the pilot and the plane's owner. The plane was flying well. Several passes had been made around the field. There were no signs of trouble. The pilot was feeling comfortable with this easy flying plane. He was making a pass down the center of the runway. He decided to loop the plane. The plane completed part of a loop. The loop turned into more of an Immelmann on the back side of the loop. The plane then veered towards the flight line and was inverted when it crossed the safety fence. It made a banking arc and headed back towards the runway, much to our relief. The plane pulled up slightly and then dove into the ground at full throttle just outside the safety fence. The apparent damage was less than one might have thought; messed up landing gear and a slight crack in the cowl. The plane was returned to one of the field's work tables. The radio was 'tested' and found to be working all of the surface controls properly. A single direction range test was performed, and it appeared to pass it. What went wrong? The first thought was that there was some type of radio signal malfunction. What the actual cause was, we'll never really know. All of our radio systems have a chance of losing signal, or having a servo 'die' or lock up, or losing control of a flight control surface. None are 100% reliable, period. Adding some type of stabilization system, stand alone or built into a receiver, also adds another layer to the control system where failures might happen. The failure could be 'electrical' in the stabilizer or caused by the end user's failure to set the stabilizer correctly or select the correct mode for the type of flying being done and by whom. Several things could have been done to make this 'out of control' situation a little bit better. The receiver's failsafe should have been set so that loss of signal from the transmitter automatically closed the throttle. That is an easy check to do, at home, or at the flying field. A 3600 range check should have been performed stopping about every 450 and checking the flight surfaces with the throttle on. Passes parallel to the field should be flown at the 'far side' of the runway. Doing so gives a bit more time for those in the pits to become aware of any problem and to take evasive action. In this case, I just froze. I couldn't believe it was happening, and I did not react quickly enough. It was only luck that prevented me, and our club's president, from being struck. The outcome, in this case, was acceptable, in that no one got hurt. It could have been worse. Any 'radio system', remember it is a system and not just the transmitter and receiver, can fail at any time. Set up the plane and fly it with the worst case scenario in mind, all of the time. The first incident/crash/really, really bad landing could have been avoided. I have noted over and over again, here in the pages of the Ampeer, that the center of gravity given by the supplier is usually wrong for a maiden flight! If the plane has 3D in part of its description, be especially careful of the CG placement for the initial flight. Always, always, always, before any maiden flight, calculate the initial flight center of gravity (CG) yourself. If you do not know how to calculate the initial safe center of gravity (ISCG), please use the following articles in the Ampeer as a reference.
The other 'problem' with this 3D/pattern type aircraft was too much control throw. In the article "The FMS SuperEZ PNP AKA SupREZ Review", I noted the initial control throw that I usually use. I noted, "When setting up any new plane, I like to use about 140 of angle movement for the moveable control surface as the initial maximum physical throw for the ailerons and elevator. The easiest way to figure out the angle is to measure the chord of the aileron or elevator at a given, easy to measure and repeatable point, where the vertical movement will be measured. Divide that number by 4. That yields the desired initial maximum vertical movement, one way, up or down, for about 140 of angle movement." More info on this can be found in the article. I have never found 140 to be too little for and initial flight of a 'typical' RC plane. The first two linked videos below, show the rudder (on a rudder, elevator and throttle, 3-channel plane) and elevator movement required to fly a RC plane under control. The third link shows aileron movement. You will be amazed at how very little control surface movement is required. Turn the sound down or off. You don't need annoying sound to watch what is happening. The following recent email discussion regarding the Hitec Weekender Extra 300 demonstrates this same problem. Hi Ken, Hope you're doing well. Before I start rambling on about my Hitec Weekender 300, I was just wondering if you are able and willing to give me advice on setting up my Weekender for maiden flights. I'm also using a Tactic TTX650 radio. I would like it to be as tame as can be for starting out. Can you recommend settings to achieve this? Sincerely,
Hi Chuck, I am fairly sure you have seen my review of this plane in the July 2014 Ampeer. Other info is in the September 2014 issue. The CG is very important. Here's what I noted in the July issue. "The Initial Safe CG was calculated at 2" behind the leading edge of the�tip rib. That is about 76.2mm behind where the leading edge of the wing meets the fuselage, or about the recommended forward CG found in the Hitec manual." On my version, that is about the the back of the red painted line at the leading edge of the wing. Tape on some weight to achieve this CG if necessary. Only change the CG rearward once you are very, very comfortable flying the plane. It will NOT be too 'nose heavy' at the CG I am recommending. Both the servo arms and control horns, on my version, have three holes in them. Here's how my plane is set up for 'pattern' type flying.
Hope this helps,
Good Morning Ken! Thanks so much for your input. I have seen your review, and I must say you seem to be the most knowledgeable on this plane. One more question, What about your radio settings? Since I'm also using the TTX650, could you recommend some conservative dual rates and expo's? I have flown this plane briefly once, at approximately 88% / -25 rates, and it was just too sensitive. I managed to land right away to reevaluate. I will set them to archive the throws in your review before my next flight. Will I be ok going slightly less on the factory throws? Chuck Hi Chuck, I don't use dual rates on the vast majority of my planes. I NEVER use exponential, as it feels like flying radio failure to me. I'm old, and I started flying RC in 1962. I set up the throws on the plane, not on the transmitter. I would have liked to have moved the aileron servo connection to the inner most hole of the servo arm, but that wasn't feasible on this plane. I have no dual rates or expo set up for this plane. The throws and CG that I noted are working well for me. It is especially important to get the least elevator throw physically possible and set the CG as I noted. I believe my throws are definitely less than the recommended. I believe that the recommended throws might be okay for 3D style flying, but they are way to sensitive for typical sport or precision aerobatics type flying. The rudder throw, that I previously noted, is good for knife-edge and point rolls. The least throw you can get, the better, especially to start out with. Some folks believe that with excessive throws, they can fly out of 'trouble'. That is absolutely not true! Very, very little surface throw is needed to control an RC plane in the air. Later,
Of course this minimal throw is not true for ALL of the planes we fly, but it will work on a majority of the planes we fly. Get the initial safe center of gravity correct and keep the throws down and most of the maidens you fly WILL be successful. Once the plane has been flown successfully, the tweaking to your liking begins, but it all hinges on a successful maiden flight. One last linked video to emphasize this point. Start the video 32 seconds into it. (The intro is longer and more annoying than the flight.) The video shows a tail heavy plane, poorly designed tail area, with too much control surface throw on too large of a moveable surface, the rudder, in this instance. Upcoming Keith Shaw Birthday Party Electric Fly-in 2016
The Balsa Butchers will once again be hosting the "Keith Shaw Birthday Party Electric Fly-In" at their field near Coldwater, MI. The event will take place on Saturday June 4, 2016. It will be a one day meet this year. The event consists of Open Electric Flying with a "Special Guest of Honor Theme". Enjoy a day with the "Pioneering Master of Electric R/C Flight". 8 am - 5 pm Saturday, $10 landing fee. For additional information contact Dave Watson 517-250-6190 or email: flybuddy619@yahoo.com
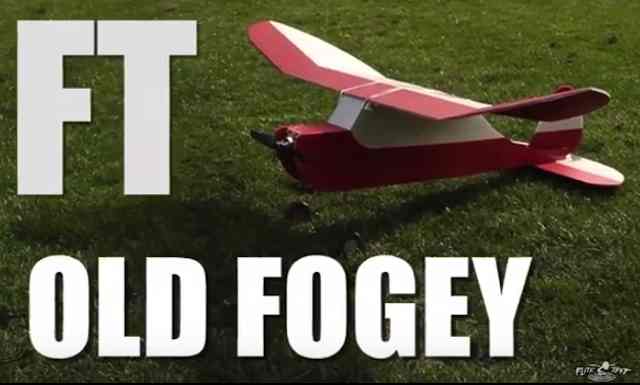
The field will be open to guests to fly Sunday as well. Directions: Quincy is approximately 4.5 miles east of I-69. Clizbe Road is approximately 1.6 miles east of Quincy. The Flying site is approximately 1.5 miles south of US-12 on the west side of Clizbe Road. 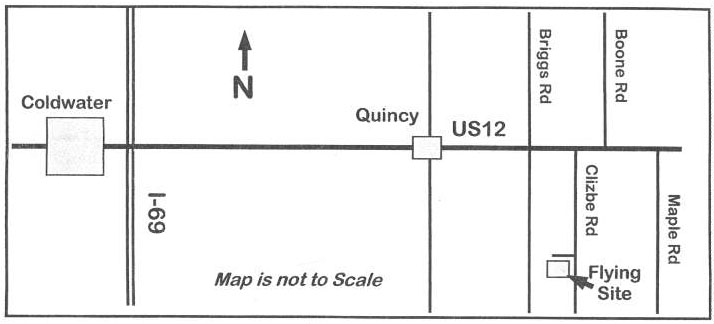 FlightTest.com & The Old Fogey
According to the folks who present material on Flite Test (http://www.flitetest.com) Josh Scott and Josh Bixler, "Flite Test is here to entertain, educate and elevate the world of flight." I became aware of their Old Fogey design in February, 2016. Flite Test does sell a kit for it, and they also present their plans, for free, on their Web site. The Flite Test Old Fogey somewhat resembles an old-timer type plane. The simplistic, basic design is very much like a 1977 Balsa USA Swizzle Stick with just slightly more rear and front fuselage structure and a means of making it electrically powered on the front end.  The flat center section, polyhedral wing, and the 'fat' fuselage sides resemble a Clancy Lazy Bee.  The Flite Test (FT) Old Fogey also has a lot in common, including the very short tail moment, with the Thunder Tiger Lazy Tiger Cub and Dereck Woodward's VSP (Very Short Plane).
 The article explains what happens to the CG with these types of short tail moment planes. More information for Dereck's VSP is in the December 2010 Flying Models. What intrigued me most was that the Old Fogey, like most other Flite Test designs, is constructed using Dollar Tree Foam Board (DTFB). Over my modeling career, I've used some other, non-typical, for model airplanes, construction materials for my models. In the late 70's, or very early 80's, I created a shoulder wing, tail dragger using corrugated cardboard for the fuselage and tail feathers, while it had a conventional, for the time, hot wire cut foam wing. Using corrugated cardboard was 'all the rage' back then. 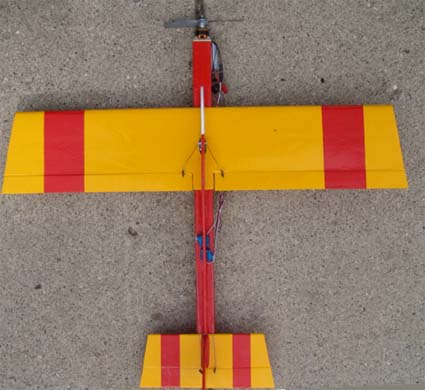 In 2009, I built a foam board model based on Carlos Reyes book, RC Advisor's ModiFly: Design and Build From Scratch Your Own Flying Model Airplane In One Day For Just $5. The foam board I used for the ModiFly was NOT Dollar Tree Foam Board. It was some foam board that I picked up a Walmart or Meijer. There wasn't a Dollar Tree store in my area at that time. The plane flew okay. It was covered in my signature red and yellow Econokote. It is now owned by a nice young fellow, who uses it frequently. Hope you are still enjoying it Tim! DTFB is 3/16" light foam covered with craft paper. It costs $1.00US per sheet at Dollar Tree stores. Its proper name is, "Readi-Board, FOAM BOARD, ADAMS, R.L. ADAMS Plastics, Inc., Wyoming, Michigan 49519 www.goadams.com". It is said to be 30 inches by 20 inches, but it is NOT! For 12 example pieces, the supposed 30" length was never 30". It averaged 29-13/16", give or take a little each way. The 20" width never measured 20". It ranged from 19-15/16" to 20-5/32". Those dimensions are really only important for scratch designers and builders. I wished that I had known that before 'designing' my version of the Old Fogey. It weighs, with the craft paper on it, about 0.19 grams (0.0067 ounces) per square inch or 26.9 grams (0.95 ounces) per square foot. The average weight for the average 599 square inch sheet was 113.3g (4 ounces). The craft paper absorbs humidity from the air and 'warps' or 'pulls' the foam into a slight arch. The 'warp' must be accounted for when building model aircraft with this material. Flite Test does not sell DTFB by the sheet, but they do have a box of 50 sheets available in their store. Flite Test has a new foam board material called "FLITE TEST WATER-RESISTANT FOAM BOARD BY ADAMS". It is not available as single sheets. The box contains 50 sheets. Flite Test uses a hot melt glue gun for the construction of their airframes using DTFB. The correct gun and glue sticks they use, which is important, is available on their Web site. I tried to use my wife's hot melt glue gun in my 150C/590F basement. It was a fail. The 4" glue sticks did not have enough glue to run the longer beads required for my bigger version of the Old Fogey, and the glue 'set up' before I could bring the parts together. For the prototype, I used Titebond Original Wood Glue, FOAM-TAC ADHESIVE and two part epoxy (5-minute). The specific glue used depended on what I wanted to glue. All of these adhesives worked well in my 'cold' construction environment. If I was going to build a lot of DTFB planes, I'd purchase their glue gun and 10" long glue sticks. I had eight 3S 1000mAh LiPo batteries on hand from doing my research into LiPo batteries. The Flite Test Old Fogey uses a smaller 2S LiPo battery power system. I needed to make my version larger to accommodate a larger power system. I downloaded the 4 .pdf files that make up the template/plans for the Old Fogey scratch build. I watched the construction video. I redrew the template/plans in my CAD program and then sized the drawing to the original FT Old Fogey full-size dimensions. I measured the fuselage bottom length on the full-size drawing in my CAD program. I found that multiplying by a factor of 1.22 would yield a bottom fuselage piece that would fit the supposed 30" length of DTFB. Little did I know that DTFB is not 30" long. Luckily, I'd left a bit of room at both ends, as my bottom fuselage piece 'just fits' the longest sheet I purchased at 29-7/8". Unfortunately, I've never found another piece that long. The parts templates were printed and cut out. I had read online that spray adhesive could be used to affix the templates to the DTFB. That's what I used. Wrong!!! After peeling the templates off the foam board, I found that the spray adhesive leaves a residue on the foam board. The residue picks up every little thing that the part comes in contact with. Later, as I worked on revisions and modifications to the plane, I found that Elmer's Washable School Glue Stick worked much better. I calculated that a Cobra C-2217/20, 72g, 960Kv brushless motor, turning an APC 10x5E or 11x5.5E prop, and using a 3S LiPo battery should work well in my larger version. Because I already had an order pending from a supplier, I added a Castle Creations Thunderbird 36 (way over kill) and two Hitec HS-65 servos (way too good of servos for a semi-disposable plane) to the order before it was shipped. I viewed several videos of the FT Old Fogey on YouTube.com. I realized that the CG was wrong. I calculated the initial safe center of gravity (ISCG) (see "Avoiding Some 'Crashes'" in this issue). My version of the plane was assembled, pretty much following the directions on the FT Old Fogey scratch build video. To get the CG right, I used a Dural type landing gear with some wheels that I had attached to it. The landing gear and wheels were just waiting to be used in my wheels and landing gear drawer. The other modification was to use Sullivan Semi-flexible pushrods. Once all of the parts had arrived, they were installed in the completed airframe. After the installation of the correct NET Framework, the Firmware Update software installed. The maiden flight was on February 1. All did not go as planned. After takeoff, it was apparent that I did have the CG right, but the Dutch roll was horrible! The plane was reasonably easy to control, but I felt seasick watching it rock back and forth. Things went from bad to worse on the non-landing. Because there were no leaves on it, I missed seeing THE tree, in the tiny park I was flying in. My version of the Old Fogey didn't. After returning home for a tall step ladder and long pole, the plane was retrieved from the tree with almost no damage. I was not satisfied with the way the wing tips were installed. (I don't have a Swedish friend handy when I'm building. See the build video starting at 3:45 into the video. I carefully cut the tips off, made an angle gauge, and re-glued the tips back on. New packing tape was applied to the tip joints. I also made a new vertical fin/rudder assembly. In the CAD program, I increased the size of the vertical fin/rudder by 1.2 times. The bottom of the new vertical fin/rudder was adjusted to be the same as the original. The dorsal fin then stayed the same to fit the hole in the horizontal stabilizer/elevator. The old vertical fin/rudder was removed and the new, larger one glued in. Weighing in at only 24 ounces, ready to fly, I was able to test the modifications at the Ultimate Soccer Arenas. There was little to no Dutch roll apparent and control was good, but I felt that it was a little overly sensitive on the rudder. I made a template to cut down the size of the rudder to about 1/2 the area and then I just cut the excess off the rudder right on the plane. On the next test flight, it still wasn't flying as easy to fly as I thought it should for a beginner. My original version had the wing tips at an angle of about 13.80 each. I made a new wing with the tips at an angle of about 9.50 each. I also made a third template for the rudder and cut off some more of the rudder. The new wing, with the lower wing tip angle, and smaller rudder worked out quite well. I was able to get in several easy flights. With the new wing, it was now climbing 'too much' at full throttle, even though there was 20 of down thrust built into the motor mount. I made seven sets of shims to try other wing incidences. The 'best' wing angle of incidence is very speed dependent. I finally decided to keep the original 3.80 of positive incidence. While waiting for another chance to fly and try out the shims, I felt the plane was getting close to being what I wanted as a student pilot trainer plane. It was time to make a final version to use with my student pilots. I ordered several items to make a completely new plane. Since I wanted to able to recommend less expensive servos, I decided to order from Heads Up Hobby. I ordered two Emax 12g ES08MAII Metal Gear Sub-Micro Servo for $4.95 each, an Emax Simon Series 20 Amp ESC with Linear BEC for $7.95, and an Emax GT2218/11 930kv Outrunner Brushless Motor for $21.95. I have to note that I am extremely happy with the Cobra motor, which is only a little more money. The reason I ordered the somewhat similar Emax motor is because I could get all of the items from the same place. I also ordered a Sensei main landing gear from Tower Hobbies. While waiting for decent flying weather to return and various items to be shipped, I watched a lot of Old Fogey videos on YouTube.com relating to the flying characteristics of the Flite Test Old Fogey. I logged the videos along with my observations to an html page. I also found some useful remarks regarding the FT Old Fogey in their forum. Ft old fogey help
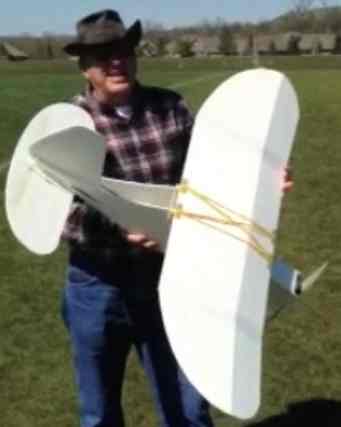
Ken with his 1.22 times larger version of his modified Old Fogey There will be more info on this version in the July issue, but on May 3, 2016 I had a very low time student pilot flying complete flights, takeoff, flying and landing on his own. He said it was excellent for training! To Reach Ken Myers, you can land mail to the address at the top of the page. My E-mail address is: KMyersEFO@theampeer.org |